Creating a synthesizer of sound effects from retro games
- Transfer
In this article, you will learn how to create a synthesizer-based audio engine that can generate sounds for retro-style games. The sound engine will generate all sounds at runtime and it does not require any external dependencies, such as MP3 or WAV files. In the end, we get a working library that can be conveniently embedded in games.
Before starting to create an audio engine, we need to deal with a couple of concepts. Firstly, with the waves that the engine will use to generate sounds. Secondly, you need to understand how sound waves are stored and labeled in digital form.
This tutorial uses the ActionScript 3.0 programming language, but the techniques and concepts used can be easily converted to any other language that provides access to the low-level audio API.
The waves
The audio engine we create will use four basic types of waves (also known as periodic waves, because their basic forms are periodically repeated). All of them are very often used in both analog and digital synthesizers. Each waveform has its own unique sound characteristic.
Below is a visual representation of each waveform, sound examples, and the code needed to generate each waveform as an array of sampled data.
Pulse
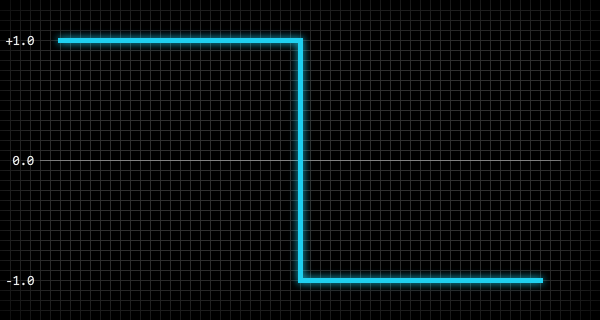
The pulse wave creates a sharp and harmonious sound.
Download MP3 .
To generate values representing a pulse wave of an array (in the range from -1.0 to 1.0), you can use the following code, in which
nis the number of values needed to fill the array, a- an array, p- the normalized position inside the wave:var i:int = 0;
var n:int = 100;
var p:Number;
while( i < n ) {
p = i / n;
a[i] = p < 0.5 ? 1.0 : -1.0;
i ++;
}Saw
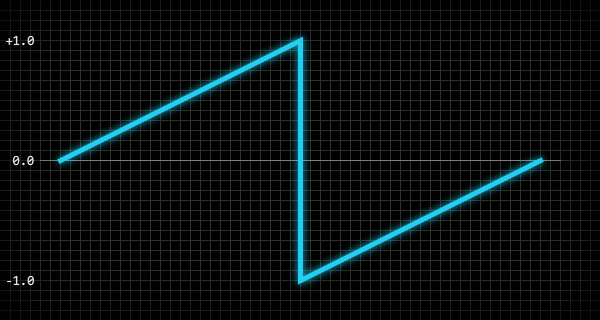
A sawtooth wave creates a sharp and harsh sound.
Download MP3 .
To generate an array of values representing a sawtooth wave (in the range from -1.0 to 1.0), where
nis the number of values needed to fill the array, ais an array, pis the normalized position inside the wave:var i:int = 0;
var n:int = 100;
var p:Number;
while( i < n ) {
p = i / n;
a[i] = p < 0.5 ? p * 2.0 : p * 2.0 - 2.0;
i ++;
}Sine wave
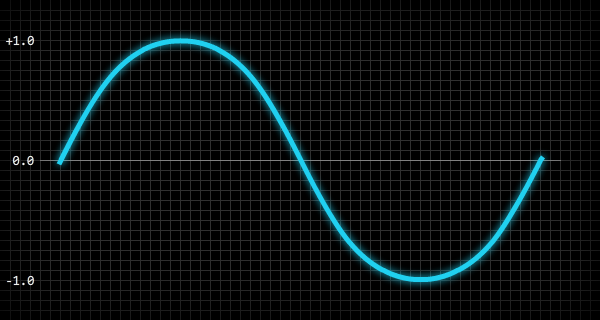
A sine wave creates a smooth and clear sound.
Download MP3 .
In order to generate an array of values representing a sinusoidal wave (in the range from -1.0 to 1.0), you can use the following code, where
nis the number of values needed to fill the array, ais an array, pis the normalized position inside the wave:var i:int = 0;
var n:int = 100;
var p:Number;
while( i < n ) {
p = i / n;
a[i] = Math.sin( p * 2.0 * Math.PI );
i ++;
}Triangle

A triangular wave creates a smooth and harmonious sound.
Download MP3 .
To generate an array of values representing a triangular wave (in the range from -1.0 to 1.0), you can use the following code, where
nis the number of values needed to fill the array, ais an array, pis the normalized position inside the wave:var i:int = 0;
var n:int = 100;
var p:Number;
while( i < n ) {
p = i / n;
a[i] = p < 0.25 ? p * 4.0 : p < 0.75 ? 2.0 - p * 4.0 : p * 4.0 - 4.0;
i ++;
}Here is the expanded version of line 6:
if (p < 0.25) {
    a[i] = p * 4.0;
}
elseif (p < 0.75) {
    a[i] = 2.0 - (p * 4.0);
}
else {
    a[i] = (p * 4.0) - 4.0;
}
Amplitude and frequency of a wave
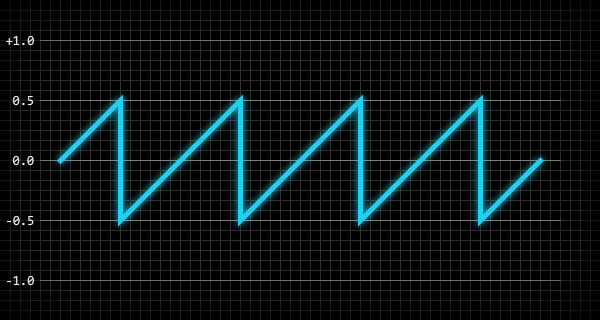
A sound wave has two important properties - the amplitude and frequency of the wave: the volume and pitch , respectively, depend on them . Amplitude is the absolute peak value of the wave, and frequency is the number of times the wave repeats in a second. Usually the frequency is measured in hertz (Hz, Hz) .
The figure below shows a 200-millisecond snapshot of a sawtooth wave with an amplitude of 0.5 and a frequency of 20 Hz:
I will give an example of how the wave frequency directly affects the pitch: a wave with a frequency of 440 Hz has the same height as a standard note for the first octave (A4) of a modern concert piano. Given this frequency, we can calculate the frequency of any other note using the following code:
f = Math.pow( 2, n / 12 ) * 440.0;The variable
nin this code is the number of notes from A4 to the note of interest to us. For example, to find the frequency for the second octave (A5), one octave higher than A4, we need to assign a nvalue 12, because A5 is 12 notes higher than A4. To find the mi frequency of the big octave (E2), we need to assign a nvalue -5, because E2 is 5 notes below A4. You can also do the reverse operation and find a note (relative to A4) at a given frequency:n = Math.round( 12.0 * Math.log( f / 440.0 ) * Math.LOG2E );These calculations work because the frequencies of the notes are logarithmic — multiplying the frequency by two shifts the note up one octave, and dividing the frequency by two lowers the note one octave.
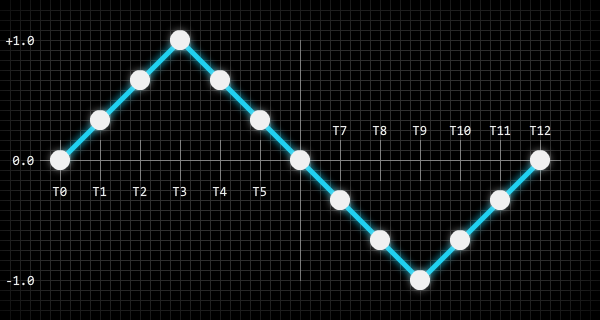
Digital sound waves
In the digital world, sound waves must be stored as binary data, and this is usually done by creating periodic snapshots of the state (or samples) of the sound wave. The number of wave samples received for each second of the sound duration is called the sampling frequency , that is, sound with a sampling frequency of 44100 will contain 44100 wave samples (per channel) per second of the sound duration.
The figure below shows how to sample a sound wave:
White dots in the figure indicate wave amplitude points sampled and stored in digital format. You can take them as the resolution of the bitmap: the more pixels there are in the bitmap, the more visual information it can store, and increasing the amount of information leads to an increase in file size (here we do not take into account compression). The same is true for digital sounds: the more wave samples the sound file contains, the more accurate the recreated sound wave will be.
In addition to the sampling frequency, digital sounds also have a bit ratemeasured in bits per second. The bit rate (bit rate) depends on the number of binary bits used to store each wave sample. This is similar to the number of bits used to store the ARGB information of each pixel of the bitmap. For example, a sound with a sampling frequency of 44100 and a bit rate of 705600 will store each of the wave samples as a 16-bit value, and we can quite easily calculate it using the following code:
bitsPerSample = bitRate / sampleRate;Here is a practical example that uses the above values:
trace( 705600 / 44100 ); // "16"The most important thing here is to understand what sound samples are. The engine we create will generate and manipulate raw sound samples.
Modulators
Before you begin programming the sound engine, you need to get acquainted with another concept - modulators , which are actively used in both analog and digital synthesizers. In essence, a modulator is a standard wave, but instead of creating sound, they are usually used to modulate one or more properties of a sound wave (i.e., its amplitude or frequency).
For example, take vibrato. Vibrato is a periodic pulsating change in height. To create such an effect using a modulator, you can set the modulator wave for a sine wave and set the modulator frequency to, for example, 8 Hz. If you then connect this modulator to the frequency of the sound wave, then the result is a vibrato effect - the modulator will gradually increase and decrease the frequency (height) of the sound wave eight times per second.
The engine we create will allow modulators to be attached to sounds to provide a wide range of different effects.
Demo audio engine
In this part we will write all the basic code necessary for a complete audio engine. Here is a simple demonstration of the audio engine (Flash): demo .
In this demo, only one sound is played, but the frequency of the sound randomly changes. A modulator is also connected to the sound, creating a vibrato effect (by modulating the amplitude of the sound), the frequency of the modulator also changes randomly.
Class AudioWaveform
The first class we create will simply store the constant values for the waves that the engine will use to generate sounds.
We start by creating a new class package called
noise, and then add the following class to this package:packagenoise {publicfinalclassAudioWaveform{
staticpublicconst PULSE:int = 0;
staticpublicconst SAWTOOTH:int = 1;
staticpublicconst SINE:int = 2;
staticpublicconst TRIANGLE:int = 3;
}
}We will also add a static general method to the class, which can be used to check the value of the wave. The method will return
trueor falsedepending on the correctness of the wave value.staticpublicfunctionvalidate( waveform:int ):Boolean {
if( waveform == PULSE ) returntrue;
if( waveform == SAWTOOTH ) returntrue;
if( waveform == SINE ) returntrue;
if( waveform == TRIANGLE ) returntrue;
returnfalse;
}Finally, we need to protect the class from instantiating it, because there is no reason to create it. This can be done inside the class constructor:
publicfunctionAudioWaveform(){
	thrownew Error( "AudioWaveform class cannot be instantiated" );
}
With this, we completed the creation of the class.
Protecting enum-style classes, fully static classes, and singleton classes from instantiating directly is good practice, because instances of such classes should not be created, there is no reason for this. In some programming languages, for example, in Java, for most of these types of classes this is done automatically, but in ActionScript 3.0 it is necessary to enforce this behavior inside the class constructor.
Audio class
Next in the list is the class
Audio. By its nature, this class is similar to the native ActionScript 3.0 class Sound, each audio engine will be presented as an instance of the class Audio. Add the
noisefollowing class skeleton to the package :packagenoise {publicclassAudio{
publicfunctionAudio(){}
}
}The first thing you need to add to the class is the properties that tell the audio engine how to generate a sound wave when playing sound. These properties are the type of wave used in the sound, the frequency and amplitude of the wave, the duration of the sound, and the decay time. All these properties will be private, and access to them will be through getters / setters:
privatevar m_waveform:int     = AudioWaveform.PULSE;
privatevar m_frequency:Number = 100.0;
privatevar m_amplitude:Number = 0.5;
privatevar m_duration:Number  = 0.2;
privatevar m_release:Number   = 0.2;
As you can see, we set reasonable default values for each property.
amplitude- this value in the range from 0.0to 1.0is frequencyindicated in Hz, and durationand release- in seconds. We also need to add two more private properties for modulators connected to the sound. Access to these properties will also be via getters / setters:
privatevar m_frequencyModulator:AudioModulator = null;
privatevar m_amplitudeModulator:AudioModulator = null;
Finally, the class
Audiomust contain several internal properties that only the class will have access to AudioEngine(we will write it soon). These properties do not need to be hidden behind getters / setters:internalvar position:Number = 0.0;
internalvar playing:Boolean = false;
internalvar releasing:Boolean = false;
internalvar samples:Vector.<Number> = null;positionis set in seconds and allows the class to AudioEnginetrack the position of the sound when it is played. This is necessary to compute sound wave samples. Properties playingand releasingtell the class AudioEnginewhat state the sound is in, and the property samplesis a reference to the cached wave samples used by the sound. How these properties are used, we will understand when we write a class AudioEngine. To finish the class
Audio, you need to add getters / setters:Audio.waveformpublicfinalfunctiongetwaveform():int {
return m_waveform;
}
publicfinalfunctionsetwaveform( value:int ):void {
if( AudioWaveform.isValid( value ) == false ) {
return;
}
switch( value ) {
case AudioWaveform.PULSE: samples = AudioEngine.PULSE; break;
case AudioWaveform.SAWTOOTH: samples = AudioEngine.SAWTOOTH; break;
case AudioWaveform.SINE: samples = AudioEngine.SINE; break;
case AudioWaveform.TRIANGLE: samples = AudioEngine.TRIANGLE; break;
}
m_waveform = value;
}Audio.frequency[Inline]
publicfinalfunctiongetfrequency():Number {
return m_frequency;
}
publicfinalfunctionsetfrequency( value:Number ):void {
// ограничиваем frequency интервалом 1.0 - 14080.0
m_frequency = value < 1.0 ? 1.0 : value > 14080.0 ? 14080.0 : value;
}Audio.amplitude[Inline]
publicfinalfunctiongetamplitude():Number {
return m_amplitude;
}
publicfinalfunctionsetamplitude( value:Number ):void {
// ограничиваем amplitude интервалом 0.0 - 1.0
m_amplitude = value < 0.0 ? 0.0 : value > 1.0 ? 1.0 : value;
}Audio.duration[Inline]
publicfinalfunctiongetduration():Number {
return m_duration;
}
publicfinalfunctionsetduration( value:Number ):void {
// ограничиваем duration интервалом 0.0 - 60.0
m_duration = value < 0.0 ? 0.0 : value > 60.0 ? 60.0 : value;
}Audio.release[Inline]
publicfinalfunctiongetrelease():Number {
return m_release;
}
publicfunctionsetrelease( value:Number ):void {
// ограничиваем время release интервалом 0.0 - 10.0
m_release = value < 0.0 ? 0.0 : value > 10.0 ? 10.0 : value;
}Audio.frequencyModulator[Inline]
publicfinalfunctiongetfrequencyModulator():AudioModulator {
return m_frequencyModulator;
}
publicfinalfunctionsetfrequencyModulator( value:AudioModulator ):void {
m_frequencyModulator = value;
}Audio.amplitudeModulator[Inline]
publicfinalfunctiongetamplitudeModulator():AudioModulator {
return m_amplitudeModulator;
}
publicfinalfunctionsetamplitudeModulator( value:AudioModulator ):void {
m_amplitudeModulator = value;
}You certainly noticed a metadata label
[Inline]associated with some of the getter functions. This metadata label is a feature of the ActionScript 3.0 Compiler , and it does exactly what its name implies: it embeds (extends) the contents of the function. When used wisely, this feature is incredibly useful for optimization, and the task of generating a dynamic audio signal during the execution of the optimization program definitely requires.AudioModulator Class
The task
AudioModulatoris to provide the ability to modulate the amplitude and frequency of instances Audioto create a variety of useful effects. Modulators are actually similar to instances Audio, they have a waveform, amplitude and frequency, but they do not create any audible sound, but only modify other sounds. Let's start from the beginning - create the
noisefollowing class skeleton in the package :packagenoise {publicclassAudioModulator{
publicfunctionAudioModulator(){}
}
}Now add the private properties:
privatevar m_waveform:int            = AudioWaveform.SINE;
privatevar m_frequency:Number        = 4.0;
privatevar m_amplitude:Number        = 1.0;
privatevar m_shift:Number            = 0.0;
privatevar m_samples:Vector.<Number> = null;
If you think this is very similar to a class
Audio, then you are not mistaken: everything is the same here, except for the property shift. To understand what the property is doing
shift, remember one of the basic waves used by the audio engine (pulse, sawtooth, sinusoidal or triangular) and imagine a vertical line passing through the wave anywhere. The horizontal position of this vertical line will be the value shift; this value is in the range from 0.0to 1.0, which tells the modulator where to start reading the wave. In turn, it has an absolute effect on the modifications introduced by the modulator into the amplitude or frequency of the sound. For example, if a modulator uses a sine wave to modulate the sound frequency,
shiftit matters0.0, then the sound frequency will first increase, and then fall in accordance with the curvature of the sine wave. However, if you shiftset the value 0.5, the sound frequency will first decrease, and therefore increase. Well, back to the code.
AudioModulatorcontains one internal method used only AudioEngine. The method has the following form:[Inline]
internalfinalfunctionprocess( time:Number ):Number {
var p:int = 0;
var s:Number = 0.0;
if( m_shift != 0.0 ) {
time += ( 1.0 / m_frequency ) * m_shift;
}
p = ( 44100 * m_frequency * time ) % 44100;
s = m_samples[p];
return s * m_amplitude;
}This function is built-in, because it is often used, and by “often” I mean “44100 times per second” for each reproduced sound that the modulator is connected to (this is where embedding is incredibly useful). The function simply receives a sound sample from the waveform used by the modulator, changes the amplitude of the sample, and then returns the result.
To complete the class
AudioModulator, add getters / setters:AudioModulator.waveformpublicfunctiongetwaveform():int {
return m_waveform;
}
publicfunctionsetwaveform( value:int ):void {
if( AudioWaveform.isValid( value ) == false ) {
return;
}
switch( value ) {
case AudioWaveform.PULSE: m_samples = AudioEngine.PULSE; break;
case AudioWaveform.SAWTOOTH: m_samples = AudioEngine.SAWTOOTH; break;
case AudioWaveform.SINE: m_samples = AudioEngine.SINE; break;
case AudioWaveform.TRIANGLE: m_samples = AudioEngine.TRIANGLE; break;
}
m_waveform = value;
}AudioModulator.frequencypublicfunctiongetfrequency():Number {
return m_frequency;
}
publicfunctionsetfrequency( value:Number ):void {
// ограничиваем frequency интервалом 0.01 - 100.0
m_frequency = value < 0.01 ? 0.01 : value > 100.0 ? 100.0 : value;
}AudioModulator.amplitudepublicfunctiongetamplitude():Number {
return m_amplitude;
}
publicfunctionsetamplitude( value:Number ):void {
// ограничиваем amplitude интервалом 0.0 - 8000.0
m_amplitude = value < 0.0 ? 0.0 : value > 8000.0 ? 8000.0 : value;
}AudioModulator.shiftpublicfunctiongetshift():Number {
return m_shift;
}
publicfunctionsetshift( value:Number ):void {
// ограничиваем shift интервалом 0.0 - 1.0
m_shift = value < 0.0 ? 0.0 : value > 1.0 ? 1.0 : value;
}And on this class
AudioModulatorcan be considered completed.AudioEngine Class
And now a serious task: class
AudioEngine. This is a fully static class. It controls almost everything related to instances Audioand sound generation. Let's start as usual with the class skeleton in
noise:packagenoise {import flash.events.SampleDataEvent;import flash.media.Sound;import flash.media.SoundChannel;import flash.utils.ByteArray;//publicfinalclassAudioEngine{
publicfunctionAudioEngine(){
thrownew Error( "AudioEngine class cannot be instantiated" );
}
}
}As mentioned above, instances should not be created for fully static classes, so if someone tries to create an instance, an exception is thrown in the constructor of the class. A class is also
finalbecause there is no reason to extend a fully static class. The first thing we add to this class is the internal constants. These constants will be used to cache samples of each of the four waveforms used by the audio engine. Each cache contains 44,100 samples, which is equal to single-Hz waveforms. This allows the audio engine to create very clean, low-frequency sound waves.
The following constants are used:
staticinternalconst PULSE:Vector.<Number>    = new Vector.<Number>( 44100 );
staticinternalconst SAWTOOTH:Vector.<Number> = new Vector.<Number>( 44100 );
staticinternalconst SINE:Vector.<Number>     = new Vector.<Number>( 44100 );
staticinternalconst TRIANGLE:Vector.<Number> = new Vector.<Number>( 44100 );
The class also uses two private constants:
staticprivateconst BUFFER_SIZE:int    = 2048;
staticprivateconst SAMPLE_TIME:Number = 1.0 / 44100.0;BUFFER_SIZEIs the number of sound samples transmitted to the ActionScript 3.0 sound API when making a request for sound samples. This is the smallest number of samples allowed, which provides the smallest possible latency of sound. The number of samples can be increased to reduce the load on the CPU, but this will increase the latency of the sound. SAMPLE_TIMEIs the duration of one sound sample in seconds. And now the private variables:
staticprivatevar m_position:Number            = 0.0;
staticprivatevar m_amplitude:Number           = 0.5;
staticprivatevar m_soundStream:Sound          = null;
staticprivatevar m_soundChannel:SoundChannel  = null;
staticprivatevar m_audioList:Vector.<Audio>   = new Vector.<Audio>();
staticprivatevar m_sampleList:Vector.<Number> = new Vector.<Number>( BUFFER_SIZE );m_positionused to track the sound streaming time in seconds.m_amplitudeIs the global secondary amplitude for all reproduced instancesAudio.m_soundStreamandm_soundChannelrequire no explanation.m_audioListContains links to all reproduced instancesAudio.m_sampleListIs a temporary buffer used to store audio samples when requested by the ActionScript 3.0 audio API.
Now we need to initialize the class. There are many ways to do this, but I prefer the simple and straightforward - static class constructor:
staticprivatefunction $AudioEngine():void {
	var i:int    = 0;
	var n:int    = 44100;
	var p:Number = 0.0;
	//while( i < n ) {
		p = i / n;
		SINE[i] = Math.sin( Math.PI * 2.0 * p );
		PULSE[i] = p < 0.5 ? 1.0 : -1.0;
		SAWTOOTH[i] = p < 0.5 ? p * 2.0 : p * 2.0 - 2.0;
		TRIANGLE[i] = p < 0.25 ? p * 4.0 : p < 0.75 ? 2.0 - p * 4.0 : p * 4.0 - 4.0;
		i++;
	}
	//
	m_soundStream = new Sound();
	m_soundStream.addEventListener( SampleDataEvent.SAMPLE_DATA, onSampleData );
	m_soundChannel = m_soundStream.play();
}
$AudioEngine();
In this code, the following happens: samples are generated and cached for each of the four waveforms, and this happens only once. An instance of the audio stream is also created, which starts and plays until the application is completed.
The class
AudioEnginehas three common methods used to play and stop instances Audio:AudioEngine.play()staticpublicfunctionplay( audio:Audio ):void {
if( audio.playing == false ) {
m_audioList.push( audio );
}
// это позволяет нам точно знать, когда было запущено воспроизведение звука
audio.position = m_position - ( m_soundChannel.position * 0.001 );
audio.playing = true;
audio.releasing = false;
}AudioEngine.stop()staticpublicfunctionstop( audio:Audio, allowRelease:Boolean = true ):void {
if( audio.playing == false ) {
// звук не воспроизводитсяreturn;
}
if( allowRelease ) {
// переход к концу звука и установка флага затухания
audio.position = audio.duration;
audio.releasing = true;
return;
}
audio.playing = false;
audio.releasing = false;
}AudioEngine.stopAll()staticpublicfunctionstopAll( allowRelease:Boolean = true ):void {
var i:int = 0;
var n:int = m_audioList.length;
var o:Audio = null;
//if( allowRelease ) {
while( i < n ) {
o = m_audioList[i];
o.position = o.duration;
o.releasing = true;
i++;
}
return;
}
while( i < n ) {
o = m_audioList[i];
o.playing = false;
o.releasing = false;
i++;
}
}And here we go to the basic methods of sound processing, each of which is private:
AudioEngine.onSampleData()staticprivatefunctiononSampleData( event:SampleDataEvent ):void {
var i:int = 0;
var n:int = BUFFER_SIZE;
var s:Number = 0.0;
var b:ByteArray = event.data;
//if( m_soundChannel == null ) {
while( i < n ) {
b.writeFloat( 0.0 );
b.writeFloat( 0.0 );
i++;
}
return;
}
//
generateSamples();
//while( i < n ) {
s = m_sampleList[i] * m_amplitude;
b.writeFloat( s );
b.writeFloat( s );
m_sampleList[i] = 0.0;
i++;
}
//
m_position = m_soundChannel.position * 0.001;
}So, in the first construct,
ifwe check to see if it m_soundChannelis still null. We need this because the event is SAMPLE_DATAdispatched immediately when the method is called, m_soundStream.play()and even before the method gets the opportunity to return an instance SoundChannel. The loop
whilebypasses the sound samples requested m_soundStreamand writes them to the instance ByteArray. Sound samples are generated by the following method:AudioEngine.generateSamples()staticprivatefunctiongenerateSamples():void {
var i:int = 0;
var n:int = m_audioList.length;
var j:int = 0;
var k:int = BUFFER_SIZE;
var p:int = 0;
var f:Number = 0.0;
var a:Number = 0.0;
var s:Number = 0.0;
var o:Audio = null;
// обход экземпляров audiowhile( i < n ) {
o = m_audioList[i];
//if( o.playing == false ) {
// экземпляр audio полностью остановлен
m_audioList.splice( i, 1 );
n--;
continue;
}
//
j = 0;
// генерирование и буферизация звуковых сэмпловwhile( j < k ) {
if( o.position < 0.0 ) {
// экземпляр audio ещё не начал воспроизведение
o.position += SAMPLE_TIME;
j++;
continue;
}
if( o.position >= o.duration ) {
if( o.position >= o.duration + o.release ) {
// экземпляр audio остановлен
o.playing = false;
j++;
continue;
}
// экземпляр audio в процессе затухания
o.releasing = true;
}
// получение частоты и амплитуды экземпляра audio
f = o.frequency;
a = o.amplitude;
//if( o.frequencyModulator != null ) {
// модуляция частоты
f += o.frequencyModulator.process( o.position );
}
//if( o.amplitudeModulator != null ) {
// модуляция амплитуды
a += o.amplitudeModulator.process( o.position );
}
// вычисление положения в кэше волн
p = ( 44100 * f * o.position ) % 44100;
// получение сэмпла волны
s = o.samples[p];
//if( o.releasing ) {
// вычисление амплитуды затухания для сэмпла
s *= 1.0 - ( ( o.position - o.duration ) / o.release );
}
// добавление сэмпла в буфер
m_sampleList[j] += s * a;
// обновление положения экземпляра audio
o.position += SAMPLE_TIME;
j++;
}
i++;
}
}Finally, in order to complete everything, we need to add a getter / setter for the private variable
m_amplitude:staticpublicfunctiongetamplitude():Number {
return m_amplitude;
}
staticpublicfunctionsetamplitude( value:Number ):void {
// ограничение amplitude интервалом 0.0 - 1.0
m_amplitude = value < 0.0 ? 0.0 : value > 1.0 ? 1.0 : value;
}Audio processor demo
In this part, we will add audio processors to the base engine and create a simple delay processor . This demo shows the delay processor in action (Flash): demo .
In this demo, only one sound is reproduced, but the frequency of the sound changes randomly, and the samples generated by the engine pass through the delay processor, which creates a fading echo effect.
Class AudioProcessor
The first thing to do is create a base class for audio processors:
packagenoise {publicclassAudioProcessor{
        //publicvar enabled:Boolean = true;
        //publicfunctionAudioProcessor(){
            if( Object(this).constructor == AudioProcessor ) {
                thrownew Error( "AudioProcessor class must be extended" );
            }
        }
        //internalfunctionprocess( samples:Vector.<Number> ):void {}
    }
}
As you can see, the class is very simple, it contains an internal method
process()called by the class AudioEnginewhen it is necessary to process the samples, and a general property enabledthat can be used to turn the processor on and off.AudioDelay Class
A class
AudioDelayis a class that creates the sound delay itself. He is expanding the class AudioProcessor. Here is the skeleton of an empty class that we will work with:packagenoise {publicclassAudioDelayextendsAudioProcessor{
//publicfunctionAudioDelay( time:Number = 0.5 ){
this.time = time;
}
}
}The argument
timepassed to the class constructor is the time (in seconds) of the delay sequence, that is, the amount of time between each sound delay. Now let's add private properties:
privatevar m_buffer:Vector.<Number> = new Vector.<Number>();
privatevar m_bufferSize:int  = 0;
privatevar m_bufferIndex:int = 0;
privatevar m_time:Number = 0.0;
privatevar m_gain:Number = 0.8;
A vector
m_bufferis a feedback loop : it contains all the sound samples transmitted to the method process, and these samples are constantly modified (in our case, their amplitude decreases) while passing m_bufferIndexthrough the buffer. This will make sense when we get to the method process(). Properties
m_bufferSizeand m_bufferIndexare used to monitor the status of the buffer. A property m_timeis the delay time in seconds. A property m_gainis a factor used to decrease the amplitude of buffered sound samples over time. This class has only one method, and it is an internal method
process()that overrides the method process()in the class AudioProcessor:internaloverridefunctionprocess( samples:Vector.<Number> ):void {
var i:int = 0;
var n:int = samples.length;
var v:Number = 0.0;
//while( i < n ) {
v = m_buffer[m_bufferIndex]; // получение буферизированного сэмпла
v *= m_gain; // снижение амплитуды
v += samples[i]; // добавление нового сэмпла//
m_buffer[m_bufferIndex] = v;
m_bufferIndex++;
//if( m_bufferIndex == m_bufferSize ) {
m_bufferIndex = 0;
}
//
samples[i] = v;
i++;
}
}Finally, we need to add getters / setters for private properties
m_timeand m_gain:publicfunctiongettime():Number {
return m_time;
}
publicfunctionsettime( value:Number ):void {
// ограничиваем time интервалом 0.0001 - 8.0
value = value < 0.0001 ? 0.0001 : value > 8.0 ? 8.0 : value;
// если time не изменилось, нет необходимости изменять размер буфераif( m_time == value ) {
return;
}
// задаём time
m_time = value;
// обновляет размер буфера
m_bufferSize = Math.floor( 44100 * m_time );
m_buffer.length = m_bufferSize;
}publicfunctiongetgain():Number {
return m_gain;
}
publicfunctionsetgain( value:Number ):void {
// ограничиваем gain интервалом 0.0 - 1.0
m_gain = value < 0.0 ? 0.0 : value > 1.0 ? 1.0 : value;
}Believe it or not, this is the
AudioDelayend of the class . In fact, the implementation of sound delays is very simple, if you understand how the feedback loop (property m_buffer) works .Class update AudioEngine
The last thing to do is update the class
AudioEngineso that you can add audio processors to it. First, let's add a vector to hold instances of the audio processor:staticprivatevar m_processorList:Vector.<AudioProcessor> = new Vector.<AudioProcessor>();To really add and remove processors from a class
AudioEngine, you must also use two common methods:AudioEngine.addProcessor()staticpublicfunctionaddProcessor( processor:AudioProcessor ):void {
if( m_processorList.indexOf( processor ) == -1 ) {
m_processorList.push( processor );
}
}AudioEngine.removeProcessor()staticpublicfunctionremoveProcessor( processor:AudioProcessor ):void {
var i:int = m_processorList.indexOf( processor );
if( i != -1 ) {
m_processorList.splice( i, 1 );
}
}Everything is quite simple - all these methods will add and remove instances
AudioProcessorfrom the vector m_processorList. The last method that we will add will go through the list of audio processors, and if the processor is turned on, transmit sound samples to the processor method
process():staticprivatefunctionprocessSamples():void {
var i:int = 0;
var n:int = m_processorList.length;
//while( i < n ) {
if( m_processorList[i].enabled ) {
m_processorList[i].process( m_sampleList );
}
i++;
}
}It is time to add the last part of the code, and this is the only line that needs to be added to the private
onSampleData()class method AudioEngine:if( m_soundChannel == null ) {
while( i < n ) {
b.writeFloat( 0.0 );
b.writeFloat( 0.0 );
i++;
}
return;
}
//
generateSamples();
processSamples();
//while( i < n ) {
s = m_sampleList[i] * m_amplitude;
b.writeFloat( s );
b.writeFloat( s );
m_sampleList[i] = 0.0;
i++;
}Add a line of code to the class
processSamples();. It just calls the method processSamples()we added earlier.Conclusion
That, in fact, is all. In the first part of the tutorial, we looked at various waveforms and a way to store sound waves in digital form. Then we created the base audio engine code, and now we are done with the addition of audio processors.
Much more can be done with this code, but it is important not to forget that the entire amount of work the audio engine must perform at runtime. If you make the engine too sophisticated (which is very easy), then the overall performance of the game may suffer - even if you transfer the audio engine to a separate stream (or to worker ActionScript 3.0), it will still take up a large share of CPU time if implemented inaccurately.
However, many professional and not-so-professional games do most of the sound processing at runtime because dynamic sound effects and music greatly enrich the gameplay and allow the player to delve deeper into the game world. The audio engine we created can easily work with ordinary (non-generated) samples of sound effects loaded from files: in essence, all digital sounds in their simplest form are a sequence of samples.
It is worth considering another aspect: sound is an important part of the game, as important and powerful as the visual component. It should not be dropped or screwed to the game at the last moment of development, if you are concerned about the quality of the game. Take time to design the sound and it will not go unnoticed.
I hope you enjoyed the tutorial and you can learn something useful from it. Even if you just think a little more about the sound in your games, I will consider my work to be in vain.
All source code audio engine can be downloaded here .
Have fun!