August 31, 2017 at 02:14
Spring MVC - Fundamentals
- Transfer
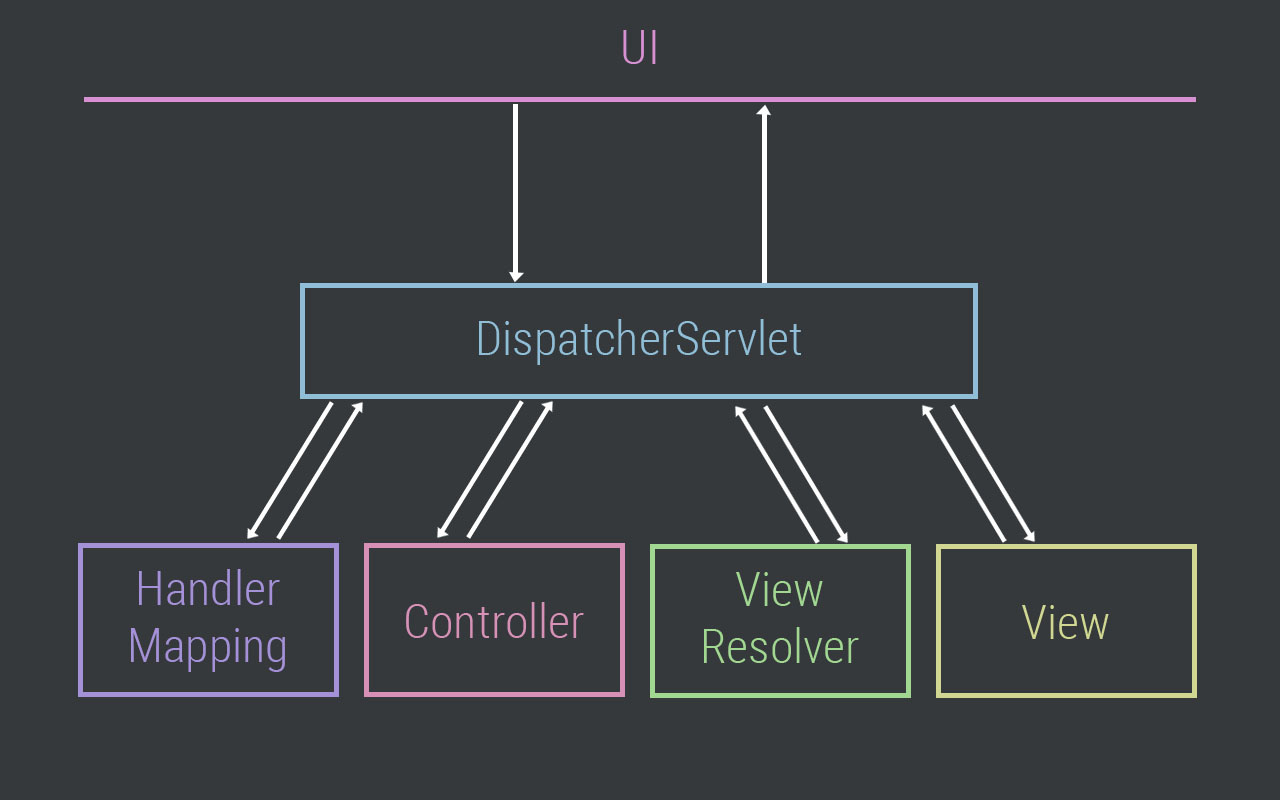
Framework Spring MVC provides patterning architecture Model - View - Controller (Model - mapping (further - Type) - Controller) using the weakly bound finished components. The MVC pattern separates aspects of the application (input logic, business logic, and UI logic), while ensuring free communication between them.
- Model encapsulates (combines) application data, in general it will consist of POJOs ("Good Old Java Objects", or bins).
- View (Display, View) is responsible for displaying the data of the Model, - as a rule, generating the HTML that we see in our browser.
- The Controller processes the user’s request, creates the corresponding Model and passes it for display in the View.
DispatcherServlet
The whole logic of Spring MVC is built around the DispatcherServlet , which accepts and processes all HTTP requests (from the UI) and responses to them. DispatcherServlet’s request processing workflow is illustrated in the following diagram:
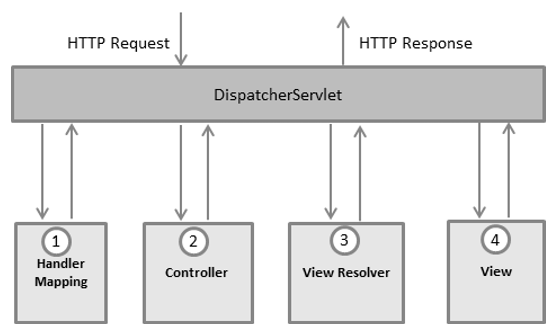
The following is a sequence of events corresponding to an incoming HTTP request:
- After receiving an HTTP request, DispatcherServlet accesses the HandlerMapping interface , which determines which Controller should be called, and then sends the request to the desired Controller.
- The controller accepts the request and calls the appropriate utility method based on GET or POST. The called method determines the Model data based on a specific business logic and returns the View name to the DispatcherServlet.
- Using the ViewResolver interface , the DispatcherServlet determines which View should be used based on the name received.
- After the View is created, the DispatcherServlet sends the Model data as attributes to the View, which is ultimately displayed in the browser.
All of the above components, namely HandlerMapping , Controller, and ViewResolver , are parts of the WebApplicationContext extends ApplicationContext interface , with some additional features needed to create web applications.
Configuration
You will need to bind (map) the requests that you want to process using the DispatcherServlet using the URL mapping in the web.xml file. The following is an example of declaring and mapping HelloWeb DispatcherServlet:
Spring MVC Application HelloWeb
org.springframework.web.servlet.DispatcherServlet
1 HelloWeb *.jsp The web.xml file will be located in the WebContent / WEB-INF directory . After initializing HelloWeb, the framework will try to load the application context from a file named [servlet-name] -servlet.xml located in the WebContent / WEB-INF directory . In our case, it will be HelloWeb-servlet.xml .
Next, the tag
If you do not want to use [servlet-name] -servlet.xml / WebContent / WEB-INF as the default file and directory, you can configure the file name and directory by adding the servlet listener ContextLoaderListener in web.xml, as shown below:
....
contextConfigLocation /WEB-INF/HelloWeb-servlet.xml
org.springframework.web.context.ContextLoaderListener
Now let's check the configuration for HelloWeb-servlet.xml located in the WebContent / WEB-INF directory:
The following are important points in HelloWeb-servlet.xml:
- The [servlet-name] -servlet.xml file will be used to create labeled bins, overriding the definitions of each bin defined with the same name in the global scope.
- Tag
- View names will be determined using the InternalResourceViewResolver . In accordance with the above rule, a view named hello will be implemented at /WEB-INF/jsp/hello.jsp
The next section will show how to create a Controller , Model, and View .
Controller Definition
DispatcherServlet sends a request to the controllers to perform certain functions. The @Controllerannotation annotation indicates that a particular class is a controller. The @RequestMapping annotation is used for mapping (binding) with URLs for the entire class or for a specific handler method.
@Controller
@RequestMapping("/hello")
public class HelloController {
   @RequestMapping(method = RequestMethod.GET)
   public String printHello(ModelMap model) {
      model.addAttribute("message", "Hello Spring MVC Framework!");
      return "hello";
   }
}
Controller annotation defines the class as Spring MVC Controller. In the first case, @RequestMapping indicates that all methods in this Controller refer to the URL "/ hello". The following annotation @RequestMapping (method = RequestMethod.GET) is used to declare the printHello () method as the default method for processing HTTP GET requests (in this Controller). You can define any other method as the handler of all POST requests at a given URL.
You can write the above Controller differently by specifying additional attributes for the @RequestMapping annotation as follows:
@Controller
public class HelloController {
   @RequestMapping(value = "/hello", method = RequestMethod.GET)
   public String printHello(ModelMap model) {
      model.addAttribute("message", "Hello Spring MVC Framework!");
      return "hello";
   }
}
The “value” attribute indicates the URL with which we associate this method (value = "/ hello"), it is further indicated that this method will process GET requests (method = RequestMethod.GET). Also, important points to note regarding the above controller:
- You define the business logic inside the utility method so connected. From it you can call any other methods.
- Based on the given business logic, within the framework of this method, you create a Model. You can add Model attributes that will be added to the View. In the example above, we create a Model with the “message” attribute.
- This utility method returns the View name as a String. In this case, the requested View has the name "hello".
Creation of the View (JSP)
Spring MVC supports many types of Views for various page display technologies. Including - JSP, HTML, PDF, Excel, XML, Velocity templates, XSLT, JSON, Atom and RSS feeds, JasperReports and so on. But most often JSP templates written using JSTL are used.
Let's write a simple “hello” view in /WEB-INF/hello/hello.jsp:
Hello Spring MVC ${message}
In this case, the variable $ {message} displays the same attribute that we set in the Controller. Inside the View, you can display any number of attributes.
Spring MVC Framework Examples
Based on the above concepts, I propose to complete several important lessons that will help us create Spring Web applications in the future:
Spring MVC Hello World Example
An example that explains how to write a simple Hello World application.
Spring MVC Form Handling Example
This example explains how to write a Spring Web application using HTML forms, send data to the controller, and display the processed result.
Spring Page Redirection Example
Using the page redirect function.
Spring Static Pages Example
Get access to static pages along with dynamic pages.
Spring Exception Handling Example Exception Handling
.