Colibri-ui - our mobile application testing automation solution
With the growth of teams, the number of features will inevitably increase, and at the same time, the test model and the number of test cases that need to be checked during regression testing. Moreover, the number of teams is growing for a reason, in our case, the business wants to release more and more often, without losing quality.
The way we at Alfa Lab solved the problem of finding a balance between speed, budget and quality, we will consider today with the example of Alfa Mobile. Looking ahead, ATTENTION, SPOILER !!! our solution is available on github: the colibri-ui library and the colibri-ui-template for a quick start.
Pavel pvivanov and Lilia Lidiyatullina took an active part in writing the article
Back in 2013, we were not even visited by thoughts about test automation, since the regression testing process took one day for one tester for both OS (iOS / Android).
However, with the active growth of the application, the addition of new services and services, the costs of manual testing also began to grow at a rapid pace.
Add here an increase in the number of teams (from one to six) that constantly produce new features - and regression testing will become a thrombus of your processes, which risks breaking away and jeopardizing production.
At some point, we came to the conclusion that at the time of preparing the application for release, all six teams were “idle”, while all six testers were tirelessly “regressing” the release candidate. In the temporary equivalent, the duration of regression testing increased to 8 working days (six people!).
This situation does not add motivation to the testers themselves. At some point, we even got a joke “To regress like a holiday!”
The problem had to be solved somehow, and we had two ways to “attach bablishko”:
For ethical and economic reasons, we chose the second option, after all, the cost of automation, whatever one may say, is a much more profitable investment.
They decided to start the movement in the chosen direction with a pilot project for the automation of testing mobile applications. Based on its results, we formed the requirements for the future instrument:
Based on the requirements, it was necessary to choose an automation tool.
As part of the pilot project, we reviewed:
The requirement for cross-platform solutions narrowed the choice to the last pair from the list. The final choice was made in favor of Appium due to the more active community involved in the development and support.
Automation of a process at the lower level is scripts and code. However, not everyone can understand the development tools or even write something on their own. That is why we decided to simplify this moment as much as possible using the BDD methodology on projects.
Our framework is divided into several levels of abstraction, where the upper level is written in the popular Gherkin test writing language, and the lower level is written by developers in the Java programming language. JBehave was chosen for scripting.
So, what does our decision look like on the part of the user?
This example describes the transition from the main screen to the mobile payment screen. Perhaps someone will object that from the point of view of the business process, it does not matter to him which way he will get to the desired screen, and he will be right. Indeed, nothing prevents us from moving to the desired section, replacing the last five lines of the previous script with one, for example, like this:
However, such steps will be less atomic and more difficult to reuse on both platforms, iOS and Android. Indeed, when we want to lower the threshold for entering the development, we need to reuse the current steps as much as possible, otherwise the tester will always need new ones and, as a result, their implementation. And here, as we recall, the tester does not always have the necessary development skills.
If everything is very clear with the script, it is read “from the sheet” and describes our actions, then how to specify the locators, while trying to explicitly not use them?
One way to achieve the goal of lowering the entry threshold is to simplify the writing of complex locators and hide everything deeper into the project. So two factories were born that allow the description to create a locator and use it for search. Unfortunately, it is not always possible to do without writing locators, in rare cases it has to be written. For such situations, we left the opportunity to find an element by XPath.
The description of the elements on the screen with us can consist of four components. All four components are never used, but two can be used, for example, in the case when you need to first scroll to the element, and then click on it.
We will use the name of the element (Name in story) in the script, we will pull Content description / ResourceId / AccessabilityIdeitificator / Text / XPath from it.
We collect all descriptions in .csv files, where in a tabular form you can conveniently edit them. On the one hand, this is a normal PageObject, and on the other hand, our testers do not have to edit the locators in the code.
It seems that much easier! We described the screen, wrote a script, launched autotests, but let's talk a little about non-trivial tasks and look at our colibri-ui framework from the inside.
When working with Appium, it is always necessary to indicate which mobile device we want to work with. In our solution, it is necessary to transfer the device udid (unique identifier) and its name to the project. The name will also be mentioned in the logs if something goes wrong. Note that using udid, our project will work with the desired mobile device, because we have a whole farm and they are all connected to the same Mac.
Currently, descriptions of mobile devices are stored in the form of a set of folders, each of which contains settings files of the type .property and json-object. The .property file contains udid and the device name, the json object contains a description of the node settings for working in cluster mode (see colibri-ui-template).
A small offtopic, or how to get udid connected devices!
For Android, we run “adb devices” in the console, for iOS - “instruments -s devices | grep -v (Simulator | $ (id -un))” and get a list of connected devices. In the case of Android, the list will include both real devices and emulators, and for iOS we filter only real devices. If someone needs to get only emulators, another filtering is needed “instruments -s devices | grep Simulator ".
It is planned to transfer this set of folders to the database or to another storage, or to receive the list dynamically, performing the above commands in the process of forming the environment. We currently have no need for such an improvement.
Additionally, note that for the above commands to work on your Mac, ADB Driver and Xcode must be installed, respectively. When working with emulators, do not forget to deflate their images.
To date, we have taken into account everything that is necessary to launch a project in the simplest mode. We have scripts, screen descriptions, and device descriptions. However, in the applications we are testing, this is not enough. In our applications, it is necessary for some user to log in to the test bench and use his credentials, such as: phone number, login, password, account numbers, etc.
Files with user credentials also lie in a separate folder in the project. In the future, as well as with devices, transfer them to the database or centralized storage.
In scripts and page descriptions, we use markers of the form # userName #, by which we get the property value from the user file and replace these markers during the run.
Thus, we can chase the same set of scripts on different users, including at the same time.
This is how it looks in the page description:
This is how it looks in the user.property file:
Keys and values must be specified.
We started the development with a description of rather small steps, for example, enter text or click on something. Over time, we realized that writing scripts in small steps, or writing complex steps, for example, returning to the main screen, we cannot duplicate the code. So began the search for a solution to reuse small steps into larger ones.
The first attempt was to add guiсe to the project for the organization of DI, but its implementation brought with it the processing of almost the entire core of the project. And since dependencies, right in the appium-java-client, already have Spring, for us the solution became obvious and our next step was to implement Spring.
When introducing Sping into our project, the amount of change was minimal. In the very depths of the project, only the JBeHave step factory and a couple of lines in the Allure report connection changed. Almost all classes have been declared components and most of the dependencies removed.
The effect of the implementation was not only the designer steps in which we can reuse smaller actions, but also the ability to make general decisions in the library (a link to the github was at the very beginning). This is relevant for us, because we use this solution on several mobile projects.
Well, the most unusual effect is that we can write tests for tests. No matter how funny and awkward this may sound, a lot depends on the quality of the instrument, so it also needs to be maintained and developed. Currently, coverage is still underway. With changes to the core of the project, we will expand the test coverage inside the library.
As already mentioned, we run our project on a specific set of devices in parallel.
An example of starting a project from the console:
As you can see from the example, the tests run for Android (--tests "* AndroidStories *"). Also passed as parameters:
The device on which the test run will be launched, Nexus6p_android6. Do not forget to describe the device in the project, we wrote about this above. That's how it is done with us.
The device.properties file contains:
The file test_node.json contains data for running the node.
Test user 6056789, the data of which we will use. The project has a whole set of test users that we use to run our tests. The user must be described in user.properties.
Type of testing smokeNewReg, our framework implements the logic of choosing test scripts for Meta tags . Each script in the Meta block has a set of labels.
The testCycle.properties file contains keys and label values.
Thus, due to the presence of Meta Matcher in JBehave, we can form a set of test scripts for a specific testing cycle.
The assembly number that we pump from the centralized repository, and the branch from which the assembly will be pumped. In our case, the environmentAndroid.properties file contains a wildcard link, which is formed based on the parameters, which in turn are transmitted to the input from the console.
Now, knowing how to start a project from the console, you can easily integrate the project into Jenkins. Our projects have such integration, and it’s enough for the tester to simply create a job in Jenkins to run autotests.
A farm with mobile devices has also been formed. This is the Mac Pro, to which about ten mobile devices are connected.
In our project, a report is generated using an allure report. Therefore, after the tests have completed, it is enough to run “allure generate directory-with-results”.
In the report we can see the statuses for each scenario. If you start to open scripts in the report, then there you can find the steps that the test took, almost before calling each method. In the event that something has fallen apart, in the step with an error, there will be a screenshot inside.
Previously, screenshots were at every step, but we thought it was pointless, and the screen is done only on collapsed scripts. In addition, as the number of automated scripts grows, the report begins to take up more space.
To summarize the tasks that we set for ourselves.
As a bonus:
The results met our expectations and confirmed the correctness of the decision to go into automation.
We are continuing to develop our solution, which is available on github: the colibri-ui library and the colibri-ui-template for a quick start. Further only more!
If you want to become one of the testers of Alpha Lab (or not just a tester) - we have open vacancies .
The way we at Alfa Lab solved the problem of finding a balance between speed, budget and quality, we will consider today with the example of Alfa Mobile. Looking ahead, ATTENTION, SPOILER !!! our solution is available on github: the colibri-ui library and the colibri-ui-template for a quick start.
Pavel pvivanov and Lilia Lidiyatullina took an active part in writing the article
What happened?
Back in 2013, we were not even visited by thoughts about test automation, since the regression testing process took one day for one tester for both OS (iOS / Android).
However, with the active growth of the application, the addition of new services and services, the costs of manual testing also began to grow at a rapid pace.
Add here an increase in the number of teams (from one to six) that constantly produce new features - and regression testing will become a thrombus of your processes, which risks breaking away and jeopardizing production.
At some point, we came to the conclusion that at the time of preparing the application for release, all six teams were “idle”, while all six testers were tirelessly “regressing” the release candidate. In the temporary equivalent, the duration of regression testing increased to 8 working days (six people!).
This situation does not add motivation to the testers themselves. At some point, we even got a joke “To regress like a holiday!”
What to do?
The problem had to be solved somehow, and we had two ways to “attach bablishko”:
- bringing new people to the ranks of testers;
- test automation in order to refuse manual testing.
For ethical and economic reasons, we chose the second option, after all, the cost of automation, whatever one may say, is a much more profitable investment.
They decided to start the movement in the chosen direction with a pilot project for the automation of testing mobile applications. Based on its results, we formed the requirements for the future instrument:
- The tool for testing automation should be with the lowest possible threshold for entering the development in order to start using it.
It's about minimizing code writing, getting rid of writing complex locators, etc., since the main users of the tool are testers from product teams who may not have automation experience. - Test scripts should be understood by non-development users;
- The solution should be cross-platform and work on two platforms at once - Android and iOS;
- A farm with a connected set of mobile devices must be formed;
- The solution must be scalable to other mobile applications of the bank.
Based on the requirements, it was necessary to choose an automation tool.
As part of the pilot project, we reviewed:
- Robotium
- Espresso
- UI Recorder
- Keep it functional
- Calabash
- Appium
The requirement for cross-platform solutions narrowed the choice to the last pair from the list. The final choice was made in favor of Appium due to the more active community involved in the development and support.
Lowering the threshold for entry into development
Automation of a process at the lower level is scripts and code. However, not everyone can understand the development tools or even write something on their own. That is why we decided to simplify this moment as much as possible using the BDD methodology on projects.
Our framework is divided into several levels of abstraction, where the upper level is written in the popular Gherkin test writing language, and the lower level is written by developers in the Java programming language. JBehave was chosen for scripting.
So, what does our decision look like on the part of the user?
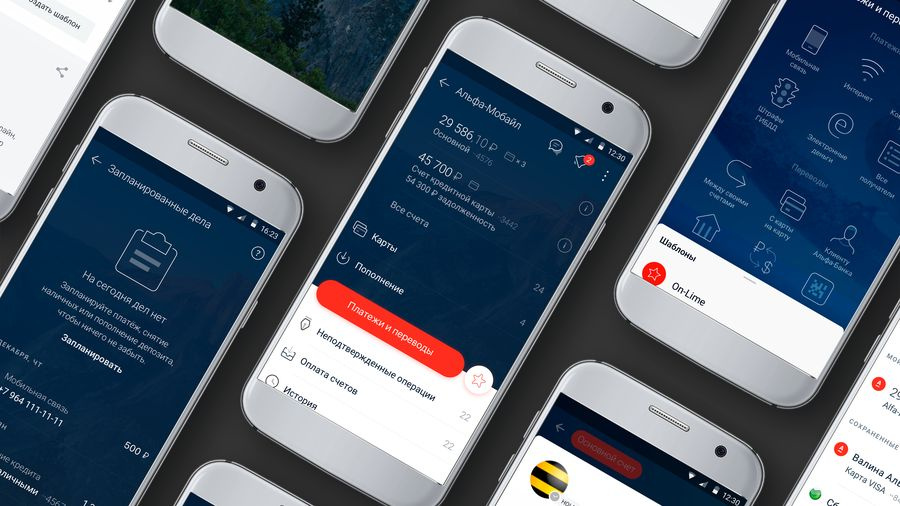
Then загружена страница "Главный экран"
When скролл внутри "Основной список" до "Платежи и переводы"
When выполнено нажатие на "Платежи и переводы"
Then загружена страница "Платежи и переводы"
When скролл внутри "Список платежей и переводов" до "Мобильная связь"
When выполнено нажатие на "Мобильная связь"
This example describes the transition from the main screen to the mobile payment screen. Perhaps someone will object that from the point of view of the business process, it does not matter to him which way he will get to the desired screen, and he will be right. Indeed, nothing prevents us from moving to the desired section, replacing the last five lines of the previous script with one, for example, like this:
When перейти в раздел "Мобильная связь"However, such steps will be less atomic and more difficult to reuse on both platforms, iOS and Android. Indeed, when we want to lower the threshold for entering the development, we need to reuse the current steps as much as possible, otherwise the tester will always need new ones and, as a result, their implementation. And here, as we recall, the tester does not always have the necessary development skills.
We describe screens
If everything is very clear with the script, it is read “from the sheet” and describes our actions, then how to specify the locators, while trying to explicitly not use them?
One way to achieve the goal of lowering the entry threshold is to simplify the writing of complex locators and hide everything deeper into the project. So two factories were born that allow the description to create a locator and use it for search. Unfortunately, it is not always possible to do without writing locators, in rare cases it has to be written. For such situations, we left the opportunity to find an element by XPath.
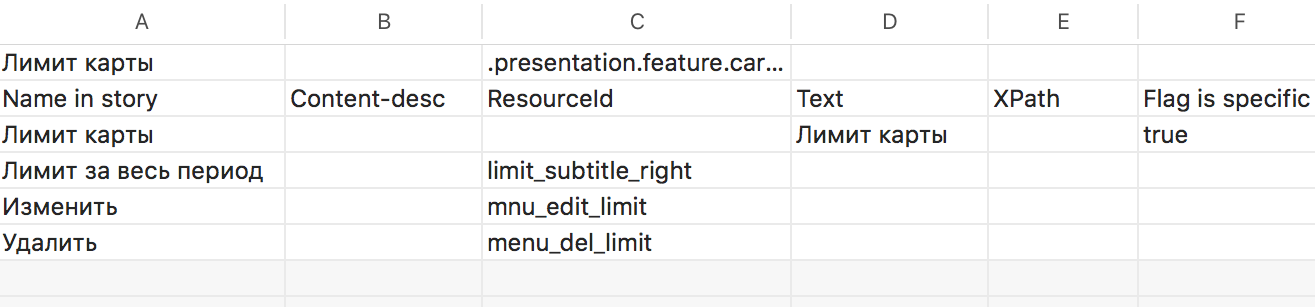
The description of the elements on the screen with us can consist of four components. All four components are never used, but two can be used, for example, in the case when you need to first scroll to the element, and then click on it.
The components of the page description as a set of elements:
- Content description - by this identifier you can find elements on Android;
- ResourceId / AccessabilityIdeitificator - A unique identifier. Sometimes application developers do not put identifiers, but this is the most desirable element that we can find in the markup of the application for Android / iOS, respectively;
- Text - visible text, for example, on a button that we can click on;
- XPath - regular XPath for xml markup. It is used in cases when the previous three ways to unambiguously describe the element did not work.
We will use the name of the element (Name in story) in the script, we will pull Content description / ResourceId / AccessabilityIdeitificator / Text / XPath from it.
We collect all descriptions in .csv files, where in a tabular form you can conveniently edit them. On the one hand, this is a normal PageObject, and on the other hand, our testers do not have to edit the locators in the code.
It seems that much easier! We described the screen, wrote a script, launched autotests, but let's talk a little about non-trivial tasks and look at our colibri-ui framework from the inside.
Customize the environment
When working with Appium, it is always necessary to indicate which mobile device we want to work with. In our solution, it is necessary to transfer the device udid (unique identifier) and its name to the project. The name will also be mentioned in the logs if something goes wrong. Note that using udid, our project will work with the desired mobile device, because we have a whole farm and they are all connected to the same Mac.
Currently, descriptions of mobile devices are stored in the form of a set of folders, each of which contains settings files of the type .property and json-object. The .property file contains udid and the device name, the json object contains a description of the node settings for working in cluster mode (see colibri-ui-template).
A small offtopic, or how to get udid connected devices!
For Android, we run “adb devices” in the console, for iOS - “instruments -s devices | grep -v (Simulator | $ (id -un))” and get a list of connected devices. In the case of Android, the list will include both real devices and emulators, and for iOS we filter only real devices. If someone needs to get only emulators, another filtering is needed “instruments -s devices | grep Simulator ".
It is planned to transfer this set of folders to the database or to another storage, or to receive the list dynamically, performing the above commands in the process of forming the environment. We currently have no need for such an improvement.
Additionally, note that for the above commands to work on your Mac, ADB Driver and Xcode must be installed, respectively. When working with emulators, do not forget to deflate their images.
We describe the user
To date, we have taken into account everything that is necessary to launch a project in the simplest mode. We have scripts, screen descriptions, and device descriptions. However, in the applications we are testing, this is not enough. In our applications, it is necessary for some user to log in to the test bench and use his credentials, such as: phone number, login, password, account numbers, etc.
Files with user credentials also lie in a separate folder in the project. In the future, as well as with devices, transfer them to the database or centralized storage.
In scripts and page descriptions, we use markers of the form # userName #, by which we get the property value from the user file and replace these markers during the run.
Thus, we can chase the same set of scripts on different users, including at the same time.
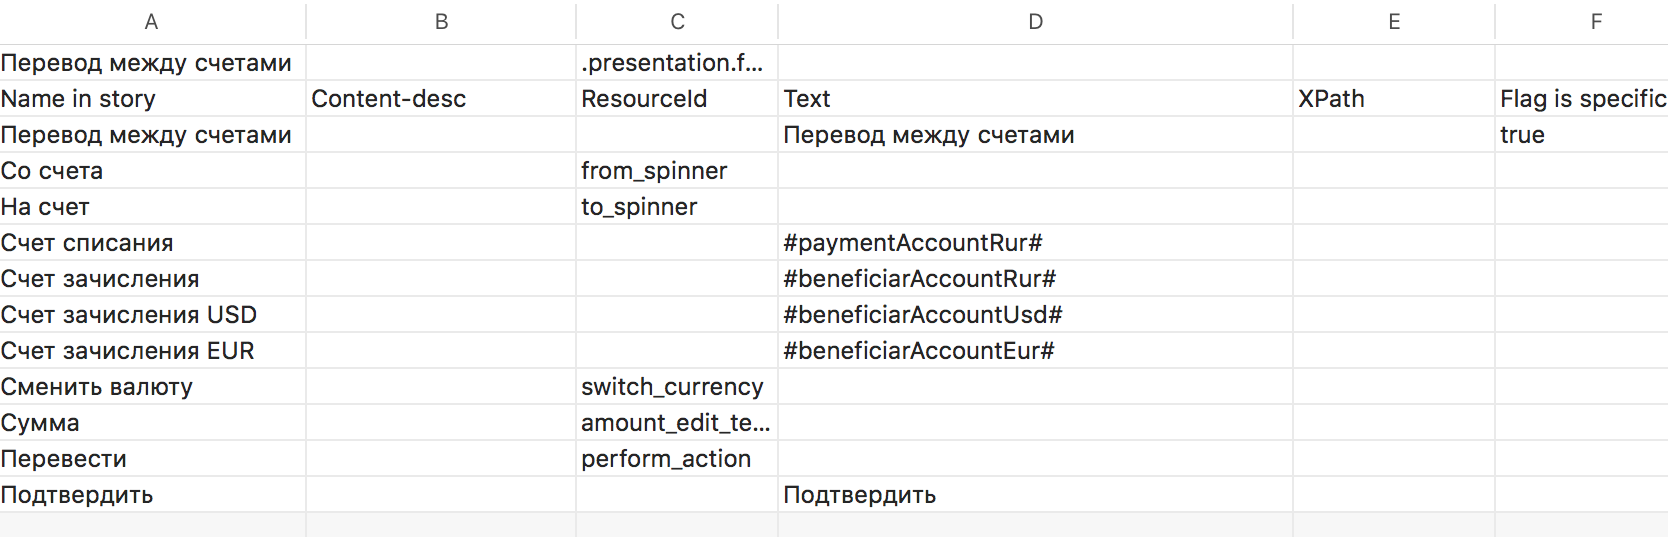
This is how it looks in the page description:
This is how it looks in the user.property file:
paymentAccountRur=··0278
beneficiarAccountRur=··0163
beneficiarAccountUsd=··0889
beneficiarAccountEur=··0038
Keys and values must be specified.
We form Uber steps and some side effects
We started the development with a description of rather small steps, for example, enter text or click on something. Over time, we realized that writing scripts in small steps, or writing complex steps, for example, returning to the main screen, we cannot duplicate the code. So began the search for a solution to reuse small steps into larger ones.
The first attempt was to add guiсe to the project for the organization of DI, but its implementation brought with it the processing of almost the entire core of the project. And since dependencies, right in the appium-java-client, already have Spring, for us the solution became obvious and our next step was to implement Spring.
When introducing Sping into our project, the amount of change was minimal. In the very depths of the project, only the JBeHave step factory and a couple of lines in the Allure report connection changed. Almost all classes have been declared components and most of the dependencies removed.
The effect of the implementation was not only the designer steps in which we can reuse smaller actions, but also the ability to make general decisions in the library (a link to the github was at the very beginning). This is relevant for us, because we use this solution on several mobile projects.
Well, the most unusual effect is that we can write tests for tests. No matter how funny and awkward this may sound, a lot depends on the quality of the instrument, so it also needs to be maintained and developed. Currently, coverage is still underway. With changes to the core of the project, we will expand the test coverage inside the library.
We start the project
As already mentioned, we run our project on a specific set of devices in parallel.
An example of starting a project from the console:
./gradlew --info clean test --tests "*AndroidStories*" -Dorg.gradle.project.platform=Nexus6p_android6 -Dorg.gradle.project.user=6056789 -Dorg.gradle.project.testType=smokeNewReg -Dorg.gradle.project.buildVersion=9.0.0.7,developmentAs you can see from the example, the tests run for Android (--tests "* AndroidStories *"). Also passed as parameters:
The device on which the test run will be launched, Nexus6p_android6. Do not forget to describe the device in the project, we wrote about this above. That's how it is done with us.
The device.properties file contains:
UDID=ENU14008659
deviceName=Nexus6p
The file test_node.json contains data for running the node.
Test user 6056789, the data of which we will use. The project has a whole set of test users that we use to run our tests. The user must be described in user.properties.
Type of testing smokeNewReg, our framework implements the logic of choosing test scripts for Meta tags . Each script in the Meta block has a set of labels.
Meta:
@regressCycle
@smokeCycle
The testCycle.properties file contains keys and label values.
smoke=+smokeCycle,+oldRegistration,-skip
smokeNewReg=+smokeCycle,+newRegistrationCardNumber,-skip
smokeNewAccountReg=+smokeCycle,+newRegistrationAccountNumber,-skip
regress=+regressCycle,+oldRegistration,-skip
regressNewReg=+regressCycle,+newRegistrationCardNumber,-skip
Thus, due to the presence of Meta Matcher in JBehave, we can form a set of test scripts for a specific testing cycle.
The assembly number that we pump from the centralized repository, and the branch from which the assembly will be pumped. In our case, the environmentAndroid.properties file contains a wildcard link, which is formed based on the parameters, which in turn are transmitted to the input from the console.
remoteFilePathReleaseAndDevelopment=http://mobile/android/mobile-%2$s/%1$s/mobile-%2$s-%1$s.apkNow, knowing how to start a project from the console, you can easily integrate the project into Jenkins. Our projects have such integration, and it’s enough for the tester to simply create a job in Jenkins to run autotests.
A farm with mobile devices has also been formed. This is the Mac Pro, to which about ten mobile devices are connected.
We generate a report
In our project, a report is generated using an allure report. Therefore, after the tests have completed, it is enough to run “allure generate directory-with-results”.
In the report we can see the statuses for each scenario. If you start to open scripts in the report, then there you can find the steps that the test took, almost before calling each method. In the event that something has fallen apart, in the step with an error, there will be a screenshot inside.
Previously, screenshots were at every step, but we thought it was pointless, and the screen is done only on collapsed scripts. In addition, as the number of automated scripts grows, the report begins to take up more space.
The result we got
To summarize the tasks that we set for ourselves.
- We managed to make a tool for testing automation with a rather low threshold for entry into development. On average, as practice has shown, a tester only needs two weeks to confidently start writing and running autotests. The greatest difficulties for testers are associated with the environment for configuring appium.
- Test scripts are clear to all team members, this is especially important when the BDD methodology is used on your project.
- Our framework can work simultaneously with two platforms - iOS and Android.
- Currently, we have formed a farm of ten mobile devices and Mac Pro. The project is integrated with Jenkins, and any tester can run automatic tests in parallel on all ten devices.
- Our solution is scalable and several mobile projects are already actively working with our framework and run auto tests.
As a bonus:
- On one of the mobile projects, due to automation, we completely saved functional testers from testing the front for backward compatibility with the backend. After the introduction of automation, the testing time in this case was reduced by 8 times (from 8 hours to 1 hour).
- New autotests are written by testers in the sprint along with the development of new functionality in mobile applications;
- Part of the regression testing is already automated, as a result - we reduced the time for regression from 8 days to 1 day. This allowed us to release more often, and testers stopped dropping out of teams for the period of regression testing. Well, they just got a little happier :)
The results met our expectations and confirmed the correctness of the decision to go into automation.
We are continuing to develop our solution, which is available on github: the colibri-ui library and the colibri-ui-template for a quick start. Further only more!
If you want to become one of the testers of Alpha Lab (or not just a tester) - we have open vacancies .