LibGDX + Scene2d (programmed in Kotlin). Part 2
Hello. Today I will talk about the atlas of textures, skins, and we will go through work on layout again. Further internationalization and finally a couple of subtleties in working with color. And in the next lesson, let's move on to the game model and the linking of game logic and UI elements.
One of the most important parameters of the "comfort" of the application is the download time. The bottleneck in this regard is reading from the drive. If we use such designs everywhere
To optimize the work with textures, it is much cheaper for us to upload one large picture once and use fragments of it in our work. This approach is called the texture atlas.
In our application, loading the atlas is implemented in a slightly different way using the AssetManager, but at the moment it does not matter.
One of the features of the LibGDX library is the tight coupling of logic and presentation code. We create elements, specify sizes, position, color directly in the code. At the same time, visual style requires multiple repetitions of the same lines of code (violation of the DRY principle). It is very expensive. Not even the copy-paste itself, but the synchronization of changes. For example, you wanted to change the text color from black to bronze. And in the case of hardcode, you need to go through the entire application, change one color to another. You’ll skip part, change where it should not change. To solve this problem, LibGDX implements a skins mechanism. Here is an example of ours:
How does it work inside? To the commonplace is simple. Inside the skin lives an ObjectMap> resources = new ObjectMap (); For each class, named sets of instances are stored. The json above just populates this map with values. Through reflection, an object is created and fields are also filled through reflection. Here is an example of creating and working the skin:
The result of today's work will be the appearance of the expedition panel when you click on the “Boot” button. In this example, we will see how to expand the layout of the application while maintaining the basic idea, adding / removing actors to the scene, a couple of new layout containers. So our past code:
We will use two new layout containers for layout of the terrain plate. VerticalGroup and HorizontalGroup. These are “lite" versions of the table, which, among other things, have one advantage. Removing an element from them removes the row / column. This is not true for the table. Even if you have a single-row table, deleting an item in a column simply makes the cell empty. Also, expand / fill / space / pad modifiers for Container, VerticalGroup, HorizontalGroup apply immediately to all elements. For a table, these values apply to each cell.
And here is the terrain plate:
Anyone who has worked with internationalization in any way will be nothing new. Internationalization works exactly the same. There is a basic .properties file in which key-value pairs are stored. There are auxiliary files xxx_ru.properties, xxx_en.properties, xxx_fr.properties. Depending on the locale of the device, the appropriate auxiliary file (if defined) or the base file (if there are no matches) is loaded. In our case, the internationalization files look like this: I put the name i18n in the global namespace
I really want to use color constants in skins. But if you try to write like this, the program will crash with an error.
(), into which the running colors and base colors of the application palette are placed. It looks like this:
This is an example using AssetManager. You can do this as well (the main thing is to do before loading the skin.json file):
And finally. Label can be “painted” in two ways. Right and wrong.
The second option works fine. The font is generated white, in my case with a translucent dark stroke.
In the final example, there is no normal layout for action dice. You can try to implement it yourself by analogy with TerrainPane.
Update:
Previous parts
Texture atlas
One of the most important parameters of the "comfort" of the application is the download time. The bottleneck in this regard is reading from the drive. If we use such designs everywhere
Image(Texture("backgrounds/main-screen-background.png"))To optimize the work with textures, it is much cheaper for us to upload one large picture once and use fragments of it in our work. This approach is called the texture atlas.
Atlas example
And although I am a big opponent of premature optimization, working with the atlas of textures offers great advantages both in terms of speed of the application and in terms of readability. To ignore the texture atlas is more expensive. We already have the AtlasGenerator class in the project, which itself can combine images from a folder into an atlas. Here is his code:object AtlasGenerator {
@JvmStatic fun main(args: Array) {
val settings = TexturePacker.Settings()
settings.maxWidth = 2048
settings.maxHeight = 2048
TexturePacker.process(settings, "images", "atlas", "game")
}
} val atlas = TextureAtlas(Gdx.files.internal("atlas/game.atlas"))
atlas.findRegion("texture-name")
In our application, loading the atlas is implemented in a slightly different way using the AssetManager, but at the moment it does not matter.
Skins
One of the features of the LibGDX library is the tight coupling of logic and presentation code. We create elements, specify sizes, position, color directly in the code. At the same time, visual style requires multiple repetitions of the same lines of code (violation of the DRY principle). It is very expensive. Not even the copy-paste itself, but the synchronization of changes. For example, you wanted to change the text color from black to bronze. And in the case of hardcode, you need to go through the entire application, change one color to another. You’ll skip part, change where it should not change. To solve this problem, LibGDX implements a skins mechanism. Here is an example of ours:
{
  "com.badlogic.gdx.scenes.scene2d.ui.Label$LabelStyle": {
    "default": {
      "font": "regular-font"
    },
    "large": {
      "font": "large-font"
    },
    "small": {
      "font": "small-font"
    },
    "pane-caption": {
      "font": "large-font",
      "fontColor": "color-mongoose"
    }
  }
}Label("some text here", uiSkin, "pane-caption")How does it work inside? To the commonplace is simple. Inside the skin lives an ObjectMap
val atlas = TextureAtlas(Gdx.files.internal("atlas/game.atlas"))
val skin = Skin(atlas)
skin.getDrawable("texture-name")
skin.get("default", Label.LabelStyle::class.java)
Label("some text here", skin , "pane-caption")
Layout
The result of today's work will be the appearance of the expedition panel when you click on the “Boot” button. In this example, we will see how to expand the layout of the application while maintaining the basic idea, adding / removing actors to the scene, a couple of new layout containers. So our past code:
row().let {
    add(Image(Texture("backgrounds/main-screen-background.png")).apply {
        setScaling(Scaling.fill)
    }).expand()
}val centralPanel = Container()
row().let {
add(centralPanel.apply {
background = TextureRegionDrawable(TextureRegion(Texture("backgrounds/main-screen-background.png")))
fill()
pad(AppConstants.PADDING * 2)
}).expand()
} class CommandPanel(val centralPanel: Container) : Table() {
...
add(Button(uiSkin.getDrawable("command-move")).apply {
addListener(object : ChangeListener() {
override fun changed(event: ChangeEvent?, actor: Actor?) {
when (isChecked) {
false -> centralPanel.actor = null
true -> centralPanel.actor = ExplorePanel()
}
}
})
}) Layout Dice Terrain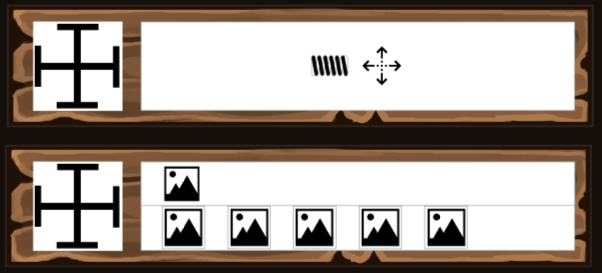
Expedition panel layout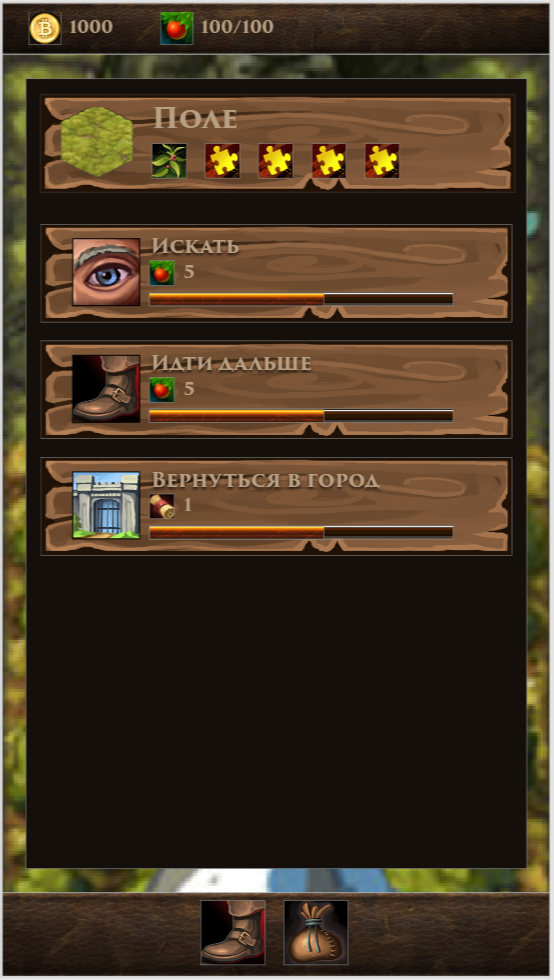
We will use two new layout containers for layout of the terrain plate. VerticalGroup and HorizontalGroup. These are “lite" versions of the table, which, among other things, have one advantage. Removing an element from them removes the row / column. This is not true for the table. Even if you have a single-row table, deleting an item in a column simply makes the cell empty. Also, expand / fill / space / pad modifiers for Container, VerticalGroup, HorizontalGroup apply immediately to all elements. For a table, these values apply to each cell.
class ExplorePanel : Table() {
    init {
        background = uiSkin.getDrawable("panel-background")
        pad(AppConstants.PADDING)
        row().let {
            add(TerrainPane())
        }
        row().let {
            add(SearchPane())
        }
        row().let {
            add(MovePane())
        }
        row().let {
            add(TownPortalPane())
        }
        row().let {
            add().expand() // для подпружинивания элементов
        }
    }
}And here is the terrain plate:
class TerrainPane : WoodenPane() {
    init {
        add(Image(uiSkin.getDrawable("terrain-meadow"))).width(160f).height(160f).top()
        add(VerticalGroup().apply {
            space(AppConstants.PADDING)
            addActor(Label(i18n["terrain.meadow"], uiSkin, "pane-caption"))
            addActor(HorizontalGroup().apply {
                space(AppConstants.PADDING)
                addActor(Image(uiSkin.getDrawable("herbs-01")))
                addActor(Image(uiSkin.getDrawable("herbs-unidentified")))
                addActor(Image(uiSkin.getDrawable("herbs-unidentified")))
                addActor(Image(uiSkin.getDrawable("herbs-unidentified")))
                addActor(Image(uiSkin.getDrawable("herbs-unidentified")))
            })
        }).expandX().fill()
    }
}Internationalization
Anyone who has worked with internationalization in any way will be nothing new. Internationalization works exactly the same. There is a basic .properties file in which key-value pairs are stored. There are auxiliary files xxx_ru.properties, xxx_en.properties, xxx_fr.properties. Depending on the locale of the device, the appropriate auxiliary file (if defined) or the base file (if there are no matches) is loaded. In our case, the internationalization files look like this: I put the name i18n in the global namespace
medieval-tycoon.properties

medieval-tycoon_en.properties

medieval-tycoon_ru.properties

... содержимое ...

explore.move=Идти

explore.search=Искать

explore.town-portal=Портал в Город

terrain.forest=Лес

terrain.meadow=Луг

terrain.swamp=Болото
val i18n: I18NBundle
    get() = assets.i18n
class MedievalTycoonGame : Game() {
    lateinit var assets: Assets
class Assets {
val i18n: I18NBundle by lazy {
manager.get(i18nDescriptor)
}
val i18n = I18NBundle.createBundle(Gdx.files.internal("i18n/fifteen-puzzle"), Locale.getDefault())
A couple of subtleties when working with color
I really want to use color constants in skins. But if you try to write like this, the program will crash with an error.
{
  "com.badlogic.gdx.scenes.scene2d.ui.Label$LabelStyle": {
    "pane-caption": {
      "font": "large-font",
      "fontColor": "color-mongoose"
    }
  }
}Adding text color identifiers
private val skinResources = ObjectMap()
private val skinDescriptor = AssetDescriptor("default-ui-skin.json", Skin::class.java,
        SkinLoader.SkinParameter("atlas/game.atlas", skinResources))
...
loadColors()
manager.load(skinDescriptor)
...
private fun loadColors() {
    skinResources.put("color-mongoose", Color.valueOf("BAA083"))
    skinResources.put("clear", Color.CLEAR)
    skinResources.put("black", Color.BLACK)
    skinResources.put("white", Color.WHITE)
    skinResources.put("light_gray", Color.LIGHT_GRAY)
    skinResources.put("gray", Color.GRAY)
    skinResources.put("dark_gray", Color.DARK_GRAY)
    skinResources.put("blue", Color.BLUE)
    skinResources.put("navy", Color.NAVY)
    skinResources.put("royal", Color.ROYAL)
    skinResources.put("slate", Color.SLATE)
    skinResources.put("sky", Color.SKY)
    skinResources.put("cyan", Color.CYAN)
    skinResources.put("teal", Color.TEAL)
    skinResources.put("green", Color.GREEN)
    skinResources.put("chartreuse", Color.CHARTREUSE)
    skinResources.put("lime", Color.LIME)
    skinResources.put("forest", Color.FOREST)
    skinResources.put("olive", Color.OLIVE)
    skinResources.put("yellow", Color.YELLOW)
    skinResources.put("gold", Color.GOLD)
    skinResources.put("goldenrod", Color.GOLDENROD)
    skinResources.put("orange", Color.ORANGE)
    skinResources.put("brown", Color.BROWN)
    skinResources.put("tan", Color.TAN)
    skinResources.put("firebrick", Color.FIREBRICK)
    skinResources.put("red", Color.RED)
    skinResources.put("scarlet", Color.SCARLET)
    skinResources.put("coral", Color.CORAL)
    skinResources.put("salmon", Color.SALMON)
    skinResources.put("pink", Color.PINK)
    skinResources.put("magenta", Color.MAGENTA)
    skinResources.put("purple", Color.PURPLE)
    skinResources.put("violet", Color.VIOLET)
    skinResources.put("maroon", Color.MAROON)
}
This is an example using AssetManager. You can do this as well (the main thing is to do before loading the skin.json file):
uiSkin.add("black", Color.BLACK)
uiSkin.load(Gdx.files.internal("uiskin.json"))
And finally. Label can be “painted” in two ways. Right and wrong.
color = Color.BLACK // неправильно
style.fontColor = Color.BLACK // правильно
The second option works fine. The font is generated white, in my case with a translucent dark stroke.
val largeFont = FreetypeFontLoader.FreeTypeFontLoaderParameter()
largeFont.fontFileName = "fonts/Merriweather-Bold.ttf"
...
largeFont.fontParameters.borderColor = Color.valueOf("00000080")
largeFont.fontParameters.borderWidth = 4f
...
Result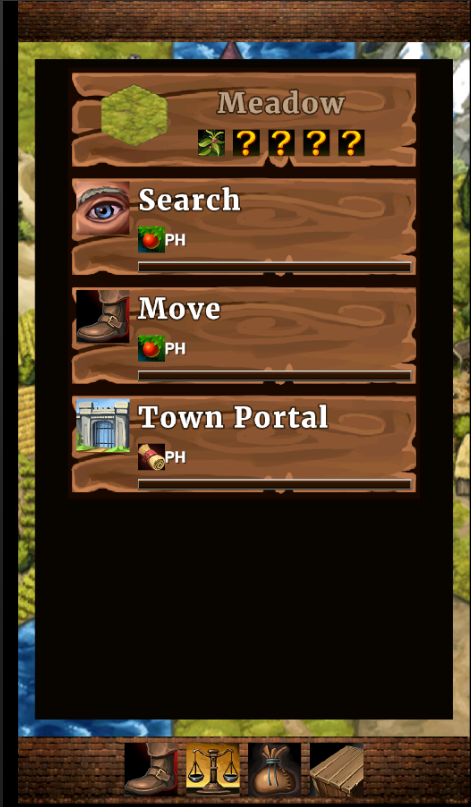
In the final example, there is no normal layout for action dice. You can try to implement it yourself by analogy with TerrainPane.
Update:
A little funny offtopic