How to create a vegetation billboard texture in Unreal Engine 4
- Transfer
In this article, we will talk about how to create a billboard texture of vegetation in Unreal Engine 4. Such vegetation is a simple multiply quadrilateral, all copies of which are always turned towards the camera. I will try to argue in favor of this approach, I will talk about potential shortcomings and will separately address the issue of performance.

In Unreal Engine 4, by default there is a built-in tool for working with vegetation called the Foliage tool. It adds cloned static meshes (in a more general sense, skeletonless models). Each asset with vegetation can be added to the map thousands of times with different rotation, position, etc. settings for all instances.
With relatively small (up to 10,000 copies) and simple (less than 100 polygons) assets, everything will work fine even with shade and good lighting of plants. But you need to intelligently adjust the clipping distance so that the graphic hardware does not try to display all 10,000 copies at once.
However, for relatively large accumulations of vegetation (for example, whole forests), this can become a problem.
Consider an example from my game. In the north of the map is a large forest, a player can enter it from the south. All that is outside the southern side of the forest is a non-game zone. But it still needs to be rendered in order to give the player the impression of a vast and vast forest.
If we decided to render the entire forest, even using low-poly tree models, this would reduce performance on low-end computers.
It is in this case that billboards come to the rescue.
Unreal Engine 4 comes with Billboard Material Component as standard . It is well suited for working with single or few meshes in a level, as shown in the example above. Unfortunately, it cannot be used for the Foliage tool, which only supports the placement of static meshes. To use the Billboard Component, it must be inside the Actor class, which is not supported by this tool.
You need to make your own Billboard Material. You can read about how to do this in the documentation at the link here in the section on stylized rendering (some do not immediately find the information they need, so I recommend reading carefully).
I will not retell this document. In exchange, I will add a screenshot of my documentation-generated material and tell you how to use it in the game.
First, import simple 2D textures that will act as a sprite with a billboard. To this end, I took screenshots of a tree model on a transparent background. When viewed from a certain distance, they are very similar to high-poly models.
It’s important to leave a little variety: I created 4 variants of one tree so that the models do not look the same.

The next step is to create material that will ensure that the vertices of the static mesh are always facing the camera. As a static mesh, take a quadrilateral formed by two triangles (more on that later).
Go to the Content Browser panel, right-click and create a new Material.
Select the following settings:

Then you can place the nodes on the graphic panel of the material. Let's make some important clarifications. The material adjusts the position of the vertices so that they are turned towards the camera. Due to the nodes tied to the World Position Offset, the material adjusts the position of its vertices so that they are turned towards the camera.
The 'Custom' node contains a special HLSL code inside the section responsible for the effects of the billboard. It is needed to calculate the correct rotation of the quadrangle. The parameters of this node look like this: opposite 'Inputs' you need to select one value and name it 'In', and opposite 'Output Type' - CMOT Float 2. The documentation describes it differently, but the parameter names are incorrect:
The nodes attached to PivotPosition are responsible for ensuring that the rectangle is moved to three-dimensional space in accordance with the coordinates and rotates around the starting point.
But this material is not intended for direct use. The texture has been converted to a Material Parameter that will be used by material instances.
After saving the material, right-click on it in the Content Browser panel and make several copies. Each of them must use the correct texture on your billboard. So the code will not be duplicated, and resources will be spent more efficiently.

Having defined the material, load a simple rectangle in Unreal Engine 4, which will be used as a static mesh for the Foliage tool.
For a billboard model, you only need a rectangle consisting of two triangles. Create such an asset using the Blender program or download the one I used. It is available for download here, feel free to use it in any projects.
When importing a triangle, you may need to adjust its transfer and rotation so that it initially faces the camera and is located on the surface. If this is not done, the material will turn sideways to the camera or turn upside down (or both at once) and will not correctly transfer its position to three-dimensional space. As a result, the material will always be rotated in the wrong direction.
I used the following settings for the quad:
At the end of the import, give the quad a name (I named TreeBillboard_Quad_1) and assign the quad to the billboard material.
Theoretically, we could already put the quadrangle on the map and make sure that when the camera moves, it is always turned towards the viewer. But it would be wiser to drag this static mesh into the Foliage tool and work on its placement:
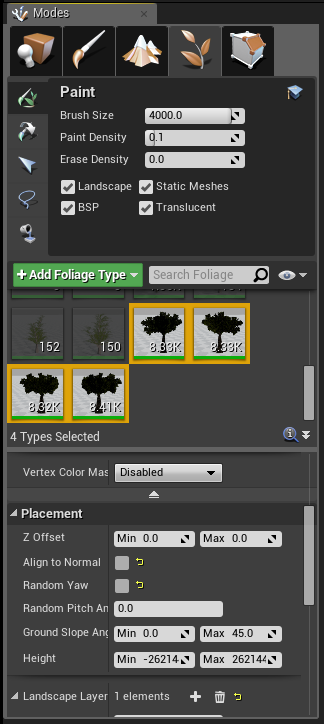
When adding the mesh to the Foliage tool, make sure that the Align to Normal and Random Yaw options are disabled: they rotate the mesh and violate the effect of the material.
This mesh should always be located outside the game zone, where the player will not be able to get close to it or go around, otherwise the whole illusion will be violated, and this will look, to put it mildly, bad.
When you add a few thousand of these trees, you get a forest. The quality of the result directly depends on the quality of the original textures:

Please note: in my game I use a low-quality tree model - only this one could be found in the public domain on the OpenGameArt website. I repeat, the result depends on the quality and detail of the mesh on which the images are created, as well as the resolution of these images.
Below are trees with shade and lighting and simple unlit billboards for comparison:

And then it is shown how these trees look in the resolution and size that are best suited for display. The image shows both meshes (closer) and billboards (further). At first glance, they are difficult to distinguish, and with better meshes and images, this will look even more spectacular:

Since we draw only 2 triangles for each tree, the performance with this approach is more than acceptable for modern computers. I managed to fill the entire map with trees without a noticeable decrease in the performance of the average video card (AMD R9 270X). The method is also great for working with reeds, grass, or other small plants. The player will not notice that they are flat, even if they come closer.
It’s not easy to apply lighting or shadow to billboards, so in my game they have no shadow.
The player is unlikely to notice this from a long distance, but if he comes close enough, a flaw will be revealed.
True, performance in this case is imperfect. The 'Custom' node that we use for the material does not allow the engine to optimize the shader. Now it does not matter, but it may be different for you. If in doubt, use the profiler.
There is another approach - use low-poly LOD chains, which are generated using tools such as Simplygon or Meshlab . Imposters can also be used as vegetation . Better yet, combine 3 approaches using a high-poly tree model (for example, with speedtree.com) and the least detailed model in your LOD chain. So you save resources. When a tree is far away, it does not differ from a flat sprite in terms of detail and shadows. Therefore, it is not necessary to draw it completely.
I hope this article will benefit your game and will not spend a fortune on expensive video cards. There are many ways to render vegetation, and this is just one of them.
Vegetation in Unreal Engine 4
In Unreal Engine 4, by default there is a built-in tool for working with vegetation called the Foliage tool. It adds cloned static meshes (in a more general sense, skeletonless models). Each asset with vegetation can be added to the map thousands of times with different rotation, position, etc. settings for all instances.
With relatively small (up to 10,000 copies) and simple (less than 100 polygons) assets, everything will work fine even with shade and good lighting of plants. But you need to intelligently adjust the clipping distance so that the graphic hardware does not try to display all 10,000 copies at once.
However, for relatively large accumulations of vegetation (for example, whole forests), this can become a problem.
Consider an example from my game. In the north of the map is a large forest, a player can enter it from the south. All that is outside the southern side of the forest is a non-game zone. But it still needs to be rendered in order to give the player the impression of a vast and vast forest.
If we decided to render the entire forest, even using low-poly tree models, this would reduce performance on low-end computers.
It is in this case that billboards come to the rescue.
Is a billboard from the advertising industry?
Unreal Engine 4 comes with Billboard Material Component as standard . It is well suited for working with single or few meshes in a level, as shown in the example above. Unfortunately, it cannot be used for the Foliage tool, which only supports the placement of static meshes. To use the Billboard Component, it must be inside the Actor class, which is not supported by this tool.
You need to make your own Billboard Material. You can read about how to do this in the documentation at the link here in the section on stylized rendering (some do not immediately find the information they need, so I recommend reading carefully).
I will not retell this document. In exchange, I will add a screenshot of my documentation-generated material and tell you how to use it in the game.
First, import simple 2D textures that will act as a sprite with a billboard. To this end, I took screenshots of a tree model on a transparent background. When viewed from a certain distance, they are very similar to high-poly models.
It’s important to leave a little variety: I created 4 variants of one tree so that the models do not look the same.
Material preparation
The next step is to create material that will ensure that the vertices of the static mesh are always facing the camera. As a static mesh, take a quadrilateral formed by two triangles (more on that later).
Go to the Content Browser panel, right-click and create a new Material.
Select the following settings:
- Blend Mode: Masked;
- Shading Model: Unlit;
- a checkmark opposite the Two Sided option.
Then you can place the nodes on the graphic panel of the material. Let's make some important clarifications. The material adjusts the position of the vertices so that they are turned towards the camera. Due to the nodes tied to the World Position Offset, the material adjusts the position of its vertices so that they are turned towards the camera.
The 'Custom' node contains a special HLSL code inside the section responsible for the effects of the billboard. It is needed to calculate the correct rotation of the quadrangle. The parameters of this node look like this: opposite 'Inputs' you need to select one value and name it 'In', and opposite 'Output Type' - CMOT Float 2. The documentation describes it differently, but the parameter names are incorrect:
float2 output;
output = atan2 (In.y,In.x);
return (output);
The nodes attached to PivotPosition are responsible for ensuring that the rectangle is moved to three-dimensional space in accordance with the coordinates and rotates around the starting point.
But this material is not intended for direct use. The texture has been converted to a Material Parameter that will be used by material instances.
After saving the material, right-click on it in the Content Browser panel and make several copies. Each of them must use the correct texture on your billboard. So the code will not be duplicated, and resources will be spent more efficiently.
Having defined the material, load a simple rectangle in Unreal Engine 4, which will be used as a static mesh for the Foliage tool.
Creating and loading a mesh
For a billboard model, you only need a rectangle consisting of two triangles. Create such an asset using the Blender program or download the one I used. It is available for download here, feel free to use it in any projects.
When importing a triangle, you may need to adjust its transfer and rotation so that it initially faces the camera and is located on the surface. If this is not done, the material will turn sideways to the camera or turn upside down (or both at once) and will not correctly transfer its position to three-dimensional space. As a result, the material will always be rotated in the wrong direction.
I used the following settings for the quad:
- Roll: 270 degrees.
- Pitch: 180 degrees.
- Yaw: 0 degrees.
- Import Uniform Scale: Customize to fit the size of your map, the quad itself is large enough.
- Import translation, Z axis: Customize to suit the landscape. I set to 190 units.
At the end of the import, give the quad a name (I named TreeBillboard_Quad_1) and assign the quad to the billboard material.
Theoretically, we could already put the quadrangle on the map and make sure that when the camera moves, it is always turned towards the viewer. But it would be wiser to drag this static mesh into the Foliage tool and work on its placement:
When adding the mesh to the Foliage tool, make sure that the Align to Normal and Random Yaw options are disabled: they rotate the mesh and violate the effect of the material.
This mesh should always be located outside the game zone, where the player will not be able to get close to it or go around, otherwise the whole illusion will be violated, and this will look, to put it mildly, bad.
When you add a few thousand of these trees, you get a forest. The quality of the result directly depends on the quality of the original textures:
Appearance
Please note: in my game I use a low-quality tree model - only this one could be found in the public domain on the OpenGameArt website. I repeat, the result depends on the quality and detail of the mesh on which the images are created, as well as the resolution of these images.
Below are trees with shade and lighting and simple unlit billboards for comparison:
And then it is shown how these trees look in the resolution and size that are best suited for display. The image shows both meshes (closer) and billboards (further). At first glance, they are difficult to distinguish, and with better meshes and images, this will look even more spectacular:
Performance
Since we draw only 2 triangles for each tree, the performance with this approach is more than acceptable for modern computers. I managed to fill the entire map with trees without a noticeable decrease in the performance of the average video card (AMD R9 270X). The method is also great for working with reeds, grass, or other small plants. The player will not notice that they are flat, even if they come closer.
It’s not easy to apply lighting or shadow to billboards, so in my game they have no shadow.
The player is unlikely to notice this from a long distance, but if he comes close enough, a flaw will be revealed.
True, performance in this case is imperfect. The 'Custom' node that we use for the material does not allow the engine to optimize the shader. Now it does not matter, but it may be different for you. If in doubt, use the profiler.
Alternatives
There is another approach - use low-poly LOD chains, which are generated using tools such as Simplygon or Meshlab . Imposters can also be used as vegetation . Better yet, combine 3 approaches using a high-poly tree model (for example, with speedtree.com) and the least detailed model in your LOD chain. So you save resources. When a tree is far away, it does not differ from a flat sprite in terms of detail and shadows. Therefore, it is not necessary to draw it completely.
Conclusion
I hope this article will benefit your game and will not spend a fortune on expensive video cards. There are many ways to render vegetation, and this is just one of them.