 July 2, 2017 at 23:46
LibGDX + Scene2d (programmed in Kotlin). Part 0
Hello again! I hasten to share, I had a great weekend! For a day and a half, I considered the option of presenting the material, sawed the layout, and generally tried my best to do well. What is good in the context of training material? In my opinion, this is “interesting”, brevity, correctness and clarity. For me personally to write such an article is a feat. But a series of articles is simply a capacious and responsible task. We will study Scene2d in the process of writing the game from scratch! The process of our creativity will stretch for ten to twelve days. I want to believe that the frequency of materials will be about once a day. For me personally this is a very ambitious task, because it is required not only to program, but also to describe in articles with a detailed analysis. I am not a supporter of rushing into the raging ocean, hoping to learn how to swim. We will jump by the puddle and we will consistently deepen and expand it. So let's get started.
I strongly advise starting the development of any program with a product card. From the obligatory - the goal. I am composing a product card in Google Docs and this is how the card looks in our case.
First of all, we try to deal with our motivation as honestly as possible. Why do we even get into this business. What will serve us as a guiding light when everything is good and a kick in the ass when everything is bad. Please try to avoid altruism and “world peace”. The human psyche is structured in such a way that personal motivations matter more than public ones (I do not consider visionary psychology here).
Middle Ages / Fantasy
Purpose of the game - a lot of money
Resource gathering
Sale
Since the first and main goal of this development is to demonstrate the work, both the game world and the description of the game process will be simplified for the sake of brevity and clarity of presentation of the material.
The player collects resources and sells them in the local market. Food / energy is spent on finding and collecting resources. When the energy is over, it must be bought in the city.
Despite the fact that in a previous article I recommended a notebook and pencil as tools for prototyping, this layout was done in Adobe Experience Design CC (Beta). At the time of publication of the article, it can be downloaded for free. I decided to work with him a day and a half, but I think it is justified. The fact is that the publication on Habré is a group work, even if I do everything alone. The better quality supporting materials I provide, the easier it will be to perceive information. Here is the Adobe Experience Design project file . It can be downloaded, launched in presentation mode and even poked a little on the buttons. Technically, you can file a separate article, but I do not know if this is necessary. Comments will judge.
Well, and what kind of development without a public repository?Here is the link .
To work, we need Android Studio 3.0 (Canary 5 is currently available), Android SKD and LibGDX . I’ll miss the installation of all these shrews, here all the big boys and girls. In extreme cases, there are comments.
The LibGDX configuration wizard starts from the command line:
Whoever was not in the know, LibGDX is a cross-platform framework that allows you to write simultaneously under PC, Android, iOS and even HTML (for the latter, we use GWT, and we have Kotlin, so we are definitely not threatened with HTML). I chose two of the extensions:
Freetype - allows you to generate bitmap fonts from ttf / otf
Tools - among other things, allows you to generate atlases of textures. A
commit with the resulting project is available in the repository. I tried to chop and name commits in such a way that it was easy to understand which fragment was responsible for what. Since LibGDX is cross-platform, I prefer to spend most of the development on a PC and test / fix errors for Android immediately before release. As a rule, this work takes no more than 2-3 hours of time.
Please note that the working folder for DesktopLauncher is located in android / assets. Launching DesktopLauncher on the commit:
Please note that even a newly configured project does not start under android. We will fix this in the next step.
LibGDX projects are configured as multi-module gradle. There is a project build.gradle and modular build.gradle for core, android and desktop. We will write almost all the code in core. In the android project, later we will have AdMob + immersive mode configuration + purchases in the Google Play store.
To transfer a project from java to kotlin, we change all apply plugin: “java” to apply plugin: “kotlin”. In android / build.gradle add apply plugin: 'kotlin-android'. The biggest changes have occurred in the project build.gradle
A Google repository was added, kotlin-gradle-plugin was added to buildscript.dependencies, and the compile-dependency kotlin-stdlib (in our case kotlin-stdlib-jre8) was added to the core project.
This version works on android, but it doesn’t work in the desktop version due to an error of Android Studio 3.0 Canary 5. Why do I think this is the reason - launching the gradle of the desktop-run target still launches the application (though it requires running Android device / emulator to run android: run). But launching from Android Studio throws an Exception in thread “main” java.lang.NoClassDefFoundError: kotlin / jvm / internal / Intrinsics. If anyone can defeat the launch of DesktopLauncher with the latest version of gradle - please let me know!
Translation of java files into kt is elementary - select the file / folder and press Ctrl + Alt + Shitf + K. The only error that you will encounter after this operation is the request of Kotlin to initialize the property at the time of definition:
internal = package visibility in java. We do not need batch visibility (and in general, after a couple of commits we will delete these fields). Not in all cases we can initialize the field right away, and making it nullable is generally stupid (we are interested in kotlin just because of null-safety). For this, kotlin has a lateinit modifier, which tells the compiler what the programmer gives the tooth, at the time of using this field it will not be null. This is the so-called syntactic salt. In general, if you look at this code not as a result of automatic conversion, then it would be more appropriate to look:
You will see this error every time you start Android Studio. Just click sync gradle:

As I said, I prefer to develop a desktop version of the application, and by changing a couple of lines we will reanimate this mode. All you need is to specify in the project build.gradle
classpath 'com.android.tools.build:gradle:2.3.2', and in gradle-wrapper.properties the version of gradle-3.3-all.zip
In DesktopLauncher add a handful of configuration options. Three relate to window size and resizing options. The fourth vSync parameter is disabled since there is a glitch, on some video cards in desktop and only on config.foregroundFPS = 60 (by default), it loads one processor core at 100%.
So we got to the first use of Scene2D. Briefly a few words for what it is intended and what you can want from it.
Scene2D is a graph (tree) of elements and is intended primarily for creating a UI. Right out of the box, you get the ability to typeset, transform elements (rotation, scale, shift, etc.). A huge plus is the handling of touches. Well, the cherry on the cake is a system of actions. With an incomprehensible definition we have finished, now the same thing in human language.
There is a scene, it takes up the whole screen. On the stage, you can place a table, a picture in the table, a scroll bar, a dozen buttons and even a bald dash (the main thing is that in your heart he is an Actor). Using the magic words top / center / left / width etc. you implement layout. An example is more complicated than hello world will be only tomorrow, and so the article turned out great. Further on any arbitrary element you hang a touch handler and it works. You do not need to manually catch the coordinates of the click, check what is there, what the z-index objects, etc. But again, about it tomorrow. And today, just a few code snippets in the end:
Our MedievalTycoonGame class now inherits from Game, whose entire task is to put the work on Screen. The first screen that we will now show the user will be called LoadingScreen and will contain one scene - LoadingStage. Because these classes are not supposed to grow, I will place them in one file LoadingScreen.kt
All that LoadingScreen does is overwrite the screen with black and call the act () and draw () methods of LoadingStage. On act () it is very convenient to hang the program logic, work with data. Draw () is just drawing all the elements in the scene.
The only thing I want to emphasize is how the java vs kotlin scene initialization looks
In the case of kotlin, we always initialize the element and place it on adjacent lines. This is achieved through the apply extension function. The hierarchy in kotlin automatically indents and is visually very easy to read. In java, all typesetting is indented. Initializing an element and placing it is often not possible side by side. If the hierarchy consists of 3+ levels of depth, it is impossible to organize elements beautifully (and cheaply in support) in java.
That's all for today. Consider this article as an introduction, the actual disclosure of Scene2D and the implementation of the game will be tomorrow and beyond. Thank you for being with us;) And not for the sake of advertising (in this application you need to make an effort to see the advertisement), my first Pyatnashki project on Scene2D when I was just learning it. Of the advantages - ease of management. There are hundreds if not thousands of versions of the application and in 90% that I saw the movement of chips is possible only by pushing into the adjacent to an empty cell. Try to collect a cat .
PS The loading screen used the work of the artist Vitaly Samarin aka Vitaly S Alexius.
Upd:
link to the sources of the Fifteen
I warn you right away, the code is scary. So we will not write. Parses the picture on the fly, i.e. You can correct the code so that the image is sucked in by URL. The project is committed to run under Android. What you need to do to start the desktop version you should already know after reading the article.
I strongly advise starting the development of any program with a product card. From the obligatory - the goal. I am composing a product card in Google Docs and this is how the card looks in our case.
Medieval tycoon
Project objectives
- Demonstration of the game development process for the site habrahabr.ru (public, informational, short-term)
- Creation of materials that subsequently can be used as educational (personal, reputation, long-term; public, informational, long-term)
- Creating the basis for a commercial game (personal, short-term)
- Attracting downloads from Google Play (personal, financial, long-term)
First of all, we try to deal with our motivation as honestly as possible. Why do we even get into this business. What will serve us as a guiding light when everything is good and a kick in the ass when everything is bad. Please try to avoid altruism and “world peace”. The human psyche is structured in such a way that personal motivations matter more than public ones (I do not consider visionary psychology here).
Game world
Middle Ages / Fantasy
Purpose of the game - a lot of money
Resource gathering
Sale
Game Description
Since the first and main goal of this development is to demonstrate the work, both the game world and the description of the game process will be simplified for the sake of brevity and clarity of presentation of the material.
The player collects resources and sells them in the local market. Food / energy is spent on finding and collecting resources. When the energy is over, it must be bought in the city.
Interface prototype
example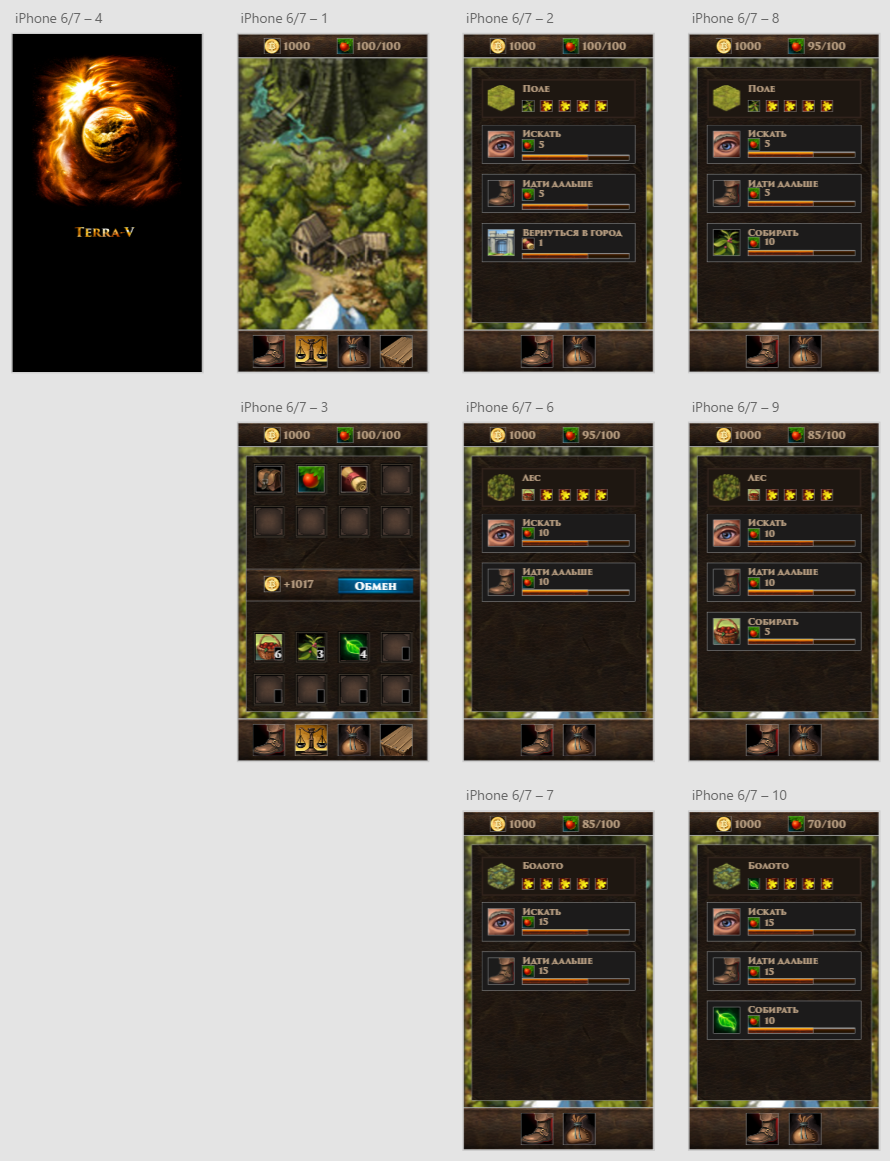
Despite the fact that in a previous article I recommended a notebook and pencil as tools for prototyping, this layout was done in Adobe Experience Design CC (Beta). At the time of publication of the article, it can be downloaded for free. I decided to work with him a day and a half, but I think it is justified. The fact is that the publication on Habré is a group work, even if I do everything alone. The better quality supporting materials I provide, the easier it will be to perceive information. Here is the Adobe Experience Design project file . It can be downloaded, launched in presentation mode and even poked a little on the buttons. Technically, you can file a separate article, but I do not know if this is necessary. Comments will judge.
Well, and what kind of development without a public repository?Here is the link .
To work, we need Android Studio 3.0 (Canary 5 is currently available), Android SKD and LibGDX . I’ll miss the installation of all these shrews, here all the big boys and girls. In extreme cases, there are comments.
The LibGDX configuration wizard starts from the command line:
java -jar gdx-setup.jarProject Options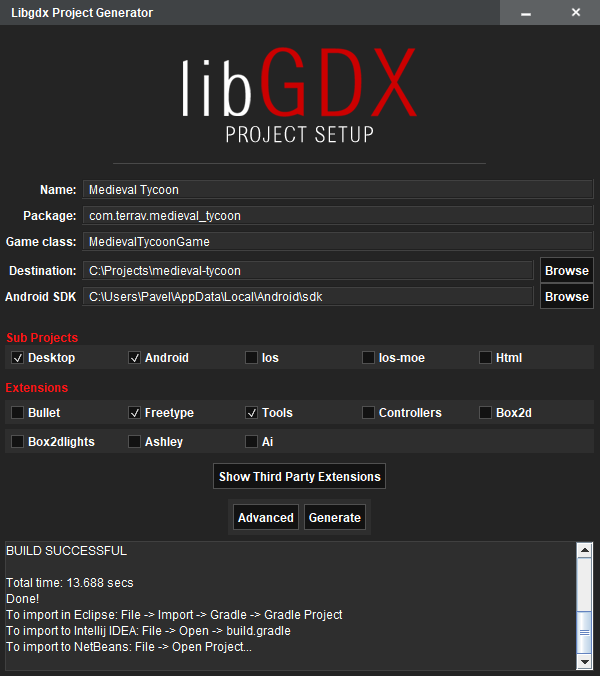
Whoever was not in the know, LibGDX is a cross-platform framework that allows you to write simultaneously under PC, Android, iOS and even HTML (for the latter, we use GWT, and we have Kotlin, so we are definitely not threatened with HTML). I chose two of the extensions:
Freetype - allows you to generate bitmap fonts from ttf / otf
Tools - among other things, allows you to generate atlases of textures. A
commit with the resulting project is available in the repository. I tried to chop and name commits in such a way that it was easy to understand which fragment was responsible for what. Since LibGDX is cross-platform, I prefer to spend most of the development on a PC and test / fix errors for Android immediately before release. As a rule, this work takes no more than 2-3 hours of time.
Further in this article
- Running a project through DesktopLauncher
- Translation of the project on Kotlin
- Kotlin not configured error
- Gradle configuration for kotlin-desktop version
- Portrait orientation configuration for desktop version
- First use of Scene2D. Boot screen, boot scene
Running a project through DesktopLauncher
Configuration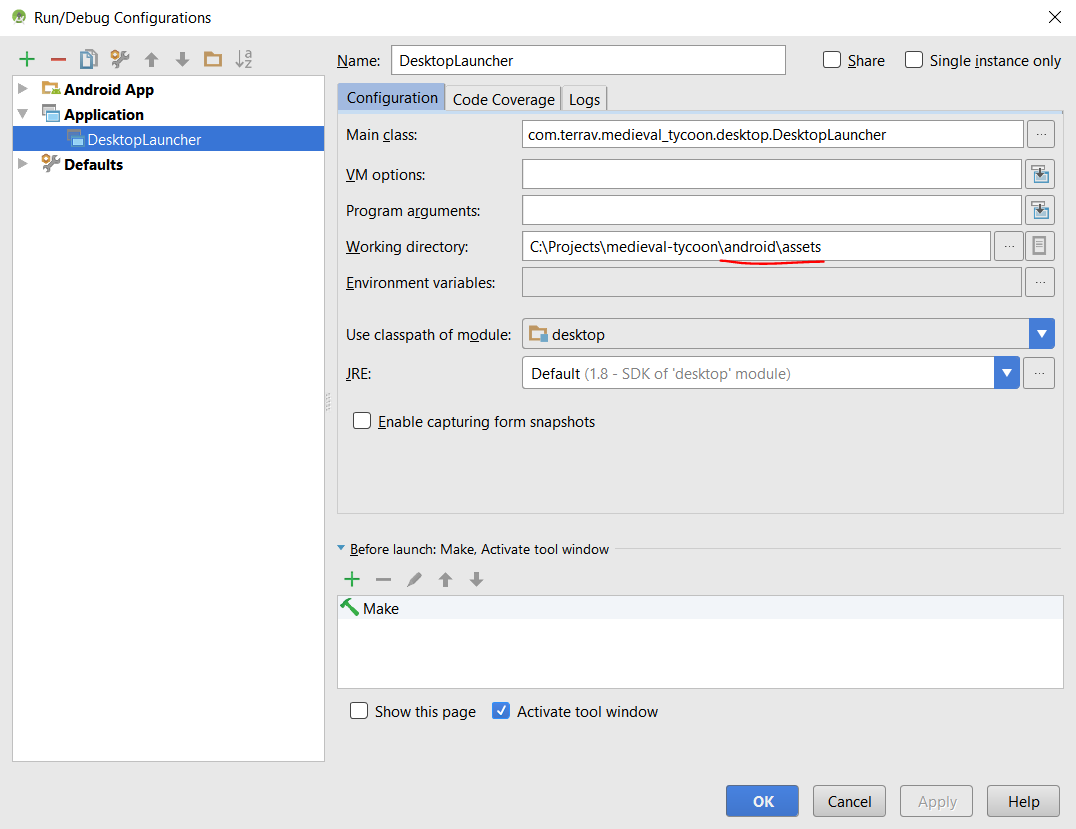
Please note that the working folder for DesktopLauncher is located in android / assets. Launching DesktopLauncher on the commit:
initial commit after libgdx wizard
Please note that even a newly configured project does not start under android. We will fix this in the next step.
Translation of the project on Kotlin
LibGDX projects are configured as multi-module gradle. There is a project build.gradle and modular build.gradle for core, android and desktop. We will write almost all the code in core. In the android project, later we will have AdMob + immersive mode configuration + purchases in the Google Play store.
To transfer a project from java to kotlin, we change all apply plugin: “java” to apply plugin: “kotlin”. In android / build.gradle add apply plugin: 'kotlin-android'. The biggest changes have occurred in the project build.gradle
build.gradle
         mavenCentral()
         maven { url "https://oss.sonatype.org/content/repositories/snapshots/" }
         jcenter()
+
+        maven { url 'https://maven.google.com' }
     }
+
+    ext.kotlin_version = '1.1.3'
+
     dependencies {
-        classpath 'com.android.tools.build:gradle:2.2.0'
-
-
+        // uncomment for desktop version
+        // classpath 'com.android.tools.build:gradle:2.3.2'
+        classpath 'com.android.tools.build:gradle:3.0.0-alpha5'
+        classpath "org.jetbrains.kotlin:kotlin-gradle-plugin:$kotlin_version"
     }
 }
@@ -37,7 +43,7 @@
 }
 project(":desktop") {
-    apply plugin: "java"
+    apply plugin: "kotlin"
     dependencies {
@@ -74,13 +80,13 @@
 }
 project(":core") {
-    apply plugin: "java"
+    apply plugin: "kotlin"
     dependencies {
         compile "com.badlogicgames.gdx:gdx:$gdxVersion"
         compile "com.badlogicgames.gdx:gdx-freetype:$gdxVersion"
-
+        compile "org.jetbrains.kotlin:kotlin-stdlib-jre8:$kotlin_version"
     }
 }
A Google repository was added, kotlin-gradle-plugin was added to buildscript.dependencies, and the compile-dependency kotlin-stdlib (in our case kotlin-stdlib-jre8) was added to the core project.
This version works on android, but it doesn’t work in the desktop version due to an error of Android Studio 3.0 Canary 5. Why do I think this is the reason - launching the gradle of the desktop-run target still launches the application (though it requires running Android device / emulator to run android: run). But launching from Android Studio throws an Exception in thread “main” java.lang.NoClassDefFoundError: kotlin / jvm / internal / Intrinsics. If anyone can defeat the launch of DesktopLauncher with the latest version of gradle - please let me know!
Translation of java files into kt is elementary - select the file / folder and press Ctrl + Alt + Shitf + K. The only error that you will encounter after this operation is the request of Kotlin to initialize the property at the time of definition:
java
public class MedievalTycoonGame extends ApplicationAdapter {
	SpriteBatch batch;
	Texture img;
	@Override
	public void create () {
		batch = new SpriteBatch();
		img = new Texture("badlogic.jpg");
	}
	@Override
	public void render () {
		Gdx.gl.glClearColor(1, 0, 0, 1);
		Gdx.gl.glClear(GL20.GL_COLOR_BUFFER_BIT);
		batch.begin();
		batch.draw(img, 0, 0);
		batch.end();
	}
	@Override
	public void dispose () {
		batch.dispose();
		img.dispose();
	}
}
kotlin
class MedievalTycoonGame : ApplicationAdapter() {
    internal var batch: SpriteBatch // ошибка тут <- следует заменить на private lateinit var batch: SpriteBatch
    internal var img: Texture // ошибка тут <- следует заменить на private lateinit var img: Texture
    override fun create() {
        batch = SpriteBatch()
        img = Texture("badlogic.jpg")
    }
    override fun render() {
        Gdx.gl.glClearColor(1f, 0f, 0f, 1f)
        Gdx.gl.glClear(GL20.GL_COLOR_BUFFER_BIT)
        batch.begin()
        batch.draw(img, 0f, 0f)
        batch.end()
    }
    override fun dispose() {
        batch.dispose()
        img.dispose()
    }
}
internal = package visibility in java. We do not need batch visibility (and in general, after a couple of commits we will delete these fields). Not in all cases we can initialize the field right away, and making it nullable is generally stupid (we are interested in kotlin just because of null-safety). For this, kotlin has a lateinit modifier, which tells the compiler what the programmer gives the tooth, at the time of using this field it will not be null. This is the so-called syntactic salt. In general, if you look at this code not as a result of automatic conversion, then it would be more appropriate to look:
private val batch = SpriteBatch()
private val img = Texture("badlogic.jpg")
Kotlin not configured error
You will see this error every time you start Android Studio. Just click sync gradle:
Gradle configuration for kotlin-desktop version
As I said, I prefer to develop a desktop version of the application, and by changing a couple of lines we will reanimate this mode. All you need is to specify in the project build.gradle
classpath 'com.android.tools.build:gradle:2.3.2', and in gradle-wrapper.properties the version of gradle-3.3-all.zip
Portrait orientation configuration for desktop version
In DesktopLauncher add a handful of configuration options. Three relate to window size and resizing options. The fourth vSync parameter is disabled since there is a glitch, on some video cards in desktop and only on config.foregroundFPS = 60 (by default), it loads one processor core at 100%.
        config.width = 576
        config.height = 1024
        config.resizable = false
        config.vSyncEnabled = false
First use of Scene2D. Boot screen, boot scene
So we got to the first use of Scene2D. Briefly a few words for what it is intended and what you can want from it.
Scene2D is a graph (tree) of elements and is intended primarily for creating a UI. Right out of the box, you get the ability to typeset, transform elements (rotation, scale, shift, etc.). A huge plus is the handling of touches. Well, the cherry on the cake is a system of actions. With an incomprehensible definition we have finished, now the same thing in human language.
There is a scene, it takes up the whole screen. On the stage, you can place a table, a picture in the table, a scroll bar, a dozen buttons and even a bald dash (the main thing is that in your heart he is an Actor). Using the magic words top / center / left / width etc. you implement layout. An example is more complicated than hello world will be only tomorrow, and so the article turned out great. Further on any arbitrary element you hang a touch handler and it works. You do not need to manually catch the coordinates of the click, check what is there, what the z-index objects, etc. But again, about it tomorrow. And today, just a few code snippets in the end:
class MedievalTycoonGame : Game() {
    val viewport: FitViewport = FitViewport(AppConstants.APP_WIDTH, AppConstants.APP_HEIGHT)
    override fun create() {
        screen = LoadingScreen(viewport)
    }
}
Our MedievalTycoonGame class now inherits from Game, whose entire task is to put the work on Screen. The first screen that we will now show the user will be called LoadingScreen and will contain one scene - LoadingStage. Because these classes are not supposed to grow, I will place them in one file LoadingScreen.kt
LoadingScreen.kt
class LoadingScreen(val viewport: Viewport) : ScreenAdapter() {
    private val loadingStage = LoadingStage(viewport)
    override fun render(delta: Float) {
        Gdx.gl.glClearColor(0f, 0f, 0f, 0f)
        Gdx.gl.glClear(GL20.GL_COLOR_BUFFER_BIT)
        loadingStage.act()
        loadingStage.draw()
    }
    override fun resize(width: Int, height: Int) {
        viewport.update(width, height)
    }
}
class LoadingStage(viewport: Viewport) : Stage(viewport) {
    init {
        val backgroundImage = Image(Texture("backgrounds/loading-logo.png"))
        addActor(backgroundImage.apply {
            setFillParent(true)
            setScaling(Scaling.fill)
        })
    }
}
All that LoadingScreen does is overwrite the screen with black and call the act () and draw () methods of LoadingStage. On act () it is very convenient to hang the program logic, work with data. Draw () is just drawing all the elements in the scene.
The only thing I want to emphasize is how the java vs kotlin scene initialization looks
    init {
        val backgroundImage = Image(Texture("backgrounds/loading-logo.png"))
        addActor(backgroundImage.apply {
            setFillParent(true)
            setScaling(Scaling.fill)
        })
    }
    public LoadingStage() {
        Image backgroundImage = new Image(new Texture("backgrounds/loading-logo.png"));
        backgroundImage.setFillParent(true);
        backgroundImage.setScaling(Scaling.fill);
        addActor(backgroundImage);
    }
In the case of kotlin, we always initialize the element and place it on adjacent lines. This is achieved through the apply extension function. The hierarchy in kotlin automatically indents and is visually very easy to read. In java, all typesetting is indented. Initializing an element and placing it is often not possible side by side. If the hierarchy consists of 3+ levels of depth, it is impossible to organize elements beautifully (and cheaply in support) in java.
That's all for today. Consider this article as an introduction, the actual disclosure of Scene2D and the implementation of the game will be tomorrow and beyond. Thank you for being with us;) And not for the sake of advertising (in this application you need to make an effort to see the advertisement), my first Pyatnashki project on Scene2D when I was just learning it. Of the advantages - ease of management. There are hundreds if not thousands of versions of the application and in 90% that I saw the movement of chips is possible only by pushing into the adjacent to an empty cell. Try to collect a cat .
screen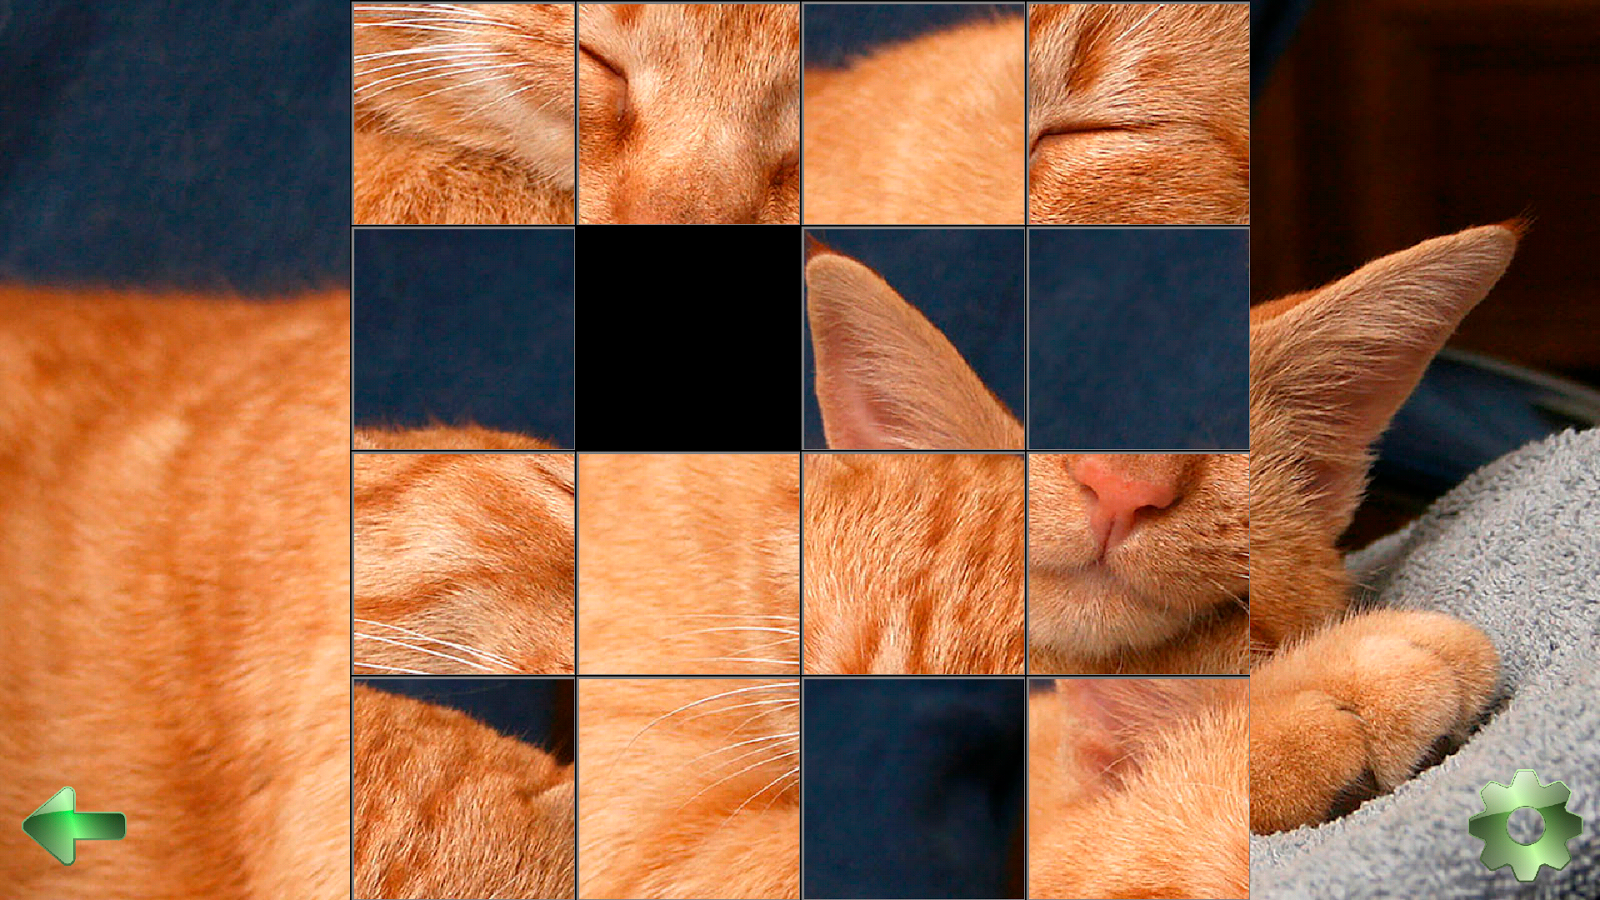
In the following articles
- The basic elements of Scene2D
- Two basic layout containers
- Texture atlas
- Skins
- Internationalization
PS The loading screen used the work of the artist Vitaly Samarin aka Vitaly S Alexius.
Upd:
link to the sources of the Fifteen
the horrors of our town
I warn you right away, the code is scary. So we will not write. Parses the picture on the fly, i.e. You can correct the code so that the image is sucked in by URL. The project is committed to run under Android. What you need to do to start the desktop version you should already know after reading the article.









