Openfire + Miranda NG. One-click remote assistance and a couple more features
- Tutorial

This article is a remake of several old notes on how, using Miranda, to simplify regular tasks for user support. In the article, you will not find the 1001th how to install Openfire on linux with pass-through authentication, but it will describe what it does:
?replace(?dbsetting(%subject%,?cinfo(%subject%,protocol),MirVer),Miranda NG Jabber 0.95.5.17337 x86 [,,],)And how, using this garbage, to get remote access to the user desktop, for example, using the same VNC or radmin tools, simply by clicking on the desired icon right in the conversation window with the user.
Source data: Debian 7, Openfire 4.1.3, Miranda NG 0.95.5.
The goal in the example is to automatically launch the remote assistant (msra) with the connection to the right user directly from the Miranda interface. Immediately make a reservation that all the credentials for access, if necessary, you will need to enter additionally, i.e. these tricks have no effect on safety.
So, Openfire is already configured on debian, and Miranda NG out of the box with a “domain login” button and without registry tweaks, clings to the server without entering credentials. It is also indicated to use the computer name as a resource. We are required to take the stock Miranda and finish it with a certain “admin” functionality. To simplify, I will call the assembly: admin and user. I draw your attention to the fact that any other is suitable as a custom one. The main thing is that somewhere in the MirVer field there should be a “resource” field, and the computer name should act as a resource, but more on that below. Remote Assistance should already work. I repeat, Miranda in our case is just a convenient interface-add-on.
It looks something like this: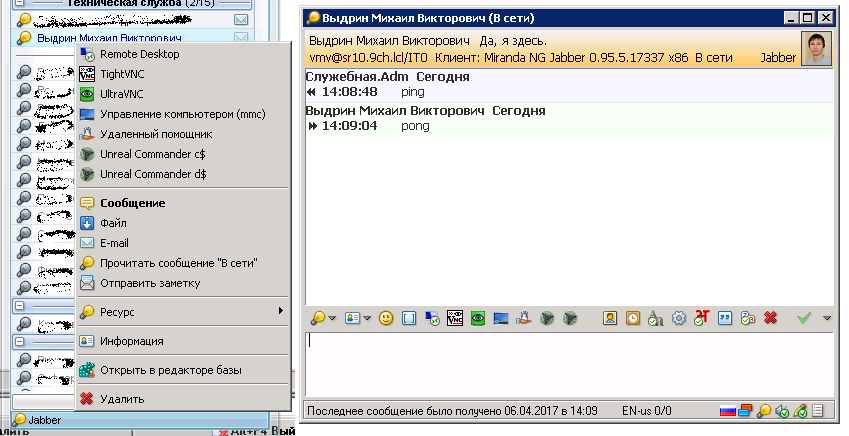
First of all, download the current (at the time of writing 0.95.5) stable Miranda NG , as well as the necessary plugins : Actman and Variables. This is the minimum necessary, but in my assembly I will show a few others with which it becomes fun to live. We add the plugins to the Plugins folder, restart the Miranda, and now point by point.
1) The main window for working with custom actions inside the Miranda is Settings → Services → Actions → Actions . With the upper green plus, create a new script (F2 for renaming), and with the bottom add the “Run” action to it (select in the upper right).
Actions window
2) To start the remote assistant, execute msra / offerra computer_name . The "Run" deystiva contains 2 fields - the path and the arguments. The first is the standard way.
%SystemRoot%\system32\msra.exeand in the second it is required to indicate that we immediately want to connect to the specified station, passing as the last argument the parsed name of the camp from the MirVer field of a particular user. In the current Miranda NG, "MirVer" takes on a value.
Miranda NG Jabber 0.95.5.17337 x86 [ресурс]And we agreed that the name of the computer acts as a resource. Hereinafter, as an example, the resource will be WS01. Note that the second field should be marked as a script (S button, see screen above), otherwise the magic of the variables will not work.
3) You can get to the Help for Variables help either from Settings - Services → Variables → the blue V button , or the same V icon by pressing the S / T buttons directly from the Actions dialog.
In the contact properties, the MirVer value looks like Miranda NG Jabber 0.95.5.17337 x86 [WS01] . The point is to find the occurrences of " Miranda NG Jabber 0.95.5.17337 x86 [ " and " ] ", replace them with an empty string and get only WS01 in the output. Code for command line parameter and name lookup:
/offerra ?replace(?dbsetting(%subject%,?cinfo(%subject%,protocol),MirVer),Miranda NG Jabber 0.95.5.17337 x86 [,,],)Note that by pressing the S | T buttons, you will be taken to a "text editor" in which line breaks are allowed, and the result will still be written on one line. Just do not forget about the gaps where you need and where you do not need.
Text editor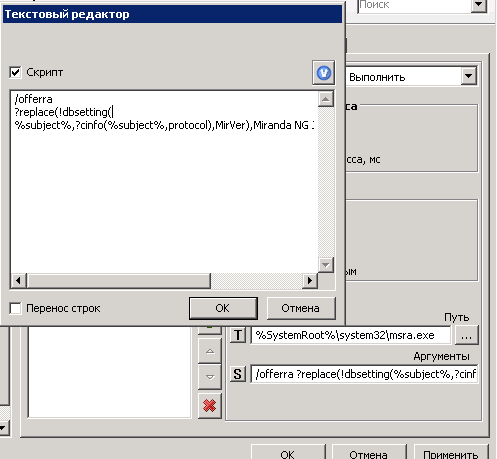
? replace (x, y, z, ...) - replacement of all occurrences of Y in X with Z, multiple arguments Y and Z are possible.
Everything is clear here. We are looking in MirVer for a couple of the required entries above and changing it to "empty". But how to get the right contact MirVer? It will help us
:? Dbsettings (x, y, z, w) - get the Z setting of the plugin Y of contact X or return W if z does not exist (w is optional).
Yeah, it’s better, but it’s not clear. Here the special contact % subject% comes to the rescue , a description of which you will find on the second tab of the “Help with Variables” window. So, choosing a contact, the marker% subject% takes the value of this contact. Conditionally, we communicate with the user, and in% subject% lies information about this particular contact. Where to get Xfor? dbsettings () sorted out.
Now we need to find out the values of the jabber plugin for Y (after all, we are jabbering and talking) from the selected contact
:? Cinfo (x, y) is the information property of contact X. Again, take% subject% and look for the protocol property that will contain the information about the current protocol used, in the property values of which you can find the necessary MirVer field. We received the Y .
Well, with the value of Z we indicate that we want to see just MirVer. W is not needed.
That's it, they got the value Miranda NG Jabber 0.95.5.17337 x86 [WS01] , naturally the name of the camp inside the square brackets for each contact will be different .
And then at the found sink we change? Replace`om 'Miranda NG Jabber 0.95.5.17337 x86 [' to ' empty ' and '] change' empty 'to, i.e. remove unnecessary. The output is pure WS01 , which will be substituted in msra / offerra WS01 .
4) The penultimate step is to go to Settings → Services → Actions → Using actions and mark where we want to see the remote assistant button. In my case, this is a panel of buttons in the message window for direct correspondence with the user and for the right button on a contact in the roster.
Using Actions
5) It remains to tighten the prettiness, because in the heap of custom buttons it will be easier to find the remote assistant if he has his own familiar icon. Settings → Icons → Actions → Registered Actions → Import Icons . Specify the file containing the icon you are looking for, and simply drag it to the desired action. And really convenient.
Custom icon for action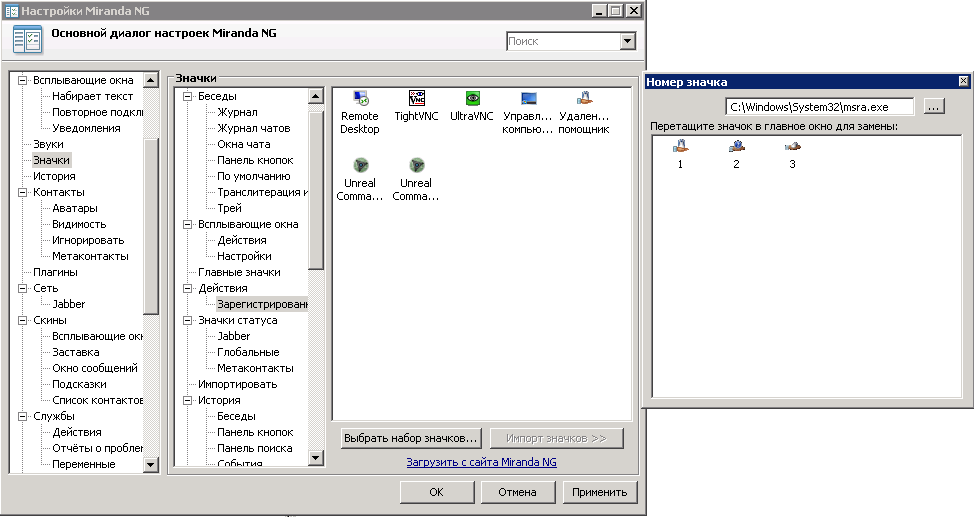
UPD from: MagicEx and Abyss777 Allows you to work with any MirVer, provided that the resource is in square brackets
long from @MagicEx
strchr (! dbsetting (% subject% ,? cinfo (% subject%, protocol), jid), @), 1))? substr (! dbsetting (% subject% ,? cinfo (% subject%, protocol), MirVer) ,? add (? strchr (! dbsetting (% subject% ,? cinfo (% subject%, protocol), MirVer), [), 1) ,? sub (? strchr (! dbsetting (% subject% ,? cinfo (% subject%, protocol), MirVer),]), 1))
short on regexp from @ Abyss777
?regexp_substr( \[(.*)\],!dbsetting(%subject%,!cinfo(%subject%,protocol),MirVer),1)That's all with the remote assistant, check how it works. You can practice with a couple of other utilities:
Remote Desktop
%SystemRoot%\system32\mstsc.exe
/v:?replace(?dbsetting(%subject%,?cinfo(%subject%,protocol),MirVer),Miranda NG Jabber 0.95.5.17337 x86 [,,],)
Computer Management Snap
mmc.exe
compmgmt.msc /computer=?replace(?dbsetting(%subject%,?cinfo(%subject%,protocol),MirVer),Miranda NG Jabber 0.95.5.17337 x86 [,,],)
UltraVNC
C:\Program Files (x86)\uvnc bvba\UltraVnc\vncviewer.exe
?replace(!dbsetting(%subject%,?cinfo(%subject%,protocol),MirVer),Miranda NG Jabber 0.95.5.17337 x86 [,,],)
Do not forget that third-party software like UltraVNC must be installed in the system.
Everything seems to be cool. But what if the client sits on a different subnet, and indeed has its own DNS suffix? We’ll leave the issue of access to the desired subnet to the gateway, but with a suffix it’s more difficult, because there is nothing about the DNS in the resource name, and it’s impossible to reach the user in another city by name alone, you need the whole FQDN. Fortunately, the Miranda with Actman and Variables plugins is so cool that there is a solution. Now in a nutshell I’ll tell you how, and for convenience, I formatted the code:
?puts(comp,?replace(?dbsetting(%subject%,?cinfo(%subject%,protocol),MirVer),Miranda NG Jabber 0.95.5.17337 x86 [,,],))
?if(?stricmp(?dbsetting(%subject%,CList,Group),Юпитер),
	?puts(grp,.jup.com),
	?if(?stricmp(?dbsetting(%subject%,CList,Group),Марс),
		?puts(grp,.mars.com),
		?if(?stricmp(?dbsetting(%subject%,CList,Group),Венера),
			?puts(grp,.venus.com),
		?puts(grp,.earth.com)
		)
	)
)
?insert(?get(comp),?get(grp),?len(?get(comp)))
The general sense here is to add the appropriate DNS suffix depending on the roster group in which the user is located. The example uses three groups: Jupiter (.jup.com), Mars (.mars.com), Venus (.venus.com), and Earth (.earth.com), if the user does not belong to any of these groups .
1) The first line is used to search for the computer name, we passed it with the only difference, that now using ? Puts () we write the computer name into the comp variable
? puts (x, y)
? puts (x, y) - saves Y as a variable named X
?puts(comp,?replace(?dbsetting(%subject%,?cinfo(%subject%,protocol),MirVer),Miranda NG Jabber 0.95.5.17337 x86 [,,],))2) with the help of nested operators ? If () we are looking for correspondence to groups, suddenly the user in one of them
? if (x, y, z)
. ? if (x, y, z) - shows Y, if X is TRUE, otherwise shows Z
Through ? Stricmp () check, whether with our fellow Jupiter and, if so, with the help of a friend? Puts () assign a variable «grp» value " .jup.com "
? stricmp (x, y)
? stricmp (x, y) - true if X = Y, case insensitive
?stricmp(?dbsetting(%subject%,CList,Group),Юпитер),?puts(grp,.jup.com)If not from Jupiter, then the next block of comparison is performed and, by analogy, another. As a result, if the user is not found on the three desired planets, then by default we assume that he is from Earth and assign the value .earth.com to the grp variable .
3) The final operator ? Insert () through ? Get () `s glues the computer name with the domain name, in the end we get the desired FQDN
? insert (x, y, z)? get (x)
? insert (x, y, z) - inserts the string Y at the position Z in the string X
? get (x) is the variable specified by put with the name X
? get (x) is the variable specified by put with the name X
?insert(?get(comp),?get(grp),?len(?get(comp)))? insert () is a hack to output the resulting value, since no echo and others are provided.
Naturally, the number of nested statements may be different, depending on your need.
As you can see, using Variables and Actions in the Miranda you can do all sorts of cool things, and the functionality is by no means limited to running applications with arguments. Other features if you wish, you will consider yourself. It is easiest to search for the required protocol values and other things through the plugin editor of the DbEditorPP database . Actually, through this plugin, I opened the necessary property for? Cinfo (x, y), and indeed this tool will come in handy more than once.
I post the finished user assembly with my settings and additional plugins, with which work in the Miranda becomes more convenient. I draw your attention to the fact that only plugins, emoticons and a couple of little things are added to the stock Miranda NG, the rest is twisted through Settings. The emphasis was on minimal changes in pure Miranda. The user assembly is more customized because you need to enable or disable a bunch of everything that the user then does not do, and a competent employee in the admin assembly will figure it out himself.
UPD: Admin build as requested in the comments. Differences from the user:
1) Added three plugins: ActMan, Variables, DbEditorPP
2) Added Remote Assistance
3) Renamed the profile directory and removed the launcher
I do not knowingly give a link to the admin assembly, as I have it is very changed from the original and it will be dreary to clean out everything. It will be correct to add a couple of plug-ins to the user version and copy-paste a couple of lines from the examples. But if necessary, tell me, lay out.
In the end, the promised couple of features
Miranda, due to the peculiarities of architecture, has difficulties with updating when used in a corporate environment. The update is done by PluginUpdater, which simply does not have the rights to write something to ProgramFiles, where the Miranda is installed. The option when the user has write permissions to the installation directory is not considered. As a result, we have a scheme according to which Miranda NG itself is deployed in% ProgramFiles%, and the user profile lies in the Orthodox faithful% ApplicationData%. As I already said, the peculiarity is that the settings, although they are in the user profile, are strongly tied to the version of the kernel and plug-ins, as a result, if you just roll over a new build, then there is an unlucky chance that everything will break. There are two options: do not update anything at all or update, but recreate the user’s Miranda profile. Both options are bad. In one case, security suffers, in the second, the user loses history, which is also a fail. And if everything is clear with the first, then I will dwell on the update in detail.
I refused the full-time Miranda installer, which is Inno Setup, in favor of a custom script to copy my own assembly. I will explain why. All required software is deployed using WSUS via LUP ( WPP), but in the case of Miranda sometimes, especially at the testing stage, it is often necessary to update the assembly to the test group of users, and the profile with the settings will remain old in any case, i.e. You need to finish it also. In short, I decided to do it easier. The deployment script looks at the version of the Miranda on the server, and if it is larger than the installed one in the system, it stupidly bangs it and writes a new one. The ini-file with the version is here MirandaNGCorpMod \ Profiles \ jabber \ profile_settings.ini. Further, the custom launcher, with the help of which the Miranda is launched, looks into the installation directory and, if the version is newer than in the user’s profile, then the profile crashes and launches the Miranda. Miranda herself, using setting-cln.ini with a missing profile, creates a new one with the necessary settings. In general, all settings that differ from default are made by settings.ini, and in Mirandaboot. ini said this. Next, the launcher waits a couple more seconds and writes the new version to the profile directory (just in case, a plus is 12 attempts in increments of 5 seconds).
The deployment script should lie next to the miranda directory, the launcher should be in the directory next to miranda32.exe
Script to copy the user assembly to AutoIT:
NoTrayIcon
;read current miranda version in ProgramFiles. If error - 0000
$MirCurVer = IniRead(@ProgramFilesDir & '\MirandaNGCorpMod\Profiles\jabber\profile_settings.ini','MirandaNGCorpMod','version','0000')
;read new miranda version in ScriptDir. If error - 0001
$MirNewVer = IniRead(@ScriptDir & '\MirandaNGCorpMod\Profiles\jabber\profile_settings.ini','MirandaNGCorpMod','version','0001')
If $MirNewVer > $MirCurVer Then
	DirRemove(@ProgramFilesDir & '\MirandaNGCorpMod',1)
	Sleep(300)
	DirCopy(@ScriptDir & '\MirandaNGCorpMod',@ProgramFilesDir & '\MirandaNGCorpMod')
	FileCreateShortcut(@ProgramFilesDir & '\MirandaNGCorpMod\miranda_launch.exe',@DesktopCommonDir & '\MirandaNGCorpMod.lnk')
	FileCreateShortcut(@ProgramFilesDir & '\MirandaNGCorpMod\miranda_launch.exe',@StartupCommonDir & '\MirandaNGCorpMod.lnk')
EndIf
Launcher Code:
#NoTrayIcon
$sMirandaOptions = ''
;check for command line options for Miranda32.exe
If $cmdline[0] > 0 Then
	For $i = 1 To $cmdline[0] Step 1
		$sMirandaOptions = $sMirandaOptions & ' ' & $cmdline[$i]
	Next
EndIf
;read current miranda version. If error - 0000
$MirCurVer = IniRead(@AppDataDir & '\MirandaNGCorpMod\jabber\profile_settings.ini','MirandaNGCorpMod','version','0000')
;read new miranda version. If error - 0001
$MirNewVer = IniRead(@ProgramFilesDir & '\MirandaNGCorpMod\Profiles\jabber\profile_settings.ini','MirandaNGCorpMod','version','0001')
;if exists version in AppData less than ProgramFiles version, remove MirandaNG profile
If $MirNewVer > $MirCurVer Then
	DirRemove(@AppDataDir & '\MirandaNGCorpMod',1)
	Sleep(300)
EndIf
;run miranda with command line parameters
Run(@ScriptDir & '\miranda32.exe ' & $sMirandaOptions)
Sleep(2000)
;whaiting for miranda creates default profile "jabber.dat". 12 retries, 5 seconds per step
For $i = 1 To 12 Step 1
	If FileExists(@AppDataDir & '\MirandaNGCorpMod\jabber\jabber.dat') Then
		;copy current "profile_settings.ini" to new profile
		FileCopy(@ProgramFilesDir & '\MirandaNGCorpMod\Profiles\jabber\profile_settings.ini',@AppDataDir & '\MirandaNGCorpMod\jabber\profile_settings.ini')
		Exit
	EndIf
	Sleep(5000)
Next
If you need collected versions, tell me, lay out.
In assemblies, you need to enable auto-connection at startup Settings → Status → Initial status → Status profiles → in the Status window indicate “Online” and change the LoginServer parameter to your jabber server. This can be done through the Miranda settings or by editing the setting-cln.ini file. Well, before the heap you can change or remove the screensaver at the start.
That's all about Miranda, but I can't help but turn on the hint how to fasten photos of users from ActiveDitectoty :
all matches are random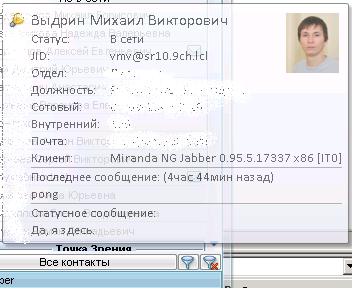
I will make a reservation, the version of the circuit is not lower than Win2008R2.
1) Enable replica in the GC for the thumbnailPhoto attribute (optional, but worth it)
windowsitpro.com/active-directory/q-how-can-i-add-pictures-my-users-active-directory-ad
You can use the same link add via PS, but inconveniently, drive onto PS, go ahead:
2) Download and install software for uploading photos to AD www.codetwo.com/freeware/active-directory-photos Free, you can install it anywhere, but run with admin rights domain.
3) In the OpenFire console, twist the parameters:
ldap.override.avatar true
and edit the parameter in vCard so that it looks like this:
image/jpeg {thumbnailPhoto} 4) Restarting OpenFire and MirandaNG sees avatars out of the box, but the user must connect to the jabber at least once.
Well now for sure. I hope the article will be useful, and welcome to comments.