Extract audio data from a wav file to UWP
- Tutorial
Today we present material from our long-standing partners, the company Music Paradise, which, as you recall, has already shared with Habr the secrets of creating music applications in our joint article “ Integrating social services into a non-gaming application ”. This time, experts from the team will talk about the specifics of the implementation of the basic functions of the Audio Editor utility, originally written for iOS and Mac devices, on the new platform - Windows - and about the method that they used to adapt.
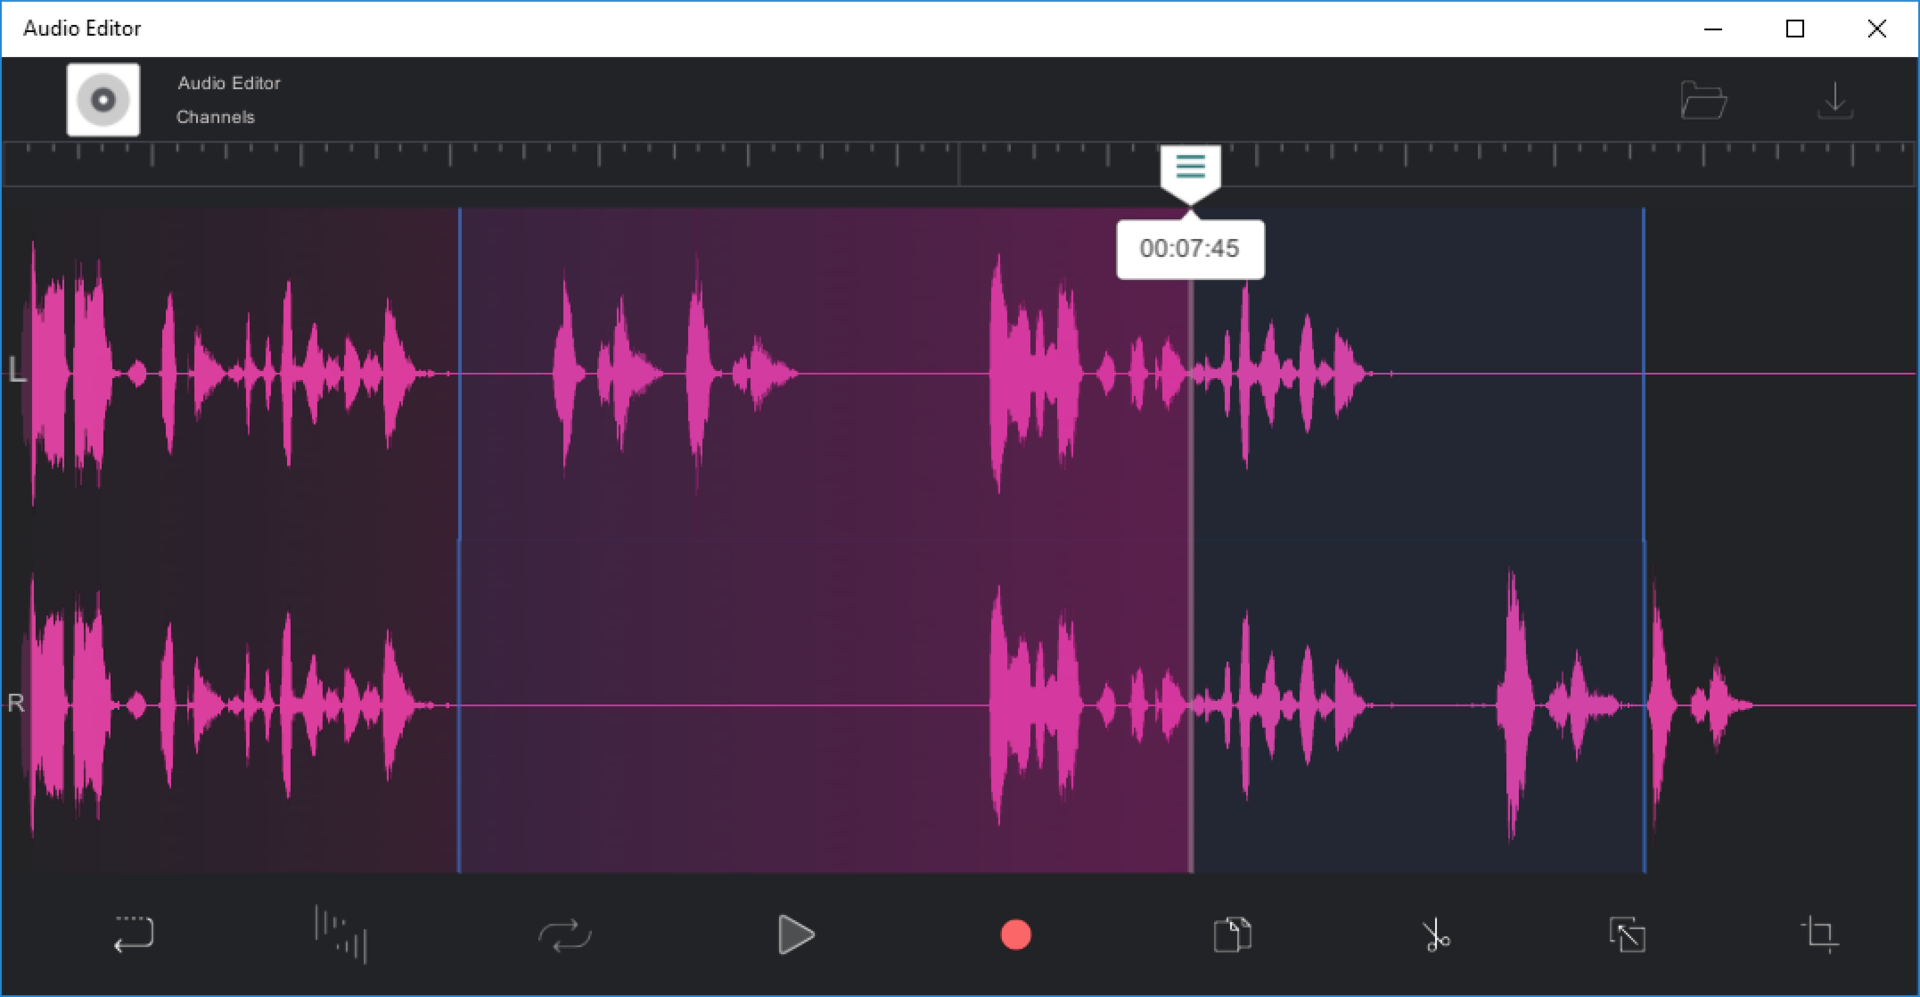
“In this article we will look at one of the most affordable ways to get audio data from a file. Extracting audio data is the cornerstone for all developers who take the first steps in working with sound, but surprisingly little attention is paid to it. The problem is felt especially sharply when trying to find ready-made solutions or instructions for UWP on the Internet: in most cases you don’t get an answer at all, or you have to be content with outdated solutions. Meanwhile, when working with sound, data extraction makes significant sense, giving the developer the ability to edit data: copy, add, change, by applying effects, visualize them on the user's screen. It is about visualization that will be discussed today. Despite the existence of special libraries for working with audio data in the NuGet gallery, we will build the application logic on independent processing of bytes of the audio file. Thus, in the process we learn more about the structure of the wav file and make sure in practice that working with audio data is not so difficult.
So, in order to achieve the goal, namely to build a graphical display of the audio wave, we must first extract the data. The process will be described using the example of a wav file, as this is one of the most convenient audio formats for work.
However, you and I understand that the world of digital audio is too large to be able to reduce everything to working with a single format. Therefore, we immediately stipulate an additional step: if we got a file of any other format, we first convert it to wav. Do not worry, this process usually does not take a lot of time.
We implement the simplest interface by adding two buttons to MainPage.xaml:
We describe the algorithm that will be executed by clicking on the button “Choose Audio File”. To do this, add the following lines to MainPage.xaml.cs:
Note : a similar method can be used for video formats, which is also sometimes very useful.
Now that the custom wav-file has become available, you need to get audio data from it, for which we all started this. To do this, you have to delve into the file structure. Going deep into theory, we see no reason - such information on the Internet is more than enough, you can always get the information you are interested in there. We limit ourselves to outlining the general structure of the file in order to clarify the logic of further implementation.
So, the structure of an uncompressed audio file in a pulse-code modulation (PCM) format is as follows:

Now let's move on to the algorithm for obtaining audio data. In the work, we will rely on the following resource .
Let's describe a class with the symbolic name "WavFile":
Note : a similar method will give us the opportunity not only to visualize audio data, but also to edit them. By the way, it is not difficult to organize the reverse process of saving data, for this it is enough to use the FileStream class again and sequentially write the received data to a file.
Note: you most likely noticed that in the description of the algorithm we deviated from the above structure of the wav-file. This is due to the fact that the file obtained by conversion has a slightly different structure. In particular, a section is added that does not matter much to us - it stores id, size and format information, followed by a sequence of zero bytes. The unnecessary section is skipped by sorting the bytes in the loop and comparing them with the value 544501094 (this is the necessary value of the Subchunk1Id field, from which the Format section begins). A similar search is necessary for the reason that the above structure is exemplary, but not mandatory, and sometimes depart from it.
Finally, after receiving the data, we can proceed to the final step - the construction of the schedule. There are several ways, here are two of the most common:
Let us dwell on them in more detail. Despite the resource cost, the first way to build images is popular on the Web when demonstrating certain examples of working with audio tracks. It may not be bad for building small graphs, but it becomes irrational when it comes to displaying the wave image of the entire audio track on the screen. Therefore, this option does not suit us.
The second method is less resource intensive and involves using unsafe code. Based on the result of the work, we will get an image that we can use in our application or, for example, save to a hard disk for future use.
Instructions on how to work with bitmaps in the UWP, available at link. Describing our logic for constructing the image of the audio file, we will be largely based on this material.
Add the structure and class described above to the project:
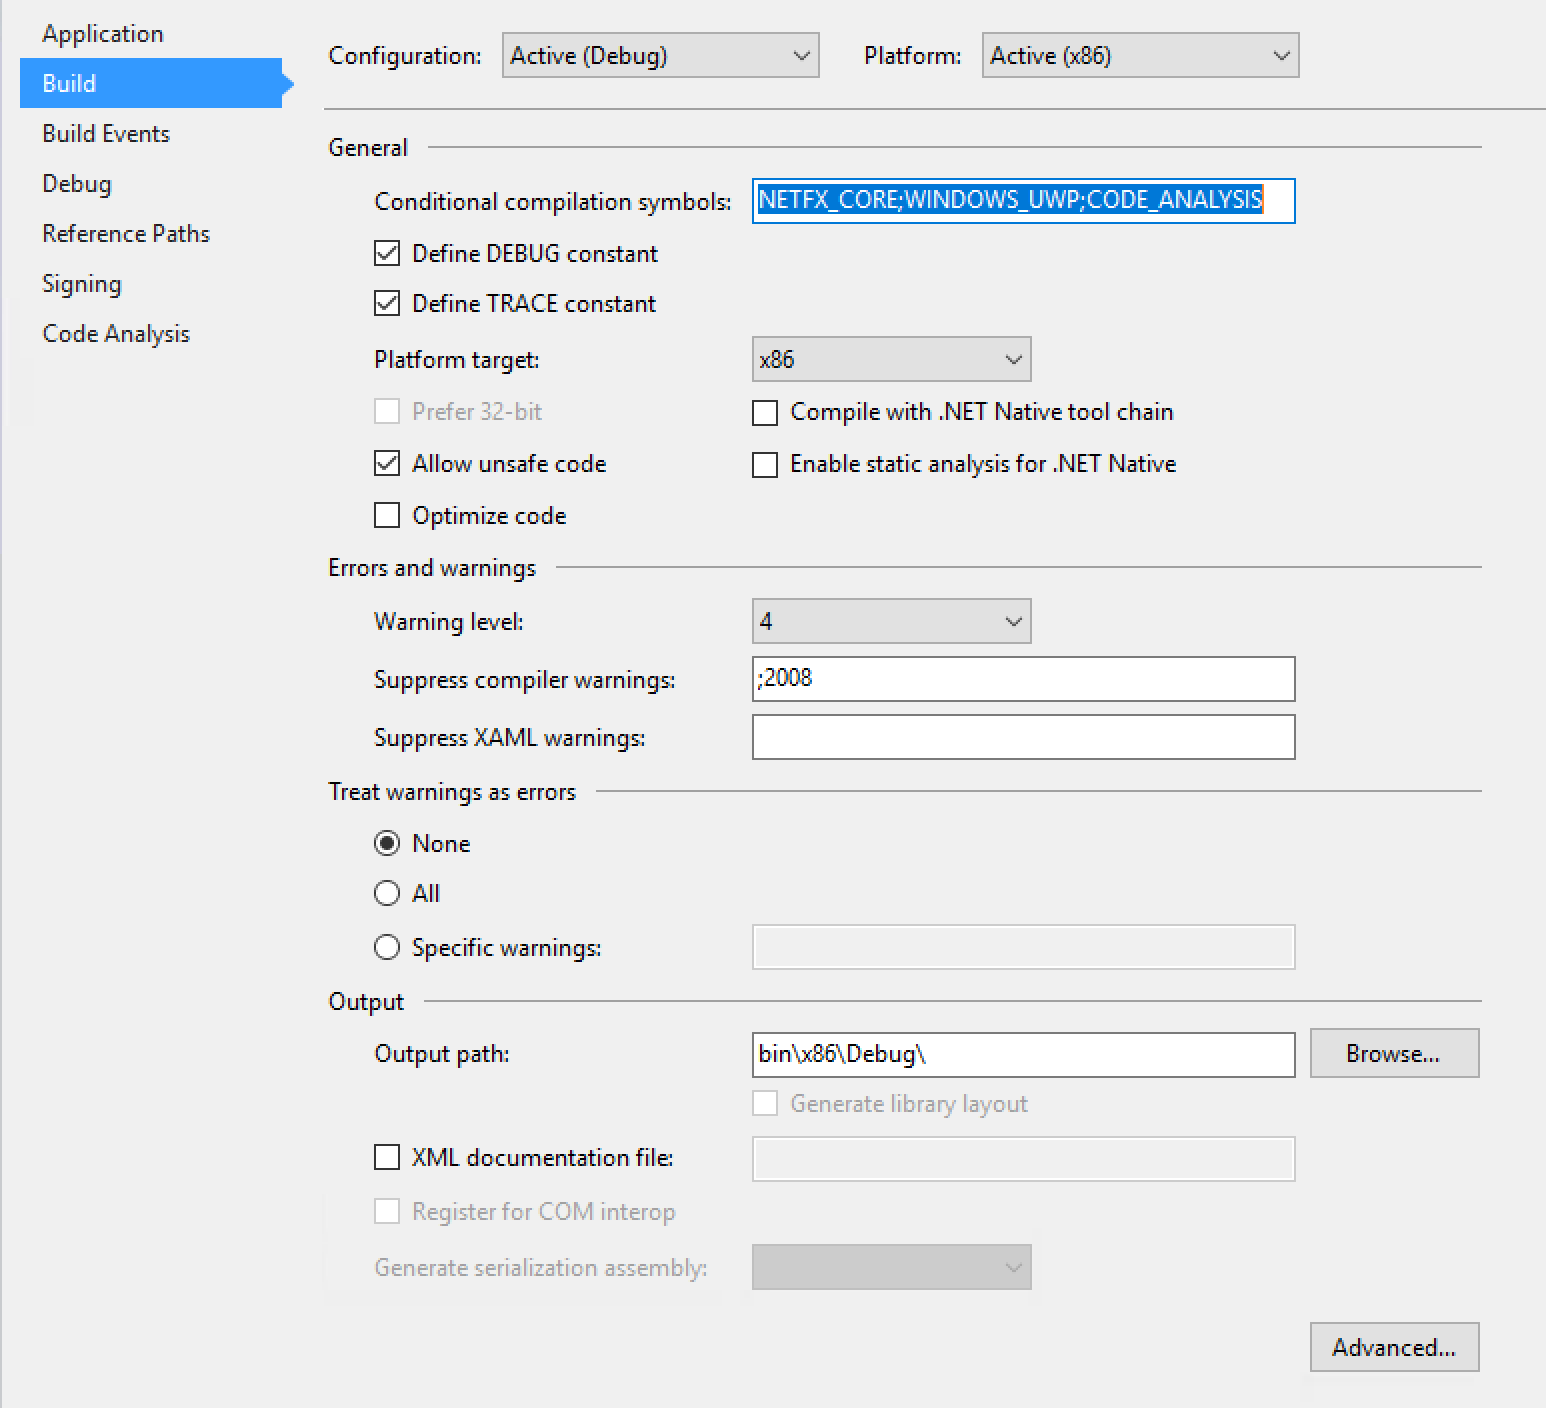
Note : do not forget to enable unsafe code in the project properties (right-click on the project, select Properties in the console menu that appears, then activate the Build tab in the window that opens and check the Allow unsafe code field, see below).

So, we examined the scheme for receiving audio data and plotting. Now all that remains is to call it from the MainPage class. To do this, we need the “Build And Save Image File” button, by clicking on which the operation algorithm prescribed by us will be launched. To implement it, we add the method presented above to the lines entered in MainPage.xaml.cs earlier:
Check the project for errors and libraries not added, and then run it. According to the result of the work, we get such an image for the selected audio file. ”

“In this article we will look at one of the most affordable ways to get audio data from a file. Extracting audio data is the cornerstone for all developers who take the first steps in working with sound, but surprisingly little attention is paid to it. The problem is felt especially sharply when trying to find ready-made solutions or instructions for UWP on the Internet: in most cases you don’t get an answer at all, or you have to be content with outdated solutions. Meanwhile, when working with sound, data extraction makes significant sense, giving the developer the ability to edit data: copy, add, change, by applying effects, visualize them on the user's screen. It is about visualization that will be discussed today. Despite the existence of special libraries for working with audio data in the NuGet gallery, we will build the application logic on independent processing of bytes of the audio file. Thus, in the process we learn more about the structure of the wav file and make sure in practice that working with audio data is not so difficult.
So, in order to achieve the goal, namely to build a graphical display of the audio wave, we must first extract the data. The process will be described using the example of a wav file, as this is one of the most convenient audio formats for work.
However, you and I understand that the world of digital audio is too large to be able to reduce everything to working with a single format. Therefore, we immediately stipulate an additional step: if we got a file of any other format, we first convert it to wav. Do not worry, this process usually does not take a lot of time.
We implement the simplest interface by adding two buttons to MainPage.xaml:
We describe the algorithm that will be executed by clicking on the button “Choose Audio File”. To do this, add the following lines to MainPage.xaml.cs:
 private StorageFile currentFile;
        private PlottingGraphImg imgFile;
        private async void ChooseFile_Click(object sender, RoutedEventArgs e)
        {
            var picker = new Windows.Storage.Pickers.FileOpenPicker();
            picker.SuggestedStartLocation = Windows.Storage.Pickers.PickerLocationId.MusicLibrary;
            picker.FileTypeFilter.Add(".mp4");
            picker.FileTypeFilter.Add(".mp3");
            picker.FileTypeFilter.Add(".wav");
            StorageFile file = await picker.PickSingleFileAsync();
            await ConvertToWaveFile(file);
        }
        public async Task ConvertToWaveFile(StorageFile sourceFile)
        {
            MediaTranscoder transcoder = new MediaTranscoder();
            MediaEncodingProfile profile = MediaEncodingProfile.CreateWav(AudioEncodingQuality.Medium);
            CancellationTokenSource cts = new CancellationTokenSource();
            //Create temporary file in temporary folder
            string fileName = String.Format("TempFile_{0}.wav", Guid.NewGuid());
            StorageFile temporaryFile = await ApplicationData.Current.TemporaryFolder.CreateFileAsync(fileName);
            currentFile = temporaryFile;
            if (sourceFile == null || temporaryFile == null)
           {
                return;
            }
            try
            {
                var preparedTranscodeResult = await transcoder.PrepareFileTranscodeAsync(sourceFile, temporaryFile, profile);
                if (preparedTranscodeResult.CanTranscode)
                {
                    var progress = new Progress((percent) => { Debug.WriteLine("Converting file: " + percent + "%"); });
                    await preparedTranscodeResult.TranscodeAsync().AsTask(cts.Token, progress);
                }
                else
                {
                    Debug.WriteLine("Error: Convert fail");
                }
            }
            catch
            {
                Debug.WriteLine("Error: Exception in ConvertToWaveFile");
            }
        }
Note : a similar method can be used for video formats, which is also sometimes very useful.
Now that the custom wav-file has become available, you need to get audio data from it, for which we all started this. To do this, you have to delve into the file structure. Going deep into theory, we see no reason - such information on the Internet is more than enough, you can always get the information you are interested in there. We limit ourselves to outlining the general structure of the file in order to clarify the logic of further implementation.
So, the structure of an uncompressed audio file in a pulse-code modulation (PCM) format is as follows:
Now let's move on to the algorithm for obtaining audio data. In the work, we will rely on the following resource .
Let's describe a class with the symbolic name "WavFile":
 public class WavFile
    {
        public string PathAudioFile { get; }
        private const int ticksInSecond = 10000000;
        private TimeSpan duration;
        public TimeSpan Duration { get { return duration; } }
        #region AudioData
        private List floatAudioBuffer = new List();
        #endregion
        public WavFile(string _path)
        {
            PathAudioFile = _path;
            ReadWavFile(_path);
        }
        public float[] GetFloatBuffer()
        {
            return floatAudioBuffer.ToArray();
        }
        private void ReadWavFile(string filename)
        {
            try
            {
                using (FileStream fileStream = File.Open(filename, FileMode.Open))
                {
                    BinaryReader reader = new BinaryReader(fileStream);
                    // RIFF
                    int chunkID = reader.ReadInt32();
                    int fileSize = reader.ReadInt32();
                    int riffType = reader.ReadInt32();
                    // Format
                    int fmtID;
                    long _position = reader.BaseStream.Position;
                    while (_position != reader.BaseStream.Length - 1)
                    {
                        reader.BaseStream.Position = _position;
                        int _fmtId = reader.ReadInt32();
                        if (_fmtId == 544501094)
                        {
                            fmtID = _fmtId;
                            break;
                        }
                        _position++;
                    }
                    int fmtSize = reader.ReadInt32();
                    int fmtCode = reader.ReadInt16();
                    int channels = reader.ReadInt16();
                    int sampleRate = reader.ReadInt32();
                    int byteRate = reader.ReadInt32();
                    int fmtBlockAlign = reader.ReadInt16();
                    int bitDepth = reader.ReadInt16();
                    if (fmtSize == 18)
                    {
                        int fmtExtraSize = reader.ReadInt16();
                        reader.ReadBytes(fmtExtraSize);
                    }
                    int dataID = reader.ReadInt32();
                    int dataSize = reader.ReadInt32();
                    byte[] byteArray = reader.ReadBytes(dataSize);
                    int bytesInSample = bitDepth / 8;
                    int sampleAmount = dataSize / bytesInSample;
                    float[] tempArray = null;
                    switch (bitDepth)
                    {
                        case 16:
                            Int16[] int16Array = new Int16[sampleAmount];
                            System.Buffer.BlockCopy(byteArray, 0, int16Array, 0, dataSize);
                            IEnumerable tempInt16 =
                                from i in int16Array
                                select i / (float)Int16.MaxValue;
                            tempArray = tempInt16.ToArray();
                            break;
                        default:
                            return;
                    }
                    floatAudioBuffer.AddRange(tempArray);
                    duration = DeterminateDurationTrack(channels, sampleRate);
                }
            }
            catch
            {
                Debug.WriteLine("File error");
                return;
            }
        }
        private TimeSpan DeterminateDurationTrack(int channels, int sampleRate)
        {
            long _duration = (long)(((double)floatAudioBuffer.Count / sampleRate / channels) * ticksInSecond);
            return TimeSpan.FromTicks(_duration);
        }
    }
Note : a similar method will give us the opportunity not only to visualize audio data, but also to edit them. By the way, it is not difficult to organize the reverse process of saving data, for this it is enough to use the FileStream class again and sequentially write the received data to a file.
Note: you most likely noticed that in the description of the algorithm we deviated from the above structure of the wav-file. This is due to the fact that the file obtained by conversion has a slightly different structure. In particular, a section is added that does not matter much to us - it stores id, size and format information, followed by a sequence of zero bytes. The unnecessary section is skipped by sorting the bytes in the loop and comparing them with the value 544501094 (this is the necessary value of the Subchunk1Id field, from which the Format section begins). A similar search is necessary for the reason that the above structure is exemplary, but not mandatory, and sometimes depart from it.
Finally, after receiving the data, we can proceed to the final step - the construction of the schedule. There are several ways, here are two of the most common:
- Building images using geometric shapes.
- Creating bitmaps.
Let us dwell on them in more detail. Despite the resource cost, the first way to build images is popular on the Web when demonstrating certain examples of working with audio tracks. It may not be bad for building small graphs, but it becomes irrational when it comes to displaying the wave image of the entire audio track on the screen. Therefore, this option does not suit us.
The second method is less resource intensive and involves using unsafe code. Based on the result of the work, we will get an image that we can use in our application or, for example, save to a hard disk for future use.
Instructions on how to work with bitmaps in the UWP, available at link. Describing our logic for constructing the image of the audio file, we will be largely based on this material.
Add the structure and class described above to the project:
public struct GraphicalWavePlot
    {
        private float minValue;
        private float maxValue;
        private float peakValue;
        public GraphicalWavePlot(
            float minValue,
            float maxValue,
            float peakValue
            )
        {
            this.minValue = minValue;
            this.maxValue = maxValue;
            this.peakValue = peakValue;
        }
        public bool CheckArea(int pos, int heightImg)
        {
            double Oh = heightImg / 2;
            double y0 = Oh - Math.Abs(minValue) * Oh / peakValue;
            double y1 = Oh + maxValue * Oh / peakValue;
            return (pos > y0 && pos < y1);
        }
    }
    public class PlottingGraphImg
    {
        private List waveSamples = new List();
        private SoftwareBitmap softwareBitmap;
        private WavFile wavFile;
        private Color backgroundColor = Color.FromArgb(0, 0, 0, 0);
        public Color BackgroundColor
        {
            get { return backgroundColor; }
            set { backgroundColor = value; }
        }
        private Color foregroundColor = Color.FromArgb(255, 255, 255, 255);
        public Color ForegroundColor
        {
            get { return foregroundColor; }
            set { foregroundColor = value; }
        }
        private int image_width;
        public int ImageWidth
        {
            get { return image_width; }
            set { image_width = value; }
        }
        private int image_height;
        public int ImageHeight
        {
            get { return image_height; }
            set { image_height = value; }
        }
        public PlottingGraphImg(WavFile _wavFile, int _image_width, int _image_height)
        {
            this.wavFile = _wavFile;
            this.image_width = _image_width;
            this.image_height = _image_height;
            BuildImage();
            CreateGraphicFile();
        }
        private void BuildImage()
        {
            int xPos = 2;
            int interval = 1;
            var yScale = ImageHeight;
            float[] readBuffer = wavFile.GetFloatBuffer();
            int samplesPerPixel = readBuffer.Length / ImageWidth;
            float negativeLimit = readBuffer.Take(readBuffer.Length).Min();
            float positiveLimit = readBuffer.Take(readBuffer.Length).Max();
            float peakValue = (positiveLimit > negativeLimit) ? (positiveLimit) : (negativeLimit);
            peakValue *= 1.2f;
            for (int i = 0; i < readBuffer.Length; i += samplesPerPixel, xPos += interval)
            {
                float[] partBuffer = new float[samplesPerPixel];
                int lengthPartBuffer = ((i + samplesPerPixel) > readBuffer.Length) ? (readBuffer.Length - i) : (samplesPerPixel);
                Array.Copy(readBuffer, i, partBuffer, 0, lengthPartBuffer);
                var min = partBuffer.Take(samplesPerPixel).Min();
                var max = partBuffer.Take(samplesPerPixel).Max();
                waveSamples.Add(new GraphicalWavePlot(minValue: min, maxValue: max, peakValue: peakValue));
            }
        }
        [ComImport]
        [Guid("5B0D3235-4DBA-4D44-865E-8F1D0E4FD04D")]
        [InterfaceType(ComInterfaceType.InterfaceIsIUnknown)]
        unsafe interface IMemoryBufferByteAccess
        {
            void GetBuffer(out byte* buffer, out uint capacity);
        }
        public unsafe void CreateGraphicFile()
        {
            softwareBitmap = new SoftwareBitmap(BitmapPixelFormat.Bgra8, ImageWidth, ImageHeight);
            using (BitmapBuffer buffer = softwareBitmap.LockBuffer(BitmapBufferAccessMode.Write))
            {
                using (var reference = buffer.CreateReference())
                {
                    byte* dataInBytes;
                    uint capacity;
                    ((IMemoryBufferByteAccess)reference).GetBuffer(out dataInBytes, out capacity);
                    // Fill-in the BGRA plane
                    BitmapPlaneDescription bufferLayout = buffer.GetPlaneDescription(0);
                    for (int i = 0; i < bufferLayout.Width; i++)
                    {
                        for (int j = 0; j < bufferLayout.Height; j++)
                        {
                            Color tempColor = waveSamples[i].CheckArea(j, ImageHeight) ? ForegroundColor : BackgroundColor;
                            //Blue
                            dataInBytes[bufferLayout.StartIndex + bufferLayout.Stride * j + 4 * i + 0] = (byte)tempColor.B;
                            //Green
                            dataInBytes[bufferLayout.StartIndex + bufferLayout.Stride * j + 4 * i + 1] = (byte)tempColor.G;
                            //Red
                            dataInBytes[bufferLayout.StartIndex + bufferLayout.Stride * j + 4 * i + 2] = (byte)tempColor.R;
                            //Alpha
                            dataInBytes[bufferLayout.StartIndex + bufferLayout.Stride * j + 4 * i + 3] = (byte)tempColor.A;
                        }
                    }
                }
            }
        }
        public async Task SaveGraphicFile(StorageFile outputFile)
        {
            using (IRandomAccessStream stream = await outputFile.OpenAsync(FileAccessMode.ReadWrite))
            {
                BitmapEncoder encoder = await BitmapEncoder.CreateAsync(BitmapEncoder.JpegEncoderId, stream);
                encoder.SetSoftwareBitmap(softwareBitmap);
                encoder.BitmapTransform.InterpolationMode = BitmapInterpolationMode.Fant;
                encoder.IsThumbnailGenerated = true;
                try
                {
                    await encoder.FlushAsync();
                }
                catch (Exception err)
                {
                    switch (err.HResult)
                    {
                        case unchecked((int)0x88982F81): //WINCODEC_ERR_UNSUPPORTEDOPERATION
                                            // If the encoder does not support writing a thumbnail, then try again
                                           // but disable thumbnail generation.
                            encoder.IsThumbnailGenerated = false;
                            break;
                        default:
                            throw err;
                    }
                }
                if (encoder.IsThumbnailGenerated == false)
                {
                    await encoder.FlushAsync();
                }
            }
        }
    }
Note : do not forget to enable unsafe code in the project properties (right-click on the project, select Properties in the console menu that appears, then activate the Build tab in the window that opens and check the Allow unsafe code field, see below).
So, we examined the scheme for receiving audio data and plotting. Now all that remains is to call it from the MainPage class. To do this, we need the “Build And Save Image File” button, by clicking on which the operation algorithm prescribed by us will be launched. To implement it, we add the method presented above to the lines entered in MainPage.xaml.cs earlier:
    private async void BuildAndSaveImageFile_Click(object sender, RoutedEventArgs e)
        {
            WavFile wavFile = new WavFile(currentFile.Path.ToString());
            imgFile = new PlottingGraphImg(wavFile, 1000, 100);
            FileSavePicker fileSavePicker = new FileSavePicker();
            fileSavePicker.SuggestedStartLocation = PickerLocationId.PicturesLibrary;
            fileSavePicker.FileTypeChoices.Add("JPEG files", new List() { ".jpg" });
            fileSavePicker.SuggestedFileName = "image";
            var outputFile = await fileSavePicker.PickSaveFileAsync();
            if (outputFile == null)
            {
                // The user cancelled the picking operation
                return;
            }
            await imgFile.SaveGraphicFile(outputFile);
        }
Check the project for errors and libraries not added, and then run it. According to the result of the work, we get such an image for the selected audio file. ”









