March 29, 2017 at 07:14
We start VMWare ESXi 6.5 under the QEMU hypervisor
- Tutorial
There is a wonderful VMWare ESXi hypervisor in the world, and everything is fine in it, but the requirements for the hardware on which it can work are quite immodest. ESXi fundamentally does not support software RAIDs, 100-megabyte and cheap gigabit network cards, so you can only try what it is like to work by purchasing the appropriate equipment.
However, ESXi's most “delicious” ESXi capabilities open up when we have more than one ESXi host — clustering, live migration, distributed VSAN, a distributed network switch, etc. In this case, the cost of test equipment can already be a decent amount. Fortunately, ESXi supports Nested Virtualization - that is, the ability to run from under an already running hypervisor. At the same time, the external hypervisor understands that its guest needs access to hardware virtualization, and ESXi knows that it does not work on bare metal. As a rule, ESXi is also used as the main hypervisor - this configuration has been supported by VMWare for quite some time. We will try to start ESXi, using the QEMU hypervisor. The network has instructions on this, but, as we will see below, they are slightly outdated.
To begin with, we denote the version of QEMU on which we will put experiments:
user@debian-pc:~$ QEMU emulator version 2.8.0(Debian 1:2.8+dfsg-2)
Copyright (c) 2003-2016 Fabrice Bellard and the QEMU Project developers
The latest version at the moment, but my focus was even on 2.4.0.
Then we disable the impolite behavior of the KVM module at the moments when the guest tries to read machine-specific registers, which actually are not there. By default, KVM in response to this generates a General protection fault exception inside the guest , which is why the guest lays in the blue (in our case, pink) death screen. Let's do it under the root:
root@debian-pc:/> echo 1 > /sys/module/kvm/parameters/ignore_msrsIn some distributions, the kvm module is loaded by default with the necessary parameters, in some - not. In any case, you need to check dmesg for strings
user@debian-pc:~$ dmesg | grep kvm
[    6.266942] kvm: Nested Virtualization enabled
[    6.266947] kvm: Nested Paging enabled
If these lines do not exist, add the line to /etc/modprobe.d/kvm.conf
options kvm-amd npt=1 nested=1and reboot. For Intel processor, the line will look like:
options kvm-intel ept=1 nested=1What is interesting is that only kvm-amd reports messages about the included Nested Paging / Nested Virtualization in dmesg, and kvm-intel does not.
Let's try to solve the problem “head-on” - go to the VMWare website , register there and download the latest image of VMware-VMvisor-Installer-201701001-4887370.x86_64.iso.
Let's not make up our minds, create an analogue of a “flash drive” on 16Gb, take for sure a supported e1000 network card, put RAM in 4 Gb (with less ESXi memory it will not stand up) and start the installation, assuming that in such a configuration ESXi will at least not see the IDE -drive:
user@debian-pc:~$ qemu-img create -f qcow2 -o nocow=on /media/storage/VMs/esx_6.5-1.qcow2 16G
Formatting '/media/storage/VMs/esx_6.5-1.qcow2', fmt=qcow2 size=17179869184 encryption=off cluster_size=65536 lazy_refcounts=off refcount_bits=16 nocow=on
user@debian-pc:~$ qemu-system-x86_64 --enable-kvm -cpu host -smp 2 -m 4096 -hda /media/storage/VMs/esxi_6.5-1.qcow2 -cdrom /media/storage/iso/VMware-VMvisor-Installer-201701001-4887370.x86_64.iso -netdev user,id=hostnet0 -device e1000,netdev=hostnet0,id=net0And here we are faced with the first surprise - ESXi not only detects our IDE disk, but also successfully installs it, although for five minutes it hangs at 27% of the installation:
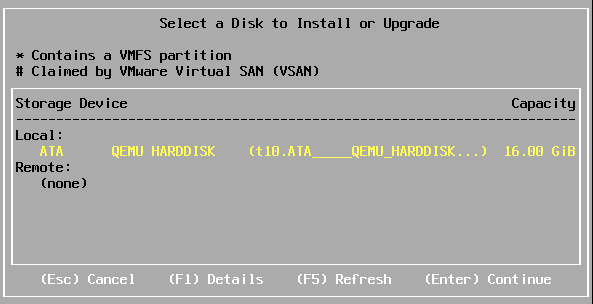
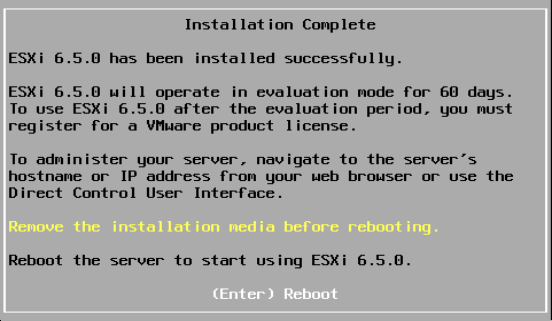
By the way, before starting the installation, I get this message:
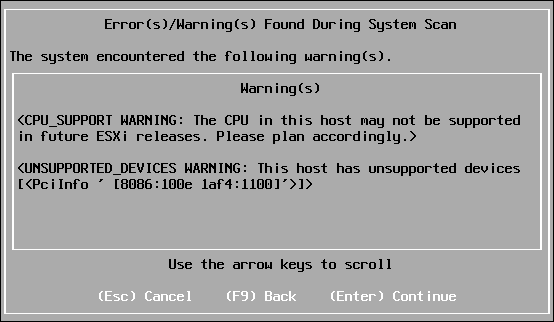
Well, with the processor it is clear - I used the -cpu host option, which copies the CPUID of the host processor to the guest, and the host processor I have is the AMD A8-3850 APU for the deceased FM1 socket. It is strange that ESXi is generally placed on such hardware.
And here is 8086: 100e is the identifier of the “Intel 82540EM Gigabit Ethernet Controller” chip, which for some time has been declared unsupported, i.e. it works, but technical support does not work with it.
In general, QEMU supports emulation of different network cards:
user@debian-pc:~$ qemu-system-x86_64 -device help
<Тут неинтересно>
Network devices:
name "e1000", bus PCI, alias "e1000-82540em", desc "Intel Gigabit Ethernet"
name "e1000-82544gc", bus PCI, desc "Intel Gigabit Ethernet"
name "e1000-82545em", bus PCI, desc "Intel Gigabit Ethernet"
name "e1000e", bus PCI, desc "Intel 82574L GbE Controller"
name "i82550", bus PCI, desc "Intel i82550 Ethernet"
name "i82551", bus PCI, desc "Intel i82551 Ethernet"
name "i82557a", bus PCI, desc "Intel i82557A Ethernet"
name "i82557b", bus PCI, desc "Intel i82557B Ethernet"
name "i82557c", bus PCI, desc "Intel i82557C Ethernet"
name "i82558a", bus PCI, desc "Intel i82558A Ethernet"
name "i82558b", bus PCI, desc "Intel i82558B Ethernet"
name "i82559a", bus PCI, desc "Intel i82559A Ethernet"
name "i82559b", bus PCI, desc "Intel i82559B Ethernet"
name "i82559c", bus PCI, desc "Intel i82559C Ethernet"
name "i82559er", bus PCI, desc "Intel i82559ER Ethernet"
name "i82562", bus PCI, desc "Intel i82562 Ethernet"
name "i82801", bus PCI, desc "Intel i82801 Ethernet"
name "ne2k_isa", bus ISA
name "ne2k_pci", bus PCI
name "pcnet", bus PCI
name "rocker", bus PCI, desc "Rocker Switch"
name "rtl8139", bus PCI
name "usb-bt-dongle", bus usb-bus
name "usb-net", bus usb-bus
name "virtio-net-device", bus virtio-bus
name "virtio-net-pci", bus PCI, alias "virtio-net"
name "vmxnet3", bus PCI, desc "VMWare Paravirtualized Ethernet v3"
<Тут тоже не интересно>
but not all of them work in ESXi equally well, for example, port forwarding in user-mode of the network does not work with formally supported e1000e, and half of packets disappear in vmxnet3. So let's stop at e1000.
We reboot the VM and see that the hypervisor started successfully. Actually, that's all - you do not need to patch QEMU for ESXi, as some manuals recommend.
It should be noted that I use the nocow = on parameter when creating a disk, since the VM disk will lie on btrfs, which in itself is a file system with the concept of copy-on-write. If we add to this the fact that a thin-provisioned qcow2 format disk also implements this principle, we get a multiple increase in the number of writes to the disk. The nocow = on parameter forces qemu-img to create a file with the nocow attribute and thereby block the copy-on-write mechanism in btrfs for a particular file.
In user network mode, a lightweight DHCP server runs inside the VM, so you do not need to assign an address, but you will have to forward ports. We go into the QEMU console by pressing Ctrl + Alt + 1, enter the command there
> hostfwd_add tcp::4443-:443and forward port 443 from the network interface of the virtual machine to port 4443 of the host. Then in the browser we type
https: // localhost: 4443 / ui we will
confirm the security exception (ESXi, of course, while using the self-signed certificate for https) and we will see the hypervisor Web interface:
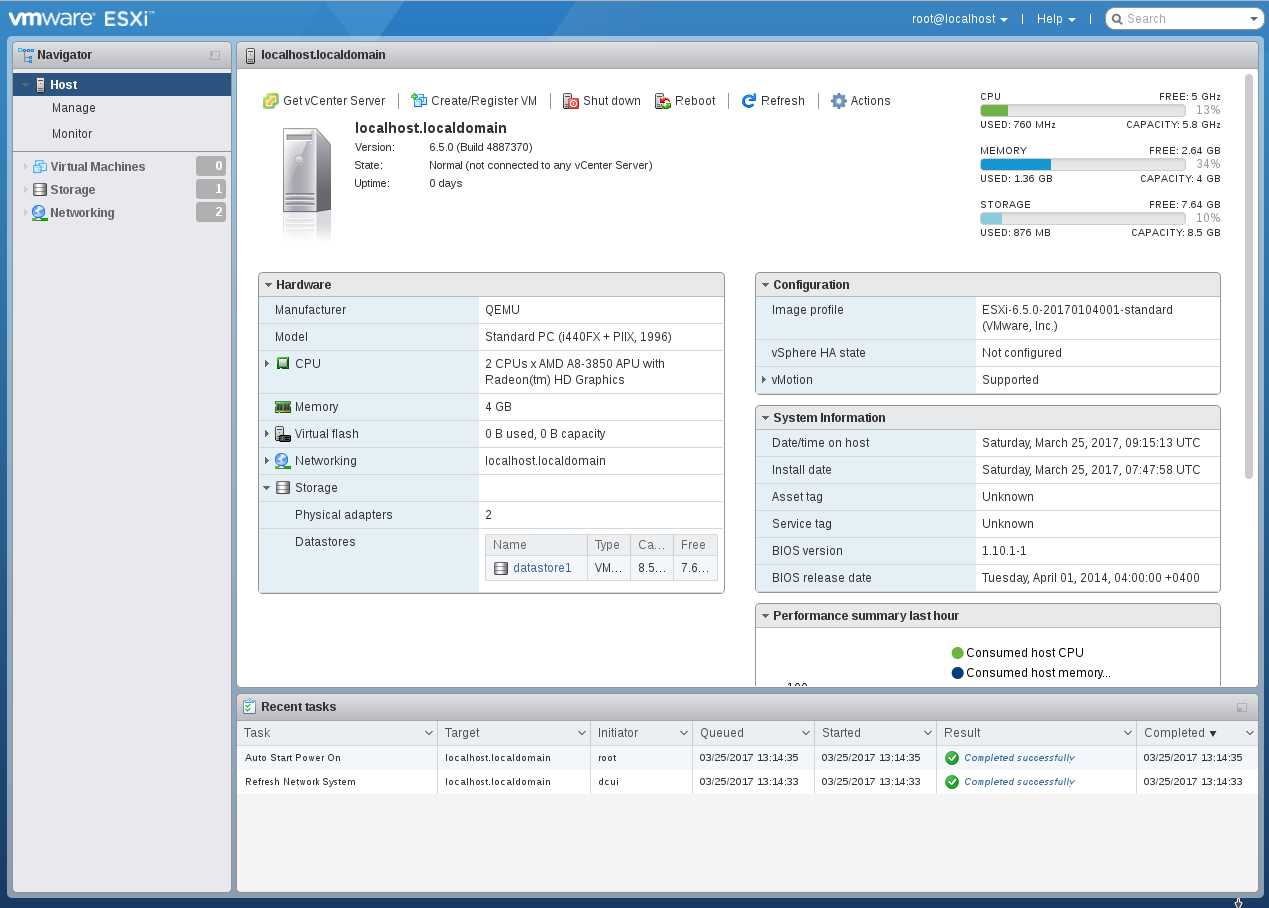
Surprisingly, the ESXi installer even created a “storage” in the free area of the disk the size of the whole 8Gb. First of all, we’ll install a package with an updated Web interface, because the development of this useful component is faster than the new ESXi releases. We go to the QEMU console by Ctrl + Alt + 1 and forward port 22 there:
> hostfwd_add tcp::2222-:22then switch to the hypervisor console by Ctrl + Alt + 2, press F2 - Troubleshooting Options - Enable SSH and connect to the SSH client:
user@debian-pc:~$ ssh [email protected] -p 2222
Password:
The time and date of this login have been sent to the system logs.
VMware offers supported, powerful system administration tools.  Please
see www.vmware.com/go/sysadmintools for details.
The ESXi Shell can be disabled by an administrative user. See the
vSphere Security documentation for more information.
We go to the temporary directory
[root@localhost:~] cd /tmpDownload update
[root@localhost:/tmp] wget http://download3.vmware.com/software/vmw-tools/esxui/esxui-offline-bundle-6.x-5214684.zip
Connecting to download3.vmware.com (172.227.88.162:80)
esxui-offline-bundle 100% |************************************************************************************|  3398k  0:00:00 ETA
and put it
[root@localhost:/tmp] esxcli software vib install -d /tmp/esxui-offline-bundle-6.x-5214684.zip
Installation Result
  Message: Operation finished successfully.
  Reboot Required: false
  VIBs Installed: VMware_bootbank_esx-ui_1.17.0-5214684
  VIBs Removed: VMware_bootbank_esx-ui_1.8.0-4516221
  VIBs Skipped:
As you can see, the size of the Web interface is slightly more than three megabytes.
Now try to improve our virtual machine. First of all, we will change the disk controller from IDE to AHCI, because the implementation of the 1996 PIIX3 controller in QEMU, as it were, is slightly inhibited. And the AHCI controller (the Intel ICH9 chipset is emulated) is, firstly, faster, and, secondly, it supports NCQ command queues .
user@debian-pc:~$ qemu-system-x86_64 --enable-kvm -cpu host -smp 2 -m 4096 -device ich9-ahci,id=ahci -drive file=/media/storage/VMs/esxi_6.5-1.qcow2,if=none,id=drive0 -device ide-drive,drive=drive0,bus=ahci.0 -netdev user,id=hostnet0 -device e1000,netdev=hostnet0,id=net0Even by reducing the loading time of the components of the hypervisor, it is clear that we got an increase in speed. For joy, we go to the Web-interface and ... how is it that there are no disks? There is an AHCI controller on the “Adapters” tab, but disks are not detected on it. But how then did the hypervisor load? Very simple - at the initial stage, the bootloader reads the disk data using the BIOS and it does not need to see the disks directly. After the components are loaded into memory, the loader transfers control to them, and the initialization of the hypervisor takes place without accessing the disk.

Be that as it may, the ESXi 6.5 does not see the disks on the AHCI controller, but the ESXi 6.0 saw these disks - I give a tooth. Using Google and such a mother, we find out the reason: in ESXi 6.5, the old ahci driver is replaced with the completely rewritten vmw_ahci driver, which is why heaps of people slow down the SSD, and we don’t have any drives detected. According to the advice from the article, we do on the hypervisor
[root@localhost:~] esxcli system module set --enabled=false --module=vmw_ahcireboot and ... nothing happens. What did we want? There are no disks, there is nowhere to record the configuration, therefore, our changes have not been saved. It is necessary to return to the IDE disk, execute this command and only then boot from AHCI - then the disks will be detected.
By the way, if we go into the web-based interface, we will see that the 8-gigabyte “storage” created by the installer is now unavailable. So for different types of controllers, VMWare has different storage definition policies. Now let's try to depict the real configuration of the system when ESXi is installed on a USB flash drive, and the storage is located on hard drives. We use USB 3.0 emulation:
user@debian-pc:~$ qemu-system-x86_64 --enable-kvm -cpu host -smp 2 -m 4096 -device nec-usb-xhci,id=xhci -drive file=/media/storage/VMs/esxi_6.5-1.qcow2,if=none,id=drive0 -device usb-storage,drive=drive0,bus=xhci.0 -netdev user,id=hostnet0, -device e1000,netdev=hostnet0,id=net0USB 3.0 drives are not detected either. Apparently, the driver is also rewritten here. Well, we already know what to do. We go to the console of the hypervisor, we write there
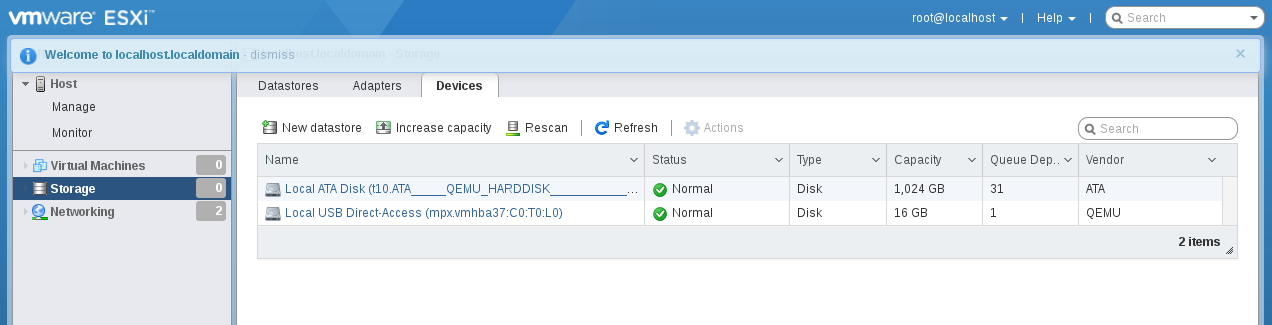
esxcli system module set -m=vmkusb -e=FALSEWhen the system boots up, go to Storage - Devices and see our flash drive there. By the way, with a USB 3.0 controller nec-usb-xhci, the system boots much faster than with ich9-usb-ehci2.

So, at least two disk controller drivers in ESXi 6.5 are rewritten over again compared to ESXi 6.0. But it would seem that only the number after the dot in the version number has changed, one might say, a minor release.
If we add a 1 Tb disk to the configuration of the virtual machine, we can create a full-fledged storage in addition to the disk with the hypervisor. To boot the system from a usb-drive, and not with ahci, we use the bootindex parameter. Usually, the -boot parameter is used to control the boot order, but in our case it will not help, because the disks “hang” on different controllers. At the same time, we will replace the platform from the old 440fx chipset to the new Q35 / ICH9.
user@debian-pc:~$ qemu-img create -f qcow2 -o nocow=on /media/storage/VMs/esxi_6.5-1.qcow2 1T
user@debian-pc:~$ qemu-system-x86_64 -machine q35 --enable-kvm -cpu host -smp 2 -m 4096 -device nec-usb-xhci,id=xhci -drive file=/media/storage/VMs/esxi_6.5-1.qcow2,if=none,id=drive0 -device usb-storage,drive=drive0,bus=xhci.0,bootindex=1 -device ich9-ahci,id=ahci -drive file=/media/storage/VMs/esxi_6.5-1-1T.qcow2,if=none,id=drive1 -device ide-drive,drive=drive1,bus=ahci.0,bootindex=2  -netdev user,id=hostnet0  -device e1000,netdev=hostnet0,id=net0
We go into the console - here they are, our drives.
Let's continue the experiments: now we need to integrate several hypervisors into a network. Some libvirt independently creates a virtual switch and connects machines to it, and we will try to carry out these operations manually.
Let us have two virtual machines, so we need two virtual adapters
user@debian-pc:~$ sudo ip tuntap add mode tap tap0
user@debian-pc:~$ sudo ip tuntap add mode tap tap1
Now we need a virtual switch. For a long time, for these purposes, it was customary to use the virtual switch built into the Linux kernel, controlled by the brctl utility. Now it is customary to solve the problem through Open vSwitch - the implementation of the switch, designed specifically for virtual environments. Open vSwitch has built-in support for VLAN, tunneling protocols (GRE, etc.) for combining several switches and, most interestingly, OpenFlow technologies. In other words, you can load L2 / L3 filtering rules into a switch in a readable format. Previously, filtering required the use of iptables / ebtables, but as they say, a good thing is not called “ebtables”.
Install Open vSwitch if it is not already installed:
user@debian-pc:~$ sudo aptitude install openvswitch-switch
Create a virtual switch:
user@debian-pc:~$ sudo ovs-vsctl add-br ovs-bridgeAdd interfaces to it:
user@debian-pc:~$ sudo sudo ovs-vsctl add-port ovs-bridge tap0
user@debian-pc:~$ sudo sudo ovs-vsctl add-port ovs-bridge tap1
Let's see what happened:
user@debian-pc:~$ sudo ovs-vsctl show
e4397bbd-0a73-4c0b-8007-12872cf132d9
   Bridge ovs-bridge
       Port "tap1"
           Interface "tap1"
       Port ovs-bridge
           Interface ovs-bridge
               type: internal
       Port "tap0"
           Interface "tap0"
   ovs_version: "2.6.2"
Run the interfaces:
user@debian-pc:~$ sudo ip link set tap0 up
user@debian-pc:~$ sudo ip link set tap1 up
user@debian-pc:~$ sudo ip link set ovs-bridge up
Now assign the following address to the switch interface:
user@debian-pc:~$ sudo ip addr add 192.168.101.1 dev ovs-bridgeIt would seem that just changing the type of network on the QEMU command line from user to tap is something like this:
-netdev tap,ifname=tap,script=no,downscripot=no,id=hostnet0 -device e1000,netdev=hostnet0,id=net0and everything will work.
Let's try:
user@debian-pc:~$ qemu-system-x86_64 -machine q35 --enable-kvm -cpu host -smp 2 -m 4096 -device nec-usb-xhci,id=xhci -drive file=/media/storage/VMs/esxi_6.5-1.qcow2,if=none,id=drive0 -device usb-storage,drive=drive0,bus=xhci.0,bootindex=1 -device ich9-ahci,id=ahci -drive file=/media/storage/VMs/esxi_6.5-1-1T.qcow2,if=none,id=drive1 -device ide-drive,drive=drive1,bus=ahci.0,bootindex=2 -netdev tap,ifname=tap0,script=no,downscript=no,id=hostnet0 -device e1000,netdev=hostnet0,id=net0We’ll go into the ESXi console and assign it the address - 192.168.101.2, and then check the connection:
user@debian-pc:~$ ping 192.168.101.2
PING 192.168.101.2 (192.168.101.2) 56(84) bytes of data.
64 bytes from 192.168.101.2: icmp_seq=1 ttl=64 time=0.582 ms
64 bytes from 192.168.101.2: icmp_seq=2 ttl=64 time=0.611 ms
...
and from the ESXi console - F2- Test Network
Everything works, pings go.
Make a copy of the esxi_6.5-1.qcow2 disk and run the second ESXi instance:
user@debian-pc:~$ qemu-img create -f qcow2 -o nocow=on /media/storage/VMs/esxi_6.5-2.qcow2 16G
Formatting '/media/storage/VMs/esxi_6.5-2.qcow2', fmt=qcow2 size=17179869184 encryption=off cluster_size=65536 lazy_refcounts=off refcount_bits=16 nocow=on
user@debian-pc:~$ dd if=/media/storage/VMs/esxi_6.5-1.qcow2 of=/media/storage/VMs/esxi_6.5-2.qcow2 bs=16M
31+1 records in
31+1 records out
531759104 bytes (532 MB, 507 MiB) copied, 10.6647 s, 49.9 MB/s
user@debian-pc:~$ qemu-img create -f qcow2 -o nocow=on /media/storage/VMs/esxi_6.5-2-1T.qcow2 1T
Formatting '/media/storage/VMs/esxi_6.5-2-1T.qcow2', fmt=qcow2 size=1099511627776 encryption=off cluster_size=65536 lazy_refcounts=off refcount_bits=16 nocow=on
user@debian-pc:~$ qemu-system-x86_64 -machine q35 --enable-kvm -cpu host -smp 2 -m 4096 -device nec-usb-xhci,id=xhci -drive file=/media/storage/VMs/esxi_6.5-2.qcow2,if=none,id=drive0 -device usb-storage,drive=drive0,bus=xhci.0,bootindex=1 -device ich9-ahci,id=ahci -drive file=/media/storage/VMs/esxi_6.5-2-1T.qcow2,if=none,id=drive1 -device ide-drive,drive=drive1,bus=ahci.0,bootindex=2  -netdev tap,ifname=tap0,script=no,downscript=no,id=hostnet0  -device e1000,netdev=hostnet0,id=net0
Here, surprises await us: ping from the host to the first guest goes only until we start ping to the second guest. After the second ping command is interrupted, packets to the first guest begin to go after 10 seconds. Pings between the guests do not go at all.
It’s clear that we messed up with mac addresses, and indeed, QEMU assigns all tap adapters the same mac address, unless otherwise specified.
Turn off both ESXi's, show them unique macs, and run them again.
user@debian-pc:~$ qemu-system-x86_64 -machine q35 --enable-kvm -cpu host -smp 2 -m 4096 -device nec-usb-xhci,id=xhci -drive file=/media/storage/VMs/esxi_6.5-1.qcow2,if=none,id=drive0 -device usb-storage,drive=drive0,bus=xhci.0,bootindex=1 -device ich9-ahci,id=ahci -drive file=/media/storage/VMs/esxi_6.5-1-1T.qcow2,if=none,id=drive1 -device ide-drive,drive=drive1,bus=ahci.0,bootindex=2 -netdev tap,ifname=tap0,script=no,downscript=no,id=hostnet0 -device e1000,netdev=hostnet0,id=net0,mac=DE:AD:BE:EF:16:B6And in another console:
user@debian-pc:~$ qemu-system-x86_64 -machine q35 --enable-kvm -cpu host -smp 2 -m 4096 -device nec-usb-xhci,id=xhci -drive file=/media/storage/VMs/esxi_6.5-2.qcow2,if=none,id=drive0 -device usb-storage,drive=drive0,bus=xhci.0,bootindex=1 -device ich9-ahci,id=ahci -drive file=/media/storage/VMs/esxi_6.5-2-1T.qcow2,if=none,id=drive1 -device ide-drive,drive=drive1,bus=ahci.0,bootindex=2 -netdev tap,ifname=tap0,script=no,downscript=no,id=hostnet0 -device e1000,netdev=hostnet0,id=net0,mac=DE:AD:BE:EF:C3:FDTo our great surprise, the problem with pings has not gone away, moreover, the arp command shows that the MAC addresses of the hypervisors have not changed. Here is the time to remember how the network is configured in ESXi: the physical network card is in “unintelligible mode” and connected as a port to a virtual switch. Another port connected to this switch is vmkernel, which is a network card from the point of view of the hypervisor. At the time of installation of ESXi, the hardware address of the physical network card is cloned into vmkernel so as not to confuse the system administrator. After that, you can change it only by deleting the interface and re-creating it or by indicating to the hypervisor that vmkernel should be reconfigured due to a change in the address of the physical card.
First way:
Delete:
esxcfg-vmknic -d -p pgNameWe create:
esxcfg-vmknic -a -i DHCP -p pgNameor
esxcfg-vmknic -a -i x.x.x.x -n 255.255.255.0 pgNameThe second way:
esxcfg-advcfg -s 1 /Net/FollowHardwareMacA significant difference between these methods is that the first does not require a reboot of the hypervisor, and the second requires.
Having completed these simple operations, we will get two hypervisors on the same network.
Now you can install vCenter and check the "live migration". For some time now, vCenter has been available as a virtual machine image with Linux and related services on board. This is the option we will try to install. We take the VMware-VCSA-all-6.5.0-5178943.iso image, mount it in the host OS, run the installer from the vcsc-ui-installer \ lin64 directory and deploy the image following the instructions of the wizard. A virtual machine will require 10 Gb of RAM, so it would be nice to have a minimum of 16 Gb on the host system. However, my image turned around on 12 Gb RAM, having eaten all the available memory and dropping the system into a swap.

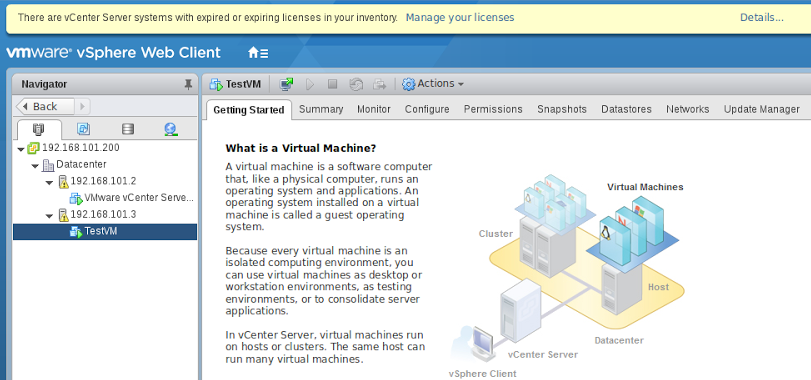
After installing VCSA, we go into the Web interface with credentials of the type [email protected] and the password that we specified when configuring SSO. After that, we add both hosts to vCenter and get the simplest cluster in which live migration works. Set up vMotion on the network cards of both hosts, create a TestVM virtual machine and make sure that it can move from one host to another, changing both the host and storage.
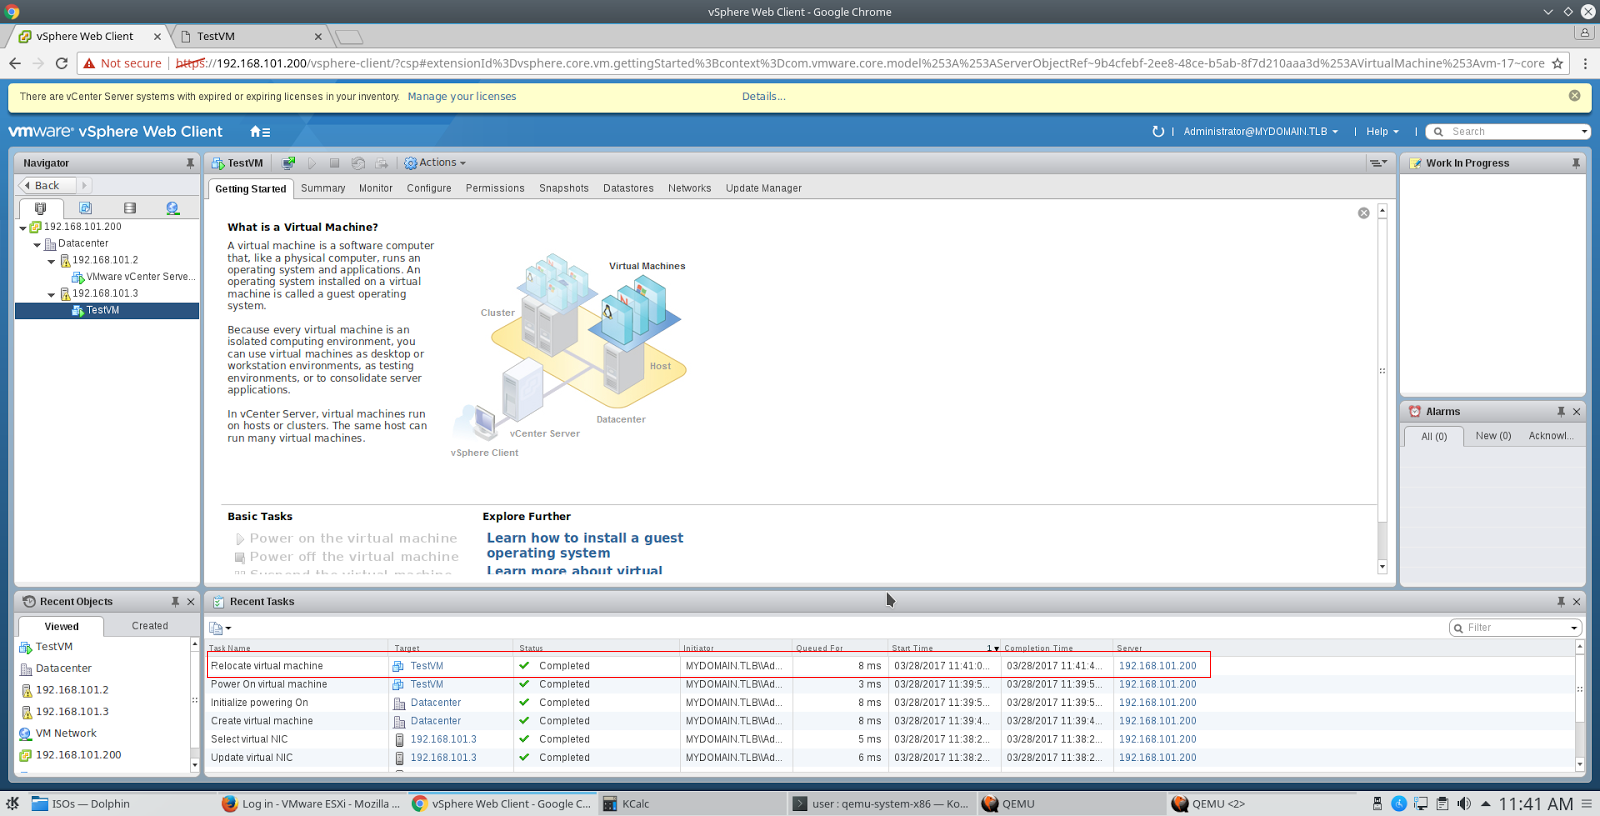
By the way, on previous versions of ESXi up to and including 6.0, the virtual machine could not be started in nested virtualization mode without adding a line
vmx.allowNested = TRUEinto her configuration file. ESXi 6.5 does not require this, and the virtual machine starts without question.
In conclusion - a small life hack. Suppose you need to copy a VM disk file from ESXi storage somewhere to a backup server, while you cannot use FastSCP from Veeam Backup and Replication. The good old rsync will come to your aid, you just need to find the binary file that runs on ESXi. Unfortunately, in rsync up to version 3.0.9 inclusive, there is a bug due to which large files on VMFS volumes are not processed correctly, so rsync version 3.1.0 should be used. and higher. You can take it here .