Beginner's Guide to Graphic Shaders
- Transfer
- Tutorial
The ability to write graphic shaders reveals the full power of modern GPUs, which today already contain thousands of cores capable of executing your code quickly and in parallel. Programming shaders requires a slightly different look at some things, but the potential that opens up costs some time to study it.
Almost every modern graphic scene is the result of some code written specifically for the GPU - from realistic lighting effects in the latest AAA games to 2D effects and fluid simulations.
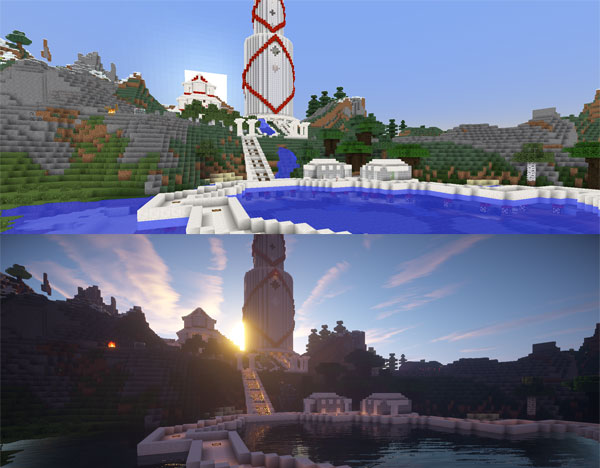
Minecraft scene before and after applying multiple shaders.
Programming shaders sometimes seems like mysterious black magic. Here and there you can find separate pieces of shader code that promise you incredible effects and, perhaps, really are able to provide them - but at the same time they don’t explain at all what they do and how they achieve such impressive results. This article will try to close this gap. I will focus on the basic things and terms regarding writing and understanding shader code, so that later on you can change the shader code yourself, combine them or write your own from scratch.
A shader is just a program that runs on one of the graphics cores and tells the video card how to draw each pixel. Programs are called "shaders" because they are often used to control the effects of lighting and shading ("shading"). But, of course, there is no reason to be limited only to these effects.
Shaders are written in a special programming language. Don’t worry, you don’t have to go and learn a new programming language from scratch right now. We will use GLSL (OpenGL Shading Language), which has a C-like syntax. There are othersshader programming languages for various platforms, but since their ultimate goal is to run the same code on the GPU, they have fairly similar principles.
This article will only talk about the so-called pixel (or fragment) shaders. If you are curious about what else they are, you should read about the graphics pipeline (for example, in the OpenGL Wiki ).
For our experiments we will use ShaderToy . This will allow you to take and start writing shader code here and now, without delaying this matter for later due to the need to install any specific tools or SDK. The only thing you need is a WebGL-enabled browser. Creating an account on ShaderToy is not necessary (only if you want to save your code there).
Note : ShaderToy is currently in beta, so at the time you read this article some of the nuances of its UI may change.
So, click the New button in the right corner, which will lead to the creation of a new shader: The

small black arrow under the code compiles and launches the shader.
I will now explain how the shader works with exactly one sentence. You are ready? Here it is. The shader’s sole purpose is to return four numbers: r, g, b, and a.
This is all the shader can and must do.
The function that you see above runs for every pixel on the screen. And for each of them, it returns the four above numbers, which become the color of the given pixel. This is how Pixel Shaders (sometimes also called fragment shaders) work.
So, now we have enough knowledge to, for example, fill the entire screen with pure red. The values of each of the rgba components (red, green, blue and “alpha” - that is, “transparency”) can be in the range from 0 to 1, so in our case we simply return r, g, b, a = 1,0 , 0.1. ShaderToy expects the final pixel color in the fragColor variable.
My congratulations! This is your first working shader!
Mini-task : can you fill the entire screen with gray color?
vec4 is just a data type, so we can declare our color as a variable:
This example is not too exciting. We have the power of hundreds or thousands of computing cores that can work efficiently and in parallel, and we shoot sparrows from this cannon, filling the entire screen with one color.
Let's at least draw a gradient. For this, as you can guess, we need to know the position of the current pixel on the screen.
Each pixel shader has several useful variables at its disposal . In our case, fragCoord will be most useful, which contains the x and y coordinates (as well as z, if you need to work in 3D) of the current pixel. First, let's try to paint all the pixels in the left half of the screen black, and in the right half red:
Note : to access the components of vec4 variables you can use obj.x, obj.y, obj.z, obj.w or obj.r, obj.g, obj.b, obj.a. These are equivalent entries. In this way, we get the opportunity to name the components of vec4 depending on what they are in each case.
Do you already see the problem with the code above? Try pressing the button to switch to full screen mode. The proportions of the red and black parts of the screen will change (depending on the size of your screen). In order to paint exactly half the screen, we need to know its size. Screen size is not a built-in variable, as it is something that the application programmer controls himself. In our case, this is the responsibility of the ShaderToy developers.
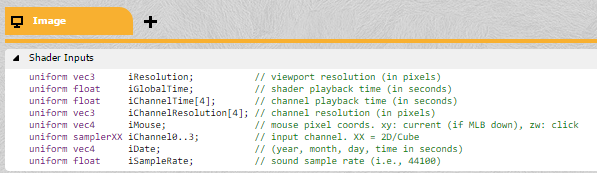
If something is not a built-in variable, you can send this information from the CPU (the main code of your application) to the GPU (your shader). ShaderToy does it for you. You can view all the variables available to the shader in the Shader Inputs tab. In GLSL, they are called uniform variables.
Let's fix our code so that it correctly defines the middle of the screen. To do this, we need the iResolution uniform variable:
Now, even if we enlarge the preview window (or switch to full-screen mode), we will get a black and red rectangle divided exactly in half.
Changing our code to get a gradient fill is easy. Color components can range from 0 to 1, and our coordinates are now also presented in the same range.
Voila!
Mini-task : try to make a vertical gradient yourself? Diagonal? What about the transition between more than two colors?
If you did not miss the above task with a vertical gradient, then you already know that the upper left corner has coordinates (0; 1), and not (0; 0), as you might suggest. This is important, remember this.
Having fun with the color fill is, of course, funny, but if we want to realize some really exciting effect, our shader should be able to accept a picture and change it. Thus, we can write a shader that can affect, for example, rendering the entire frame in the game (to realize the effects of fluid movement or color correction) or vice versa, to perform only certain operations for some objects in the scene (for example, to implement part of the lighting system).
If we were writing shaders on some ordinary platform, we would have to pass the image to the shader as a uniform variable (in the same way as the screen resolution was transmitted). ShaderToy does it for us. There are four input channels below:

Click on the iChannel0 channel and select any texture (image). Now you have a picture that will be transferred to your shader. But there is one problem: we do not have DrawImage () function. You remember, all that a shader can do is return the rgba value for one pixel.
So, if we can only return the color value, then how do we draw a picture on the screen? We must somehow correlate the pixel in the image with the pixel for which the shader was called:

We can do this using the texture (textureData, coordinates) function, which takes the texture and coordinates (x, y) as input and returns the color of the texture to given point in the form of a variable of type vec4.
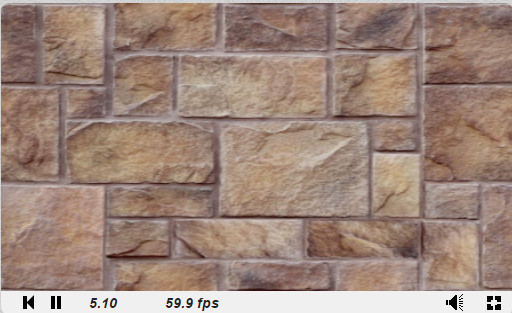
You can match the pixels of the texture and the screen as you like. You can, for example, stretch a texture to a quarter of the screen or draw only part of it. In our case, we just want to see the original image:
And here she is, our picture!
Now that you can draw data from a texture, you can manipulate it however you want. You can stretch or compress the image, play with its colors.
Let's add here the gradient we already know:
Congratulations, you just wrote your first post-processing effect!
Mini-task : can you write a shader that converts the input image into a black and white image?
Note that although we use a static picture, what you see on the screen is rendered in real time, many times per second. You can verify this by replacing the static image in the input channel with a video (just click on the iChannel0 channel and select a video).
Up to this point, all of our effects were static. We can do much more interesting things using the input parameters provided by the ShaderToy developers. iGlobalTime is an ever-increasing variable - we can use it as a basis for periodical effects. Let's try playing with colors:
GLSL has built-in sine and cosine functions (and many other useful ones). Color components should not be negative, so we use the abs function.
Mini-task : can you make a shader that will periodically smoothly make the picture black and white, and then again full color?
When writing regular programs, you may have used the option of debugging output or logging, but for shaders this is not very possible. You can find some debugging tools for your specific platform, but in the general case it is best to present the value you need in the form of some graphical information, which you can see in the output with the naked eye.
We considered only the basic tools for developing shaders, but you can already experiment with them and try to do something your own. Browse through the effects available on ShaderToy and try to understand (or reproduce yourself) some of them.
One of the (many) things that I have not mentioned in this article is Vertex Shaders. They are written in the same language, but they are launched not for pixels, but for vertices, returning, respectively, the new position of the vertex and its color. Vertex shaders are involved, for example, displaying a 3D scene on the screen.
Last mini-task: can you write a shader that replaces the green background (in some videos on ShaderToy) with another picture or video?
That's all I wanted to tell in this article. In the following, I will try to talk about lighting systems, fluid simulations and the development of shaders for specific platforms.
Almost every modern graphic scene is the result of some code written specifically for the GPU - from realistic lighting effects in the latest AAA games to 2D effects and fluid simulations.
Minecraft scene before and after applying multiple shaders.
The purpose of this instruction
Programming shaders sometimes seems like mysterious black magic. Here and there you can find separate pieces of shader code that promise you incredible effects and, perhaps, really are able to provide them - but at the same time they don’t explain at all what they do and how they achieve such impressive results. This article will try to close this gap. I will focus on the basic things and terms regarding writing and understanding shader code, so that later on you can change the shader code yourself, combine them or write your own from scratch.
What is a shader?
A shader is just a program that runs on one of the graphics cores and tells the video card how to draw each pixel. Programs are called "shaders" because they are often used to control the effects of lighting and shading ("shading"). But, of course, there is no reason to be limited only to these effects.
Shaders are written in a special programming language. Don’t worry, you don’t have to go and learn a new programming language from scratch right now. We will use GLSL (OpenGL Shading Language), which has a C-like syntax. There are othersshader programming languages for various platforms, but since their ultimate goal is to run the same code on the GPU, they have fairly similar principles.
This article will only talk about the so-called pixel (or fragment) shaders. If you are curious about what else they are, you should read about the graphics pipeline (for example, in the OpenGL Wiki ).
Go!
For our experiments we will use ShaderToy . This will allow you to take and start writing shader code here and now, without delaying this matter for later due to the need to install any specific tools or SDK. The only thing you need is a WebGL-enabled browser. Creating an account on ShaderToy is not necessary (only if you want to save your code there).
Note : ShaderToy is currently in beta, so at the time you read this article some of the nuances of its UI may change.
So, click the New button in the right corner, which will lead to the creation of a new shader: The
small black arrow under the code compiles and launches the shader.
What's going on here?
I will now explain how the shader works with exactly one sentence. You are ready? Here it is. The shader’s sole purpose is to return four numbers: r, g, b, and a.
This is all the shader can and must do.
The function that you see above runs for every pixel on the screen. And for each of them, it returns the four above numbers, which become the color of the given pixel. This is how Pixel Shaders (sometimes also called fragment shaders) work.
So, now we have enough knowledge to, for example, fill the entire screen with pure red. The values of each of the rgba components (red, green, blue and “alpha” - that is, “transparency”) can be in the range from 0 to 1, so in our case we simply return r, g, b, a = 1,0 , 0.1. ShaderToy expects the final pixel color in the fragColor variable.
void mainImage( out vec4 fragColor, in vec2 fragCoord )
{
    fragColor = vec4(1.0,0.0,0.0,1.0);
}
My congratulations! This is your first working shader!
Mini-task : can you fill the entire screen with gray color?
vec4 is just a data type, so we can declare our color as a variable:
void mainImage( out vec4 fragColor, in vec2 fragCoord )
{
    vec4 solidRed = vec4(1.0,0.0,0.0,1.0);
    fragColor = solidRed;
}
This example is not too exciting. We have the power of hundreds or thousands of computing cores that can work efficiently and in parallel, and we shoot sparrows from this cannon, filling the entire screen with one color.
Let's at least draw a gradient. For this, as you can guess, we need to know the position of the current pixel on the screen.
Shader Input
Each pixel shader has several useful variables at its disposal . In our case, fragCoord will be most useful, which contains the x and y coordinates (as well as z, if you need to work in 3D) of the current pixel. First, let's try to paint all the pixels in the left half of the screen black, and in the right half red:
void mainImage( out vec4 fragColor, in vec2 fragCoord )
{
    vec2 xy = fragCoord.xy; // координаты текущего пикселя
    vec4 solidRed = vec4(0,0.0,0.0,1.0);// чёрный цвет
    if(xy.x > 300.0){// некоторое число, мы не знаем реального размера экрана
        solidRed.r = 1.0;// красный цвет
    }
    fragColor = solidRed;
}
Note : to access the components of vec4 variables you can use obj.x, obj.y, obj.z, obj.w or obj.r, obj.g, obj.b, obj.a. These are equivalent entries. In this way, we get the opportunity to name the components of vec4 depending on what they are in each case.
Do you already see the problem with the code above? Try pressing the button to switch to full screen mode. The proportions of the red and black parts of the screen will change (depending on the size of your screen). In order to paint exactly half the screen, we need to know its size. Screen size is not a built-in variable, as it is something that the application programmer controls himself. In our case, this is the responsibility of the ShaderToy developers.
If something is not a built-in variable, you can send this information from the CPU (the main code of your application) to the GPU (your shader). ShaderToy does it for you. You can view all the variables available to the shader in the Shader Inputs tab. In GLSL, they are called uniform variables.
Let's fix our code so that it correctly defines the middle of the screen. To do this, we need the iResolution uniform variable:
void mainImage( out vec4 fragColor, in vec2 fragCoord )
{
    vec2 xy = fragCoord.xy; // координаты текущего пикселя
    xy.x = xy.x / iResolution.x; // делим на разрешение экрана
    xy.y = xy.y / iResolution.y;
    // теперь х будет равен 0 для самого левого пикселя и 1 для самого правого
    vec4 solidRed = vec4(0,0.0,0.0,1.0); // чёрный цвет
    if(xy.x > 0.5){
        solidRed.r = 1.0; // красный цвет
    }
    fragColor = solidRed;
}
Now, even if we enlarge the preview window (or switch to full-screen mode), we will get a black and red rectangle divided exactly in half.
From split screen to gradient
Changing our code to get a gradient fill is easy. Color components can range from 0 to 1, and our coordinates are now also presented in the same range.
void mainImage( out vec4 fragColor, in vec2 fragCoord )
{
    vec2 xy = fragCoord.xy; // координаты текущего пикселя
    xy.x = xy.x / iResolution.x; // делим на разрешение экрана
    xy.y = xy.y / iResolution.y;
    // теперь х будет равен 0 для самого левого пикселя и 1 для самого правого
    vec4 solidRed = vec4(0,0.0,0.0,1.0); // чёрный цвет
     solidRed.r = xy.x; // устанавливаем красную компоненту цвета в нормализированное значение х
    fragColor = solidRed;
}
Voila!
Mini-task : try to make a vertical gradient yourself? Diagonal? What about the transition between more than two colors?
If you did not miss the above task with a vertical gradient, then you already know that the upper left corner has coordinates (0; 1), and not (0; 0), as you might suggest. This is important, remember this.
Drawing pictures
Having fun with the color fill is, of course, funny, but if we want to realize some really exciting effect, our shader should be able to accept a picture and change it. Thus, we can write a shader that can affect, for example, rendering the entire frame in the game (to realize the effects of fluid movement or color correction) or vice versa, to perform only certain operations for some objects in the scene (for example, to implement part of the lighting system).
If we were writing shaders on some ordinary platform, we would have to pass the image to the shader as a uniform variable (in the same way as the screen resolution was transmitted). ShaderToy does it for us. There are four input channels below:
Click on the iChannel0 channel and select any texture (image). Now you have a picture that will be transferred to your shader. But there is one problem: we do not have DrawImage () function. You remember, all that a shader can do is return the rgba value for one pixel.
So, if we can only return the color value, then how do we draw a picture on the screen? We must somehow correlate the pixel in the image with the pixel for which the shader was called:
We can do this using the texture (textureData, coordinates) function, which takes the texture and coordinates (x, y) as input and returns the color of the texture to given point in the form of a variable of type vec4.
You can match the pixels of the texture and the screen as you like. You can, for example, stretch a texture to a quarter of the screen or draw only part of it. In our case, we just want to see the original image:
void mainImage( out vec4 fragColor, in vec2 fragCoord )
{
    vec2 xy = fragCoord.xy / iResolution.xy; // сжимаем в одну линию
    vec4 texColor = texture(iChannel0,xy); // берём пиксель с координатами (x;y) из канала iChannel0
    fragColor = texColor; // устанавливаем цвет пикселя на экране
}
And here she is, our picture!
Now that you can draw data from a texture, you can manipulate it however you want. You can stretch or compress the image, play with its colors.
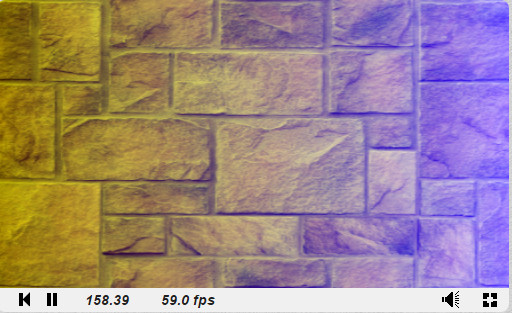
Let's add here the gradient we already know:
texColor.b = xy.x;Congratulations, you just wrote your first post-processing effect!
Mini-task : can you write a shader that converts the input image into a black and white image?
Note that although we use a static picture, what you see on the screen is rendered in real time, many times per second. You can verify this by replacing the static image in the input channel with a video (just click on the iChannel0 channel and select a video).
Add some movement
Up to this point, all of our effects were static. We can do much more interesting things using the input parameters provided by the ShaderToy developers. iGlobalTime is an ever-increasing variable - we can use it as a basis for periodical effects. Let's try playing with colors:
void mainImage( out vec4 fragColor, in vec2 fragCoord )
{
    vec2 xy = fragCoord.xy / iResolution.xy; // сжимаем в одну линию
    vec4 texColor = texture(iChannel0,xy); // берём пиксель с координатами (x;y) из канала iChannel0
       texColor.r *= abs(sin(iGlobalTime));
    texColor.g *= abs(cos(iGlobalTime));
    texColor.b *= abs(sin(iGlobalTime) * cos(iGlobalTime));
    fragColor = texColor; // устанавливаем цвет пикселя на экране
}
GLSL has built-in sine and cosine functions (and many other useful ones). Color components should not be negative, so we use the abs function.
Mini-task : can you make a shader that will periodically smoothly make the picture black and white, and then again full color?
Debugging shaders
When writing regular programs, you may have used the option of debugging output or logging, but for shaders this is not very possible. You can find some debugging tools for your specific platform, but in the general case it is best to present the value you need in the form of some graphical information, which you can see in the output with the naked eye.
Conclusion
We considered only the basic tools for developing shaders, but you can already experiment with them and try to do something your own. Browse through the effects available on ShaderToy and try to understand (or reproduce yourself) some of them.
One of the (many) things that I have not mentioned in this article is Vertex Shaders. They are written in the same language, but they are launched not for pixels, but for vertices, returning, respectively, the new position of the vertex and its color. Vertex shaders are involved, for example, displaying a 3D scene on the screen.
Last mini-task: can you write a shader that replaces the green background (in some videos on ShaderToy) with another picture or video?
That's all I wanted to tell in this article. In the following, I will try to talk about lighting systems, fluid simulations and the development of shaders for specific platforms.