Invisible friends of your github repository
- Tutorial

Github is an indispensable tool that has firmly entered the life of almost every developer.
Although many of us use it constantly, not everyone knows that there are a large number of third-party (and free) services and tools that are tightly integrated with github and expand its functionality.
In this article, we will focus mainly on tools that work in the npm infrastructure. A complete list of services integrating with github can be found on the github integrations directory page .
Today in the issue:
- Configuring continuous integration c travis ci
- Set up test coverage reports with coveralls
- Monitor dependency status with david
- Set up automatic dependency updates with greenkeeper
- Improving commit messages with commitizen
- Generate changelog and release notes with conventional-changelog
- Managing tasks with zube
Most of the services reviewed provide information badges that can be added to the project page. In order not to show the same image at every mention of badge, we will show it once at the beginning of the article:

We will also need to write several scripts. To do this, we will use npm scripts, avoiding tools like grunt or gulp, so you don’t need to know specific collectors.
A little lyrical digression about task runners
Not so long ago, several smart people (for example, the notorious Cory House ) voiced the idea that it is not necessary to use tools such as grunt or gulp to build a project . In most cases, simple npm scripts are enough.
We have seen from personal experience that this idea is correct.
If you are building your project, for example, using gulp, then for each tool you use, you have to look for (or write yourself) a plugin. For example, to compile typescript you need to use gulp-typescript , to run tslint you need gulp-tslint , to run typedoc , you needgulp-typedoc . Well and so on.
The tools are updated periodically and sometimes you are really looking forward to the released update. It happens that plugins are updated with some delay. And it happens that they are not updated at all.
For example, the long-awaited typescript 2.x release was released not so long ago. They did not take long to wait for tslint and typedoc updates. But new versions of plugins were in no hurry to go out. As a result, the project was impossible to transfer to a new version of typescript due to the old version of the gulp plug-in for a general auxiliary tool.
In addition, plugins are additional dependencies in your package.json, and they often have dependencies, and so on. All this directly affects the installation time, for example, when starting a build in travis.
In general, our experience has shown that if you rewrite the assembly to npm scripts, then life becomes easier.
It's also great not to use tools that require a global installation. But we will not discuss this idea in detail and simply share a link to a good article for those interested.
Live examples of using the described services can be found in our repositories of the e2e4 library (simple options) or the right-angled library of angular grids (more interesting options).
Configuring continuous integration c travis ci
Let's start with the obvious - every project needs continuous integration. Then travis ci is ready to help us .
Configuring the build in travis is quite simple and consists of the following steps:
- Log in to travis using your github account.
- We indicate on the settings page which of our repositories travis should monitor.
- Add the file ".travis.yml" to the root directory of the repository, which indicates the environment settings and commands for launching the build.
For example, like this:
language: node_js
node_js:
  - "6"
script:
  - npm run ci
So we tell travis that we need an environment with nodejs version 6.
The build process consists of one npm-command that runs a script called “ci” from the “scripts” section of the package.json file.
In our case, this command takes turns linting the project with tslint , building with typescript , and running tests with karma . If you are interested in the details, you can see them in package.json on github .
Also note that we did not specify “npm install” in the build commands. Travis himself understands that it is necessary to install dependencies through npm and performs it.
Moreover, if you use yarn, then travis will understand this, install yarnand install the dependencies using it.
Travis has a lot of such templates that save us from unnecessary actions.
Now we execute the push of the “.travis.yml 'file, after which the first build will be executed. The build process can be observed in real time on the travis page.
What else
- If you are interested in more complex scenarios or other platforms, we recommend that you look at the travis documentation . The quality of the documentation is impressive.
- In case the build fails, travis will write about this to the email address specified in your github account. You can also configure integration with slack.
- When creating a tag, travis will report the result in case of a successful build too.
- In addition to commits, travis runs a build on every pull request. Upon completion of the build, information about the result will be displayed on the pull request page. After executing the merge, travis will run the build again and report the result again on the pull request page.

- You can add a special badge to the readme file that will display the current status of the build. In combination, this is a link to information about the latest build in travis. Using badge, you can show your community that everything is fine with the build. Or all is bad. In the second case, such a badge motivates to fix the situation as quickly as possible.
- For public repositories, information about builds will be available to everyone. They don’t even need to log into travis for this.
- And the last one. You cannot delete builds from history. The maximum that can be done is to delete the log build. For example, if you “revealed” classified information in it. But the build itself will remain in history forever.
Set up test coverage reports with coveralls
The next service we will meet is coveralls .
The general idea is that when you run the tests, you generate a coverage report in lcov format and send it to the coveralls service for analysis. The service processes it and provides the following features:
- You can add a badge with a test coverage percentage in your readme. So you tell your community that you have everything seriously.
- When creating pull requests, coveralls adds information about how the test coverage has changed to the pull request.
- You can set the percent coverage limits for tests. And, if changes in the pull request reduce the percentage of coverage below the specified value, then the check for the pull request fails.
- The service integrates with ci-services, such as travis, stores the build history and allows you to watch the dynamics of test coverage from build to build. For example, here are the reports for the right-angled library.
To connect coveralls to your project, you must follow these steps:
- Log in to coveralls using your github account.
- Select the repositories for which you want to enable the collection of information.
- Install the coveralls npm package to your repository.
- Configure generation of coverage reports during test runs.
We will not consider how to generate coverage reports in detail, since it all depends on what you write tests on, what tools you use, and how you run tests. Plus, for example, for typescript there are no coverage reporting generation tools, since it is not typescript that is launched, but javascript. And, if you want to see the coverage of typescript code, then you will need tools for remapping reports on coverage of js code back to typescript code. All this is excessive specificity, which we try to avoid in this article. You can start exploring possible options from the coveralls npm package page on github.
- Add an npm script to transfer the generated report to the coveralls service.
"scripts": { "coveralls": "cat ./coverage/lcov.info | ./node_modules/.bin/coveralls", ... } - Run the added script after running the build in travis. To do this, use the after_success section in the travis.yml file. Now our travis.yml looks like this:
language: node_js
node_js:
  - "6"
script:
  - npm run ci
after_success:
  - npm run coveralls
What else
In addition to github, coveralls integrates with bitbucket and promised gitlab emergency support. It also supports integration with many continuous integration services and many development platforms.
Monitor dependency status with david
The david dependency monitoring service will be the simplest of those discussed in this article.
The idea of the service is simple - we add a badge to the project page, which is an indicator of the state of project dependencies. It is also a link to the project dependency analysis page.
To connect david to our project, we type the address in the browser according to the following template:
https://david-dm.org/<имя аккаунта>/<название репозитория>Depending on what types of dependencies are in your project, on the page that opens you will see the tabs “dependencies”, “devdependencies”, “peer dependencies” and “optional dependencies”.
On each of the tabs there is a list of dependencies of a certain type and badge, clicking on which you can copy the link in markdown or HTML format and place it in your readme file or on the project page in github pages.
What else
There is also a david cli utility designed to help update dependencies on your machine. True, we still could not understand what its advantages are compared with the built-in npm outdated and npm update commands .
Set up automatic dependency updates with greenkeeper
The greenkeeper service is also designed to help us in the difficult task of updating dependencies, but does it at a much higher level. His task is to completely relieve us of working with dependencies whenever possible.
To connect greenkeeper to our project, you need to go to the greenkeeper page in the public integrations section on github and install the application in the repository we need.
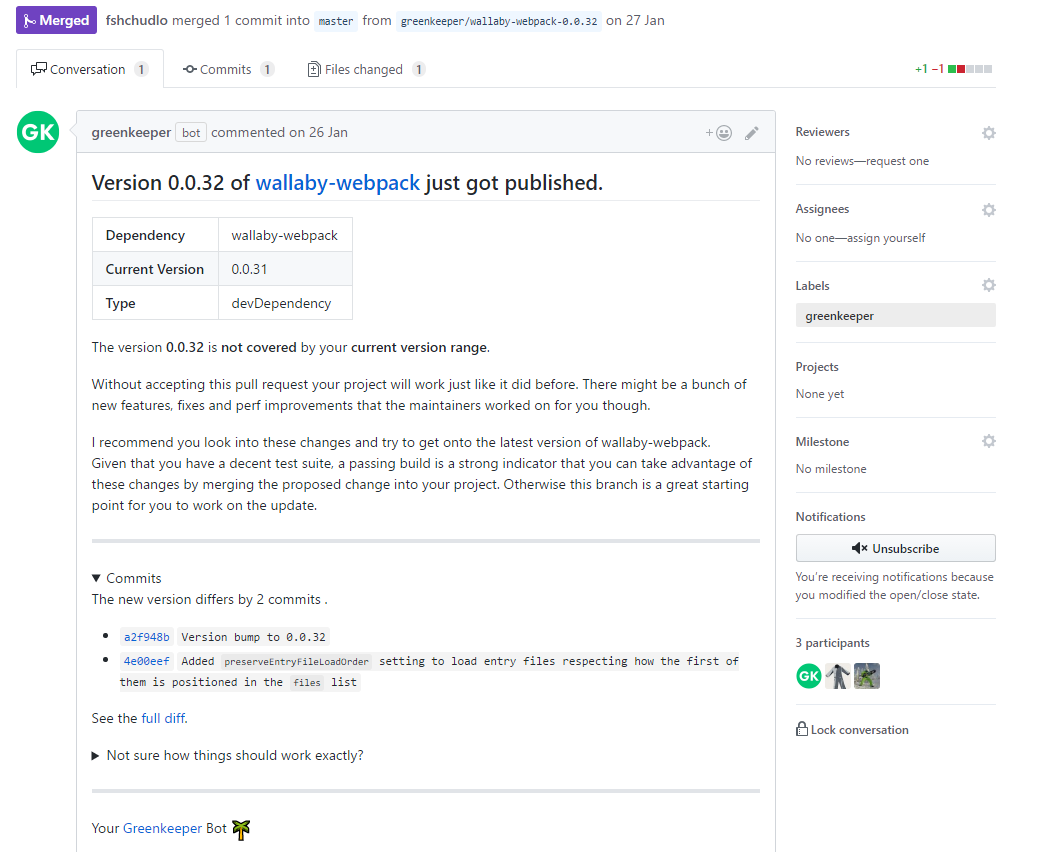
In just a minute, greenkeeper will create a pull request in which it will update all the dependencies of your project and add a badge to the readme that displays the status of greenkeeper.
Only if you make the merge of this pull request will greenkeeper start monitoring your project.
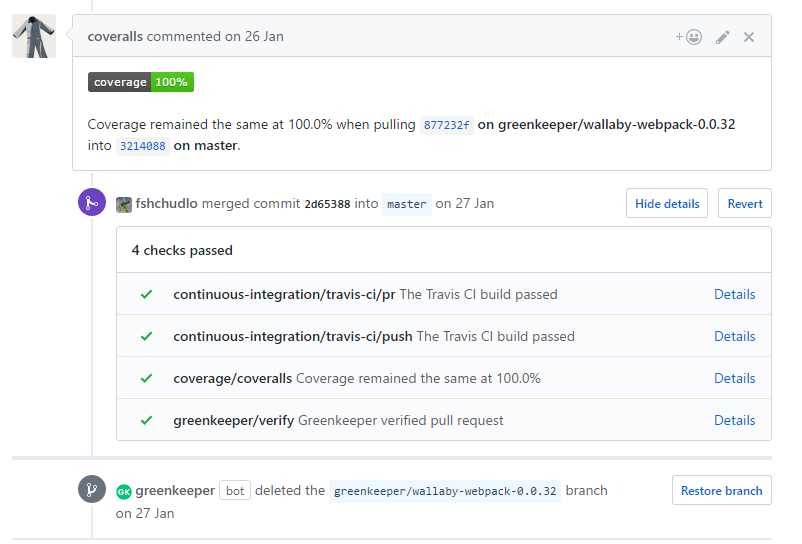
Further, when new versions of dependencies appear, greenkeeper will create pull requests, which will give a detailed description of what has been updated and, if possible, will list the changes in the new version. You just have to do a merge.
Naturally, connecting greenkeeper only makes sense if you have an automatic build configured and there are tests that can be used to at least nominally verify that your project is in working condition after the update. Greenkeeper recognizes if your repository has builds and tests, and writes a warning in the pull request text if it does not detect one or the other.
What else
- After you close the pull request, greenkeeper will delete the created branch itself.
- If the updated dependency releases the following versions very quickly (which will be similar to the quick fix release), greenkeeper will create a new branch and write about it in the comments to the original pull request.
- You may notice that sometimes greenkeeper creates a branch, and immediately deletes it without making a pull request. So greenkeeper acts if a dependency update is released that fits into the package.json version range specified in your package . That is, this version of the dependency will get to you when reinstalling the dependencies. Greenkeeper verifies in this way that even the version that gets into the version range does not break your build and, after running it, simply removes the branch. In case of an error, greenkeeper will create an issue.
- If you do not want greenkeeper to update certain dependencies in your project, then you can add the following section to your package.json file:
"greenkeeper": { "ignore": [“список”, “зависимостей”, “которые”, “не нужно”, “обновлять”] } - You should also know that greenkeeper is currently not working with yarn. There are ways around this problem, but it's hard to call them good. All information on this subject can be found in the issue on github .
- And the last moment. It is possible that a project uses several dependencies that need to be updated at the same time. For example, angular is divided into modules, and the chances are good that more than one module will be needed in the project. At the same time, updating them makes sense all together. Greenkeeper is not yet able to cope with such a task.
Improving commit messages with commitizen
Commitizen is a suite of tools to help you write meaningful commit messages.
In addition to being more informative for people interested in your repository, using commitizen has another plus. From the commitizen messages generated, you can easily compile changelog and release notes. And there are even utilities that analyze the history of commits and tell you what the next version number should be in order to comply with the semver convention . But more on that in the next section.
And we will start with the simplest. Install cz-cli. After installation, we can use the “git cz” command instead of the “git commit”. This command launches a wizard that guides us through a series of questions about what exactly we changed in the current commit and generates a commit message in a format that is both easy to read by a person and parsed by various tools.
So:
- Install commitizen globally:
npm install commitizen -g - We make our commitizen friendly repository. To do this, in the repository folder, run the command:
commitizen init <название адаптера> --save-dev --save-exact
Instead of <adapter name>, you must specify one of the possible adapters . In the world of front end development, the most popular is cz-conventional-changelog, the next message notation developed by the angular
team. This command will install the necessary dependencies, save them in the devDependencies section of the package.json file and write the necessary settings there.
What else
- In addition to working through the command line, there are extensions for code editors. For example, for vscode . Perhaps it will be more convenient for you, although there are no fundamental differences from using “git cz” in the terminal with the same vscode.
- It is worth noting that the messages that git cz generates are not difficult to write yourself. Some of our developers do this. A full description of the format can be found here .
- You can add a badge to the readme page so that your repository visitors know that you are following the commitizen convention.
Generate changelog and release notes with conventional-changelog
After we enabled commitizen, we get another option - the ability to configure the automatic generation of changelog and release notes.
Will help us in this conventional-changelog .
conventional-changelog is a whole family of tools with which you can build a release of a release using high-level tools according to ready-made templates, or assemble from individual tools what you need specifically.
The developers themselves recommend using standard-version , which is a relatively high-level tool.
An even higher level is semantic-release . This tool even makes push changes and publishes the version in npm.
From our experience - having tried both options, we settled on the use of lower-level tools.
The reason for this choice is that standard-version, for example, does not push changes and does not generate a release description on github. Adding such things to the release process, plus configuring via the standard-version options to launch the build, or to generate documentation, together require a configuration that is comparable in complexity to manually configuring the publishing process based on the npm version command .
Semantic-release, on the other hand, is trying to automate the whole process and to use it you need to take a very disciplined approach to development. The complexity of its configuration is also comparable to the manual configuration of the process. And the last one. Semantic-release does npm publish, which limits its use only to libraries distributed via npm, and publishing versions is possible not only for libraries.
So, we will build the release process based on npm version. Also, when running the version npm script, it independently runs the preversion and postversion scripts, if any. We will use both. The release process will consist of the following steps:
Preversion phase:
- Clearing directories with the results of a previous build using rimraf .
- Run tslint .
- Compilation typescript.
- Run tests with karma .
Using the e2e4 repository as an example , these steps are identical to those performed in the precommit hook, so we use the same script:
{
"preversion": "npm run precommit",
"precommit": "npm run rimraf -- esm coverage && npm run clean:src && npm run clean:tests && npm run lint && npm run build && npm run test"
}
Phase version:
- Generate documentation for publishing on github pages. In our case, typedoc is used for this . Regarding github pages - since recently it has become unnecessary to create a branch named gh-pages, you can simply specify the folder of your project in the github settings that will be used as the site. By default, this is the “docs” folder. Therefore, we simply generate documentation in the docs folder.
- Add generated documentation to git for commit.
- Add changelog.md with information about the changes. For this we will use conventional-changelog-cli . As parameters, we pass it the file name and convention for parsing messages. In our case, it is “angular”.
- Add updated changelog for commit.
- Update the version in package.json and add it for the commit. This npm will do for us.
- Generate a tag for the version and label it pre-release or latest, if necessary. This npm will also do for us. What label to put it will understand the version number, in accordance with the rules of semver .
Total, the following set of scripts is obtained:
{
"version": "npm run docs && git add -A docs && npm run changelog && git add CHANGELOG.md",
"changelog": "npm run conventional-changelog -- -p angular -i CHANGELOG.md -s",
"docs": "npm run rimraf -- docs && typedoc --options typedoc.json src/"
}
Postversion phase:
- We carry out push of the changed package.json, changelog.md, documentation.
- We carry out push of the created tag.
- Add a description of the changes to github release. To do this, we use conventional-github-releaser, passing it message notation as a parameter. In our case, it is “angular”. Since appropriate access rights are required to record information, you need to generate an access token that conventional-github-releaser will use for authorization. How this is done can be found in the project description.
Script for version:
{
"postversion": "git push && git push --tags && conventional-github-releaser -p angular",
}
Our release process is ready.
Run the script with the command:
npm version <номер версии или major/minor/patch>
The generated release notes look something like this: The
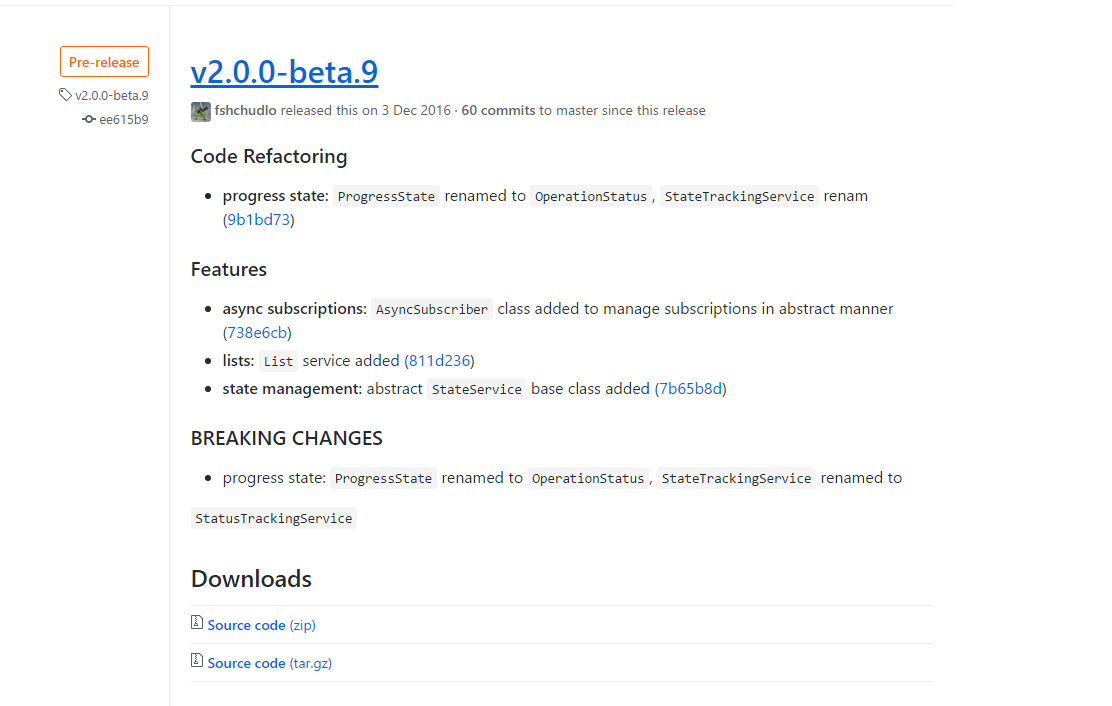
content in changelog.md is almost the same, so we won’t give it here.
What else
- Использовать инструменты conventional-changelog можно не только с github. Conventional-changelog-cli работает с любым git-репозиторием, а у conventional-github-releaser есть братская библиотека для работы с gitlab.
- Возможно, вы задались вопросом, зачем размещать одну и ту же информацию в двух местах. Описание релиза удобно, когда пользователь просто заинтересован, что в новой версии. А changelog поставляется в npm-пакете и пригодится когда пользователь уже обновил версию и ему нужна информация о релизе, чтобы внести коррективы в код в соответствии с breaking changes или использовать новые возможности библиотеки. И смотреть данную информацию прямо в редакторе кода удобнее, чем в описании релиза на github.
Управляем задачами с zube
We won’t talk much about zube.io. Each of us worked with task trackers and zube is not much different from many of them.
We will name only two of its advantages, because of which we decided to mention it in this article:
- It is free for open source projects, which is rare for project management tools integrating with github.
- zube allows you to combine tasks from several github repositories into one project and work with them simultaneously.
This concludes our review. If you know other interesting services or tools for working with github - please share your knowledge in the comments.
Thank you for your attention.
Cover image for the article - the Benevocats by cameronmcefee.