Launching WebRTC media server in Amazon EC2 cloud for live video streaming from browsers and mobile applications
AWS Marketplace
First of all, I would like to say a few words about the Amazon AWS Marketplace . Unlike Google Play and the App Store , where mobile applications are uploaded, developers post server applications on AWS. Here you can find a lot of interesting things, from the free LAMP stack to server-based Enterprise solutions like SAP .
The beauty of working with the market lies in the speed and convenience of deployment. The required application server, as a rule, is already configured, optimally configured and will be launched during the launch of the EC2 instance itself(Amazon EC2 virtual server). The launch of the instance comes from the web interface and does not require any additional admin knowledge and skills.
Linux administration skills, however, may be required later during operation. But you must admit, it’s definitely nice to take it and start working, skipping all the stages of installation and configuration and saving an hour or two of time for any troubleshooting and walking with a tambourine on a rake. As a result, we get a live server with the required functionality, pre-configured and already working.

Later, nothing prevents you from logging into this server via SSH, checking all current settings, the file system, etc. As a result, we have full access to the server and saved valuable time.
To work with AWS Marketplace, you will of course need an account on Amazon Web Services. Fortunately, many developers and IT professionals already have such an account. If not, you can always get it on the AWS website .
WebRTC media server
As you know, WebRTC is a technology for capturing, playing and transmitting audio and video data in browsers and mobile devices. Using WebRTC, you can make applications such as online broadcasts, video chats, video calls, conferences, Internet radio and many other projects where RTC itself is required - real-time communication in real time and with low latency.

WebRTC media servers extend the capabilities of WebRTC technology, which without such a server works Peer-to-Peer and has a number of technical limitations.
A media server can be used for tasks such as:
- WebRTC video stream recording on the server
- Video Stream Relay
- Video Stream Transcoding
- Stream format conversion, e.g. from WebRTC to RTMP or HLS
- Slicing a video stream to snapshots
- Play WebRTC video stream from IP cameras
- etc.
In this article, we will show how to launch a WebRTC server on Amazon AWS in just two clicks and how to test several examples related to processing video received via WebRTC.
Web call server
We will test Web Call Server . This is a WebRTC media server with support for WebRTC, RTMP, RTSP and other protocols and technologies for working with real-time video.
Immediately after starting, we will try to test several functions inherent in the media server, such as recording, relaying, converting to RTMP and playback from an IP camera.

AWS Marketplace Listing
It was mentioned above that to start, you will need a login in AWS. Listing is a page of a server application in a market.
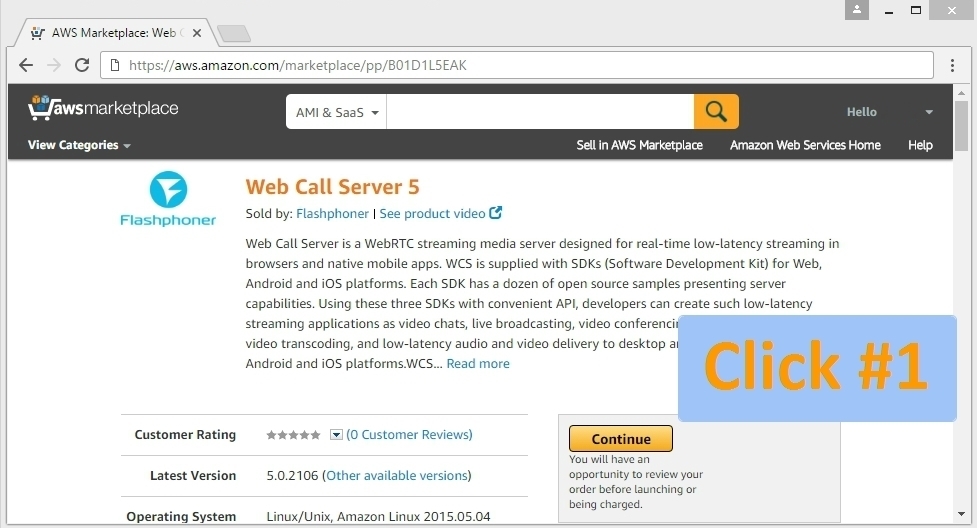
Web Call Server listing is available at this link and looks as follows. Pay attention to the yellow Continue button - this is our number 1 click.
The next page is a complete description of the service and allows you to choose the appropriate instance size by CPU and memory, adjust the list of open ports.
You can still not change anything and just click the Launch with 1 click button , leaving all the settings by default.
Amazon - Instances are famous for creating and destroying them at the same time. Therefore, if something was configured incorrectly or the wrong instance size was selected, we simply terminate it and create it again. Fortunately, this is a routine operation, requiring a couple of minutes in time.

Done
After the second click, you will see a message about a successful launch. After that, you will have to wait until the instance rises and all the necessary procedures related to the first launch pass.

If you go to the EC2 Management Console and see what we started there in the Instances section , then you can find this plate:

This is our starting EC2 instance, which was assigned the following addresses:
DNS:	ec2-34-207-147-235.compute-1.amazonaws.com
IP:	34.207.147.235
Open the address of the initial server setup in the Google Chrome browser :
https://ec2-34-207-147-235.compute-1.amazonaws.com:8888

Chrome gives an unfriendly greeting and complains about problems with SSL certificates. Indeed, only you can install certificates and your own domain must be used to install them.
Therefore, just click on the ADVANCED / PROCEED links and thereby tell the Chrome browser to use the certificates that the server offers.
The next step is to enter the number of a free license for Web Call Server, which can be obtained here .

Next, you need to set an administrator password to enter the server’s Dashboard and log in using the username and password.

Testing WebRTC Records
Server presetting is completed and you can proceed directly to testing. To do this, log in to Dashboard and open a test case.
For example, WebRTC broadcast with video stream recording is as follows:
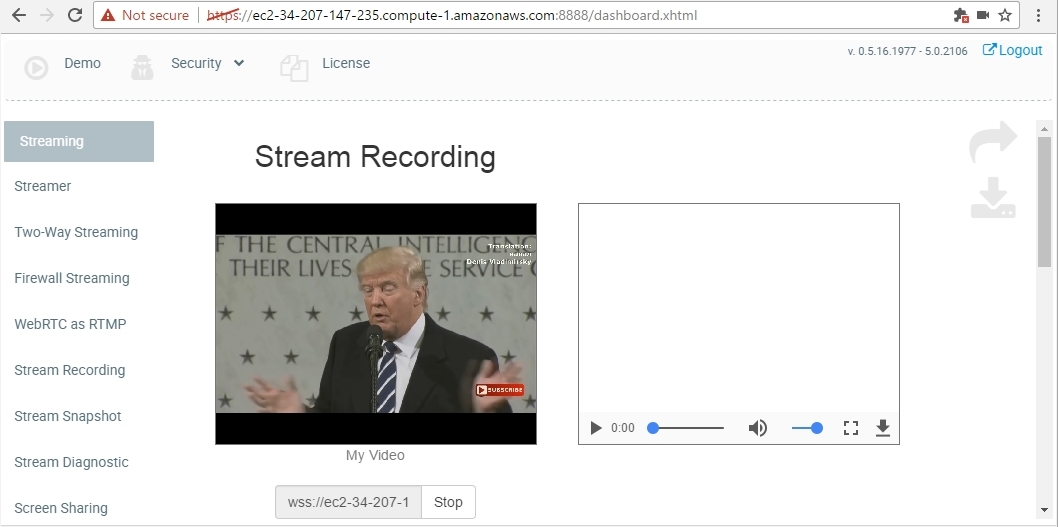
On the left side we capture video from a webcam. Video is simultaneously relayed and recorded on the server. After the broadcast is stopped by the Stop button , the stream stops going to the server and recording stops. A link to the download of the file in mp4 format appears on the right .
WebRTC Testing - Relays
Another useful application of the WebRTC media server is one-to-many relay of the WebRTC stream. For this, it is convenient to use the Two Way Streaming example .

In the screenshot above, a video stream with the name eabc is sent to Amazon EC2 server using WebRTC technology. Thus, the name of the video stream is set and the stream can be played by this name in the same interface on the right by pressing the Play button , or in another example - Player , for example like this:

Since this is a relay, you can open many player windows, each of which will play the same WebRTC video stream.
WebRTC broadcast from RTSP cameras
The server can pick up the stream from the IP camera and distribute it via WebRTC. To do this, the IP camera must be accessible via RTSP and contain H.264 and AAC codecs.
For testing, you can use the same Player , with the only difference being that you need to specify the RTSP URL as the name of the video stream.
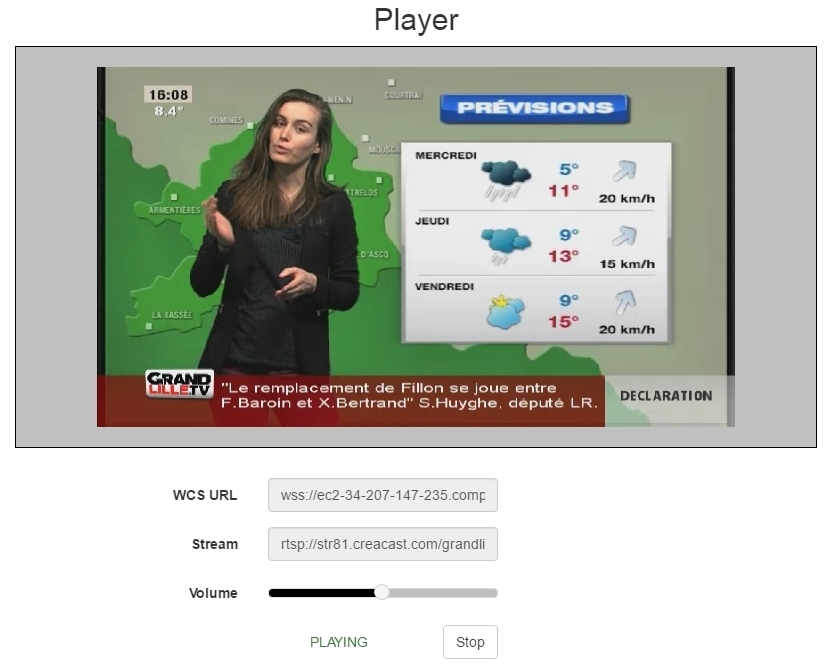
This example uses an RTSP stream from a source at rtsp: //str81.creacast.com/grandlilletv/high
WebRTC relay in RTMP
As a final fourth example, consider translating a WebRTC stream with RTMP replication. It's no secret that despite the wide development of WebRTC technology, many services continue to run on Flash, and the task of this conversion is to make WebRTC stream available on Flash platforms and servers that do not support WebRTC.
An example is called WebRTC as RTMP re-publishing and shows how on one page you can send a stream to a server via WebRTC (on the left), redirect it to the same server as RTMP and play in Flash Player using the RTMP protocol (on the right).

Thus, we showed such WebRTC media server features as
- WebRTC Record
- Webcam Relay
- RTSP IP Camera Relay
- Convert to RTMP
Web development
All the examples that we ran in Dashborad are just plain open source JavaScript + HTML .
For example, the Player example code is available here .
The work of all these examples comes down to three simple JavaScript functions .
1. Establish a connection.
This code establishes a connection to the server using the Websocket protocol. Having received the ESTABLISHED status , you can call createStream () on the session object to send a video stream or playback.
Flashphoner.createSession({urlServer: "wss://ec2-34-207-147-235.compute-1.amazonaws.com:8443"}).on(Flashphoner.constants.SESSION_STATUS.ESTABLISHED, function (session) {
   //session connected, start streaming
}).on(Flashphoner.constants.SESSION_STATUS.DISCONNECTED, function () {
   //display status
}).on(Flashphoner.constants.SESSION_STATUS.FAILED, function () {
   //display status
});
2. Sending a video stream
To send a video stream to a server, the stream.publish () method is used . As you can see from the code, first event handlers are hung on the created Stream, and publish () is called at the very end .
session.createStream({
   name: "eabcd",
   display: localVideo,
   cacheLocalResources: true,
   receiveVideo: false,
   receiveAudio: false
}).on(Flashphoner.constants.STREAM_STATUS.PUBLISHING, function (publishStream) {
//display status
}).on(Flashphoner.constants.STREAM_STATUS.UNPUBLISHED, function () {
//display status
}).on(Flashphoner.constants.STREAM_STATUS.FAILED, function () {
//display status
}).publish();
3. Play a video stream
To play a stream, you need to call play () . The stream is played in the div element with id = remoteVideo.
session.createStream({
   name: "stream222",
   display: remoteVideo,
   cacheLocalResources: true,
   receiveVideo: true,
   receiveAudio: true
}).on(Flashphoner.constants.STREAM_STATUS.PLAYING, function (playStream) {
   //display status
}).on(Flashphoner.constants.STREAM_STATUS.STOPPED, function () {
   //display status
}).on(Flashphoner.constants.STREAM_STATUS.FAILED, function () {
   //display status
}).play();
Thus, the development and adaptation of examples will require a solid knowledge of JavaScript and HTML, allowing you to embed these functions in existing page code and scripts.
More detailed documentation on web development of scripts for playing and sending video streams can be found on the Web SDK page for Web Call Server .
Administration
The instance obtained at the AWS Marketplace is a regular Amazon EC2 instance, to which standard SSH administration methods apply.
In order to enter the server console via SSH, we use for example Putty
1. Enter the IP address or domain of the EC2 server in the Session menu .

2. We set the standard user name ec2-user in the menu Connection / Data
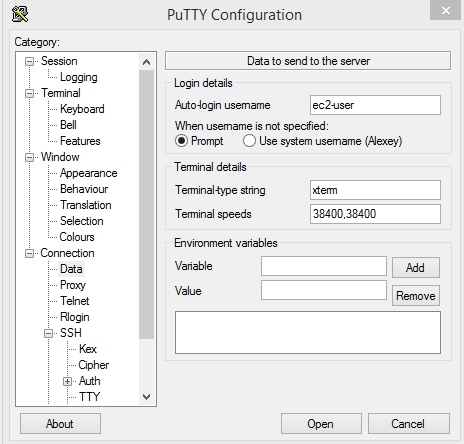
3. Specify the path to the file with the private key.
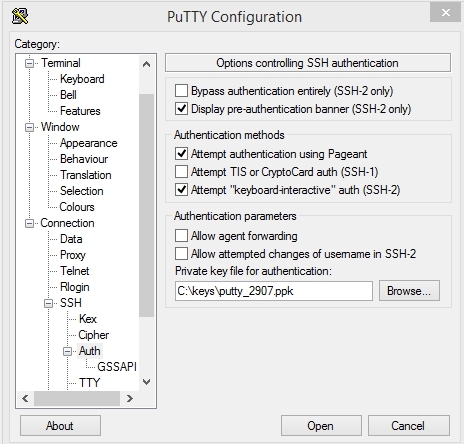
Key management is done inside an Amazon AWS account in Security Settings. Most likely, since you already have an account, you have already created at least one Security group and downloaded keys. If this is not the case, refer to the Amazon AWS documentation to create / download your Private Key .
Next, we get to the console of the Linux server and can administer it.
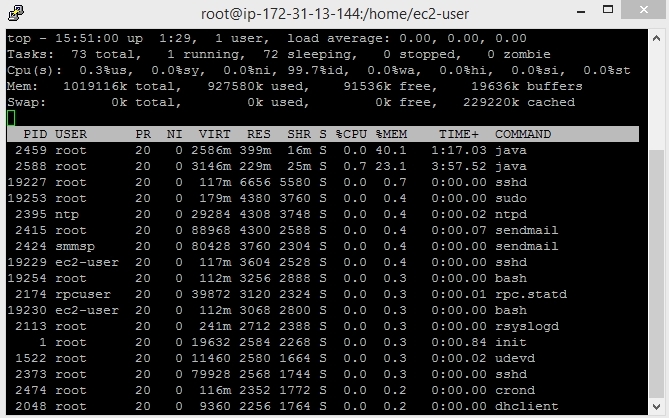
For example, you can go to the folder with the examples that we showed above and see the files that lie there. In particular, the Two Way Streaming example will be located along the following path:
/usr/local/FlashphonerWebCallServer/client2/examples/demo/streaming/two_way_streamingAnd the tree of example files will look like this:
cd /usr/local/FlashphonerWebCallServer
tree -L 1 client2
These examples can be packaged and copied to your web server, such as Apache or Nginx.
For example, like this:
cd /usr/local/FlashphonerWebCallServer
tar -czf client2.tar.gz client2
It will not be superfluous to pay attention to the fact that we test everything using HTTPS, as In Chrome, WebRTC refuses to work with insecure (HTTP) pages. Therefore, when porting examples to Apache or Nginx, make sure that these pages are accessible via HTTPS.
References
- AWS Web Services - Amazon AWS Servers
- AWS Marketplace - Amazon AWS Market
- Web Call Server - WebRTC Media Server Web Call Server site
- Web Call Server Listing on Amazon Marketplace - Listing Web Call Server on AWS
- Player - Example JavaScript / HTML Player code for playing WebRTC
- Web SDK - JavaScript API for developing WebRTC web applications
- Putty is an SSH client for Windows.
- AWS Security and key management - key management in AWS Marketplace