February 23, 2017 at 09:39
Localization Guide for iOS
- Transfer
- Tutorial

Localization is the process when you create support for other languages for your application. Often you first make an application with an English interface and then localize it in other languages, for example, Japanese.
The localization process is time-consuming, and its steps are slowly changing as Xcode updates. This post explains each step based on the
Translated to Alconost
Before starting work on localization, be sure to select the option “Use Base Internationalization”.
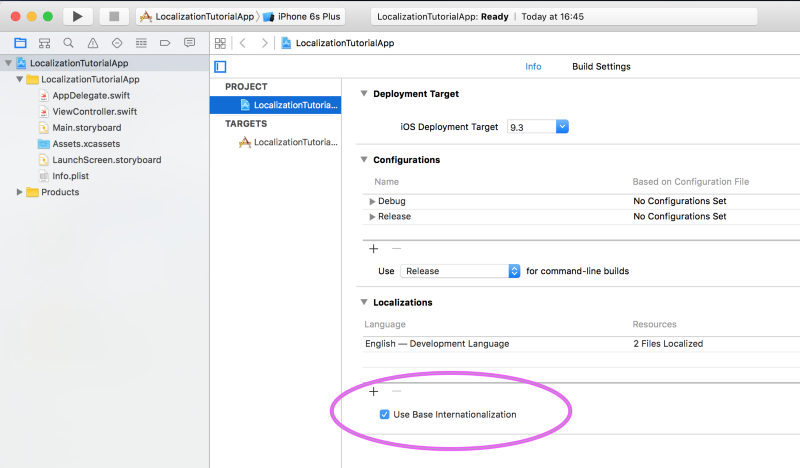
What is basic internationalization?
When you create a project, Xcode automatically generates resources and file structure for the default language.
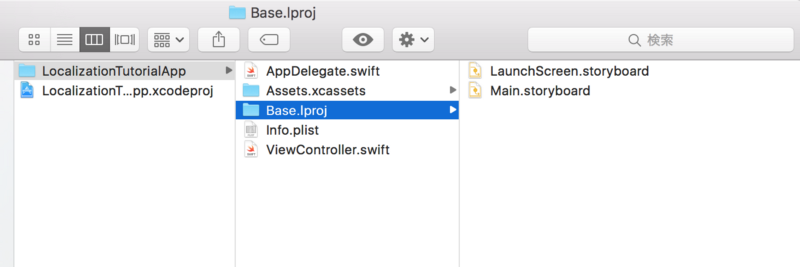
This is the so-called Base language. If you are creating an application for the global market, your basic language resources will usually contain English texts.
Adding a New Localization
So, we have the default base structure of language resources. Let's add support for the new language.
Select your project file in the Project Navigator, then select your project in the lists of projects (Project) and target parameters (Targets). Open the Info tab and click the + button under the Localizations block. Now select the language you want to support from the ones presented in the drop-down list.
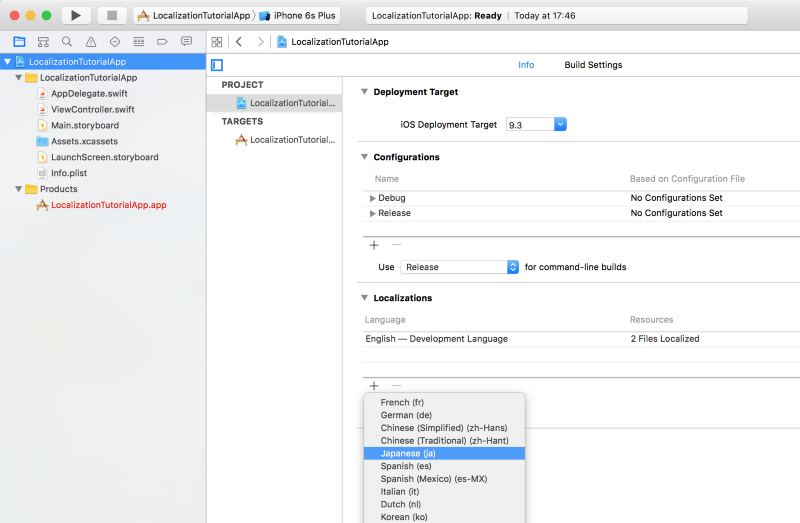
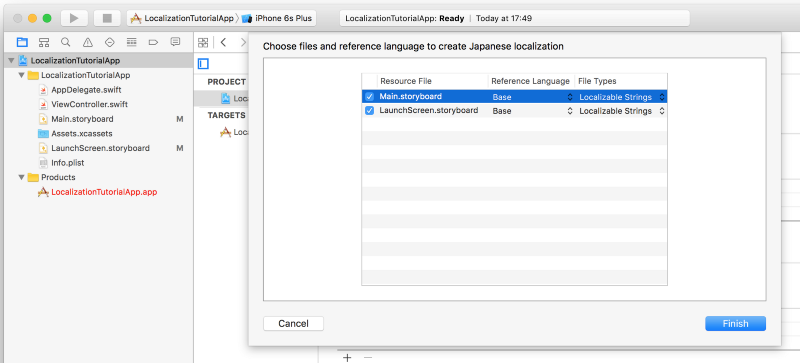
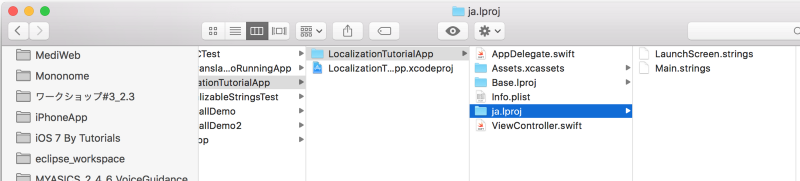
Xcode will open a dialog with a set of resources that you need to add for the new language. Clicking the Finish button will create these files in the folder of the new language project called [new language] .lproj. (In this example, support for the Japanese language is added, respectively, the ja.lproj folder is created.)
Now we have the file structure in the project folder, as in the example below.
Where is the Localizable.strings file?
The Localizable.strings file is where you add translation data as key / value pairs.
Earlier versions of Xcode generated a Localizable.strings file by default, copies of which could be easily created for other languages.
Recent versions of Xcode do not create a Localizable.strings file by default.
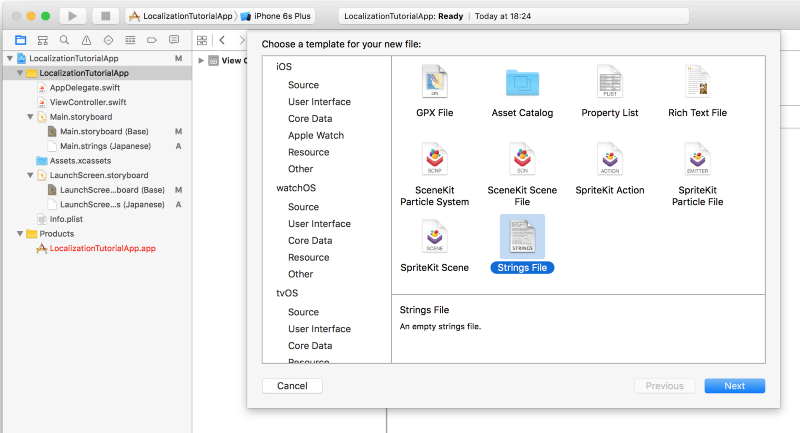
To add the Localizable.strings file, select File → New → File, and then the Strings (Strings File) file on the iOS Resource tab, name Localizable.strings and create the file.
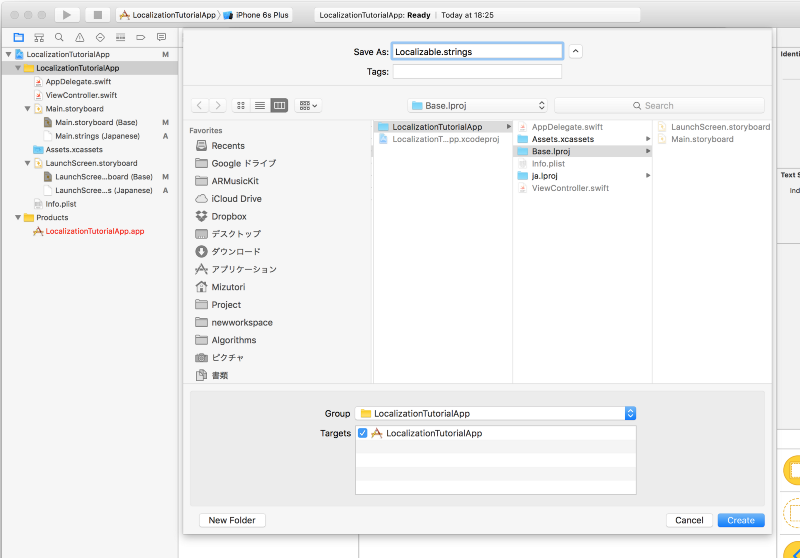
Now you have the Localizable.strings file for the Base language, as in the example below.
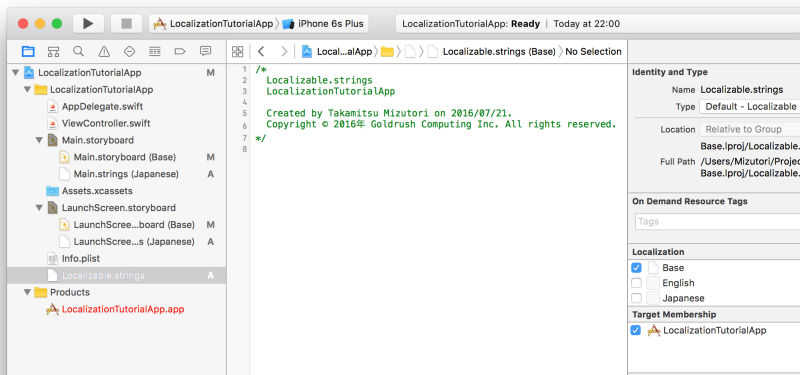
To add Localizable.strings for the Japanese language, select Japanese (Japanese) in the browser (File Inspector). This will create a new Localizable.strings file in the ja.lproj folder.
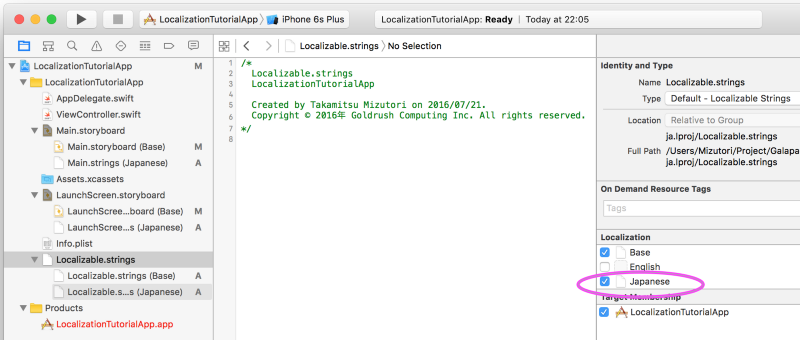
Now we have two Localizable.strings files: one in the Base.lproj folder, the other in the ja.lproj folder.
Let's add the words and phrases used in the application to the Localizable.strings file of the base language.
Below is an example of adding “Welcome” = “Welcome”;
The left side is the so-called key, with the help of which the NSLocalizedString method then extracts the text (value) from the right side. This is what this data type looks like - key / value pairs.
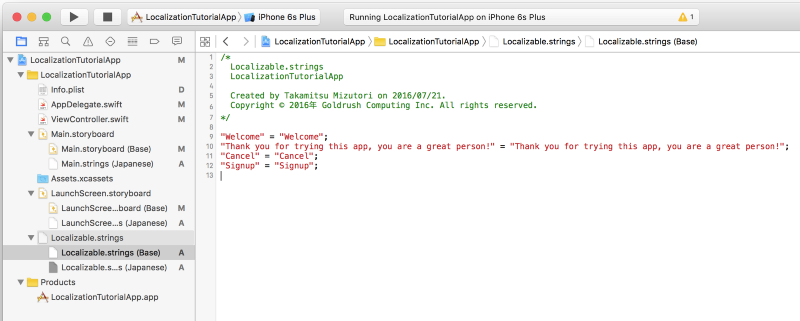
Below is an example of the NSLocalizedString method. We set the key as the first parameter of the method, thus allowing it to extract the corresponding value from the Localizable.strings file and return it. In this example, we get localized strings for the title, message, and notification buttons.
let alertTitle = NSLocalizedString("Welcome", comment: "")
let alertMessage = NSLocalizedString("Thank you for trying this app, you are a great person!", comment: "")
let cancelButtonText = NSLocalizedString("Cancel", comment: "")
let signupButtonText = NSLocalizedString("Signup", comment: "")
let alert = UIAlertController(title: alertTitle, message: alertMessage, preferredStyle: UIAlertControllerStyle.Alert)
let cancelAction = UIAlertAction(title: cancelButtonText, style: UIAlertActionStyle.Cancel, handler: nil)
let signupAction = UIAlertAction(title: signupButtonText, style: UIAlertActionStyle.Default, handler: nil)
alert.addAction(cancelAction)
alert.addAction(signupAction)
presentViewController(alert, animated: true, completion: nil)
When launching the application, we see a notification with texts in English.
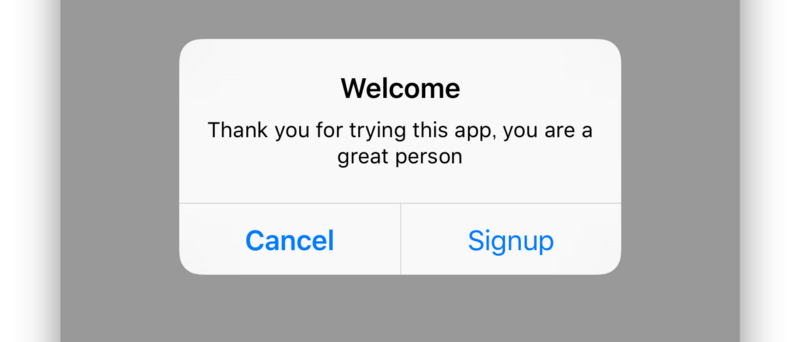
Next step: add the Japanese texts to the Localizable.strings file in the ja.lproj folder. We use the same keys, but replace the values with the corresponding translations into Japanese.
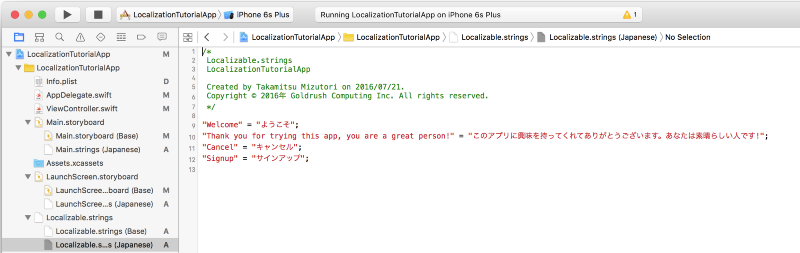
Then, in the iOS simulator, switch the phone language to Japanese, launch the application and see a notification with texts in Japanese.
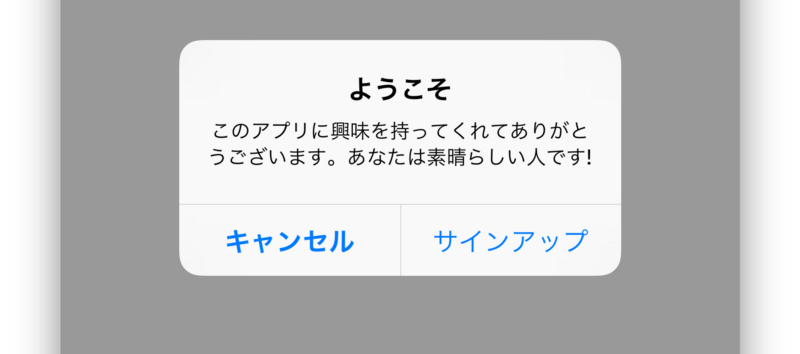
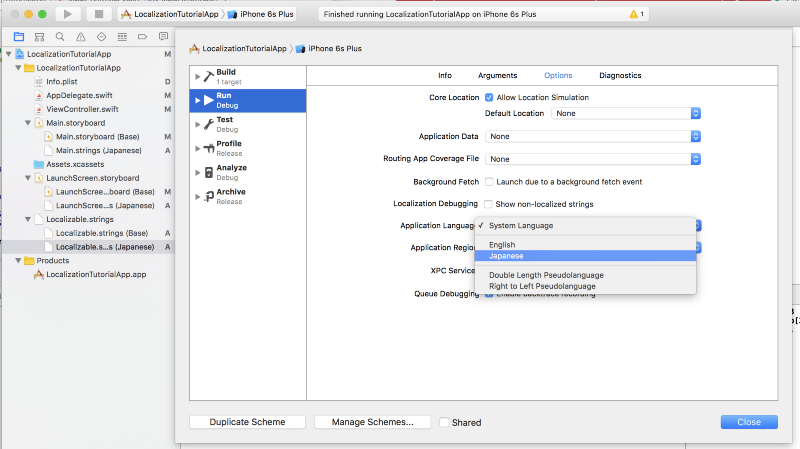
Switching the phone language every time you need to check the localization results is too laborious. Xcode provides a convenient ability to switch languages only for the application when it is running in the iOS simulator.
To do this, select Edit Scheme from the drop-down menu in the upper left corner of the Xcode window and change the Application Language from System (System Language) to Japanese (Japanese). (If you’re lost, see the screenshot below.)
This configuration will not switch the phone language in the simulator, but will change the environment language in the application to the one you specified. This is convenient when you add several languages and want to switch between them to check the results of localization.
Localization of storyboards
Well, now we know how to extract localized texts using NSLocalizedString and how to prepare the data in Localizalbe.strings files.
This is enough to programmatically display localized texts to users.
The next step is to support the localization of texts defined in Storyboards, for example, button names. If you specify the names of buttons or shortcuts in storyboards and do not change these texts programmatically in the view controllers (ViewControllers), you will have to do the localization of your .storyboard files.
To add translation data to words used in storyboards, first select the storyboard file in the Project Navigator, then find and add Japanese (Japanese) to the browser (File Inspector) on the right. This will create the [StoryboardFileName] .strings file in the ja.lproj folder. In the example below, the file Main.strings (Japanese) was created for the Main.storyboard file.
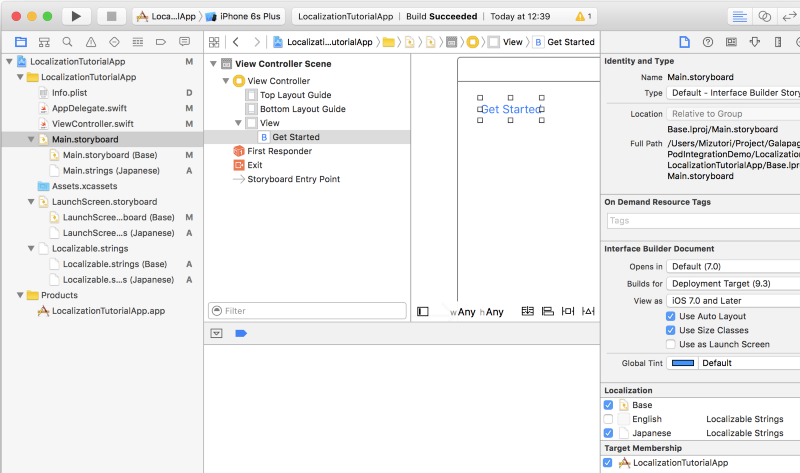
In the Main.strings file, you will see something similar.
/* Class = "UIButton"; normalTitle = "Get Started"; ObjectID = "qs4-6I-gUp"; */
"qs4-6I-gUp.normalTitle" = "Get Started";
Replace the “Get Started” part with the appropriate Japanese phrase.
/* Class = "UIButton"; normalTitle = "Get Started"; ObjectID = "qs4-6I-gUp"; */
"qs4-6I-gUp.normalTitle" = "始める";
Launch the app. Make sure the button name is correctly localized to Japanese.
What is wrong with [Storyboard] .strings files
The only problem is that the Main.strings file does not update when you add new user interface components to the storyboard file.
Therefore, you will always have to first decide on the components of the interface and only then create Main.strings, including, for example, Japanese localization in the browser (File Inspector).
Application Name Localization
To localize the name of the application or something else from the Info.plist file, create the InfoPlist.strings file.
Choose Go to File → New → File, then the Strings (Strings File) file on the iOS Resource tab and set the name InfoPlist.strings. Save the InfoPlist.strings file in the Base.lproj folder. (Now Xcode will classify this InfoPlist.strings file as the base language.)
We usually localize these two values in the info.plist file:
- CFBundleDisplayName - the name of the application in the form in which it is displayed on the main screen;
- NSHumanReadableCopyright - Copyright information (e.g. 2014, Goldrush Computing Inc. All rights reserved).
Provide the application name and copyright information for these keys, as in the example below.
/*
  InfoPlist.strings
  LocalizationTutorialApp
  Created by Takamitsu Mizutori on 2016/07/25.
  Copyright  2016年 Goldrush Computing Inc. All rights reserved.
*/
"CFBundleDisplayName" = "MyApp";
"NSHumanReadableCopyright" = "2016 Goldrush Computing Inc. All rights reserved.";
Then in the browser (File Inspector), select Japanese to add InfoPlist.strings to the ja.lproj folder (for this, the InfoPlist.strings file should remain selected).
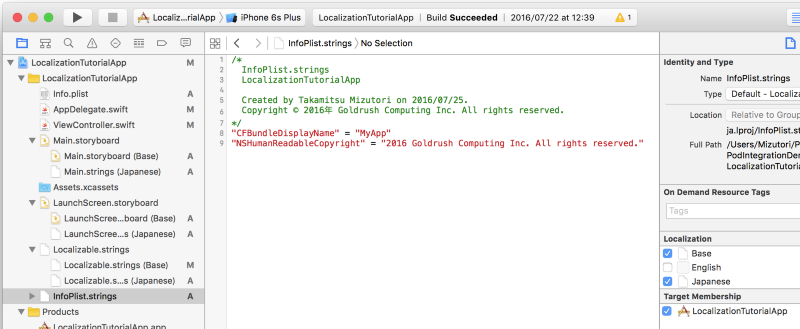
In the InfoPlist.strings (Japanese) file, replace the values with translations in Japanese, as in the example.
/*
  InfoPlist.strings
  LocalizationTutorialApp
  Created by Takamitsu Mizutori on 2016/07/25.
  Copyright  2016年 Goldrush Computing Inc. All rights reserved.
*/
"CFBundleDisplayName" = "マイアプリ";
"NSHumanReadableCopyright" = "2016年 Goldrush Computing Inc. All rights reserved.";
Launch the application and see if the name of your application is correctly localized in Japanese.

That's the whole process of localizing an application into another language.
A new way to localize applications
I wrote many applications and worked a lot on localization. It significantly takes up working time, so I always looked for ways to simplify it. Finally, we created a tool that facilitates the localization process - it is called InAppTranslation. If you are interested, visit our website - inapptranslation.com .
About the translator
Translation of the article was done in Alconost.
Alconost localizes applications, games and sites in 60 languages. Native-language translators, linguistic testing, cloud platform with API, continuous localization, project managers 24/7, any format of string resources.
We also make promotional and educational videos.- for sites selling, image-building, advertising, training, teasers, expliners, trailers for Google Play and the App Store.
Read more: alconost.com