WS2801 LED Strip Control Using Raspberry Pi and iOS
- Tutorial
Hello!
This article contains the source code of the application for the iOS operating system, the purpose of which is to control the WS2801 LED strip connected to the Raspberry PI.
The article pbelov served as the basis for this post - “ We control the LED strip using Raspberry Pi and Android” habrahabr.ru/post/203532 . If you need to familiarize yourself with the basic principles of connecting tapes with WS2801 chips to Raspberry PI, it is better to start reading from the original article by Pavel.
Some time ago I became interested in the organization of lighting in the house. The search for ready-made software solutions yielded results, but I wanted more freedom in customizing the RGB tape. In particular, existing solutions were deprived of the ability to customize custom animations, creeping lines, or flowing from one color to another. For this reason, it was decided to start creating our own application with advanced color settings, the order of colors in the tape and their smooth animation.
Project repository github.com/PawelMolodkin/HomeLed
The root folder of the repository contains the client-side iOS project for Xcode, and the server application project for IntelliJ IDEA is in the ledserver folder.
The ledserver / putty folder contains life-facilitating scripts written to automate the loading and debugging of a server application on raspberry.
This is how the whole program looks.
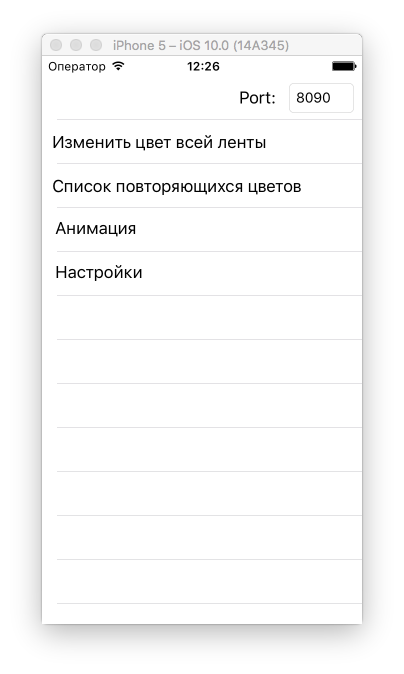
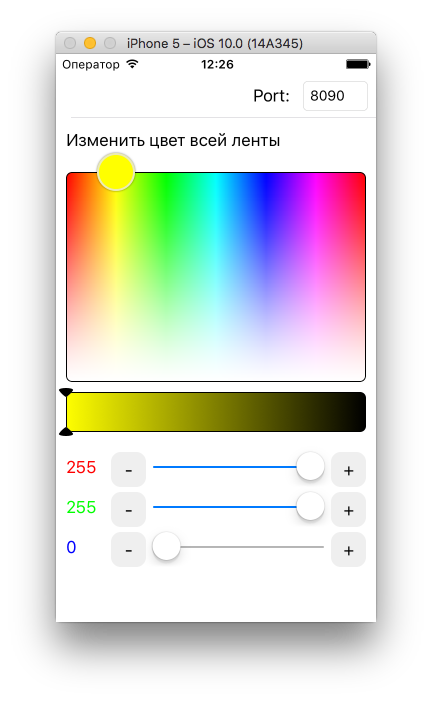
The first cell adjusts the color of the entire ribbon.
The second cell is used to create lists of colors.
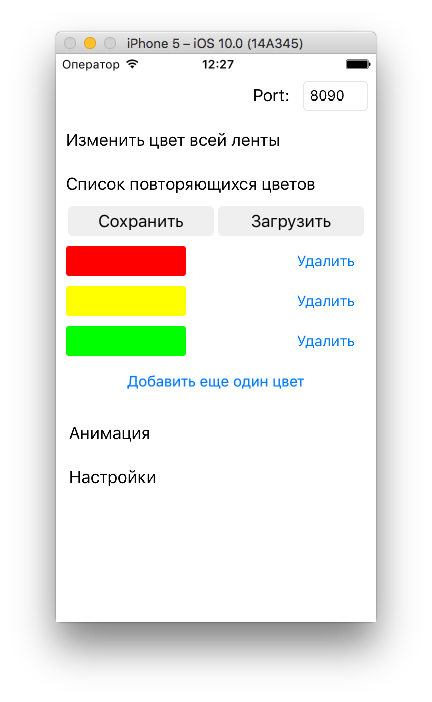
You can sequentially select any colors, then save the list by giving it a name. The saved lists will be needed to set up the animation.
The third cell combines two functions: linear animation and animation of smooth alternation of color lists created in the second cell.

The enable animation animator launches linear animation. Spinner can change the speed of linear animation.
List animations are a bit trickier.
First, you should have several color lists in the second cell. Then tap on the "Color Animation" button. In it we add the necessary lists in the sequence in which you want the colors to change. Then we return from the add list dialog. Now click "Save" and enter the name of the new animation.
To activate the saved animation, click "Download" and select the animation of the color list we need
The server is started by the command
Where the number 50 is the number of diodes in the tape.
The server listens on UDP port 8090. UDP was chosen for easier integration of the server into the local network, as it is configured to listen to the broadcast channel, therefore if your iPhone and Raspberry are connected to the same router, you don’t even have to enter the correct Raspberry IP address in iOS, the server will still receive its messages from the client.
For ease of development on the Desktop and debugging on a remote Raspberry PI, create a Remote debugging configuration in IDEA.
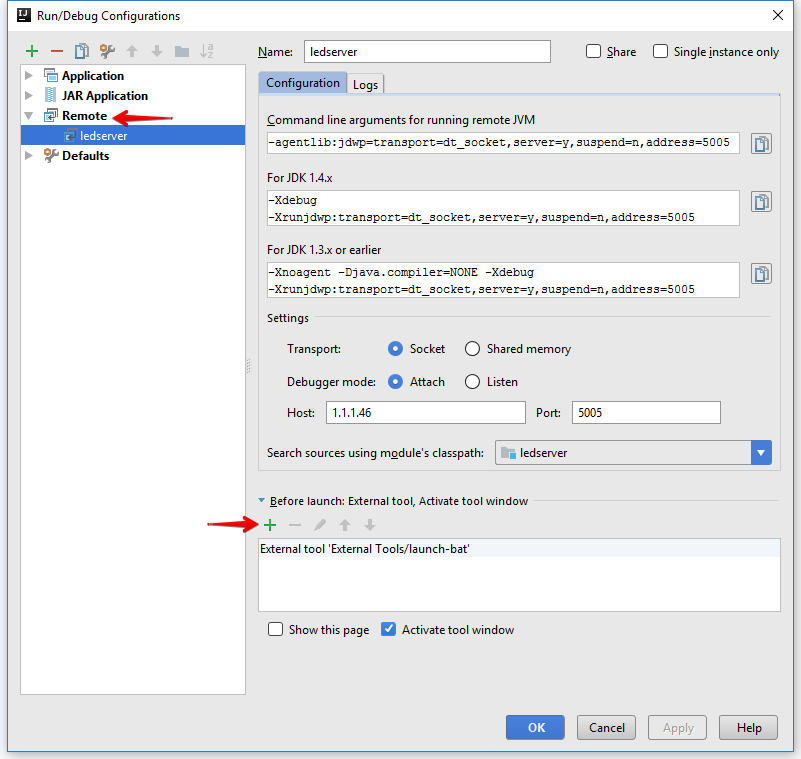
As the 'external tool' select the 'Run External Tool', then the putty / launch-led-server.bat script. Remember, in the launch-led-server.bat script, you must specify the correct IP addresses of your Raspberry. Also, an ssh public key must be added to raspberry so that putty can automatically log in using pagent to upload fresh .jar and use it.
Thank you for attention!
This article contains the source code of the application for the iOS operating system, the purpose of which is to control the WS2801 LED strip connected to the Raspberry PI.
The article pbelov served as the basis for this post - “ We control the LED strip using Raspberry Pi and Android” habrahabr.ru/post/203532 . If you need to familiarize yourself with the basic principles of connecting tapes with WS2801 chips to Raspberry PI, it is better to start reading from the original article by Pavel.
Some time ago I became interested in the organization of lighting in the house. The search for ready-made software solutions yielded results, but I wanted more freedom in customizing the RGB tape. In particular, existing solutions were deprived of the ability to customize custom animations, creeping lines, or flowing from one color to another. For this reason, it was decided to start creating our own application with advanced color settings, the order of colors in the tape and their smooth animation.
Project repository github.com/PawelMolodkin/HomeLed
The root folder of the repository contains the client-side iOS project for Xcode, and the server application project for IntelliJ IDEA is in the ledserver folder.
The ledserver / putty folder contains life-facilitating scripts written to automate the loading and debugging of a server application on raspberry.
Client part
This is how the whole program looks.
The first cell adjusts the color of the entire ribbon.
The second cell is used to create lists of colors.
You can sequentially select any colors, then save the list by giving it a name. The saved lists will be needed to set up the animation.
The third cell combines two functions: linear animation and animation of smooth alternation of color lists created in the second cell.
The enable animation animator launches linear animation. Spinner can change the speed of linear animation.
List animations are a bit trickier.
First, you should have several color lists in the second cell. Then tap on the "Color Animation" button. In it we add the necessary lists in the sequence in which you want the colors to change. Then we return from the add list dialog. Now click "Save" and enter the name of the new animation.
To activate the saved animation, click "Download" and select the animation of the color list we need
Server side
The server is started by the command
java -jar ledserver.jar 50Where the number 50 is the number of diodes in the tape.
The server listens on UDP port 8090. UDP was chosen for easier integration of the server into the local network, as it is configured to listen to the broadcast channel, therefore if your iPhone and Raspberry are connected to the same router, you don’t even have to enter the correct Raspberry IP address in iOS, the server will still receive its messages from the client.
Debugging
For ease of development on the Desktop and debugging on a remote Raspberry PI, create a Remote debugging configuration in IDEA.
As the 'external tool' select the 'Run External Tool', then the putty / launch-led-server.bat script. Remember, in the launch-led-server.bat script, you must specify the correct IP addresses of your Raspberry. Also, an ssh public key must be added to raspberry so that putty can automatically log in using pagent to upload fresh .jar and use it.
Thank you for attention!