Introduction to Error Handling in Swift 3
- Transfer
Today we have prepared a translation for those who, just as the author of the article, while studying the Swift programming language documentation avoid the chapter “Error Handling”.
From the article you will learn :

My Story
When I was younger, I started learning the Swift language documentation. I read all the chapters several times, except for one: “Error Handling”. For some reason, it seemed to me that you need to be a professional programmer to understand this chapter.
I was afraid of error handling. Words like catch, try, throw and throws seemed meaningless. They were just scary. Do they not look intimidating to the person who sees them for the first time? But do not worry, my friends. I am here to help you.
As I explained to my thirteen-year-old sister, error handling is just another way to write an if-else block to send an error message.
Error message from Tesla Motors
As you probably know, Tesla cars have an autopilot feature. But, if the machine crashes for some reason, it asks you to pick up the steering wheel and reports an error. In this tutorial, we will learn how to display such a message using Error Handling.
We will create a program that will recognize objects such as traffic lights on the streets. To do this, you need to know at least machine learning, vector calculus, linear algebra, probability theory and discrete mathematics. Joke.
Introducing the if-else statement
To get the most out of Hand Swift Error in Swift, let's take a look at the past. Here's what many, if not all, novice developers would do when faced with an error message:
Problem
The biggest problem is the readability of the code when the else block becomes too cumbersome. Firstly, you won’t understand whether the function itself contains an error message until you read the function from beginning to end or if you call it, for example, selfDriveCanCauseError, which will also work.
See, the function can kill the driver. It is necessary to explicitly warn your team that this function is dangerous and can even be fatal if you inattentively handle it.
You may encounter another problem when performing some complex functions or actions inside the else block. For instance:
The else block is inflated, and working with it is like trying to play basketball in winter clothes (in truth, I do, since it’s quite cold in Korea). Do you understand what I'm talking about? It is ugly and unreadable.
Therefore, you could simply add a function to the else block instead of direct calls.
However, this saves the first of the problems I have highlighted, plus there is no definite way to indicate that the selfDrive () function is dangerous and that you need to handle it with caution. Therefore, I suggest diving into Error Handling to write modular and accurate error messages.
Introducing Error Handling
By now, you already know about the If-else problem with error messages. The example above was too simple. Let's assume there are two error messages:
I am going to create an enum that conforms to the Error protocol.
Honestly, I don’t know exactly what the Error protocol does, but you can’t do without error handling. It’s like: “Why does the laptop turn on when you press the button? Why can the phone’s screen be unlocked by swiping it? ”
Swift developers decided so, and I don’t want to wonder about their motives. I just use what they did for us. Of course, if you want to understand in more detail, you can download the Swift program code and analyze it yourself - that is, by our analogy, disassemble a laptop or iPhone. I’ll just skip this step.
If you are confused, tolerate a few more paragraphs. You will see how everything becomes clear when TeslaError becomes a function.
Let's first send an error message without using Error Handling.
So, if I ran this:
But let's use Error Handling. First of all, you must explicitly indicate that the function is dangerous and may throw errors. We will add the throws keyword to the function.
Now the function automatically tells your teammates that autoDriveTesla is a special case and they don’t need to read the entire block.
That sounds good? Great, now it's time to throw these errors when the driver encounters lostGPA or lowBattery inside the Else-If block. Remember the enum TeslaError?
I will catch you all.
If lostGPS is true, then the function will send TeslaError.lostGPS. But what to do then? Where do we insert this error message and add code for the else block?
Okay, I don’t want to overwhelm you with information, so let's start by how to execute the function when it has the throws keyword.
Since this is a special case, you need to add try inside the do block when working with this function. You are: "What?". Just follow my thoughts a little more.
I know what you are thinking now: “I really want to display my error message on the screen, otherwise the driver will die.”
So where do we put this error message? We know that the function is capable of sending 2 possible error messages:
When the function produces an error, you need to “catch” it and, as soon as you do this, display the corresponding message on the screen. It sounds a little confusing, so let's see.
Now everything should be clear. If not everything is clear, you can always watch my video on YouTube .
Error handling with Init
Error handling can be applied not only to functions, but also when you need to initialize an object. Suppose, if you did not specify a course name, then you need to give an error.
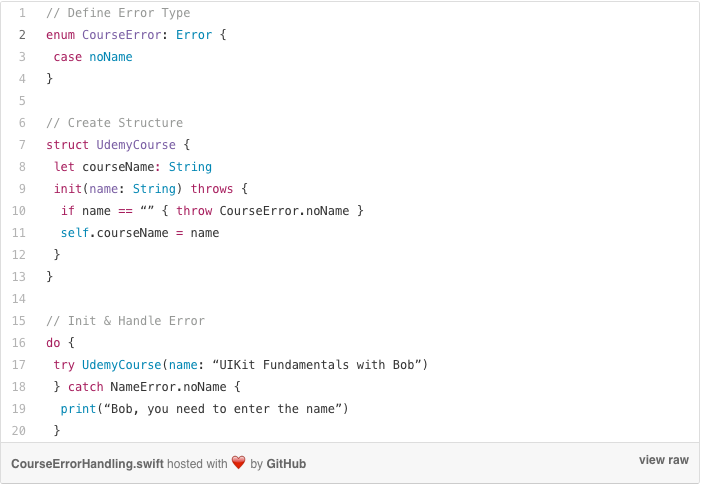
If you enter tryUdemyCourse (name: ""), an error message appears.
When to use Try! and try?
Good. Try is only used when you execute a function / initialization inside a do-catch block. However, if you do not have a goal to warn the user about what is happening by displaying an error message on the screen, or somehow correct it, you do not need a catch block.
try? - what is it?
Let's start with try? Although not recommended,
try? always returns an optional object, so you need to extract newCourse
If the init method throws an error, such as
then myCourse will be nil.
try! - what is it?
Unlike try? it returns not an optional value, but a normal one. For instance,
bobCourse is not optional. However, if the initialization method throws an error like,
then the application will crash. As with forced extraction using!, Never use it unless you are 101% sure what is going on.
That's it. Now you understand the concept of Error Handling with me. Simply and easily! And do not need to become a professional programmer.
From the article you will learn :
- what is the if-else statement and what is wrong with it;
- how to make friends with Error Handling;
- when to use Try! and try?
My Story
When I was younger, I started learning the Swift language documentation. I read all the chapters several times, except for one: “Error Handling”. For some reason, it seemed to me that you need to be a professional programmer to understand this chapter.
I was afraid of error handling. Words like catch, try, throw and throws seemed meaningless. They were just scary. Do they not look intimidating to the person who sees them for the first time? But do not worry, my friends. I am here to help you.
As I explained to my thirteen-year-old sister, error handling is just another way to write an if-else block to send an error message.
Error message from Tesla Motors
As you probably know, Tesla cars have an autopilot feature. But, if the machine crashes for some reason, it asks you to pick up the steering wheel and reports an error. In this tutorial, we will learn how to display such a message using Error Handling.
We will create a program that will recognize objects such as traffic lights on the streets. To do this, you need to know at least machine learning, vector calculus, linear algebra, probability theory and discrete mathematics. Joke.
Introducing the if-else statement
To get the most out of Hand Swift Error in Swift, let's take a look at the past. Here's what many, if not all, novice developers would do when faced with an error message:
var isInControl = true
func selfDrive() {
 if isInControl {
  print("You good, let me ride this car for ya")
 } else {
  print("Hold the handlebar RIGHT NOW, or you gone die")
 }
}
selfDrive() // "You good..."
Problem
The biggest problem is the readability of the code when the else block becomes too cumbersome. Firstly, you won’t understand whether the function itself contains an error message until you read the function from beginning to end or if you call it, for example, selfDriveCanCauseError, which will also work.
See, the function can kill the driver. It is necessary to explicitly warn your team that this function is dangerous and can even be fatal if you inattentively handle it.
You may encounter another problem when performing some complex functions or actions inside the else block. For instance:
else {
 print("Hold the handle bar Right now...")
 // If handle not held within 5 seconds, car will shut down
 // Slow down the car
 // More code ...
 // More code ...
}
The else block is inflated, and working with it is like trying to play basketball in winter clothes (in truth, I do, since it’s quite cold in Korea). Do you understand what I'm talking about? It is ugly and unreadable.
Therefore, you could simply add a function to the else block instead of direct calls.
else {
 slowDownTheCar()
 shutDownTheEngine()
}
However, this saves the first of the problems I have highlighted, plus there is no definite way to indicate that the selfDrive () function is dangerous and that you need to handle it with caution. Therefore, I suggest diving into Error Handling to write modular and accurate error messages.
Introducing Error Handling
By now, you already know about the If-else problem with error messages. The example above was too simple. Let's assume there are two error messages:
- you get lost
- the car battery is running low.
I am going to create an enum that conforms to the Error protocol.
enum TeslaError: Error {
 case lostGPS
 case lowBattery
}
Honestly, I don’t know exactly what the Error protocol does, but you can’t do without error handling. It’s like: “Why does the laptop turn on when you press the button? Why can the phone’s screen be unlocked by swiping it? ”
Swift developers decided so, and I don’t want to wonder about their motives. I just use what they did for us. Of course, if you want to understand in more detail, you can download the Swift program code and analyze it yourself - that is, by our analogy, disassemble a laptop or iPhone. I’ll just skip this step.
If you are confused, tolerate a few more paragraphs. You will see how everything becomes clear when TeslaError becomes a function.
Let's first send an error message without using Error Handling.
var lostGPS: Bool = true
var lowBattery: Bool = false
func autoDriveTesla() {
 if lostGPS {
  print("I'm lost, bruh. Hold me tight")
  // A lot more code
 }
 if lowBattery {
  print("HURRY! ")
  // Loads of code
 }
}
So, if I ran this:
autoDriveTesla() // "HURRY! " But let's use Error Handling. First of all, you must explicitly indicate that the function is dangerous and may throw errors. We will add the throws keyword to the function.
func autoDriveTesla() throws { ... }Now the function automatically tells your teammates that autoDriveTesla is a special case and they don’t need to read the entire block.
That sounds good? Great, now it's time to throw these errors when the driver encounters lostGPA or lowBattery inside the Else-If block. Remember the enum TeslaError?
func autoDriveTesla() throws {
 if lostGPS {
  throw TeslaError.lostGPS
}
 if lowBattery {
  throw TeslaError.lowBattery
}
I will catch you all.
If lostGPS is true, then the function will send TeslaError.lostGPS. But what to do then? Where do we insert this error message and add code for the else block?
print("Bruh, I'm lost. Hold me tight")Okay, I don’t want to overwhelm you with information, so let's start by how to execute the function when it has the throws keyword.
Since this is a special case, you need to add try inside the do block when working with this function. You are: "What?". Just follow my thoughts a little more.
do {
 try autoDriveTesla()
}
I know what you are thinking now: “I really want to display my error message on the screen, otherwise the driver will die.”
So where do we put this error message? We know that the function is capable of sending 2 possible error messages:
- TeslaError.lowBattery
- TeslaError.lostGPS.
When the function produces an error, you need to “catch” it and, as soon as you do this, display the corresponding message on the screen. It sounds a little confusing, so let's see.
var lostGPS: Bool = false
var lowBattery: Bool = true
do {
 try autoDriveTesla()
 } catch TeslaError.lostGPS {
  print("Bruh, I'm lost. Hold me tight")
 } catch TeslaError.lowBattery {
  print("HURRY! ")
 }
}
// Results: "HURRY! "
Now everything should be clear. If not everything is clear, you can always watch my video on YouTube .
Error handling with Init
Error handling can be applied not only to functions, but also when you need to initialize an object. Suppose, if you did not specify a course name, then you need to give an error.
If you enter tryUdemyCourse (name: ""), an error message appears.
When to use Try! and try?
Good. Try is only used when you execute a function / initialization inside a do-catch block. However, if you do not have a goal to warn the user about what is happening by displaying an error message on the screen, or somehow correct it, you do not need a catch block.
try? - what is it?
Let's start with try? Although not recommended,
let newCourse = try? UdemyCourse("Functional Programming")try? always returns an optional object, so you need to extract newCourse
if let newCourse = newCourse { ... }If the init method throws an error, such as
let myCourse = try? UdemyCourse("") // throw NameError.noNamethen myCourse will be nil.
try! - what is it?
Unlike try? it returns not an optional value, but a normal one. For instance,
let bobCourse = try! UdemyCourse("Practical POP")bobCourse is not optional. However, if the initialization method throws an error like,
let noCourseName = try! UdemyCourse("") // throw NameError.noNamethen the application will crash. As with forced extraction using!, Never use it unless you are 101% sure what is going on.
That's it. Now you understand the concept of Error Handling with me. Simply and easily! And do not need to become a professional programmer.