Lab "Learning to Set Up Networks in GNU / Linux"
- Tutorial
No one likes long intros, so go straight to the point.
In this impromptu lab, I would like to highlight networking with GNU / Linux
and consider the following topics:
Z.Y. all people are mistaken, I am open to your comments, if I wrote some stupidity, I’m ready to fix it!
Given: local area network consisting of VM1, VM2. R1 router (also a virtual machine), S1 web server.
You can download a ready-made virtual for this lab from the Yandex disk
. I tried to submit this article as a lesson, for the most part I do not write commands in text, but take a screenshot so that they can be driven in with my own hands. This helps to better understand and remember faster. I fully understand that this is inconvenient, but I decided to choose this approach.
Setting for VM1 - connect as a bridge to the interface. You can select any interface and browse everything on it. For completeness, I made an adapter in the system 2 bridge adapter (br0, br1) and connected vm1, vm2, r1 (adapter 1) to br0, and s1, r1 (adapter 2) to br2.
For the remaining 3 settings are similar.
We start vm1 and vm2 and look at the interfaces in our system with the command
We add a new device, which will be called eth0.100 and will be a tagged interface with id = 100.
Now assign the ip address to this interface:
short view of the record:
We pay attention to the following things: no-carrier and DOWN,
this means that we do not have a network cable connected to the interface, and the interface itself is in DOWN.
We connect the cable and get the following picture:
And let's enable the interface with the command:
Thus, we created an interface that will receive tagged packets with vlan id = 100 and, accordingly, hang tag 100 on packets when releasing a packet to the network through this interface. and assigned him the ip address 10.10.10.10/24
do the same on VM2, assign the address 10.10.10.20/24
We check the connectivity between VM1 and VM2: ping 10.10.10.10 with VM2
 To summarize: we created on 2 machines in 1 local network 2 tagged interfaces in the 100th vlan and checked the connectivity between them.
We verify that all this is not a lie and provocation! We start the listener on VM1 and knock on it with VM2 and traffic traffic.
1. run on VM1 2. run on VM2
We see in the headers of the channel level vlan 100. So the packets on the network really go with tags and this is not the invention of mother goose.
Now go to point number 2 - we break these 2 virtual machines into different vlan and configure the router.
On VM1:
add eth0.200 interface with tag 200 and assign it an address 192.168.0.2
on VM2:
add eth0.300 interface with tag 300 and assign it an address 172.16.0.2
(Independently)
Turn on and configure the R1 router. On the router, unlike VM1, VM2, you need to create an interface in both vlan 200 and vlan 300 - this interface will be a gateway in these networks. Assign them the addresses 192.168.0.1, 172.16.0.1.
Check connectivity. We ping from the router 192.168.0.2 and 172.16.0.2. (By the way, here there was a small problem, because I was mistaken in setting eth0.300 on VM2.
So, we got a connection between VM1, R1 and VM2, R1. Let's try to connect VM1, VM2 through R1.
In order for our Router to be able to forward packets between interfaces, you need to allow it to do so. You need to uncomment the net.ipv4.ip_forward = 1 directive in the /etc/sysctl.conf file and apply the changes with the sysctl -p command .
And now the most important thing. You need to configure routing. There are 3 common ways to do this:
1. specify the default route. those. we don’t know where destination ip is located, so all packets that do not belong to the local network helmet on the router.
2. Specify a gateway for a particular subnet. This must be done if the networks are accessible behind different routers.
3. indicate the interface behind which the one who receives the package is located. This situation arose for me, for example, if necessary, in the data center to route the subnet. Those. There was a virtual router to the external address of which the data center statically routed the subnet allocated to me. Then I just pointed out that the ip addresses of this subnet are on one of the router's interfaces sticking inside. Packets were sent to this interface and received on the other side by the virtuals to whom these white addresses were assigned. those. in this situation, specifying a gateway was completely optional.
Let's see the list of routes on VM1:
Our virtual machine knows only about 2 subnets: 10.10.10.0/24 & 192.168.0.0/24. Nothing is said about the host 172.16.0.2! because if you try ping, nothing will work:
add the route to the subnet 172.16.0.0/24:
via - means through whom. those. send packets to host 192.168.0.1, it will figure it out.
Looking through the routing table, the following decision is made:
1. Who is this packet for? host 172.16.0.2
2. To whom to send packet 172.16.0.2? host 192.168.0.1
3. What do we know about host 192.168.0.1? he is directly connected. This subnet is ours. at the channel level, we create the source mac address, the host mac address is 192.168.0.1, the source ip address is 192.168.0.2, the destination ip address is 172.16.0.2, and sent via eth0.200 interface. As the author of the podcast “Networks for the Youngest” said, the fate of the package does not bother us.
Let's try to ping the gateway of the neighboring vlan:
Works! But what happens if you ping 172.16.0.2? It will not work, because there is no return route. The packet will reach the host VM2, but VM2 will not be able to send it back, because doesn't know where. Let's try to add the route back to VM2.
Add a default route for VM2. This can be done by specifying the subnet and mask (0.0.0.0/0 - that is, absolutely all addresses fall under it) or using the default keyword
We get the same result. And in the end, now VM1 freely pings VM2. Hurrah!
To summarize: We learned how to route between 2 vlan using a linux router.
Add some public server S1. on it I will install apache2 (apt install apache2) and I will imitate a web server on the Internet. Whereas our VM1, VM2 are private machines that are located behind the router. The second interface router looks at the makeshift Internet.
Let's add the 2nd interface for R1 - eth1 and already without VLAN we will configure it the ip address 8.8.8.100, and on S1 - 8.8.8.8
It is important to remember that all the commands that we entered in the console only work until the reboot. When I added 2 interfaces and turned off the virtual machine, after rebooting I received an unconfigured machine, as a result of which all the commands had to be applied again.
If you repeat the VBOX setup after me, do not forget to add both network cards to both S1 and R1 in br1. Bridge interface in the system can be created with the command
But in general, you can make an entire lab and create nothing on any one interface.
I emphasize the separation in order to simulate bridge = like a switch.
After configuring S1, R1, we check the connectivity - perform ping 8.8.8.8.8 - it should work with R1. Moreover, if we ping with VM2, then there will be no ping.
In addition, if we ping a server with VM1, it will generally say that the network is unavailable.
Let's fix this by writing the gateway:
Now all 4 cars perfectly ping each other. But it should not be so. Gray addresses should not go online! And the network where R1 is looking at the second interface should not know where the addresses 172.16. *. *, 192.168. *. * Are located.
Delete deafult gw with S1:
To summarize: we learned how to register routes to the networks we need, and also learned how to "hide" the gray addresses behind the router, releasing all the traffic "out" through only one white address.
It's time to talk about NAT. NAT (from the English. Network Address Translation - "network address translation") is a mechanism in TCP / IP networks that allows you to translate IP addresses of transit packets. Also named IP Masquerading, Network Masquerading and Native Address Translation. We will consider masquerading. this is SourceNAT (SNAT) && DestinationNAT (DNAT).
What do we really need from NAT? But we need the outgoing packet towards S1 to receive the router's source ip address, and when it returns, it will receive the virtual address again as the destination address.
Let's configure the masquerade for the 17.16.0.0/24 subnet - we will execute the command on the router:
I will not describe in detail how iptables work, because this is many, many beeches and this article is clearly not for this. Here is a very good article to study.
I’ll only pay attention to
You can see the result obtained by the team.
So what have we achieved? We set up a masquerade for VM2. This means that when it knocks on S1, then S1 will see the address not of VM2, but the address of the router! A couple of proofs:
But what does S1 see at that moment?
8.8.8.8 communicates perfectly with 8.8.8.100, no 172.16.0.2 and it did not smell!
And what happens at this moment on the router? How does this kitchen work? Eavesdrop on the “gray” eth0.300 interface
And here is how it looks at the output to the "external" network:
The kernel processes it and substitutes the correct ip addresses, depending on the direction of the packet. But if we do the same with VM1, then S1 will see gray addresses. and simply will not respond to this request. Look at it yourself. Let me remind you that GW on S1 must be deleted.
To summarize: We hid our gray networks and released the hosts behind the router, replacing the source ip address with the router address. And in the opposite direction - we learned how to forward a certain port of a certain virtual machine “outside” and were able to connect to the gray address of VM1 virtual machine from the “public” network from S1 server.
We will pretend that S1 is a certain client from the Internet and he wants to connect to VM1 (that client, to which there is no route, no masquerade is configured). Let it be an attempt to connect via ssh. SSH by default hangs on port 22, but if we have more than 1 of these servers, then what about? In general, ssh should always be removed from port 22 in order to get rid of the simplest network scanners. We will use port 30022, for example, to access VM1 via ssh.
How it works?
S1 sends a packet (s.ip = S1.ip, d.ip = R1.ip; s.port = N, d.port = 30022) which arrives at R1.
R1 Looks at iptables and applies the DNAT rule, and forms a packet (according to our rule): (s.ip = S1.ip, d.ip = VM1.ip; s.port = N, d.port = 22) Looks at the
routing table and sends the vm1 packet through eth0.200.
VM1, in turn, receives the packet, receives data, and generates a response: (s.ip = VM1.ip, d.ip = S1.ip; s.port = 22, d.port = N).
R1 receives the packet and restores the original s.ip to which s1 originally contacted:
(s.ip = R1.ip, d.ip = S1.ip; s.port = 22, d.port = N)
This can be achieved as follows:
try to connect:
To summarize: we learned to provide access to services located on virtual machines behind a certain router (in other words, to virtual machines behind NAT, which is most often needed)
And the last thing I would like to consider in this lesson is tcp sessions and the direction in which these sessions are installed. So, for example, consider 2 segments: server and client. The client, for example, should be able to "go" to the server segment to the domain controller. But the domain controller has nothing to do on the client machine. There are many such examples, and situations why one can go from one network segment to another and vice versa do not. Why might this be needed? For example, we have a web server that “watches” the Internet and is “captured” by an attacker. From this server, he may well try to knock on the corporate network. However, if you prohibit the establishment of sessions from this segment - this will not happen. Those. we at least complicate the life of the attacker. Let's add a rule that prohibits VM2 from going to VM1,
We try to go from VM1 to VM2:
and in the opposite direction:
Why it happens? At the moment of establishing the TCP session, the TCP SYN packet arrives (the SYN ACK responds to it, and then the ACK and the session are considered established). the first rule we wrote down (with NEW) allows forwarding TCP SYN packets from the network 192.168.0.0 to 172.16.0.0.
When the second participant answers this and any subsequent packet, then 2 rules on established sessions fall under the action and such packets from the network 172.16.0.0 pass. But if he himself tries to establish a session (or just ping) then he will not fall under the 1.2 rule, but will fall under the 3rd, which this package will drop. Voila!
To summarize: We learned how to manage the directions of installation of tcp sessions to control the direction of traffic between security zones.
Thanks for attention!
I post my draft lectures on the telegram channel: t.me/bykvaadm
In this impromptu lab, I would like to highlight networking with GNU / Linux
and consider the following topics:
- Learning vlan. We build a network between vm1, vm2 in one vlan. We ping, we catch packets, we study headings.
- We break vm1 vm2 into different vlan. Configuring intervlan routing using R1.
- Iptables. Customize the masquerade. We simulate access to external networks.
- Iptables. We configure port forwarding for services on vm1 and v2, which are behind NAT.
- Iptables. Configure security zones. We study tcp sessions.
Z.Y. all people are mistaken, I am open to your comments, if I wrote some stupidity, I’m ready to fix it!
Given: local area network consisting of VM1, VM2. R1 router (also a virtual machine), S1 web server.
You can download a ready-made virtual for this lab from the Yandex disk
. I tried to submit this article as a lesson, for the most part I do not write commands in text, but take a screenshot so that they can be driven in with my own hands. This helps to better understand and remember faster. I fully understand that this is inconvenient, but I decided to choose this approach.
Network diagram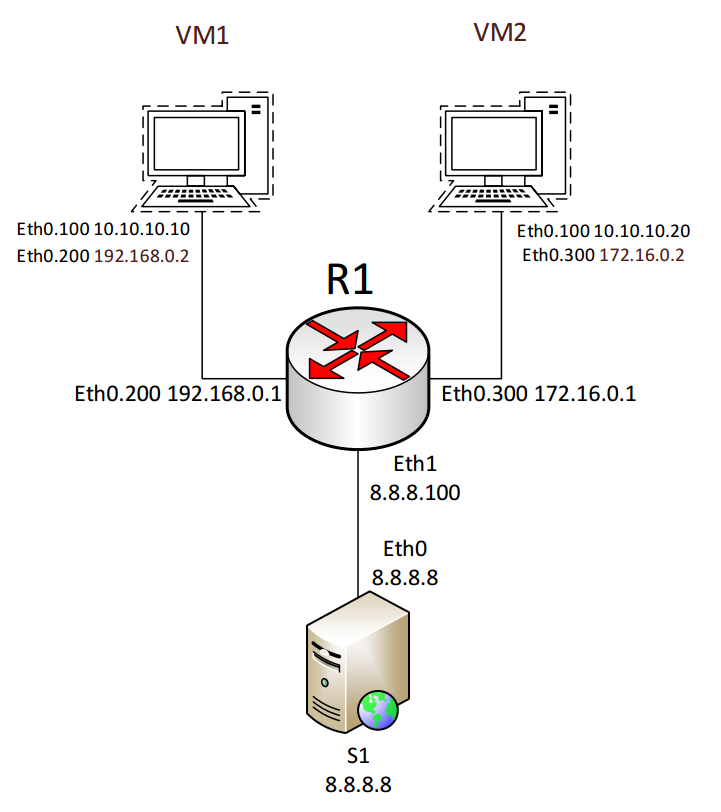
Example virtual machines in my VBOX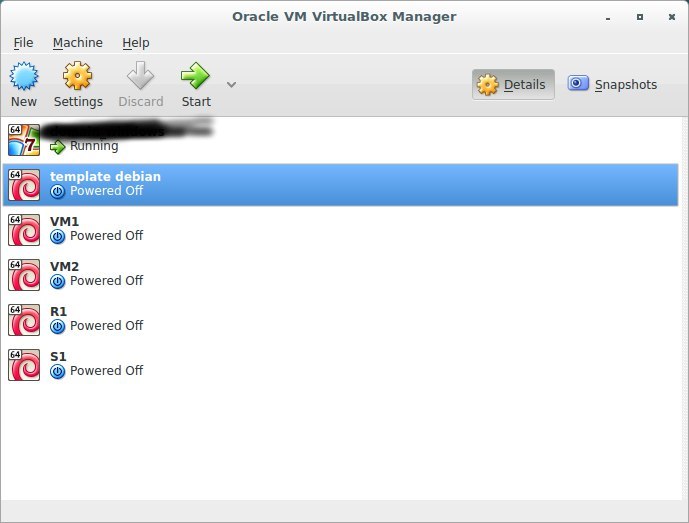
Setting for VM1 - connect as a bridge to the interface. You can select any interface and browse everything on it. For completeness, I made an adapter in the system 2 bridge adapter (br0, br1) and connected vm1, vm2, r1 (adapter 1) to br0, and s1, r1 (adapter 2) to br2.
adapter setup example
For the remaining 3 settings are similar.
I. We study vlan. We build a network between vm1, vm2 in one vlan. We ping, we catch packets, we study headings.
We start vm1 and vm2 and look at the interfaces in our system with the command
ip addrResult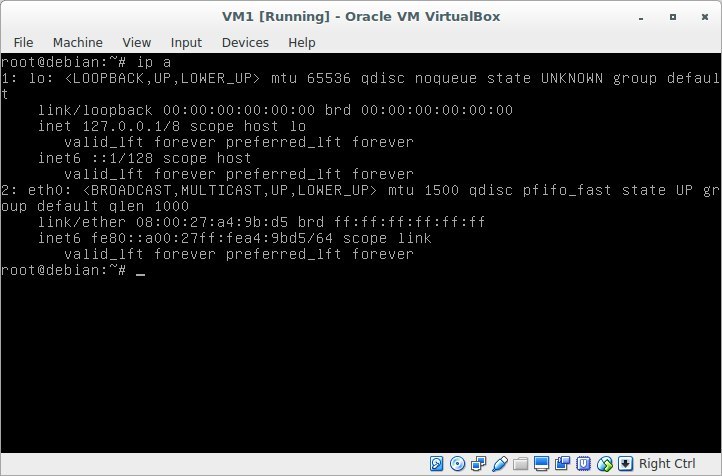
We add a new device, which will be called eth0.100 and will be a tagged interface with id = 100.
Result
ip link add - добавить устройство

link eth0 - соединить с ФИЗИЧЕСКИМ адаптером eth0

name eth0.100 - имя устройства в списке. Это имя можно выбрать любым, но для собственного удобства мы выбрали имя физического интерфейса и номер vlan. так то точно не запутаемся

type vlan - тип создаваемого интерфейса. Оно работает с 8021q - тип vlan

id 100 - собственно сам id vlan
Now assign the ip address to this interface:
ip addr add 10.10.10.10/24 dev eth0.100short view of the record:
ip a a 10.10.10.10/24 dev eth0.100Result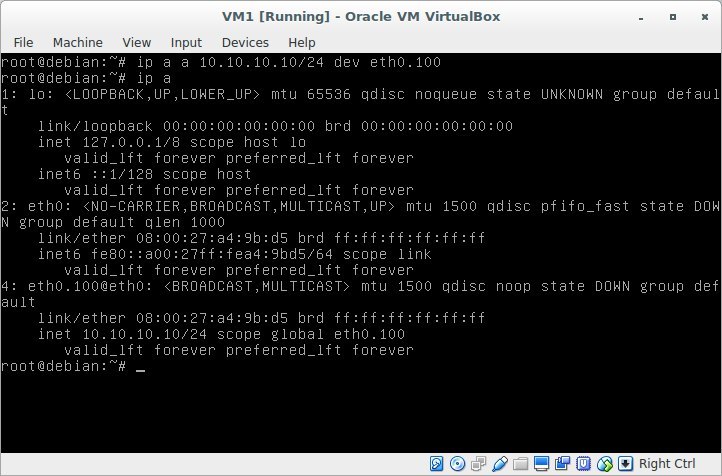
We pay attention to the following things: no-carrier and DOWN,
this means that we do not have a network cable connected to the interface, and the interface itself is in DOWN.
Result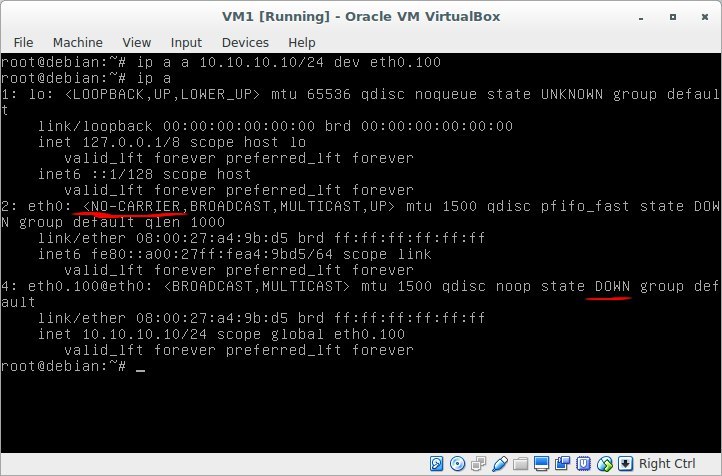
We connect the cable and get the following picture:
Result
And let's enable the interface with the command:
ip link set dev eth0.100 upResult
Thus, we created an interface that will receive tagged packets with vlan id = 100 and, accordingly, hang tag 100 on packets when releasing a packet to the network through this interface. and assigned him the ip address 10.10.10.10/24
do the same on VM2, assign the address 10.10.10.20/24
Result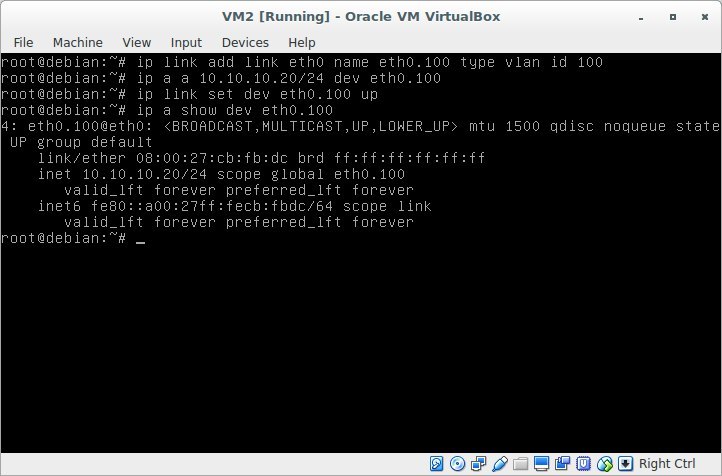
We check the connectivity between VM1 and VM2: ping 10.10.10.10 with VM2
Result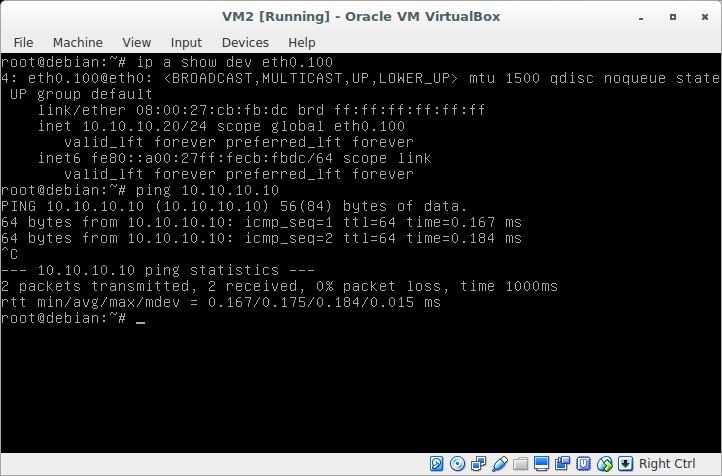
To summarize: we created on 2 machines in 1 local network 2 tagged interfaces in the 100th vlan and checked the connectivity between them. We verify that all this is not a lie and provocation! We start the listener on VM1 and knock on it with VM2 and traffic traffic.
1. run on VM1 2. run on VM2
nohup nc -lvp 3000 &

tcpdump -n host 10.10.10.20 -i eth0 -e
nc 10.10.10.10 3000Result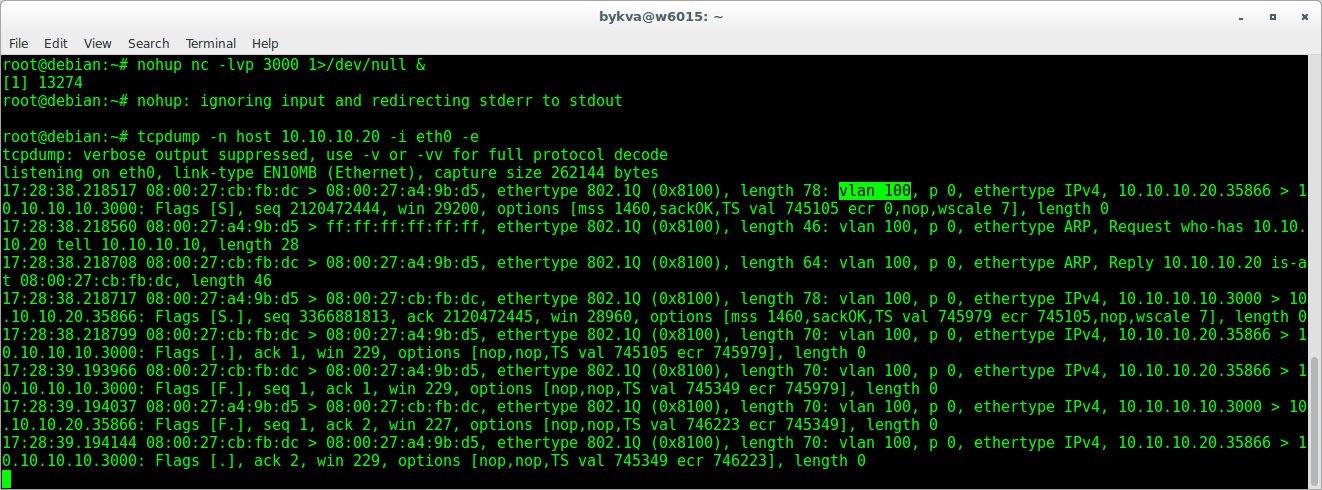
We see in the headers of the channel level vlan 100. So the packets on the network really go with tags and this is not the invention of mother goose.
II. We break vm1 vm2 into different vlan. Configuring intervlan routing using R1.
Now go to point number 2 - we break these 2 virtual machines into different vlan and configure the router.
On VM1:
add eth0.200 interface with tag 200 and assign it an address 192.168.0.2
on VM2:
add eth0.300 interface with tag 300 and assign it an address 172.16.0.2
(Independently)
Result (VM1)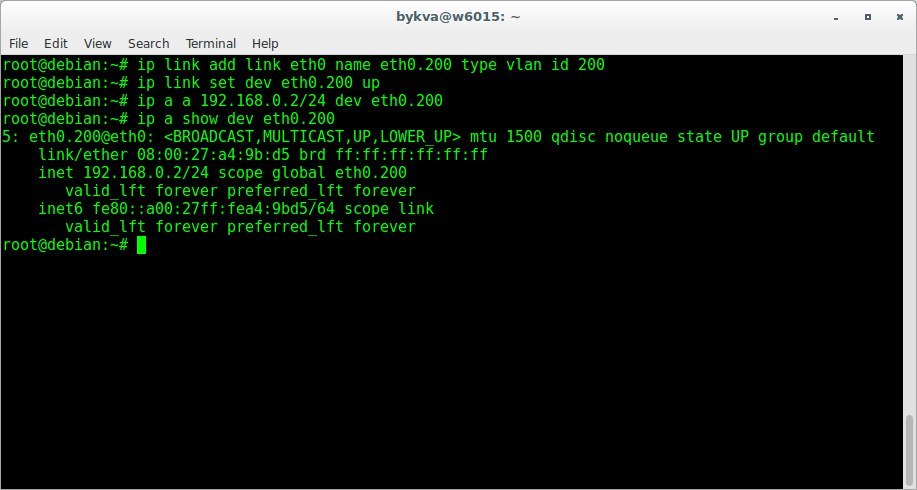
Result (VM2)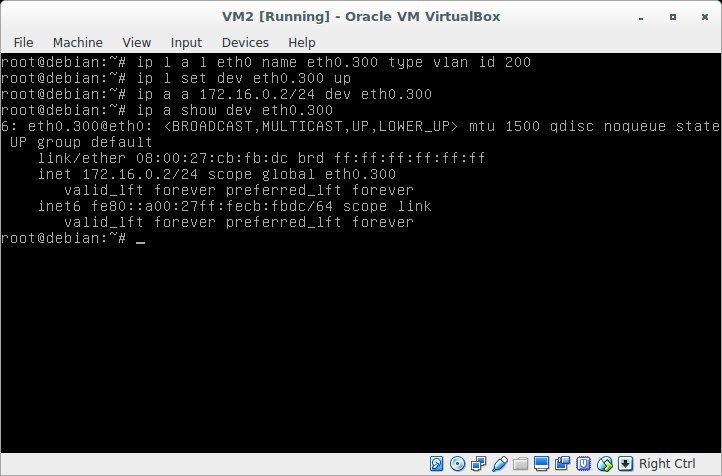
Turn on and configure the R1 router. On the router, unlike VM1, VM2, you need to create an interface in both vlan 200 and vlan 300 - this interface will be a gateway in these networks. Assign them the addresses 192.168.0.1, 172.16.0.1.
Result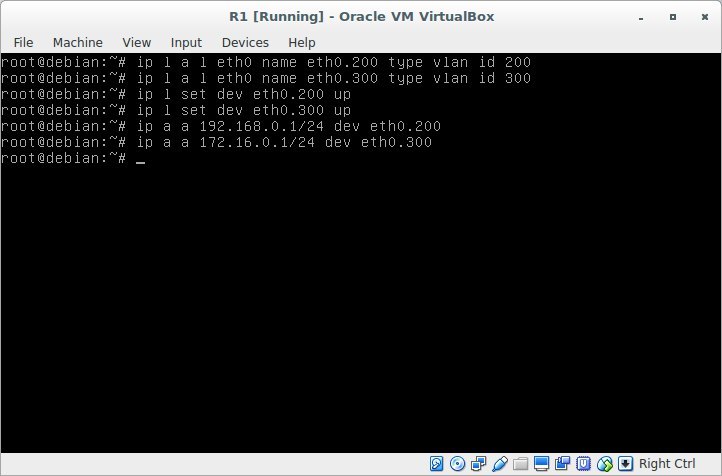
Check connectivity. We ping from the router 192.168.0.2 and 172.16.0.2. (By the way, here there was a small problem, because I was mistaken in setting eth0.300 on VM2.
I did not find an error
instead of id = 300, I registered id = 200
Result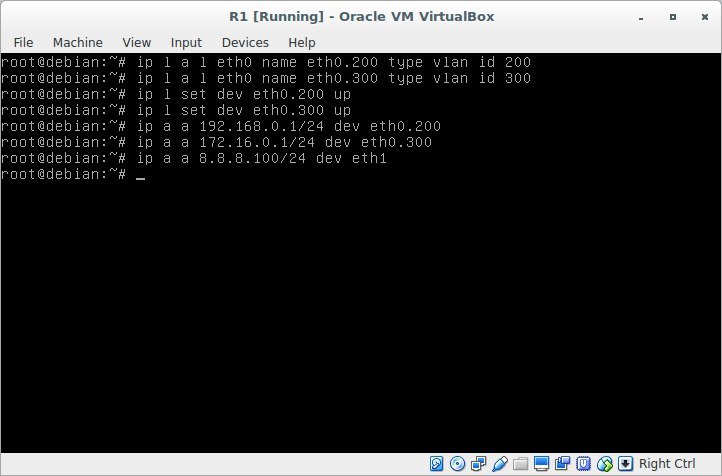
So, we got a connection between VM1, R1 and VM2, R1. Let's try to connect VM1, VM2 through R1.
In order for our Router to be able to forward packets between interfaces, you need to allow it to do so. You need to uncomment the net.ipv4.ip_forward = 1 directive in the /etc/sysctl.conf file and apply the changes with the sysctl -p command .
# nano /etc/sysctl.conf
# sysctl -p
net.ipv4.ip_forward = 1
Result
And now the most important thing. You need to configure routing. There are 3 common ways to do this:
1. specify the default route. those. we don’t know where destination ip is located, so all packets that do not belong to the local network helmet on the router.
2. Specify a gateway for a particular subnet. This must be done if the networks are accessible behind different routers.
3. indicate the interface behind which the one who receives the package is located. This situation arose for me, for example, if necessary, in the data center to route the subnet. Those. There was a virtual router to the external address of which the data center statically routed the subnet allocated to me. Then I just pointed out that the ip addresses of this subnet are on one of the router's interfaces sticking inside. Packets were sent to this interface and received on the other side by the virtuals to whom these white addresses were assigned. those. in this situation, specifying a gateway was completely optional.
Let's see the list of routes on VM1:
ip roResult
Our virtual machine knows only about 2 subnets: 10.10.10.0/24 & 192.168.0.0/24. Nothing is said about the host 172.16.0.2! because if you try ping, nothing will work:
Result
add the route to the subnet 172.16.0.0/24:
ip ro add 172.16.0.0/24 via 192.168.0.1via - means through whom. those. send packets to host 192.168.0.1, it will figure it out.
Looking through the routing table, the following decision is made:
1. Who is this packet for? host 172.16.0.2
2. To whom to send packet 172.16.0.2? host 192.168.0.1
3. What do we know about host 192.168.0.1? he is directly connected. This subnet is ours. at the channel level, we create the source mac address, the host mac address is 192.168.0.1, the source ip address is 192.168.0.2, the destination ip address is 172.16.0.2, and sent via eth0.200 interface. As the author of the podcast “Networks for the Youngest” said, the fate of the package does not bother us.
Let's try to ping the gateway of the neighboring vlan:
ping 172.16.0.1Result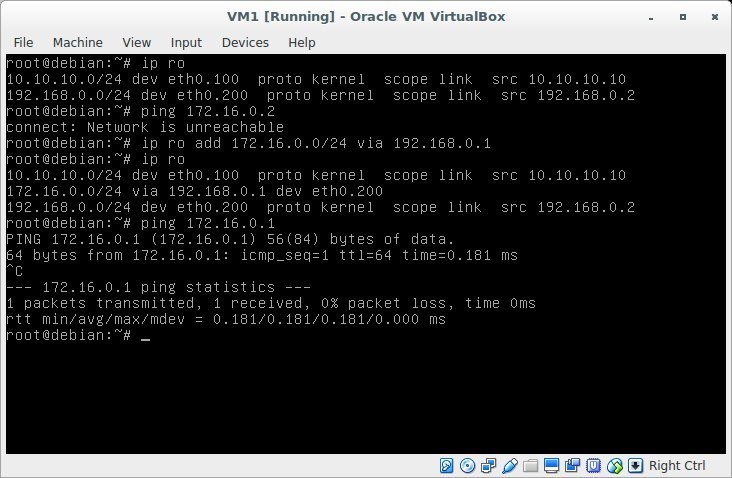
Works! But what happens if you ping 172.16.0.2? It will not work, because there is no return route. The packet will reach the host VM2, but VM2 will not be able to send it back, because doesn't know where. Let's try to add the route back to VM2.
Add a default route for VM2. This can be done by specifying the subnet and mask (0.0.0.0/0 - that is, absolutely all addresses fall under it) or using the default keyword
Result
We get the same result. And in the end, now VM1 freely pings VM2. Hurrah!
To summarize: We learned how to route between 2 vlan using a linux router.III. Iptables. Customize the masquerade. We simulate access to external networks.
Add some public server S1. on it I will install apache2 (apt install apache2) and I will imitate a web server on the Internet. Whereas our VM1, VM2 are private machines that are located behind the router. The second interface router looks at the makeshift Internet.
Let's add the 2nd interface for R1 - eth1 and already without VLAN we will configure it the ip address 8.8.8.100, and on S1 - 8.8.8.8
Result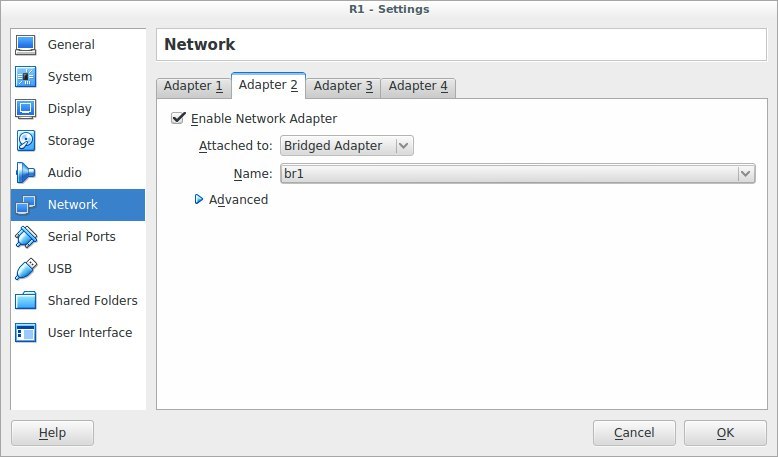
It is important to remember that all the commands that we entered in the console only work until the reboot. When I added 2 interfaces and turned off the virtual machine, after rebooting I received an unconfigured machine, as a result of which all the commands had to be applied again.
Result
If you repeat the VBOX setup after me, do not forget to add both network cards to both S1 and R1 in br1. Bridge interface in the system can be created with the command
ip link add br1 type bridgeBut in general, you can make an entire lab and create nothing on any one interface.
I emphasize the separation in order to simulate bridge = like a switch.
After configuring S1, R1, we check the connectivity - perform ping 8.8.8.8.8 - it should work with R1. Moreover, if we ping with VM2, then there will be no ping.
Why?
Because S1 does not know about the network 172.16.0.0. add our R1 as the default gateway for S1:
ip ro add default via 8.8.8.100In addition, if we ping a server with VM1, it will generally say that the network is unavailable.
Why?
Because we did not register default gw at all, but indicated where the network 172.16.0.0/24 is located.
Let's fix this by writing the gateway:
Result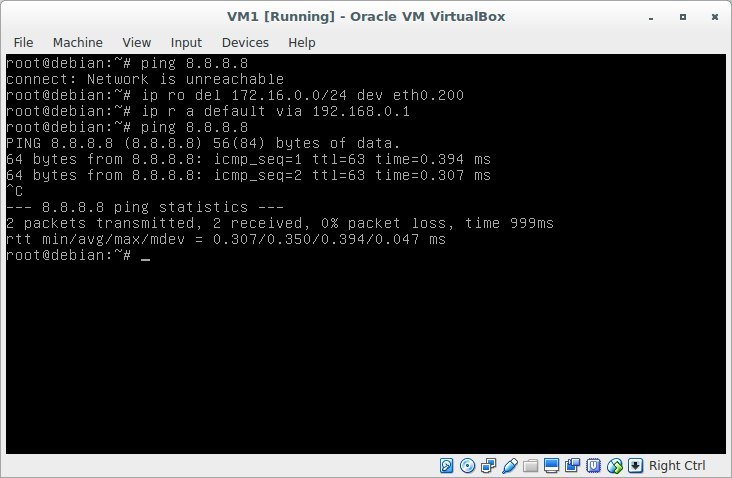
Now all 4 cars perfectly ping each other. But it should not be so. Gray addresses should not go online! And the network where R1 is looking at the second interface should not know where the addresses 172.16. *. *, 192.168. *. * Are located.
Delete deafult gw with S1:
ip ro del defaultIt's time to talk about NAT. NAT (from the English. Network Address Translation - "network address translation") is a mechanism in TCP / IP networks that allows you to translate IP addresses of transit packets. Also named IP Masquerading, Network Masquerading and Native Address Translation. We will consider masquerading. this is SourceNAT (SNAT) && DestinationNAT (DNAT).
What do we really need from NAT? But we need the outgoing packet towards S1 to receive the router's source ip address, and when it returns, it will receive the virtual address again as the destination address.
Let's configure the masquerade for the 17.16.0.0/24 subnet - we will execute the command on the router:
iptables -t nat -A POSTROUTING -p tcp -m tcp -s 172.16.0.0/24 ! -d 172.16.0.0/24 -j MASQUERADEI will not describe in detail how iptables work, because this is many, many beeches and this article is clearly not for this. Here is a very good article to study.
I’ll only pay attention to
! -d 172.16.0.0/24: why is this necessary. This is necessary so that hosts from the 172.16.0.0/24 subnet that could potentially be located behind the router (for example, remote vpn clients) would not fall under this rule. You can see the result obtained by the team.
iptables-saveSo what have we achieved? We set up a masquerade for VM2. This means that when it knocks on S1, then S1 will see the address not of VM2, but the address of the router! A couple of proofs:
Result
But what does S1 see at that moment?
Result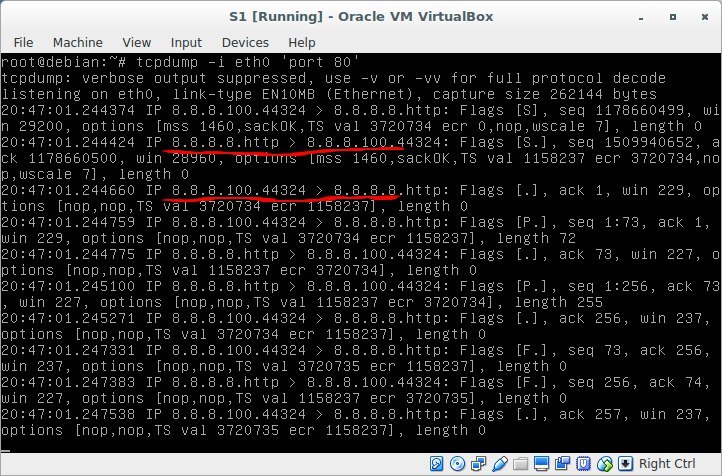
8.8.8.8 communicates perfectly with 8.8.8.100, no 172.16.0.2 and it did not smell!
And what happens at this moment on the router? How does this kitchen work? Eavesdrop on the “gray” eth0.300 interface
Result
And here is how it looks at the output to the "external" network:
Result
The kernel processes it and substitutes the correct ip addresses, depending on the direction of the packet. But if we do the same with VM1, then S1 will see gray addresses. and simply will not respond to this request. Look at it yourself. Let me remind you that GW on S1 must be deleted.
To summarize: We hid our gray networks and released the hosts behind the router, replacing the source ip address with the router address. And in the opposite direction - we learned how to forward a certain port of a certain virtual machine “outside” and were able to connect to the gray address of VM1 virtual machine from the “public” network from S1 server.IV. Iptables. Настраиваем port forwarding для сервисов на vm1 и v2, которые находятся за NAT
We will pretend that S1 is a certain client from the Internet and he wants to connect to VM1 (that client, to which there is no route, no masquerade is configured). Let it be an attempt to connect via ssh. SSH by default hangs on port 22, but if we have more than 1 of these servers, then what about? In general, ssh should always be removed from port 22 in order to get rid of the simplest network scanners. We will use port 30022, for example, to access VM1 via ssh.
How it works?
S1 sends a packet (s.ip = S1.ip, d.ip = R1.ip; s.port = N, d.port = 30022) which arrives at R1.
R1 Looks at iptables and applies the DNAT rule, and forms a packet (according to our rule): (s.ip = S1.ip, d.ip = VM1.ip; s.port = N, d.port = 22) Looks at the
routing table and sends the vm1 packet through eth0.200.
VM1, in turn, receives the packet, receives data, and generates a response: (s.ip = VM1.ip, d.ip = S1.ip; s.port = 22, d.port = N).
R1 receives the packet and restores the original s.ip to which s1 originally contacted:
(s.ip = R1.ip, d.ip = S1.ip; s.port = 22, d.port = N)
This can be achieved as follows:
Result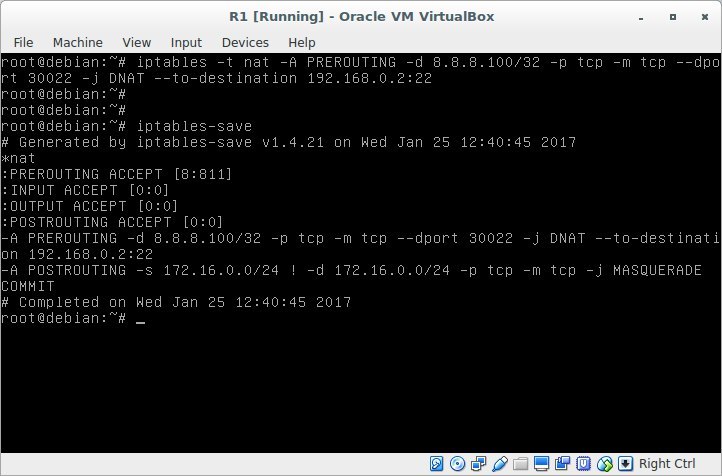
try to connect:
Result
To summarize: we learned to provide access to services located on virtual machines behind a certain router (in other words, to virtual machines behind NAT, which is most often needed)V. iptables. Configure security zones. We study tcp sessions.
And the last thing I would like to consider in this lesson is tcp sessions and the direction in which these sessions are installed. So, for example, consider 2 segments: server and client. The client, for example, should be able to "go" to the server segment to the domain controller. But the domain controller has nothing to do on the client machine. There are many such examples, and situations why one can go from one network segment to another and vice versa do not. Why might this be needed? For example, we have a web server that “watches” the Internet and is “captured” by an attacker. From this server, he may well try to knock on the corporate network. However, if you prohibit the establishment of sessions from this segment - this will not happen. Those. we at least complicate the life of the attacker. Let's add a rule that prohibits VM2 from going to VM1,
Result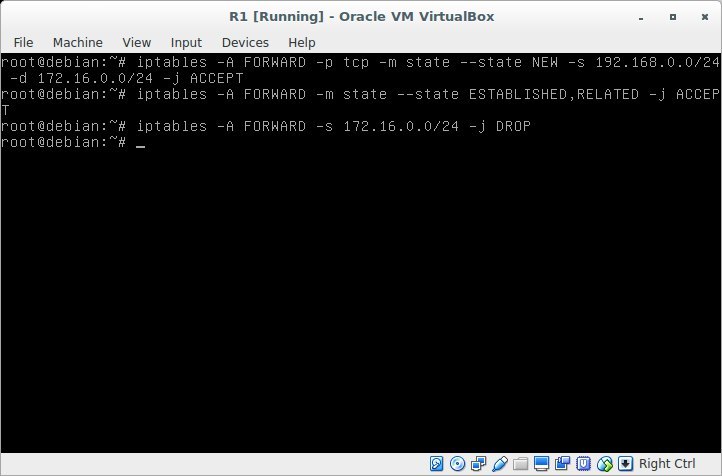
We try to go from VM1 to VM2:
Result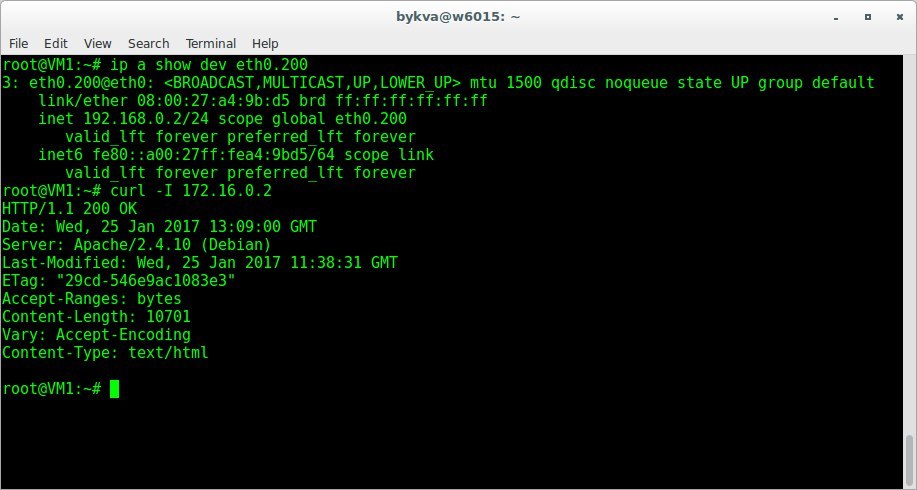
and in the opposite direction:
Result
Why it happens? At the moment of establishing the TCP session, the TCP SYN packet arrives (the SYN ACK responds to it, and then the ACK and the session are considered established). the first rule we wrote down (with NEW) allows forwarding TCP SYN packets from the network 192.168.0.0 to 172.16.0.0.
When the second participant answers this and any subsequent packet, then 2 rules on established sessions fall under the action and such packets from the network 172.16.0.0 pass. But if he himself tries to establish a session (or just ping) then he will not fall under the 1.2 rule, but will fall under the 3rd, which this package will drop. Voila!
To summarize: We learned how to manage the directions of installation of tcp sessions to control the direction of traffic between security zones. Thanks for attention!
I post my draft lectures on the telegram channel: t.me/bykvaadm