 January 25, 2017 at 08:52
Load Balancing with Pacemaker and iPadr (Active / Active cluster)
- Tutorial
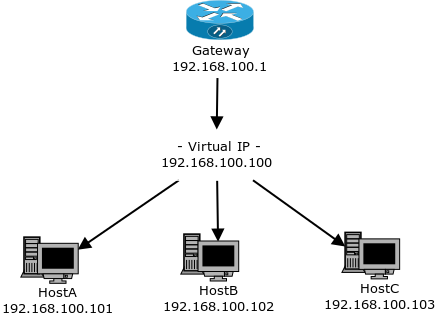
I want to tell you about another way to balance the load. About Pacemaker and IPaddr (resource agent) and setting it up for the Active / Passive cluster, there is already quite a lot of information, but I found very little information on organizing a full-fledged Active / Active cluster using this module. I will try to fix this situation.
To begin, I’ll tell you more about how such a balancing method is remarkable:
- Lack of an external balancer - On all nodes in the cluster, one common virtual IP address is configured. All requests are sent to it. Nodes respond to requests to this address randomly and by agreement between themselves.
- High Availability - If one node drops, its responsibilities are picked up by another.
- Easy setup - Setup is done in just 3-5 teams.
Input data
Let's look at the picture at the beginning of the article, we will see the following devices:
- Gateway - IP: 192.168.100.1
- HostA - IP: 192.168.100.101
- HostB - IP: 192.168.100.102
- HostC - IP: 192.168.100.103
Clients will contact the external address of our gateway, it will redirect all requests to the virtual IP 192.168.100.100, which will be configured on all three nodes of our cluster.
Training
To begin with, we need to make sure that all our nodes can access each other by a single hostname, for reliability it is better to immediately add the node addresses to /etc/hosts:
192.168.100.101    hostA
192.168.100.102    hostB
192.168.100.103    hostC
Install all the necessary packages:
yum install pcs pacemaker corosync #CentOS, RHEL
apt-get install pcs pacemaker corosync #Ubuntu, Debian
When installing pcs creates a user hacluster, let's set him a password:
echo CHANGEME | passwd --stdin hacluster Further operations are performed on one node.
Configure authentication:
pcs cluster auth HostA HostB HostC -u hacluster -p CHANGEME --force We create and launch the “Cluster” cluster of three nodes:
pcs cluster setup --force --name Cluster hostA hostB hostC
pcs cluster start --all
We look at the result:
pcs cluster statusCluster Status:
Last updated: Thu Jan 19 12:11:49 2017
Last change: Tue Jan 17 21:19:05 2017 by hacluster via crmd on hostA
Stack: corosync
Current DC: hostA (version 1.1.14-70404b0) - partition with quorum
3 nodes and 0 resources configured
Online: [ hostA hostB hostC ]
PCSD Status:
hostA: Online
hostB: Online
hostC: OnlineSome of the steps were taken from an article by Lelik13a , thanks to him for that.
In our particular case, neither our quorum nor stonith is required by our cluster, so we can safely disable both of them:
pcs property set no-quorum-policy=ignore
pcs property set stonith-enabled=false
In the future, if you have the resources for which it is necessary, you can refer to the Silvar article .
A few words about MAC addresses
Before we get started, we need to understand that all of our nodes will be configured with the same IP and the same mac-address, upon request to which they will alternately give answers.
The problem is that each switch works in such a way that during operation it compiles its own switching table, in which each mac-address is associated with a specific physical port. The switching table is compiled automatically, and serves to offload the network from "unnecessary" L2 packets.
So, if the mac-address is in the switching table, then packets will be sent only to one port and this mac-address is assigned to it.
Unfortunately, this does not suit us and we need to make sure that all our hosts in the cluster simultaneously "see" all these packets. Otherwise, this circuit will not work.
First, we need to make sure that the mac address we use is a multicast address . That is, is in the range 01:00:5E:00:00:00- 01:00:5E:7F:FF:FF. Having received a packet for such an address, our switch will transmit it to all other ports except the source port. In addition, some managed switches allow you to configure and define multiple ports for a specific MAC address.
You may also have to disable the Dynamic ARP Inspection feature , if supported by your switch, as it may block arp responses from your hosts.
Setting up an iPad Resource
So we got to the most interesting.
There are currently two versions of the iPad with cloning support:
IPaddr2 (
ocf:heartbeat:IPaddr2) - A standard resource agent for creating and operating a virtual IP address. It is usually installed along with the standard packageresource-agents.- IPaddr3 (
ocf:percona:IPaddr3) - An improved version of iPadcon from Percona.
This version includes fixes oriented to work in the clone mode.
Separate installation required.
To install IPaadr3, run these commands on each host:
curl --create-dirs -o /usr/lib/ocf/resource.d/percona/IPaddr3 \
    https://raw.githubusercontent.com/percona/percona-pacemaker-agents/master/agents/IPaddr3
chmod u+x /usr/lib/ocf/resource.d/percona/IPaddr
Further operations are performed on one node.
Create a resource for our virtual IP address:
pcs resource create ClusterIP ocf:percona:IPaddr3 \
    params ip="192.168.100.100" cidr_netmask="24" nic="eth0" clusterip_hash="sourceip-sourceport" \
    op monitor interval="10s"
clusterip_hash - here you need to specify the desired type of distribution of requests.
There can be three options:
sourceip- distribution only by the source IP address, this ensures that all requests from the same source will always go to the same host.sourceip-sourceport- distribution by source IP address and outgoing port. Each new connection will go to a new host. The best option.sourceip-sourceport-destport- distribution by source IP address of the outgoing port and the destination port. Provides the best distribution, it is important if you have several services running on different ports.
For IPaddr2, you must specify a parameter mac=01:00:5E:XX:XX:XXwith a mac address from the multicast range. IPadr3 installs it automatically.
Теперь склонируем наш ресурс:
pcs resource clone ClusterIP \
    meta clone-max=3 clone-node-max=3 globally-unique=true
Это действие создаст следующее правило в iptables:
Chain INPUT (policy ACCEPT)
target     prot opt source               destination
  all  --  anywhere             192.168.100.100       CLUSTERIP hashmode=sourceip-sourceport clustermac=01:00:5E:21:E3:0B total_nodes=3 local_node=1 hash_init=0
Как вы можете заметить, здесь используется модуль CLUSTERIP.
Работает он следующим образом:
На три ноды приходят все пакеты, но все три Linux-ядра знают сколько нод получает пакеты, все три ядра нумеруют получаемые пакеты по единному правилу, и, зная сколько всего нод и номер своей ноды, каждый сервер обрабатывает только свою часть пакетов, остальные пакеты сервером игнорируются — их обрабатывают другие сервера.
Подробнее об этом написанно в этой статье.
Давайте еще раз посмотрим на наш кластер:
pcs cluster statusCluster Status:
Cluster name: cluster
Last updated: Tue Jan 24 19:38:41 2017
Last change: Tue Jan 24 19:25:44 2017 by hacluster via crmd on hostA
Stack: corosync
Current DC: hostA (version 1.1.14-70404b0) - partition with quorum
3 nodes and 0 resources configured
Online: [ hostA hostB hostC ]
Full list of resources:
Clone Set: ClusterIP-clone [ClusterIP-test] (unique)
ClusterIP:0 (ocf:percona:IPaddr3): Started hostA
ClusterIP:1 (ocf:percona:IPaddr3): Started hostB
ClusterIP:2 (ocf:percona:IPaddr3): Started hostC
PCSD Status:
hostA: Online
hostB: Online
hostC: OnlineIP-адреса успешно запустились. Пробуем обратиться к ним снаружи.
Если все работает как надо, то на этом настройку можно считать законченой.
Ссылки
- Pacemaker High Availability Cluster (HA-cluster)
- Pacemaker-based HA-Cluster for LXC and Docker container virtualization
- pacemaker: how to finish lying
- The use of Iptables ClusterIP target as a load balancer for PXC, PRM, MHA and NDB
- Pacemaker load-balancing with clone
- Load balancing on LDAP servers using iptables CLUSTERIP
- pacemaker / Ch-Active-Active.txt at masterClusterLabs / pacemaker
- 9.5. Clone the IP address









