Tap gesture to hide the keyboard in iOS (Swift 3)
In this article we will analyze how to hide the keyboard by clicking on the view from the very basics to the implementation in one line or without any code.

The basics
The following case is quite common: by clicking on the background, hide the keyboard.
The basic solution - we have a link to UITextField, create UITapGestureRecognizerwith a method that removes the selection from the text field and it looks like this:
This article uses Swift 3, but can be implemented on other versions and on Objective-C
class ViewController: UIViewController {
    @IBOutlet weak var textField: UITextField!
    override func viewDidLoad() {
        super.viewDidLoad()
        let tapGesture = UITapGestureRecognizer(target: self, action: #selector(self.tapGesture))
        view.addGestureRecognizer(tapGesture)
    }
    func tapGesture() {
        textField.resignFirstResponder()
    }
}
Problems with this code:
viewDidLoaddirty and unreadable- a lot of code in the controller
- not reusable
Make readable
To solve the first problem, we can take out the code for creating and adding a gesture in a separate function:
class ViewController: UIViewController {
    @IBOutlet weak var textField: UITextField!
    override func viewDidLoad() {
        super.viewDidLoad()
        addTapGestureToHideKeyboard()
    }
    func addTapGestureToHideKeyboard() {
        let tapGesture = UITapGestureRecognizer(target: self, action: #selector(self.tapGesture))
        view.addGestureRecognizer(tapGesture)
    }
    func tapGesture() {
        textField.resignFirstResponder()
    }
}
The code became even more, but it became cleaner, more logical and more pleasant to the eye.
Code reduction
To solve the second problem, UIViewthere is a method:
func endEditing(_ force: Bool) -> BoolHe is just responsible for removing the selection from the view itself or its subview. Thanks to him, we can greatly simplify our code:
class ViewController: UIViewController {
    override func viewDidLoad() {
        super.viewDidLoad()
        addTapGestureToHideKeyboard()
    }
    func addTapGestureToHideKeyboard() {
        let tapGesture = UITapGestureRecognizer(target: view, action: #selector(view.endEditing))
        view.addGestureRecognizer(tapGesture)
    }
}
If you follow the steps, be sure to remove the textField property from IB.
Also changetargetfromselftoview.
The code began to please the eye! But you still have to copy this to each controller.
Copy solution
For reuse, we’ll put out our method of adding to the extensioncontroller:
extension UIViewController {
    func addTapGestureToHideKeyboard() {
        let tapGesture = UITapGestureRecognizer(target: view, action: #selector(view.endEditing))
        view.addGestureRecognizer(tapGesture)
    }
}
And the code of our controller will look like this:
class ViewController: UIViewController {
    override func viewDidLoad() {
        super.viewDidLoad()
        addTapGestureToHideKeyboard()
    }
}
Clean, one line of code, and it is reusable! Perfect!
Multiple view
The solution above is very good, but it has one drawback: we cannot add a gesture to a specific view.
To solve this case, we will use the extension UIView:
extension UIView {
    func addTapGestureToHideKeyboard() {
        let tapGesture = UITapGestureRecognizer(target: self, action: #selector(endEditing))
        addGestureRecognizer(tapGesture)
    }
}
and accordingly, the controller code will look like this:
class ViewController: UIViewController {
    override func viewDidLoad() {
        super.viewDidLoad()
        view.addTapGestureToHideKeyboard()
    }
}
Here another problem arises: this extension solves the problem only for the controller view. If we add someView to the view and hang a gesture on it, it will not work. This is all because the method endEditingworks only for a view that contains an active view or is itself a view, and our text field is most likely not to be in it. We will solve this problem.
Because view of the controller will definitely contain the active view, and our added view will always be in its hierarchy, then we can reach the view of the controller through superviewand call it endEditing.
We get the view of the controller through the UIView extension:
var topSuperview: UIView? {
    var view = superview
    while view?.superview != nil {
        view = view!.superview
    }
    return view
}
I will say right away by changing the selector to:
#selector(topSuperview?.endEditing)still will not work. We need to add a method that will call the construct above:
func dismissKeyboard() {
    topSuperview?.endEditing(true)
}
Now replace the selector with:
#selector(dismissKeyboard)So, the extension for UIView will look like this:
extension UIView {
    func addTapGestureToHideKeyboard() {
        let tapGesture = UITapGestureRecognizer(target: self, action: #selector(dismissKeyboard))
        addGestureRecognizer(tapGesture)
    }
    var topSuperview: UIView? {
        var view = superview
        while view?.superview != nil {
            view = view!.superview
        }
        return view
    }
    func dismissKeyboard() {
        topSuperview?.endEditing(true)
    }
}
Now, using addTapGestureToHideKeyboard()for any view we will hide the keyboard.
KeyboardHideManager
![]()
I used the solution above for a long time, but then I began to notice that even one line pollutes the view installation function. Also, (rarely, but still happens) it doesn’t look very beautiful when it is the only method in viewDidLoad:
override func viewDidLoad() {
    super.viewDidLoad()
    addTapGestureToHideKeyboard()
}
Вместе с пробелом это занимает 5 строк, что сильно сказывается на чистоте контроллера! У меня появилась идея сделать все это без кода, чтобы не было в контроллере и одной лишней строчки. Я создал класс, который можно добавить в IB с помощью Object
И с помощью @IBOutlet привязать нужные нам вьюхи:
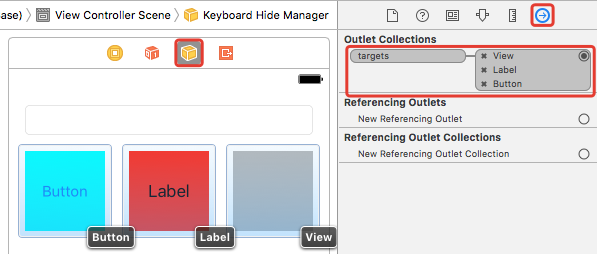
Реализация данного класса наипростейшая — добавляем жест на каждую вьюху с помощью выше созданных функций:
final public class KeyboardHideManager: NSObject {
@IBOutlet internal var targets: [UIView]! {
didSet {
for target in targets {
addGesture(to: target)
}
}
}
internal func addGesture(to target: UIView) {
let gesture = UITapGestureRecognizer(target: self, action: #selector(dismissKeyboard))
target.addGestureRecognizer(gesture)
}
@objc internal func dismissKeyboard() {
targets.first?.topSuperview?.endEditing(true)
}
}
extension UIView {
internal var topSuperview: UIView? {
var view = superview
while view?.superview != nil {
view = view!.superview
}
return view
}
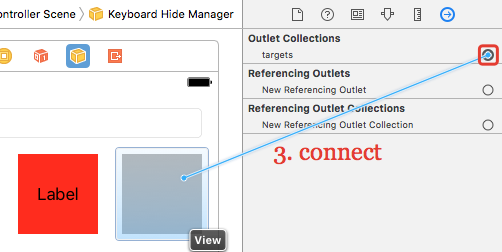
}Чтобы воспользоваться данным классом, нужно три простых действия:
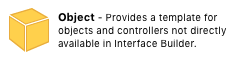
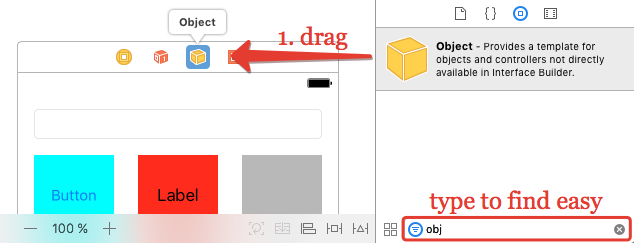
- 1) Перетащить Object в контроллер
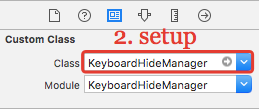
- 2) Установить KeyboardHideManager в качестве класса данного объекта
- 3) Соединить нужные вьюхи со свойством targets
Yes, there are more actions than writing one line (or several lines if there are several defined views), for this controller does not have this line.
Someone may say that it is better to write a line in the code, it’s more clear, and they will be right, on the one hand. I am in favor of removing from the controller all that is possible and thereby facilitating it.
You can connect this class via CocoaPods or simply copy it to the project.
Link to the source code of the KeyboardHideManager with a full ReadMe about the library itself and its connection.
Total
We disassembled the implementation of the popular case, examined several of its solutions, in one line and without code at all. Use the method that you like more.