We use Veeam Backup & Replication to test new systems and applications before upgrading
About a month ago, Microsoft announced the release of the latest version of Windows Server 2019. However, after GA (general availability), serious flaws were discovered, as in Windows October 10, 2018 Update (1809) - installing an update resulted in data loss (files from My Documents were brutally removed, so that they could not be restored from Windows.old). The manufacturer was forced to cancel the release before fixing the problem. And finally, on November 13, the repaired version saw the light .
Along with this, it should be remembered that Microsoft will soon end up supporting SQL Server 2008 R2 and Windows Server 2008 R2.
Naturally, users have many questions about the transition to new systems:
Does Microsoft Azure move to the cloud? How to safely raise the functional level of the domain? Should I switch to Azure SQL? Maybe you need to virtualize Windows Server 2008 R2 or transfer to Azure? Do I need to migrate to the newest Hyper-V?
Migrating to a new platform is needed to ensure that mission-critical applications running in the data center have a system supported by the vendor. Therefore, it is important that the migration take place without surprises. Veeam users are lucky - they have good ways to minimize the risks of such operations, so that, as they say, “measure 7 times, cut them off once”.
For details, welcome under cat.
Bestbackup practices recommend checking backups for the possibility of recovery, in particular, using the sandbox Veeam DataLab . She first saw the light in the release of Veeam Backup & Replication in 2010 (then it was called Virtual Lab) and has been constantly updated and developed since then. Today, it becomes an excellent helper for testing new software before deployment - an autonomous sandbox allows you to test planned updates and changes to systems and applications without risking production, whether it is an upgrade to Windows Server 2019, switching to a new version of SQL or other operations.
The device of such a “sandbox” is shown in the picture below:
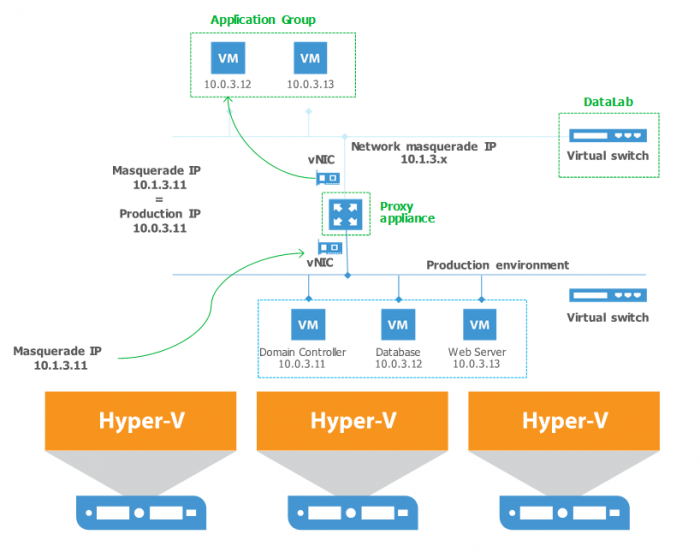
For the work of the “sandbox” they are involved:
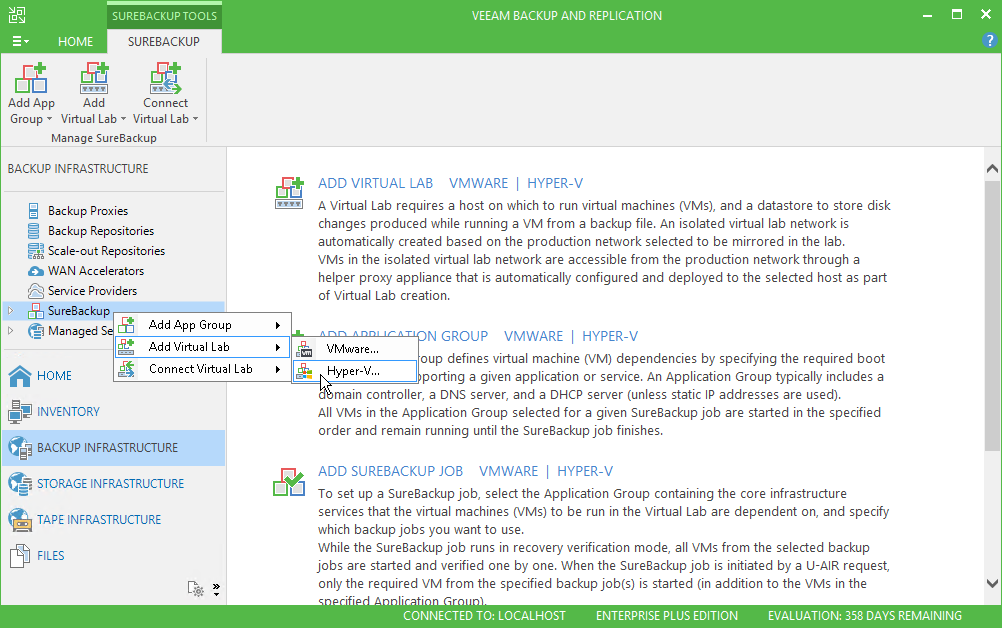
Setting up such a “sandbox” is described in detail in the user documentation . Also in the near future a separate document is planned with an example of using DataLab just for testing upgrades on Windows Server 2019, on a new SQL Server, and also for migrating to Azure.
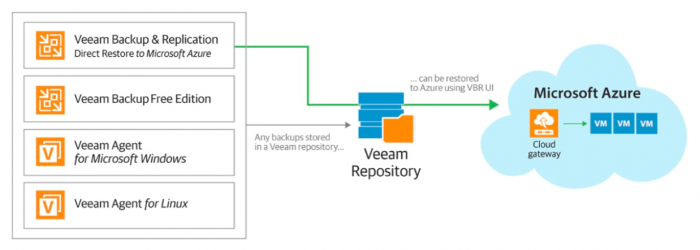
Another useful technology implemented in the Veeam solution is the ability to restore from backup to Microsoft Azure. Now it is built into Veeam Backup & Replication, which is very convenient. In addition, you can use this feature to test new systems and applications, the migration process, network connections, etc. - because you can raise the test infrastructure in the cloud Azure. If everything goes well, then repeat the same steps during the planned migration of production to Azure. Let us dwell on this feature in more detail.
Microsoft announced that Extended Security Updates will be available for free in Azure for Windows server 2008 R2 for another 3 years after the end of support. Users can move their machines to Azure without changing the application code, and the sooner they do this, the more time they have to plan for future updates. You can read more here .
Note that using recovery from backup to the Azure cloud can transfer almost everything that Veeam can backup: Windows Servers, Linux machines, virtual machines on vSphere and Hyper-V platforms, and so on.
For Windows machines, the process will go like this:
Restoration of Linux-machines is similar - only disks are mounted on a helical appliance. See more details here (in English. Language).
To restore there are a number of restrictions, namely:
Important! Check that the time on the Veeam backup server is set correctly, otherwise there may be errors when trying to add Microsoft Azure accounting to the Veeam Backup & Replication infrastructure or when performing recovery.
In order to perform recovery, it is necessary, in particular, to add a Microsoft Azure account to the Veeam Backup & Replication infrastructure. At the same time, Veeam Backup & Replication saves in its database the subscriptions and resources associated with the account, and during the recovery to the cloud it uses them to register a new VM in Microsoft Azure. There are 2 options for importing this data:
The provider itself (Microsoft Azure) recommends deploying new machines in the cloud using the Resource Manager, so we will use it.
Before adding a Microsoft Azure account in the Veeam Backup console, you need to do a few preliminary steps:
Now we are going to add an Azure account. As agreed, we will use the model with Resource Manager:
The following types of backups are supported:
Note: To restore a physical machine to Azure, you need to back up the whole of it or back up the volumes.
Note that you can restore the machine to the state as in the last restore point or as in any previous point in the backup chain. The chain should be stored in the repository that is part of the Veeam Backup infrastructure. You can also import existing backup.
To do this, run the Restore to Azure Restore Wizard:
On the final steps, we indicate the purpose for which we restore the VM, check the settings once again, click Finish and watch the progress of the recovery session to the cloud.
A detailed description of the recovery wizard for both deployment modes (including Classic mode) can be found here (in English).
If you are ready to share your experience of practical use of the sandbox or restore to Azure from Veeam backups, welcome to comments.
If you want to know more about this functionality, then you can help:
Along with this, it should be remembered that Microsoft will soon end up supporting SQL Server 2008 R2 and Windows Server 2008 R2.
Naturally, users have many questions about the transition to new systems:
Does Microsoft Azure move to the cloud? How to safely raise the functional level of the domain? Should I switch to Azure SQL? Maybe you need to virtualize Windows Server 2008 R2 or transfer to Azure? Do I need to migrate to the newest Hyper-V?
Migrating to a new platform is needed to ensure that mission-critical applications running in the data center have a system supported by the vendor. Therefore, it is important that the migration take place without surprises. Veeam users are lucky - they have good ways to minimize the risks of such operations, so that, as they say, “measure 7 times, cut them off once”.
For details, welcome under cat.
Testing in the “network sandbox”
Best
The device of such a “sandbox” is shown in the picture below:
For the work of the “sandbox” they are involved:
- Application group (“group for application”) is one or more virtual machines that provide the work of the application you are interested in. For example, it could be a web server and a database server for SharePoint, or a domain controller and an Exchange server, etc.
- A proxy appliance is an auxiliary proxy machine that serves to isolate the DataLab sandbox from the production infrastructure. It allows you to create an IP address space in an isolated network without interfering with the production network using masquerade IP addresses.
Setting up such a “sandbox” is described in detail in the user documentation . Also in the near future a separate document is planned with an example of using DataLab just for testing upgrades on Windows Server 2019, on a new SQL Server, and also for migrating to Azure.
Recreation from backups to cloud
Another useful technology implemented in the Veeam solution is the ability to restore from backup to Microsoft Azure. Now it is built into Veeam Backup & Replication, which is very convenient. In addition, you can use this feature to test new systems and applications, the migration process, network connections, etc. - because you can raise the test infrastructure in the cloud Azure. If everything goes well, then repeat the same steps during the planned migration of production to Azure. Let us dwell on this feature in more detail.
Why about Azure?
Microsoft announced that Extended Security Updates will be available for free in Azure for Windows server 2008 R2 for another 3 years after the end of support. Users can move their machines to Azure without changing the application code, and the sooner they do this, the more time they have to plan for future updates. You can read more here .
Note that using recovery from backup to the Azure cloud can transfer almost everything that Veeam can backup: Windows Servers, Linux machines, virtual machines on vSphere and Hyper-V platforms, and so on.
How it works?
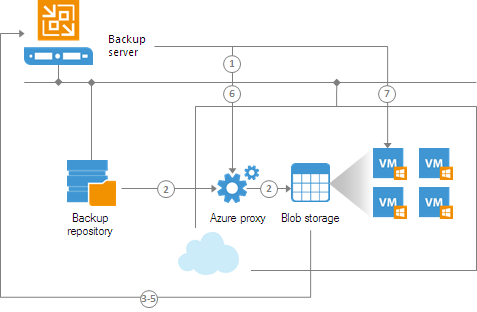
For Windows machines, the process will go like this:
- If you are using an Azure proxy, then Veeam Backup & Replication will enable it. Read more about this proxy here .
- Veeam Backup & Replication converts disks from a backup machine to VHD format and uploads it to storage (blob storage) in the Microsoft Azure cloud.
- Then these disks are mounted to the server Veeam backup server.
- The disks are being prepared for VM recovery: the rules for the Remote Desktop are activated, the rules for working through the firewall are configured, the ground is set for the installation of the Microsoft Azure agent, etc.
- Veeam Backup & Replication unmounts the drives.
- If Azure-proxy was used, it will automatically shut down.
- Veeam Backup & Replication registers a Microsoft Azure VM with prepared disks. After that, the machine turns on, and a Microsoft Azure agent is placed on it.
Restoration of Linux-machines is similar - only disks are mounted on a helical appliance. See more details here (in English. Language).
To restore there are a number of restrictions, namely:
- The following guest OSes are supported:
- Microsoft Windows Server 2008 / Windows Vista and above
- Linux - according to https://docs.microsoft.com/en-us/azure/virtual-machines/virtual-machines-linux-endorsed-distros ).
- The size of one disk of the restored VM should not exceed 4095 GB.
- If the system disk of the source machine has a GPT partition structure, then the number of partitions can be no more than 4. During recovery, such a disk will be converted to a disk with an MBR partition structure.
- Azure Hybrid Use Benefit is not supported.
Important! Check that the time on the Veeam backup server is set correctly, otherwise there may be errors when trying to add Microsoft Azure accounting to the Veeam Backup & Replication infrastructure or when performing recovery.
Add a Microsoft Azure account to Veeam Backup & Replication
In order to perform recovery, it is necessary, in particular, to add a Microsoft Azure account to the Veeam Backup & Replication infrastructure. At the same time, Veeam Backup & Replication saves in its database the subscriptions and resources associated with the account, and during the recovery to the cloud it uses them to register a new VM in Microsoft Azure. There are 2 options for importing this data:
- work model using Resource Manager
- classic work model
The provider itself (Microsoft Azure) recommends deploying new machines in the cloud using the Resource Manager, so we will use it.
Before adding a Microsoft Azure account in the Veeam Backup console, you need to do a few preliminary steps:
- Make sure you already have a Microsoft Azure account. The setup wizard can only add accounts, but not create them.
- [For those who have a Windows server OS] In Internet Explorer settings, you need to turn off Protected Mode, otherwise you will not be logged in to the cloud during the work with the Setup Wizard.
- If it is not possible to disable Protected Mode, add the following to the list of allowed sites:
- login.live.com
- login.microsoftonline.com
- secure.aadcdn.microsoftonline-p.com
- auth.gfx.ms
- about: security_veeam.backup.shell.exe
You may also need to disable Internet Explorer Enhanced Security Configuration in Server Manager. - Check that the Veeam backup server is set to the correct time corresponding to the time zone in which the server is located.
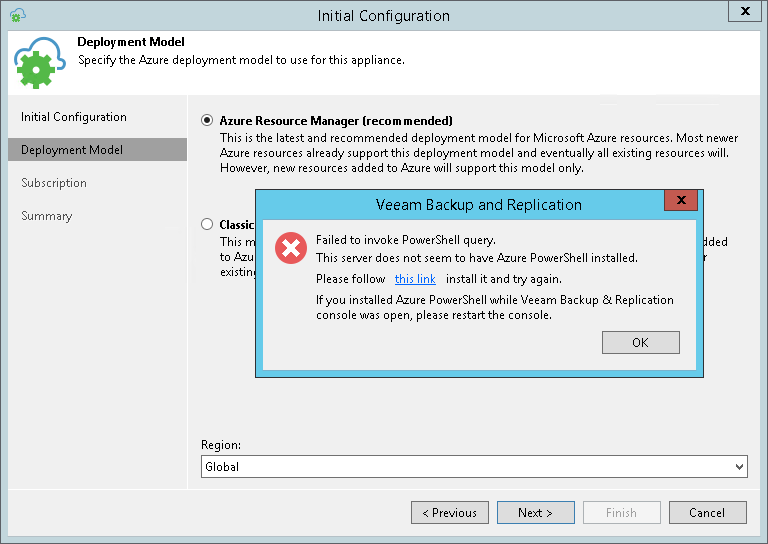
- On the machine where the Veeam Backup console is running, it is strongly recommended to install Microsoft Azure PowerShell 4.0.2. If you have a different version, there may be difficulties. If you don’t have any version of Microsoft Azure PowerShell at all, then Veeam Backup will offer to install it (see below).
- You need to configure HTTP / HTTPS proxy for the Local System account or for the account under which the Veeam Backup Service is running. See more here .
Now we are going to add an Azure account. As agreed, we will use the model with Resource Manager:
- In the main menu of Veeam Backup & Replication, select Manage Azure Accounts .
- In the Manage Microsoft Azure Account window, click Add to launch the wizard.
- In the Deployment Model step, select the Azure Resource Manager option .
- From the Region list, select the desired Microsoft Azure region: Global , Germany or China .
- After clicking on Next Veeam Backup & Replication, it will check if there is Microsoft Azure PowerShell on this machine. If not, a warning will be issued with a link to the installation instructions. After installation, you will need to restart the Setup Wizard.
- At the Subscription step, click the Configure account . You will need to login to the Microsoft Azure portal by entering an existing account. Veeam Backup & Replication will receive information about subscriptions and resources provided to the owner of this account.
If you plan to restore Linux machines, then you need to check the Enable restore of Linux-based computers checkbox . In this case, Veeam Backup & Replication will deploy a helper appliance in the cloud, which is necessary for recovery.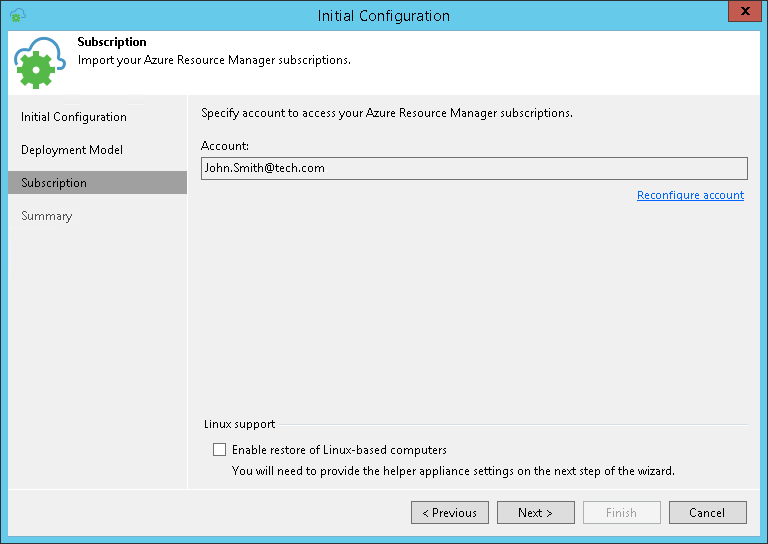
- Go through the steps of the Setup Wizard to the end and click Finish there .
We prepare backups
The following types of backups are supported:
- Virtual machine backups (Microsoft Windows and Linux) created with Veeam Backup & Replication
- Back-ups of physical Windows machines created with the Veeam Agent for Windows.
- Backups of physical Linux machines created with Veeam Agent for Linux.
Note: To restore a physical machine to Azure, you need to back up the whole of it or back up the volumes.
Note that you can restore the machine to the state as in the last restore point or as in any previous point in the backup chain. The chain should be stored in the repository that is part of the Veeam Backup infrastructure. You can also import existing backup.
Perform recovery
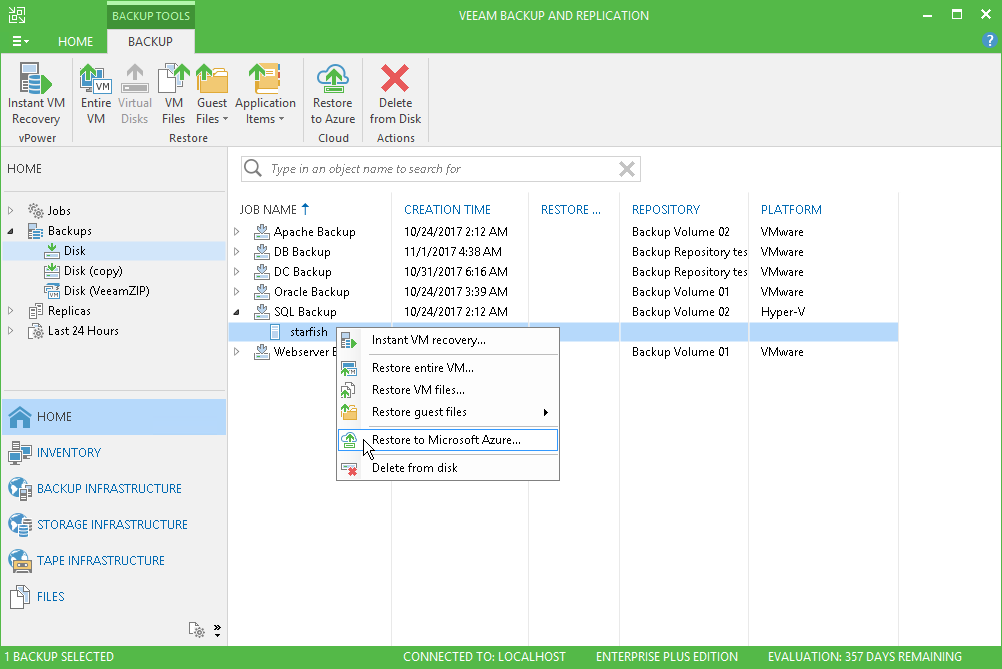
To do this, run the Restore to Azure Restore Wizard:
- In the Home view, expand the Backups node in the tree on the left. Then in the right panel we expand the node of the necessary backup, we select the necessary machine there.
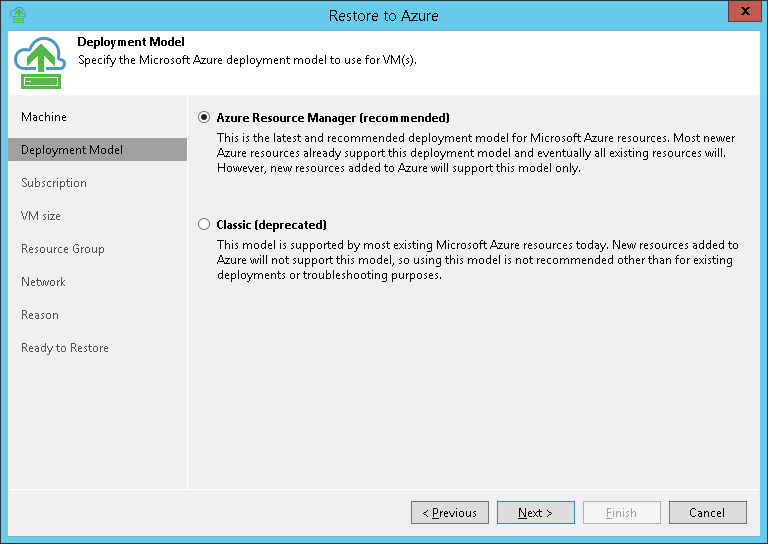
- Clicking on it with the right button, select the Restore to Microsoft Azure command and go to the step of the Deployment Model wizard .
- Specify which deployment model in Microsoft Azure we will use when restoring to the cloud. In our case, it will be Azure Resource Manager.
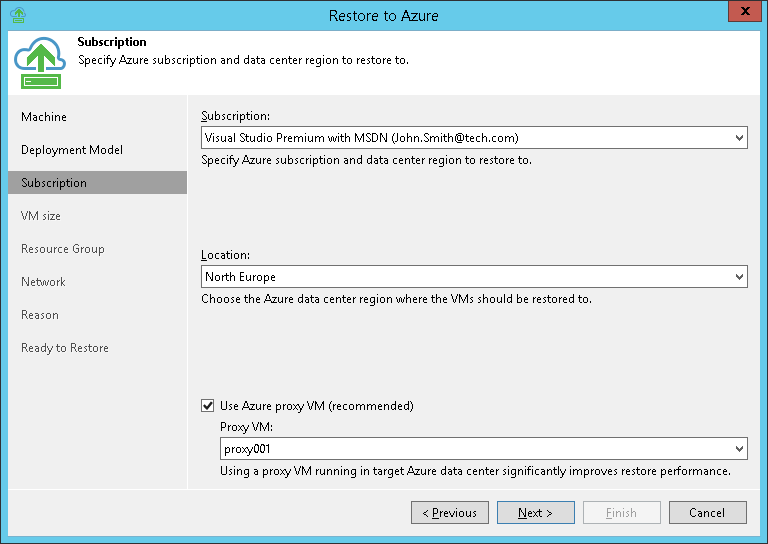
- In the Subscription step, we specify the following settings:
- In the Subscription list , all the subscriptions available for the account that we added to Veeam Backup in the first stage will be shown. Choose a subscription, the resources of which we want to use.
- From the list of Locations, select the region in which we want to place the restored machine. Make sure you have at least one storage system for this region.
- If you want to speed up the recovery process to a remote region, we recommend using the Use Azure proxy VM by selecting Microsoft Azure proxy from the list. It is reasonable that the proxy is in the same region where you will repair the car.
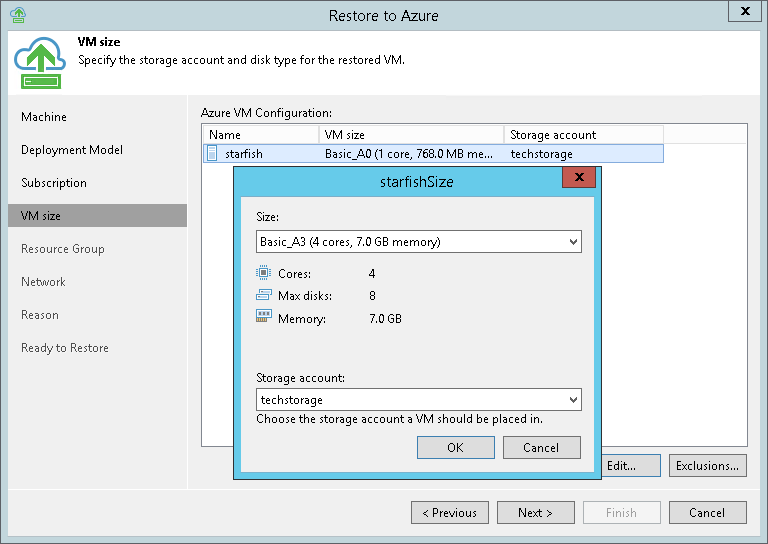
- In the VM size step, we specify the size of the machine and the account for the storage system where the disks of the restored machine will be placed.
- Select a machine from the Azure VM Configuration list and click Edit .
- From the list of sizes Size choose what size the restored VM will be. (By default, the minimum sufficient will be selected for the number of disks available on the VM).
Note: It must be borne in mind here that the number of CPU cores, memory and disk space that will be allocated to this VM will depend on the size of the VM. Read more document from Microsoft . - From the list of Storage account, select the so-called. “Storage account” for storage where we want to store disks of the VM to be restored. (Remember the selected VM size.) If you indicated that when you deploy a VM in the cloud, you will use Azure proxy, then only general-purpose accounts will appear in this list (accounts for Blob will not be shown). About different types of accounting is written here .
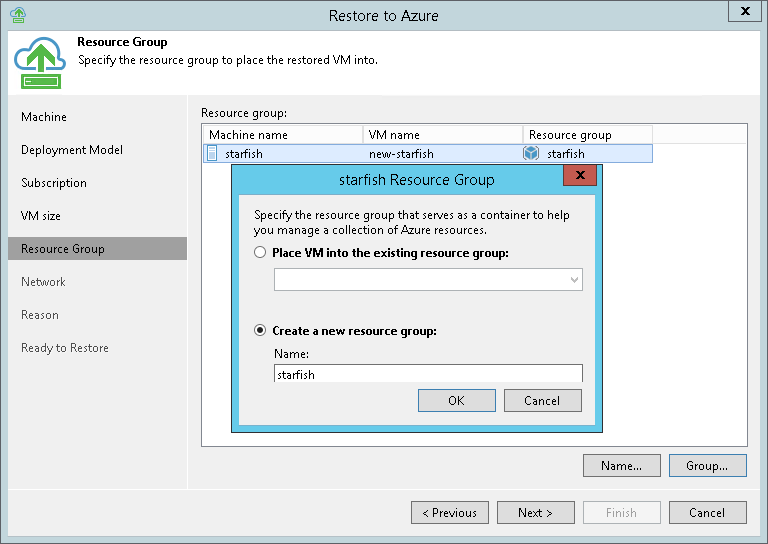
- At the Resource Group step, you can specify a new name for the VM being restored (by default, it will be the same as the name of the source machine). Click Name and specify a new name explicitly, or set a rule according to which it will be formed - by adding a prefix and \ or postfix to the original one.
By default, a new resource group will be created for the VM. If you want to add a VM to an existing group, you can also do this at this step. Select a VM from the list and click on the Group , specify the desired option:- Place VM into the existing resource group (place in existing group)
- or Create a new resource group (create a new group)
- In the Network step , we specify the network and subnet for connecting the restored VM.

On the final steps, we indicate the purpose for which we restore the VM, check the settings once again, click Finish and watch the progress of the recovery session to the cloud.
A detailed description of the recovery wizard for both deployment modes (including Classic mode) can be found here (in English).
Finally
If you are ready to share your experience of practical use of the sandbox or restore to Azure from Veeam backups, welcome to comments.
If you want to know more about this functionality, then you can help:
- Article on Habré about the sandbox as an autonomous test environment
- Basic scenarios for using Veeam Backup & Replication for VMware vSphere (in Russian)
- Basic scenarios for using Veeam Backup & Replication for Microsoft Hyper-V (in Russian)
- Webinar “Veeam DataLabs: from beginners to advanced users” (in Russian)
- Webinar “Restore in Microsoft Azure” (in Russian)