Creating and testing Firewall on Linux, Part 2.1. Introduction to the second part. We look at the network and protocols. Wireshark
The content of the first part:
The content of the second part:
2.1 - Introduction to the second part. We look at the network and protocols. Wireshark
2.2 - Firewall Tables. Transport Layer Structures TCP, UDP. Extend Firewall.
2.3 - Extend functionality. We process data in user space. libnetfilter_queue.
2.4 - Bonus. We study the real Buffer Overflow attack and prevent it with our Firewall.
In the previous part, we wrote a simple kernel module, char device driver, equipped it with an interface for communicating with user space via read / write char device and sysfs operations, and most importantly, added an ordered interception of all traffic. In this part, we will go a little deeper into the topic of firewall, and also look at how to make our program more advanced.
Attention! If the words “protocols”, TCP \ IP, Wireshark are not new for you, you have nothing to do here :)
Before we continue, I would like to say just a few words about the network (since there are tons of information on the topic), for those who I did not deal with this topic at all.
In order for one packet to get from one device (computer, phone, router ...) to another, certain rules are necessary that determine the order of its transportation. These rules are called protocols. As an example, if you want to fly from St. Petersburg to Tel Aviv, you go to the airport, go to the counter, they check you in, send you to another counter, they do the same thing there, send you on, and so on, until you get off in glorious Tel Aviv. In networks, the packet also goes through different stages, depending on the network and other factors. Theoretically, the OSI model is defined (read here ), which describes all the stages, almost everything is a little different. Let's look at the picture:
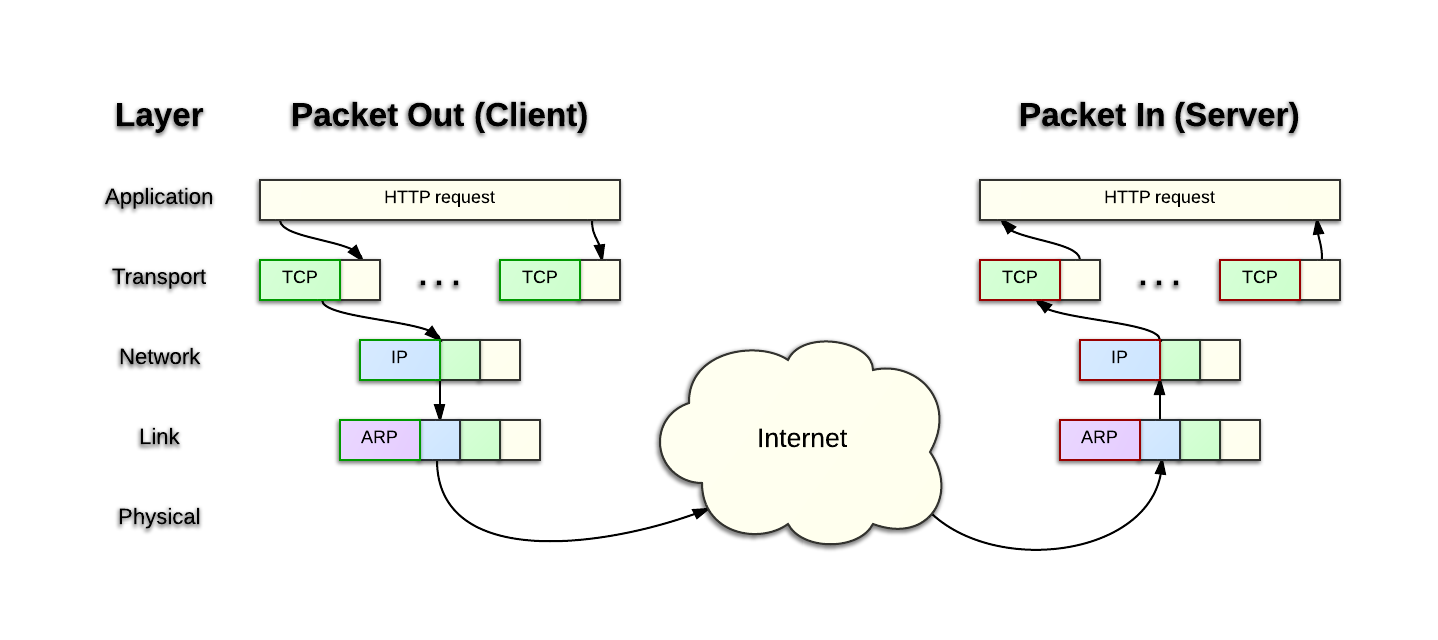
( source of the picture )
When a client sends a packet to the server, the packet passes through several instances (again in classical theoretical cases). Application - for example, a browser. He adds some data, for example, a photo that you want to upload to the social. network. Transport - two protocols are widespread here - TCP and UDP. They have big differences, but at this stage it is important for us that each of them adds information in order to fulfill its functions (for example, so that all packages arrive in the sent order). Network - here the most common protocol is IP, it is responsible for ensuring that packets are transmitted through different routers on large networks. It will forward the packet to your provider, then to another server, then to another one, and at the end to the endpoint. Link is used to route packets on small networks, and Physical is a very low level,
The same thing happens in our virtual network. At the IP protocol level, only two fields will be important to us: IP source - who sends the packet, IP destination - where the packet is sent. At the TCP level, we will only be interested in source port, destination port. A port is a specific connection identification number (for example, when your browser connects to a remote server, it does this with source port = 12345 at destination port = 80. The destination port for known services is reserved and known in advance.
Example:

Host2 sends a packet to host1 with port 12345 to port 80:

The data packet got to the network card 10.0.3.1, after which the firewall redirected it to 10.0.2.1 (yes, the same forwarding from the first part, as fw knew exactly where to send it - is a separate topic, it's easy located on the Internet).
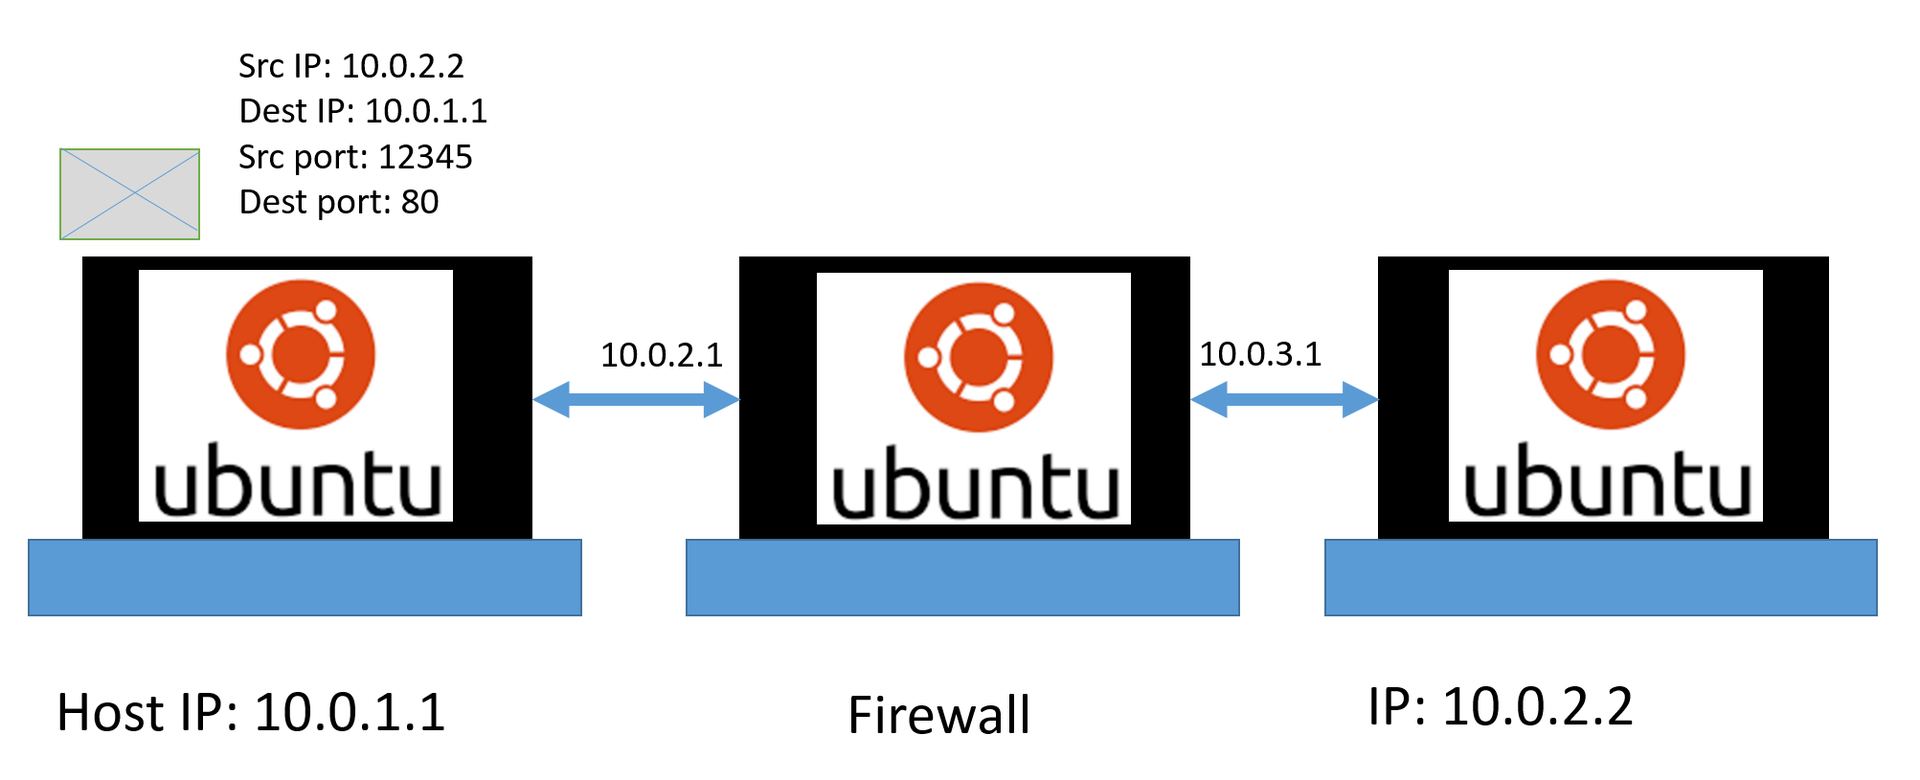
And finally, host1 receives a data packet, sees that its IP address is written in the src ip field, so it picks it up for itself (and doesn’t forward it anywhere else).
It is important to note! Srp ip, des tip, src port, dest port, TCP / UDP - five of these data is unique to uniquely identify any communication session (they often talk about four data, without a protocol, which is not entirely true, because tcp port numbers and udp can match). That is, it cannot be in a normal network, where everything is according to the rules, two connections with the same 5th data described above at the same time!
I think this is enough for the reader to continue reading the article, who does not have knowledge about the operation of networks.
Important 2! The above is intended to give a minimum of intuition and is far from a complete and accurate picture, although it reflects the main foundations of networks (for example, the Internet).
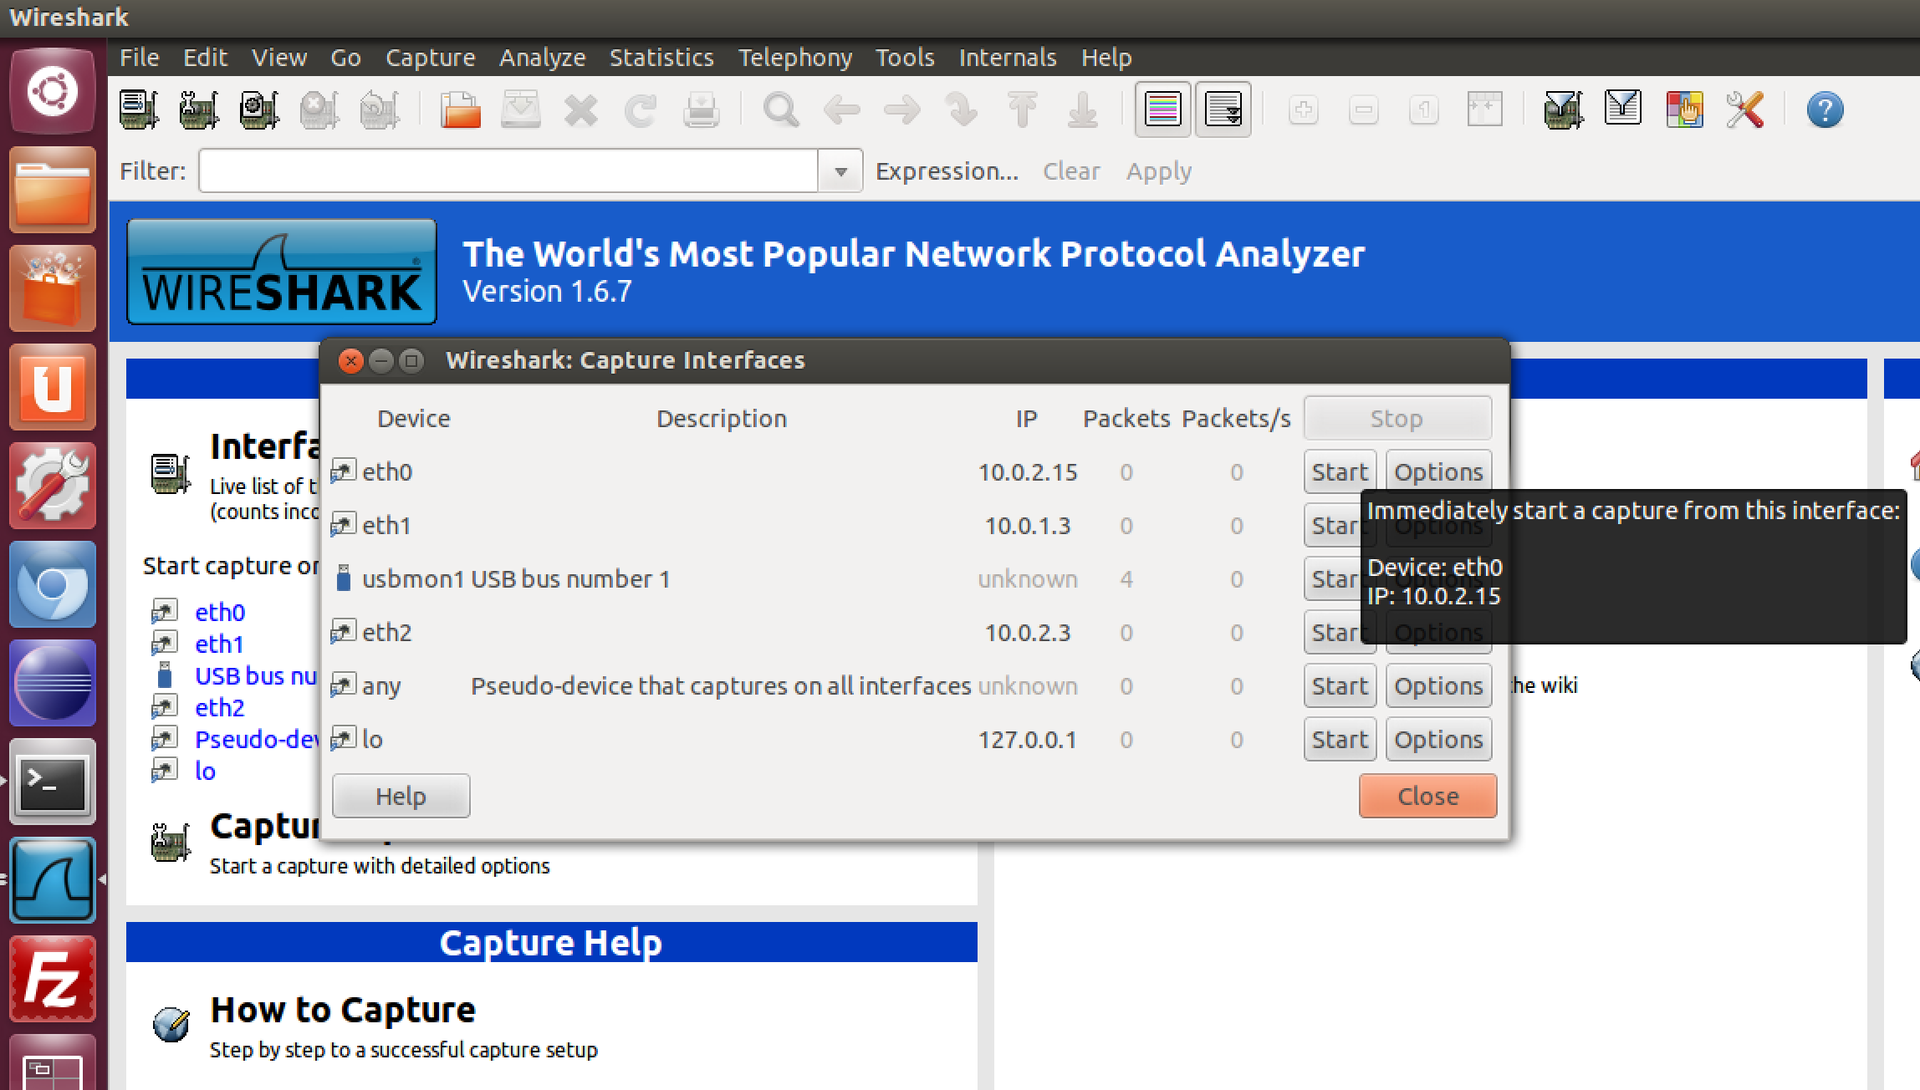
As a practice, you can use the widespread program for listening to the network (which, by the way, works on the same principles as the firewall in this series of articles). It is available under both linux and windows, and is distributed free of charge.
Let's watch live on the package. So, run wireshark and listen to our DHCP output:
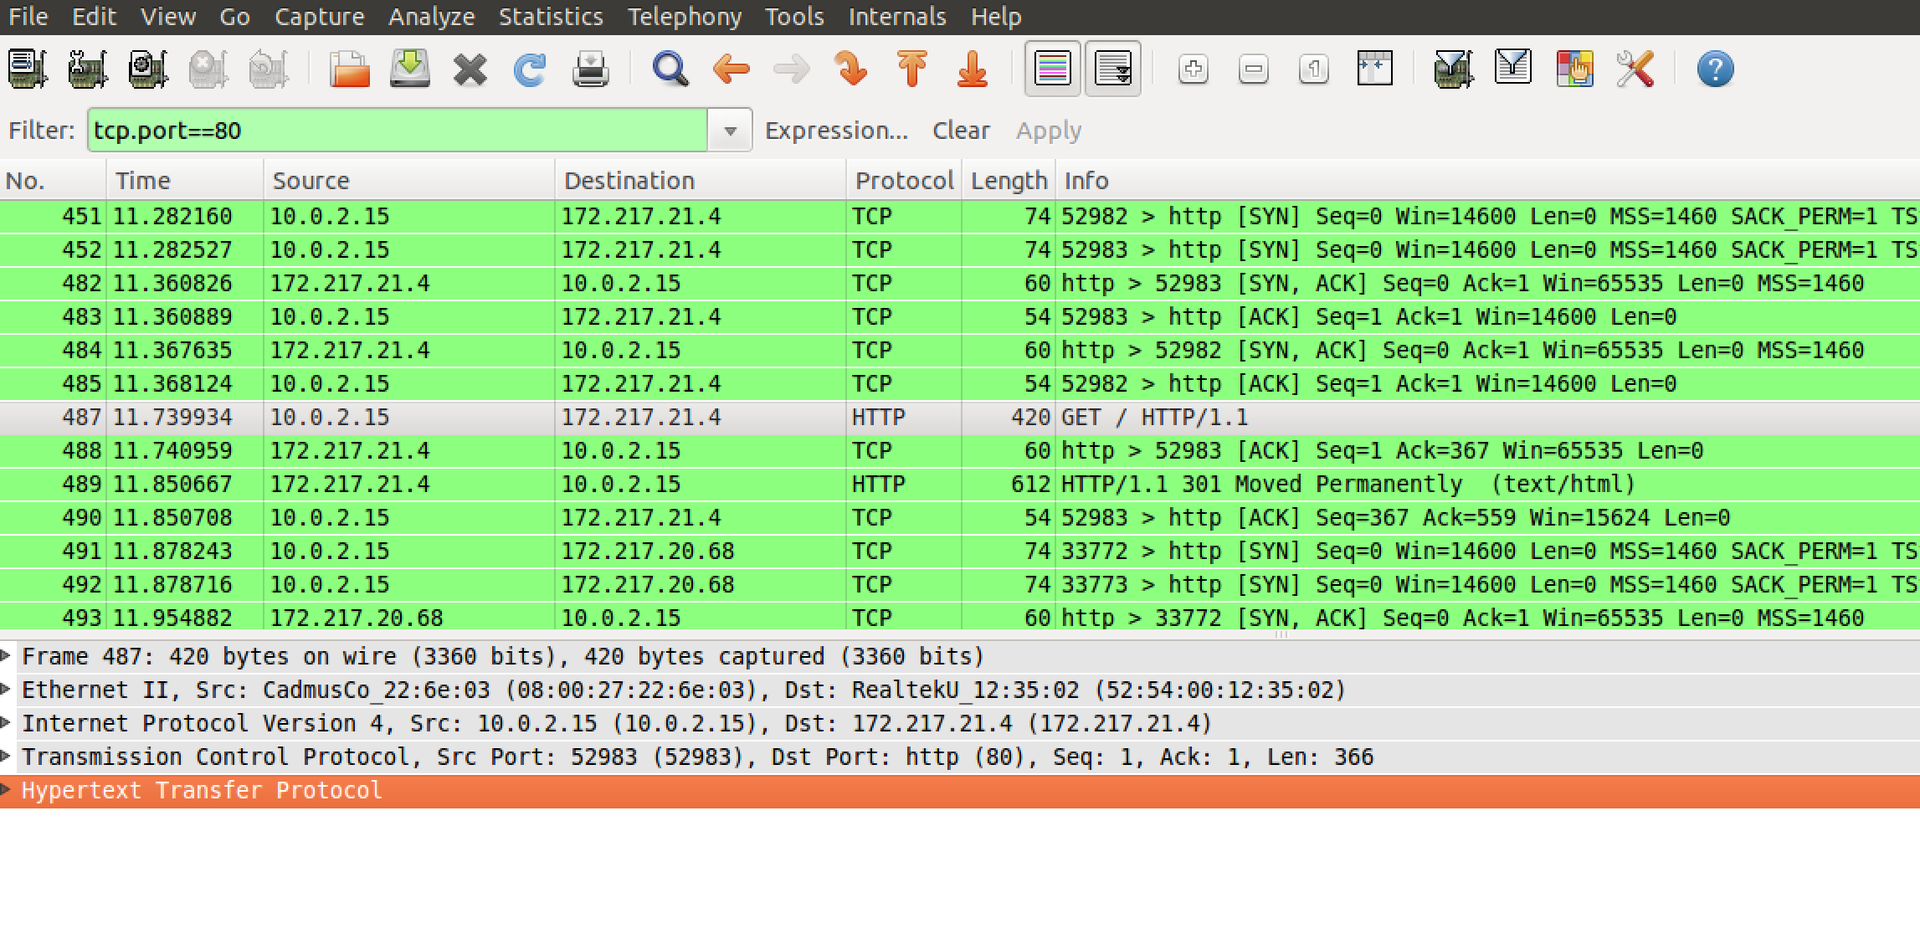
I launched the browser and went to Google:

In general, for those who have never tried it, I strongly advise you to play here, because, in addition to connecting to google.com, you can see everything, everything, everything that happens on the network, all the protocols that work in it and ensure its stable work, including DNS and lower level. You can see that, without doing anything yet, I already own more than 1000 packages. I will use the filter to find those that are directly related to the connection to google.com
And double-click to open in a separate window:

This is how it looks. All the OSI levels used are visible above (what I wrote above), and below I highlighted the data related to the IP protocol, including the most important IP source, IP destination for us. At the application (browser) level, at the very top, you can see that we are sending a GET /HTTP/1.1 request to google.com, that is, we are requesting a page (details of the HTTP protocol can also be easily found on the Internet), as well as various settings of our system ( language, encodings, etc.).
At the TCP level, we see source port = 52983, destination port = 80, and some other flags that can be read on the Internet.
At the end:The article is written mainly for those who are not at all versed in networks, and is intended to prepare for the next parts. The practical part of it can be a starting point for those who have never "felt" the network, but at the same time always wanted to do it.
In the next part we will talk about firewall tables, the difference between statefull vs stateless firewall, and also see how from our module you can access the fields about which I wrote above.
Lab creation, Netfilter architecture, char device, sysfs
1.1 - Creating a virtual laboratory (so that we have a place to work, I will show how to create a virtual network on your computer. The network will consist of 3 Linux ubuntu machines).
1.2 - Writing a simple module in Linux. Introduction to Netfilter and intercepting traffic with it. Putting it all together, testing.
1.3 - Writing a simple char device. Adding a virtual file system - sysfs. Writing user interface. Putting it all together, testing.
1.2 - Writing a simple module in Linux. Introduction to Netfilter and intercepting traffic with it. Putting it all together, testing.
1.3 - Writing a simple char device. Adding a virtual file system - sysfs. Writing user interface. Putting it all together, testing.
The content of the second part:
2.1 - Introduction to the second part. We look at the network and protocols. Wireshark
2.2 - Firewall Tables. Transport Layer Structures TCP, UDP. Extend Firewall.
2.3 - Extend functionality. We process data in user space. libnetfilter_queue.
2.4 - Bonus. We study the real Buffer Overflow attack and prevent it with our Firewall.
Part 2
In the previous part, we wrote a simple kernel module, char device driver, equipped it with an interface for communicating with user space via read / write char device and sysfs operations, and most importantly, added an ordered interception of all traffic. In this part, we will go a little deeper into the topic of firewall, and also look at how to make our program more advanced.
Part 2.1 Introduction to the network. From theory to practice.
Attention! If the words “protocols”, TCP \ IP, Wireshark are not new for you, you have nothing to do here :)
Before we continue, I would like to say just a few words about the network (since there are tons of information on the topic), for those who I did not deal with this topic at all.
In order for one packet to get from one device (computer, phone, router ...) to another, certain rules are necessary that determine the order of its transportation. These rules are called protocols. As an example, if you want to fly from St. Petersburg to Tel Aviv, you go to the airport, go to the counter, they check you in, send you to another counter, they do the same thing there, send you on, and so on, until you get off in glorious Tel Aviv. In networks, the packet also goes through different stages, depending on the network and other factors. Theoretically, the OSI model is defined (read here ), which describes all the stages, almost everything is a little different. Let's look at the picture:
( source of the picture )
When a client sends a packet to the server, the packet passes through several instances (again in classical theoretical cases). Application - for example, a browser. He adds some data, for example, a photo that you want to upload to the social. network. Transport - two protocols are widespread here - TCP and UDP. They have big differences, but at this stage it is important for us that each of them adds information in order to fulfill its functions (for example, so that all packages arrive in the sent order). Network - here the most common protocol is IP, it is responsible for ensuring that packets are transmitted through different routers on large networks. It will forward the packet to your provider, then to another server, then to another one, and at the end to the endpoint. Link is used to route packets on small networks, and Physical is a very low level,
The same thing happens in our virtual network. At the IP protocol level, only two fields will be important to us: IP source - who sends the packet, IP destination - where the packet is sent. At the TCP level, we will only be interested in source port, destination port. A port is a specific connection identification number (for example, when your browser connects to a remote server, it does this with source port = 12345 at destination port = 80. The destination port for known services is reserved and known in advance.
Example:
Host2 sends a packet to host1 with port 12345 to port 80:
The data packet got to the network card 10.0.3.1, after which the firewall redirected it to 10.0.2.1 (yes, the same forwarding from the first part, as fw knew exactly where to send it - is a separate topic, it's easy located on the Internet).
And finally, host1 receives a data packet, sees that its IP address is written in the src ip field, so it picks it up for itself (and doesn’t forward it anywhere else).
It is important to note! Srp ip, des tip, src port, dest port, TCP / UDP - five of these data is unique to uniquely identify any communication session (they often talk about four data, without a protocol, which is not entirely true, because tcp port numbers and udp can match). That is, it cannot be in a normal network, where everything is according to the rules, two connections with the same 5th data described above at the same time!
I think this is enough for the reader to continue reading the article, who does not have knowledge about the operation of networks.
Important 2! The above is intended to give a minimum of intuition and is far from a complete and accurate picture, although it reflects the main foundations of networks (for example, the Internet).
Part 2.1 Introduction to the network. Practice
As a practice, you can use the widespread program for listening to the network (which, by the way, works on the same principles as the firewall in this series of articles). It is available under both linux and windows, and is distributed free of charge.
Let's watch live on the package. So, run wireshark and listen to our DHCP output:
I launched the browser and went to Google:
In general, for those who have never tried it, I strongly advise you to play here, because, in addition to connecting to google.com, you can see everything, everything, everything that happens on the network, all the protocols that work in it and ensure its stable work, including DNS and lower level. You can see that, without doing anything yet, I already own more than 1000 packages. I will use the filter to find those that are directly related to the connection to google.com
And double-click to open in a separate window:
This is how it looks. All the OSI levels used are visible above (what I wrote above), and below I highlighted the data related to the IP protocol, including the most important IP source, IP destination for us. At the application (browser) level, at the very top, you can see that we are sending a GET /HTTP/1.1 request to google.com, that is, we are requesting a page (details of the HTTP protocol can also be easily found on the Internet), as well as various settings of our system ( language, encodings, etc.).
At the TCP level, we see source port = 52983, destination port = 80, and some other flags that can be read on the Internet.
At the end:The article is written mainly for those who are not at all versed in networks, and is intended to prepare for the next parts. The practical part of it can be a starting point for those who have never "felt" the network, but at the same time always wanted to do it.
In the next part we will talk about firewall tables, the difference between statefull vs stateless firewall, and also see how from our module you can access the fields about which I wrote above.