Spine animation, tips and tricks, pseudo 3D effect
I want to share my experience with Spine, a program for creating skeletal animation specially tailored for games.
After viewing the official guide, a lot of questions arise, let's talk about what pitfalls await us when working with this program at each stage of the workflow (using Spine - Unity as an example), how we can optimize our work, and also look at some popular 3D-type chips effect. The article will have a lot of heavy gifs.
UPD: After the recent release of Spine version 3.6, the Json chips described at the end of the article are relevant only for general development, as developers have added this functionality called “out of the box”.
I’ll make a reservation right away, there are other solutions for creating animation in games, such as Dragon Bones, Spriter, Creature, Marionette studio, the Puppet 2D plugin and there are probably others, I just work as an animator in Spine.
When we have information and understanding on which characters / animations should be created for the game, the necessary material is drawn - we can proceed.
The general scheme of work is as follows:
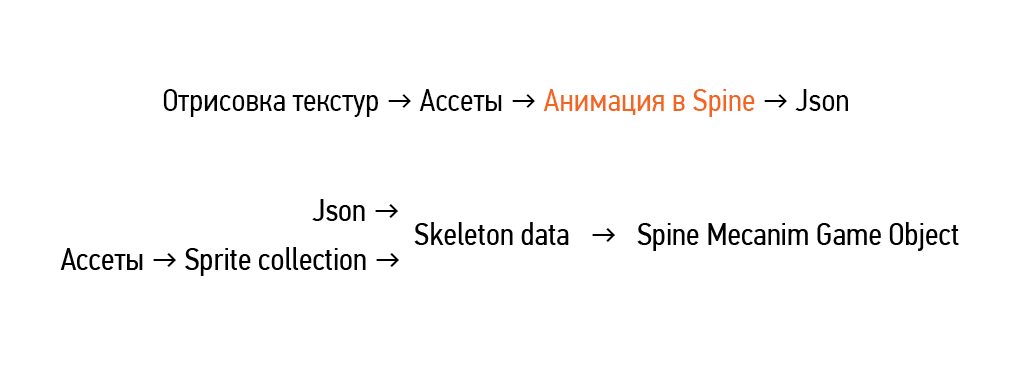
First of all, it is necessary to prepare working material from graphic editors. Then the assets (assets, textures) are imported into Spine and animated. At the output, we get Json - a file in which all the key frames of the transformation of bones, slots, etc. are recorded. This file is imported into the engine, a special skeleton data is created, which is added to the scene in the Spine game object, where our animation is visualized using mesh renderer, the launch can be controlled using the code or the standard unity animator.
The direct workflow in spine is as follows:
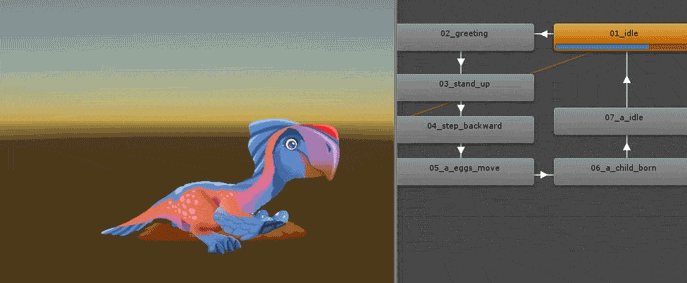
As an example, let's try to make an animation of such a character:

At the stage of preparing the textures, it is important for us to understand how much character projections are needed, what part of the work will be done frame-by-frame, what programmatically, how to correctly cut the character and prepare the assets.
Common mistakes:
And also an insufficient number of projections if the character changes the angle.
Often characters have paired elements with identical images - arms, legs, eyes, and so on. In this case, it is advisable to save only one texture, and use it two or more times.
In this case, one projection will be enough for us, and the artist painted the assets well. You can start importing into spine.
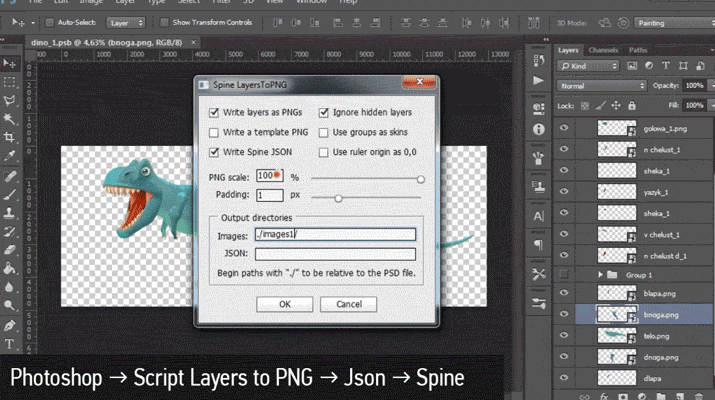
The process of importing textures can be significantly accelerated using the layers to PNG script , which saves each layer from Photoshop to a separate png image, while writing a Json file which contains information about the location of the textures, importing it into a spine gives you a ready-made assembled character.
However, this method has several disadvantages - the script saves images without compression, which is impractical. Just re-saving the layers through file-generate-image assets we will reduce the weight of the image by about 10 times.
Next, you must not forget to deploy your sprites in a horizontal or vertical position, and erase everything unnecessary, because the script will save the images right in the position in which they are in Photoshop.

If the project requires frame-by-frame animation (e.g. fire, special effects, etc.) - materials must be drawn in advance. Next, using adobe after effects and the ae_to_spine script, we can transfer the sequence of frames to Spine in a couple of clicks.
I recommend to think over the concept of naming in advance , the materials often come in the format “layer 1 (copy) 5”, this is not very practical, for each texture in the project it is necessary to make a unique name so as not to cause problems when packing atlases. The format option CharacterVyasya_Skin_a_Hand_R_1 is quite suitable .
Here, the find and replace tool can help us a lot, which allows you to quickly rename and specify the path for a large number of objects.
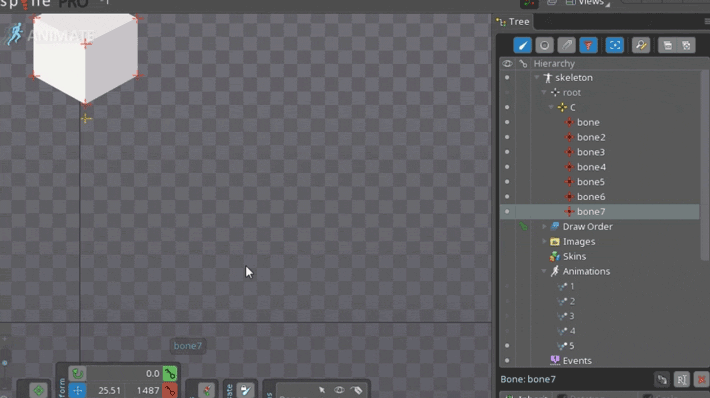
When setting up the skeleton for a character, you need to think about the fact that, most likely, in the process of working on the game, the animation will need to be adjusted, corrected, so it is desirable to make it as flexible as possible so that the editing process is as simple and fast as possible.
The introduction of additional control bones can help here to split the movement along the X and Y axes (since the separate dimentions function is missing in the spine).
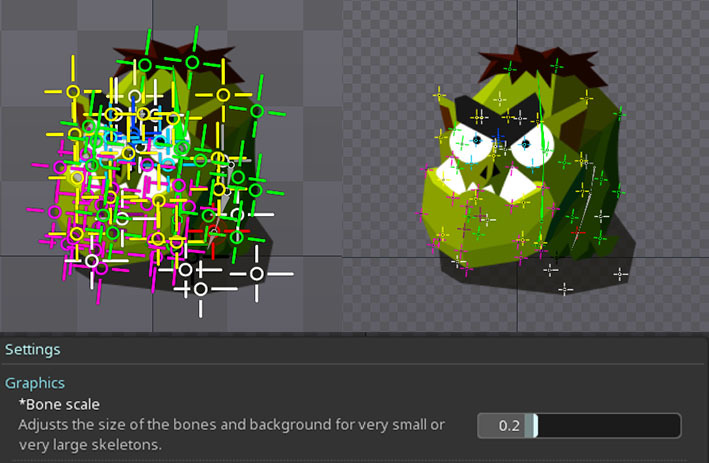
Here is a small tip, if you suddenly feel a jumble due to an excessive number of bones - try twisting the bone scale setting:
See examples of ready-made rigs from samples delivered with the spine, or online.
Useful materials can also be searched on behavior , the forum , relevant communities in social networks.
Mesh - One of the key tools in spine, imposing on its texture we get the opportunity to deform, distort, create the illusion of 3D.
When creating a mesh, remember: the fewer vertices, the easier it is to control the animation.
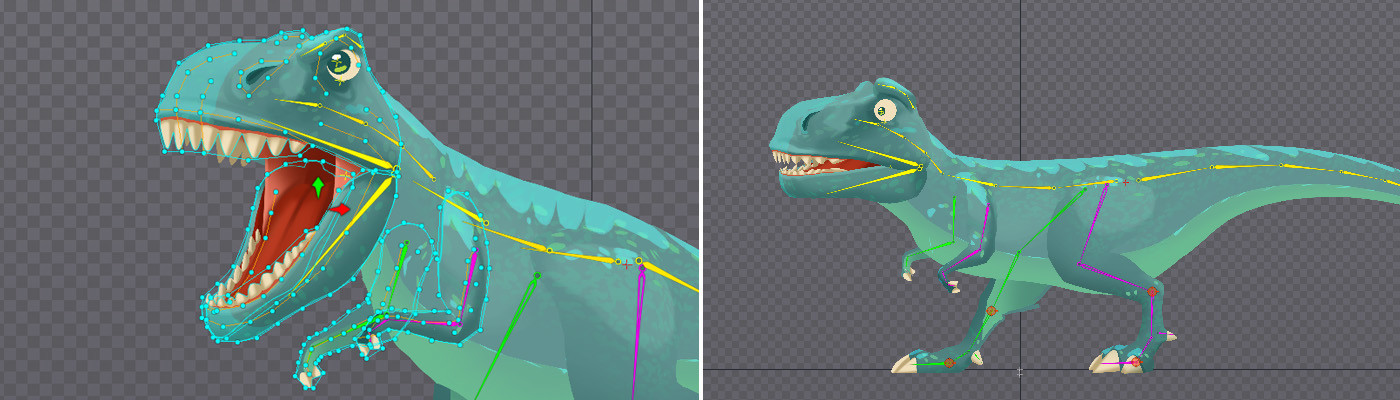
Because mesh deformation consumes CPU resources, when creating a mesh it is necessary to be guided by the principle of the necessary minimum, this can be clearly illustrated by the example of a dinosaur tail tip rig:
Do not forget about the possibility of duplication of the whole mesh hierarchy along with bones and weights. This will greatly save time when rigging duplicate objects.
In the end, the question arises - how many vertices can I use? Spine
developers do not specifically answer this question, and refer to the Spine Metrics tab , where we can track the total number of elements in the scene, but at the same time talk about the need for custom performance tests.
It’s important to remember that mesh transformation, timelines, and loads load the CPU, while static geometry loads the GPU. In general, I would advise in case of work on key characters not to bother a lot about points, plus or minus a dozen will not play any role, however, in the case of an object from the environment that will be repeated a hundred times, each saved vertex will benefit.
And so, when our character is configured, we can proceed to the animation:
Animation itself is a very big topic and is clearly not for discussion in the same article.
Here I will limit myself to banal tips in the key:
This is what spine is so fond of - the ability to deform an image using a mesh, thereby creating a three-dimensional effect.
For myself, I noted several ways to create pseudo 3D:
The principle of constructing a three-dimensional effect can be clearly seen on geometric primitives:
From the examples it is clear that the animation of the points in the mesh itself is one of the most inflexible options, which, if necessary, will be difficult to redo. To this it is worth adding that in some other runtimes, in addition to unity, this feature is not supported. Therefore, I recommend that you do not touch the mesh if possible and control it with the help of bones.
By analogy, you can make a deformation of any geometric shape, thereby adding expressiveness to your animation.
And so, we sat for several hours over key frames, meshes, and made an animation of the character:
Then you can send our animation to the engine. However, situations often arise when the appearance of the animation in spine and runtime is significantly different. each interaction the animator-programmer takes a certain time, it is better to conduct an animation test in runtime in advance, during which the main jambs are revealed, and only then give the work away being sure that everything is fine.
If your animator is not friends with the engine, you can use Skeleton Viewer.
What problems arise most often:
Incorrect texture mapping
Most often this happens due to incorrect texture composition - the mesh should clearly correspond to the size of the sprite.

This happens because in runtime the animation is calculated not from the default position, but from the current one. Those. if we turn on the texture once and don’t turn it off, it will remain in this position in all animations. Same thing with other keys. This is probably not a bug, but a feature, but unfortunately the animator does not see the real picture until he imports his material into runtime. There are several ways to solve this issue:
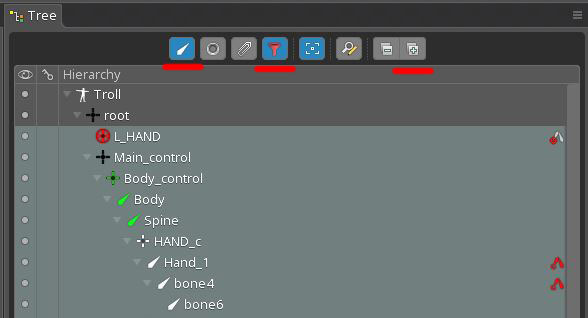
1) Put the keys on all the properties of all objects at the beginning and at the end of each animation. At first glance it’s a little dreary, but in this way you will completely protect yourself from unexpected surprises. Using filters and hot keys will speed up the process.
The icon for filtering objects by bones and a button for quickly expanding the hierarchy are highlighted in red
: Default hot keys:
2) Use the setToSetupPose script , which, as it were, forces the animation to play from the default state. But this method has a significant drawback - Setup Pose is set instantly, and the render changes the picture to the appropriate one only from the next frame. Thus, we have an extra frame skipping between animations, it looks unpleasant. The corresponding issue is already on the developers board.
We can export from the spine Json, carry out any manipulations with it, and import it back, getting a certain result. This is a very powerful tool. we get access to all components of the project, in turn, this can help us a lot in certain situations:
Often there is a need to keep animations in one scene, for example, like this:
There are at least two ways to do this: with hands and a script.
Copy pieces of code from one json to another, in the corresponding categories: slots for slots, dice to bones, animations for animations, etc. To avoid conflicts, it is important to keep the names of objects correct so that names from one json do not coincide with names from another. The easiest way to achieve this in advance is to assign all the objects in the names their unique index of type _skel1_ and _skel2_. This method is slightly time-consuming, but I have not failed yet.
Good people wrote a special tool for merging. You can read and download the link . It is quite convenient to use it; automatic renaming of objects is enabled, however, I have often encountered errors.
There is no nesting of compositions in the spine (an analogue of precompositions in After Effects or a symbol in Flash), however, as shown above, it is possible to duplicate objects while preserving all the dependencies, but animation keys are not copied in this case. It is not difficult to guess that, in order not to do the animation again, you can reassign it to a duplicate of bones, for this you just need to kill the names in Json. Again, this is easier to do if each bone has its own unique index.
Projects saved in the newer version will not be compatible with the old ones. Sometimes this can be a problem, and there are several ways to solve it:
It will help if there is a small gap between versions, and there are no fundamental differences in the animation algorithms.
You can familiarize yourself with the principle of work and download from the link .
Thank you for your attention, for sure if you read the article before this point you have any questions or comments, I will gladly read everything in the comments.
PS The article was written by the animator for the most part for animators, if you are a programmer and you have a “little hand”, you can comment in the comments.
After viewing the official guide, a lot of questions arise, let's talk about what pitfalls await us when working with this program at each stage of the workflow (using Spine - Unity as an example), how we can optimize our work, and also look at some popular 3D-type chips effect. The article will have a lot of heavy gifs.
UPD: After the recent release of Spine version 3.6, the Json chips described at the end of the article are relevant only for general development, as developers have added this functionality called “out of the box”.
I’ll make a reservation right away, there are other solutions for creating animation in games, such as Dragon Bones, Spriter, Creature, Marionette studio, the Puppet 2D plugin and there are probably others, I just work as an animator in Spine.
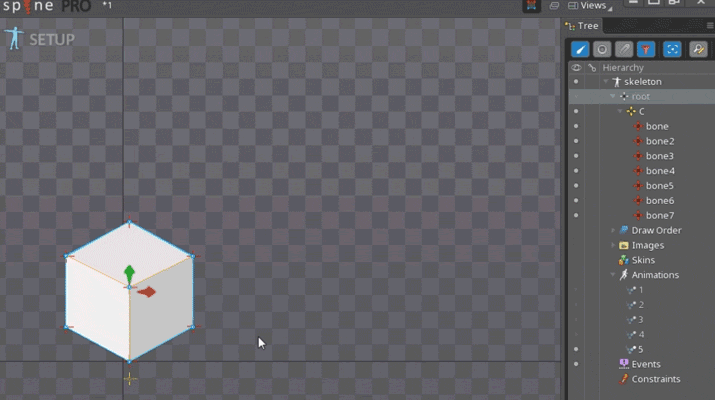
A visual demonstration of the principle of skeletal animation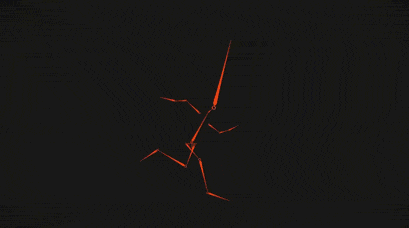
Scheme of work
When we have information and understanding on which characters / animations should be created for the game, the necessary material is drawn - we can proceed.
The general scheme of work is as follows:
First of all, it is necessary to prepare working material from graphic editors. Then the assets (assets, textures) are imported into Spine and animated. At the output, we get Json - a file in which all the key frames of the transformation of bones, slots, etc. are recorded. This file is imported into the engine, a special skeleton data is created, which is added to the scene in the Spine game object, where our animation is visualized using mesh renderer, the launch can be controlled using the code or the standard unity animator.
The direct workflow in spine is as follows:
- Texture import
- Rigging (skeleton setup)
- Skinning (setting up the mesh and binding it to bones)
- Animation
- Json export and validation
As an example, let's try to make an animation of such a character:
Texture import
At the stage of preparing the textures, it is important for us to understand how much character projections are needed, what part of the work will be done frame-by-frame, what programmatically, how to correctly cut the character and prepare the assets.
Common mistakes:
Do not draw textures of moving parts where they are not visible: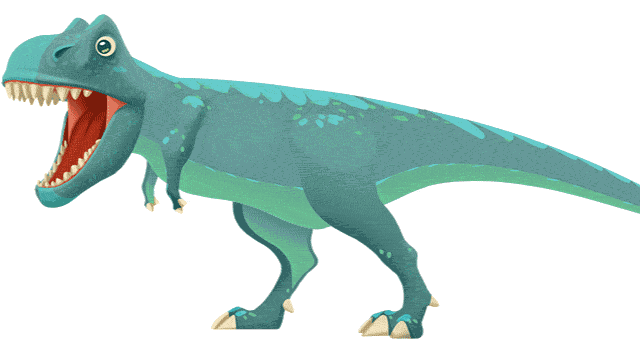
wrong shadows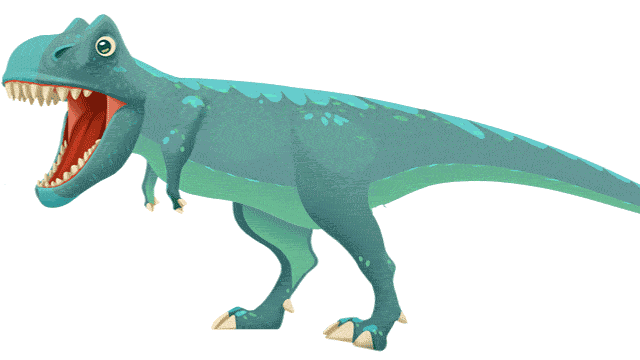
And also an insufficient number of projections if the character changes the angle.
Often characters have paired elements with identical images - arms, legs, eyes, and so on. In this case, it is advisable to save only one texture, and use it two or more times.
In this case, one projection will be enough for us, and the artist painted the assets well. You can start importing into spine.
The process of importing textures can be significantly accelerated using the layers to PNG script , which saves each layer from Photoshop to a separate png image, while writing a Json file which contains information about the location of the textures, importing it into a spine gives you a ready-made assembled character.
How to use layers to PNG script
1) We export from Photoshop using a Json script and PNG image (you can specify the skeel factor)
2) Import json into the file-import data spine
3) Specify the path to the textures
more
2) Import json into the file-import data spine
3) Specify the path to the textures
more
However, this method has several disadvantages - the script saves images without compression, which is impractical. Just re-saving the layers through file-generate-image assets we will reduce the weight of the image by about 10 times.
Next, you must not forget to deploy your sprites in a horizontal or vertical position, and erase everything unnecessary, because the script will save the images right in the position in which they are in Photoshop.
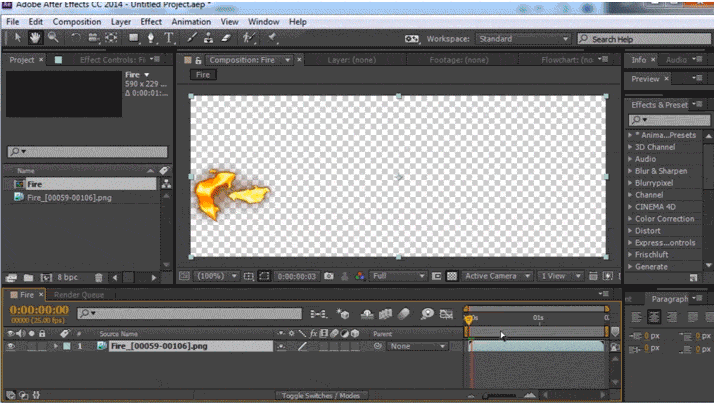
If the project requires frame-by-frame animation (e.g. fire, special effects, etc.) - materials must be drawn in advance. Next, using adobe after effects and the ae_to_spine script, we can transfer the sequence of frames to Spine in a couple of clicks.
How to use AE to Spine script
I recommend to think over the concept of naming in advance , the materials often come in the format “layer 1 (copy) 5”, this is not very practical, for each texture in the project it is necessary to make a unique name so as not to cause problems when packing atlases. The format option CharacterVyasya_Skin_a_Hand_R_1 is quite suitable .
Here, the find and replace tool can help us a lot, which allows you to quickly rename and specify the path for a large number of objects.
find and replace tool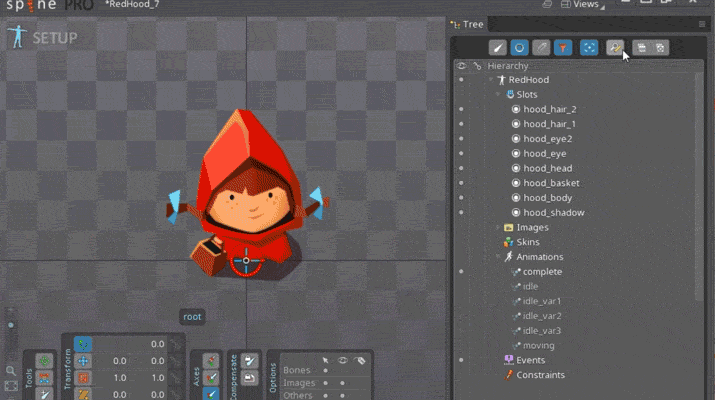
Rigging
When setting up the skeleton for a character, you need to think about the fact that, most likely, in the process of working on the game, the animation will need to be adjusted, corrected, so it is desirable to make it as flexible as possible so that the editing process is as simple and fast as possible.
The introduction of additional control bones can help here to split the movement along the X and Y axes (since the separate dimentions function is missing in the spine).
Example rig with additional controls
The complex movement of the lizard is summed up from several components: vertical, horizontal and for the possibility of quick adjustments, a global control is added.
Here is a small tip, if you suddenly feel a jumble due to an excessive number of bones - try twisting the bone scale setting:
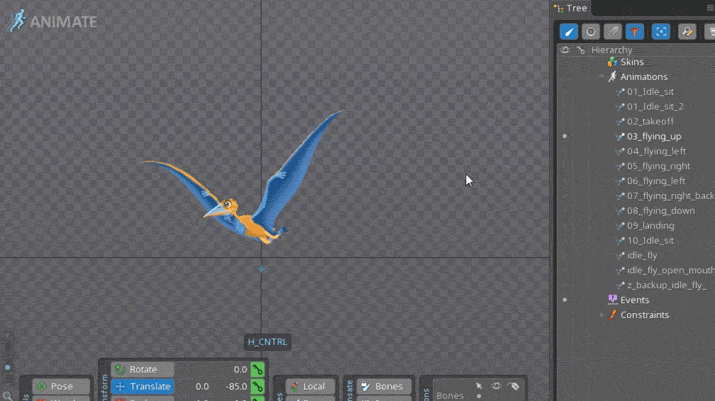
See examples of ready-made rigs from samples delivered with the spine, or online.
A small selection of well-known authors who have something to peep:
Useful materials can also be searched on behavior , the forum , relevant communities in social networks.
Skinning
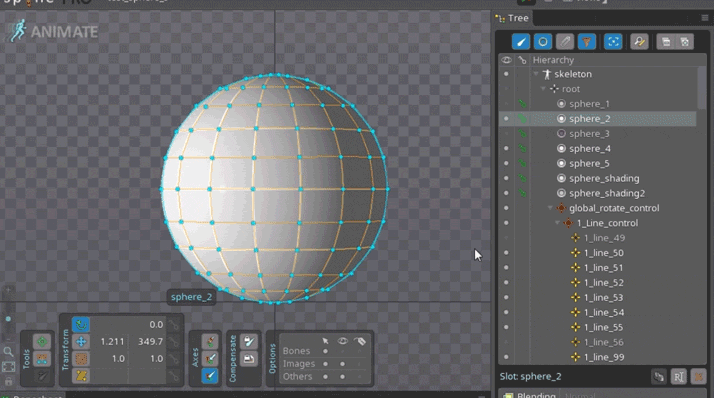
Mesh - One of the key tools in spine, imposing on its texture we get the opportunity to deform, distort, create the illusion of 3D.
When creating a mesh, remember: the fewer vertices, the easier it is to control the animation.
Demonstration
Because mesh deformation consumes CPU resources, when creating a mesh it is necessary to be guided by the principle of the necessary minimum, this can be clearly illustrated by the example of a dinosaur tail tip rig:
Option 1 - not enough points, the kinks in the picture are visible: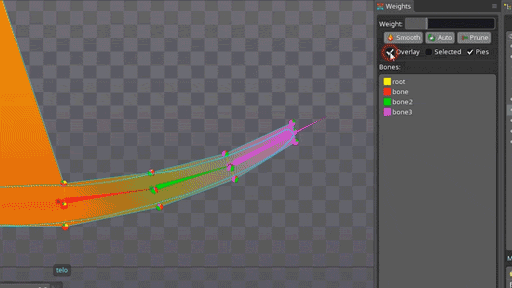
2, 3 option - good: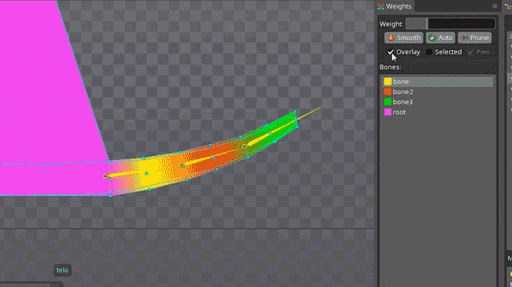
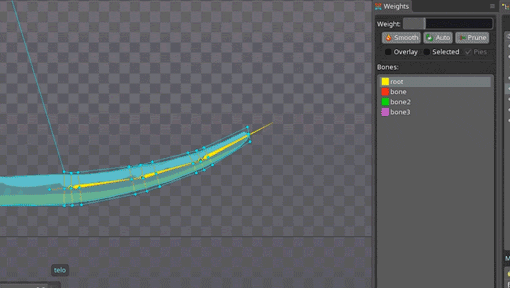
Option 4 - an excessive number of points that do not perform any function is worthless: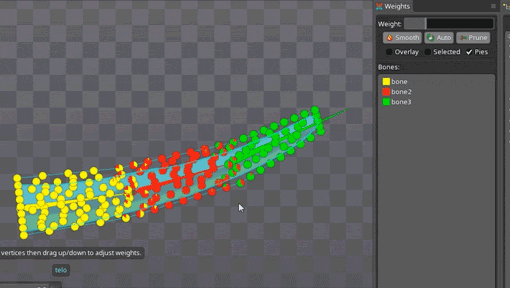
Do not forget about the possibility of duplication of the whole mesh hierarchy along with bones and weights. This will greatly save time when rigging duplicate objects.
Life hack how to duplicate a whole hierarchy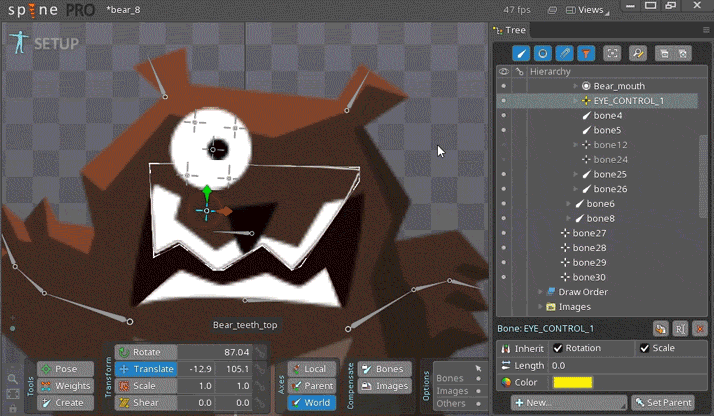
Performance
In the end, the question arises - how many vertices can I use? Spine
developers do not specifically answer this question, and refer to the Spine Metrics tab , where we can track the total number of elements in the scene, but at the same time talk about the need for custom performance tests.
It’s important to remember that mesh transformation, timelines, and loads load the CPU, while static geometry loads the GPU. In general, I would advise in case of work on key characters not to bother a lot about points, plus or minus a dozen will not play any role, however, in the case of an object from the environment that will be repeated a hundred times, each saved vertex will benefit.
And so, when our character is configured, we can proceed to the animation:
Animation
Animation itself is a very big topic and is clearly not for discussion in the same article.
Here I will limit myself to banal tips in the key:
- Do not forget about the art part, try to make the animation as expressive as possible
- Follow Disney Animation Guidelines
- Import the material into the location, often only after that the jambs become visible.
3D effect
This is what spine is so fond of - the ability to deform an image using a mesh, thereby creating a three-dimensional effect.
Demonstration
For myself, I noted several ways to create pseudo 3D:
- Mash vertex animation directly
- Lots of bones at key points in the mesh, animated bones
- The bones are set selectively, and then weights are carefully adjusted in the mesh.
- The combined way, everything is brought under global controls
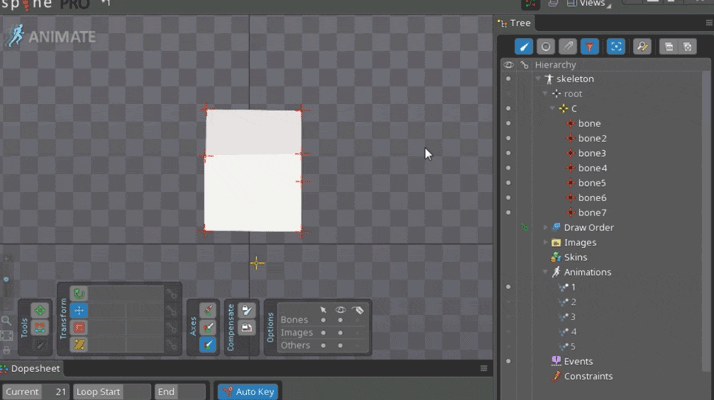
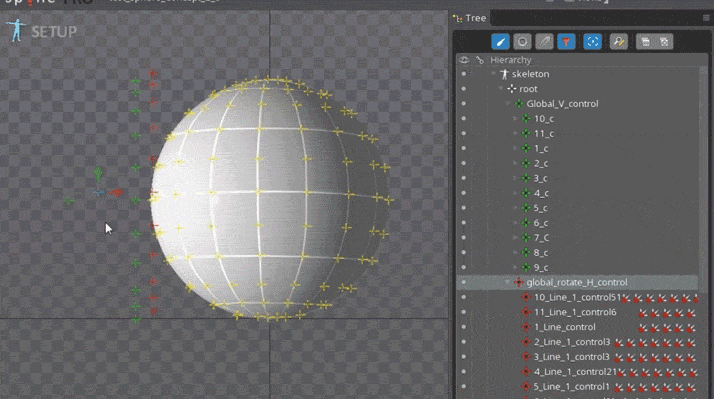
The principle of constructing a three-dimensional effect can be clearly seen on geometric primitives:
Cube
Проставляются кости в ключевых точках меша:
Анимируя кости создаем трехмерный эффект:
Анимируя кости создаем трехмерный эффект:
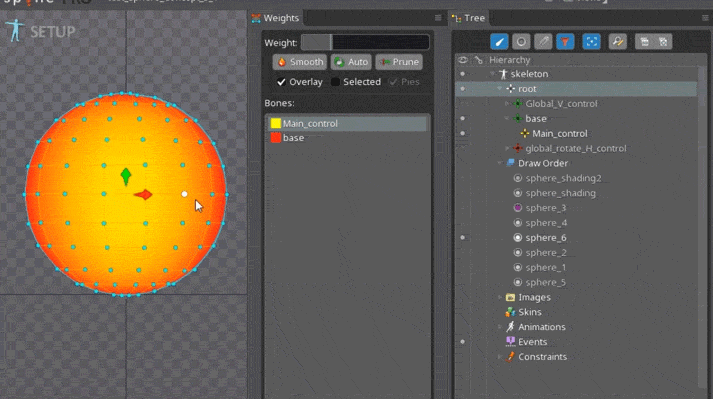
A slightly more complicated example with a sphere:
Можно сделать анимацией вертексов в меше, но как мы видим по сравнению с кубом точек значительно больше:
Аналогично кубу, кости в ключевых точках меша. По затраченному времени этот способ не лучше предыдущего:
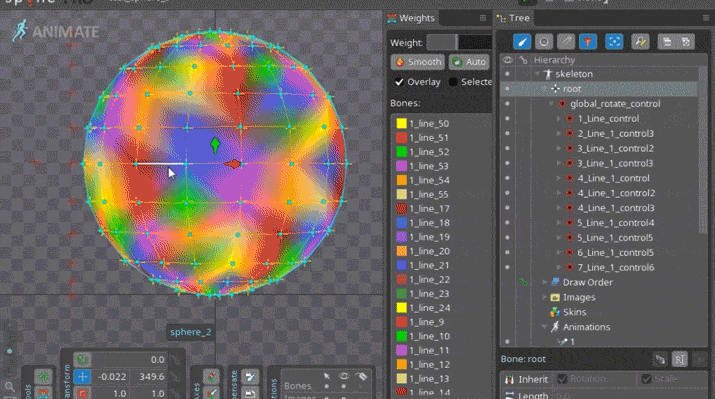
Было бы гораздо более гибко свести риг под один глобальный контрол с помощью констрейнов, двигая одним управлять всеми костями:
То же самое, можно сделать без лишней массы костей,
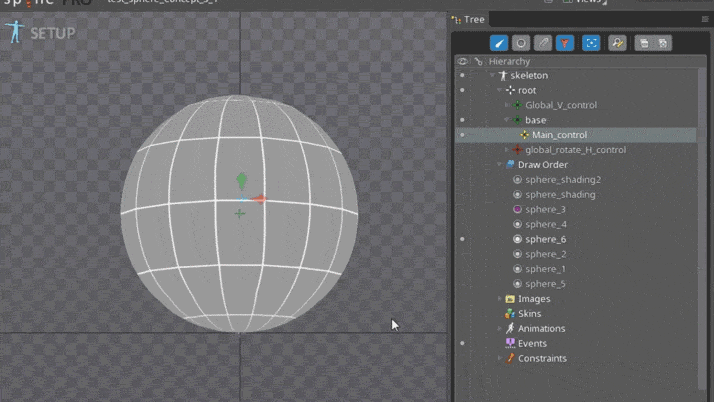
Для этого каждому вертексу тщательно подбирается значение в весах. Такой способ можно считать оптимальным для округлых поверхностей.
Можно сделать анимацией вертексов в меше, но как мы видим по сравнению с кубом точек значительно больше:
Аналогично кубу, кости в ключевых точках меша. По затраченному времени этот способ не лучше предыдущего:
Было бы гораздо более гибко свести риг под один глобальный контрол с помощью констрейнов, двигая одним управлять всеми костями:
То же самое, можно сделать без лишней массы костей,
Для этого каждому вертексу тщательно подбирается значение в весах. Такой способ можно считать оптимальным для округлых поверхностей.
From the examples it is clear that the animation of the points in the mesh itself is one of the most inflexible options, which, if necessary, will be difficult to redo. To this it is worth adding that in some other runtimes, in addition to unity, this feature is not supported. Therefore, I recommend that you do not touch the mesh if possible and control it with the help of bones.
By analogy, you can make a deformation of any geometric shape, thereby adding expressiveness to your animation.
And so, we sat for several hours over key frames, meshes, and made an animation of the character:
What happened
Testing
Then you can send our animation to the engine. However, situations often arise when the appearance of the animation in spine and runtime is significantly different. each interaction the animator-programmer takes a certain time, it is better to conduct an animation test in runtime in advance, during which the main jambs are revealed, and only then give the work away being sure that everything is fine.
If your animator is not friends with the engine, you can use Skeleton Viewer.
What problems arise most often:
- You forgot to put some assets, or vice versa, there was too much exported (working files, references, etc.) - everything is obvious here - before you give out the material, carefully check what should be in the project and what should not
- mismatch at the joints of the animation - you can try to set the transition duration in the unit, thereby smoothing the joint. Or fix keys if possible
- textures are not displayed correctly
- after working out the animation does not look like it used to
Incorrect texture mapping
Most often this happens due to incorrect texture composition - the mesh should clearly correspond to the size of the sprite.
Otherwise it will be like this.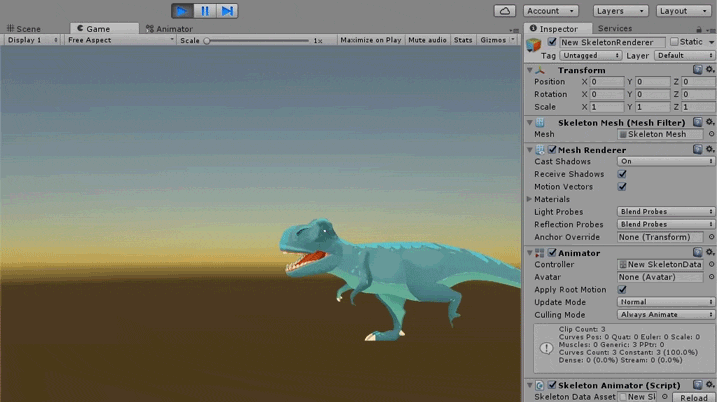
After working out, the animation does not look like before
Example
Изначально овираптор сидит на гнезде с яйцами, потом встает и отходит в сторону. Казалось бы, когда анимация начнется с начала, он должен таким же образом сидеть на гнезде, однако т.к. мы сдвинули его в предыдущей анимации он будет смещен до тех пор пока не будет поставлен ключом в соответствующую позицию.
This happens because in runtime the animation is calculated not from the default position, but from the current one. Those. if we turn on the texture once and don’t turn it off, it will remain in this position in all animations. Same thing with other keys. This is probably not a bug, but a feature, but unfortunately the animator does not see the real picture until he imports his material into runtime. There are several ways to solve this issue:
1) Put the keys on all the properties of all objects at the beginning and at the end of each animation. At first glance it’s a little dreary, but in this way you will completely protect yourself from unexpected surprises. Using filters and hot keys will speed up the process.
The icon for filtering objects by bones and a button for quickly expanding the hierarchy are highlighted in red
: Default hot keys:
Key Active: L
Key Selected: ctrl + L
Key Dopesheet: ctrl + shift + L
Key Translation, Key Rotation, Key Scale, Key Shear, Key Color - you need to configure it yourself
2) Use the setToSetupPose script , which, as it were, forces the animation to play from the default state. But this method has a significant drawback - Setup Pose is set instantly, and the render changes the picture to the appropriate one only from the next frame. Thus, we have an extra frame skipping between animations, it looks unpleasant. The corresponding issue is already on the developers board.
Setup Pose Bug
Json
We can export from the spine Json, carry out any manipulations with it, and import it back, getting a certain result. This is a very powerful tool. we get access to all components of the project, in turn, this can help us a lot in certain situations:
- If necessary, run several projects
- If necessary, copy the bone hierarchy along with the animation
- If necessary, roll back to an older version
- Any other use that comes to mind
Merging projects
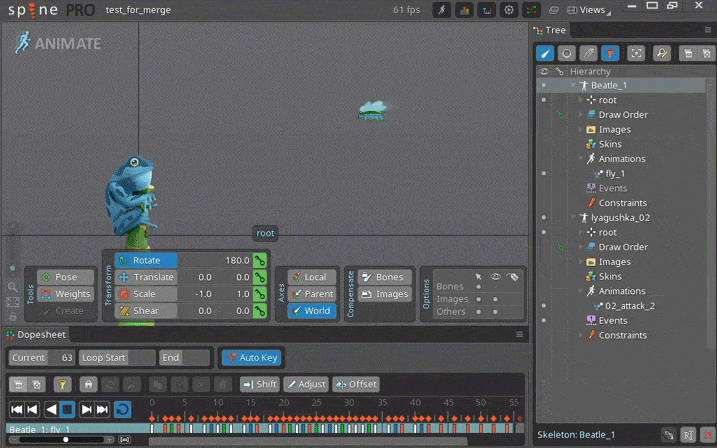
Often there is a need to keep animations in one scene, for example, like this:
Frog eating a beetle
Сам жук в игре появляется в множестве других сцен и был скопирован из одной из них. Однако теперь в проекте два скелета, и соответственно на выходе будет 2 json и 2 объекта на сцене, что добавит необходимость делать определенную логику синхронного запуска этих анимаций для их совмещения во времени, а так же нужно будет точно совместить объекты по положению в локации. Можно упростить себе жизнь отдав материал в одной сцене. Для этого два json нужно смержить.
There are at least two ways to do this: with hands and a script.
Hands
Copy pieces of code from one json to another, in the corresponding categories: slots for slots, dice to bones, animations for animations, etc. To avoid conflicts, it is important to keep the names of objects correct so that names from one json do not coincide with names from another. The easiest way to achieve this in advance is to assign all the objects in the names their unique index of type _skel1_ and _skel2_. This method is slightly time-consuming, but I have not failed yet.
Examples
Предельно простой пример для демонстрации принципа, два скелета с костями в одном проекте:

В результате имеем все в одном проекте:
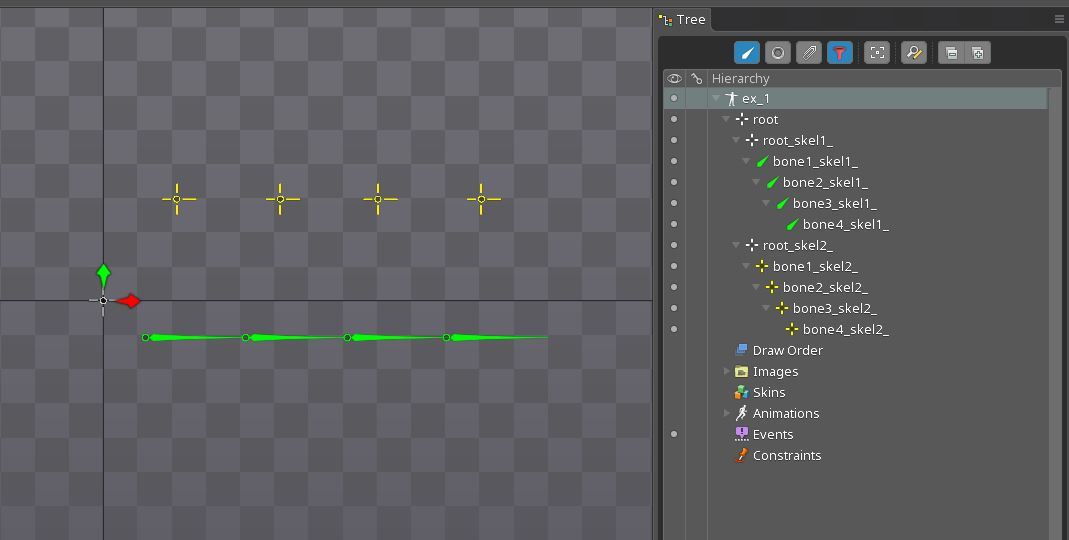
Проблемы могут возникнуть в проектах с скинами, по возможности старайтесь не менять иерархию костей.
Более сложный пример с лягушкой:
(Осторожно, длинные файлы)
Жук
Лягушка
Жук+Лягушка
Скелет 1
{
"skeleton": { "hash": "ZMTMZiuTD2M2gnBhJR0JLPQWOws", "spine": "3.4.02", "width": 0, "height": 0, "images": "" },
"bones": [
	{ "name": "root_skel1_" },
	{ "name": "bone1_skel1_", "parent": "root_skel1_", "length": 26.95, "rotation": 360, "x": 11.09, "y": -9.65, "color": "00ff00ff" },
	{ "name": "bone2_skel1_", "parent": "bone1_skel1_", "length": 26.95, "x": 26.27, "color": "00ff00ff" },
	{ "name": "bone3_skel1_", "parent": "bone2_skel1_", "length": 26.95, "x": 26.57, "color": "00ff00ff" },
	{ "name": "bone4_skel1_", "parent": "bone3_skel1_", "length": 26.95, "x": 25.97, "color": "00ff00ff" }
],
"animations": {
	"animation": {}
}
}
Скелет 2
{
"skeleton": { "hash": "osF6oBu7PH6sMNfjN7pm2EwQ8fY", "spine": "3.4.02", "width": 0, "height": 0, "images": "" },
"bones": [
	{ "name": "root_skel2_" },
	{ "name": "bone1_skel2_", "parent": "root_skel2_", "x": 19.25, "y": 26.63, "color": "fff100ff" },
	{ "name": "bone2_skel2_", "parent": "bone1_skel2_", "x": 27.14, "color": "fff100ff" },
	{ "name": "bone3_skel2_", "parent": "bone2_skel2_", "x": 25.57, "color": "fff100ff" },
	{ "name": "bone4_skel2_", "parent": "bone3_skel2_", "x": 27.14, "color": "fff100ff" }
],
"animations": {
	"animation": {}
}
}
Соединенные скелеты
{
"skeleton": { "hash": "ZMTMZiuTD2M2gnBhJR0JLPQWOws", "spine": "3.4.02", "width": 0, "height": 0, "images": "" },
"bones": [
	{ "name": "root" },
	{ "name": "root_skel1_", "parent": "root" },
	{ "name": "bone1_skel1_", "parent": "root_skel1_", "length": 26.95, "rotation": 360, "x": 11.09, "y": -9.65, "color": "00ff00ff" },
	{ "name": "bone2_skel1_", "parent": "bone1_skel1_", "length": 26.95, "x": 26.27, "color": "00ff00ff" },
	{ "name": "bone3_skel1_", "parent": "bone2_skel1_", "length": 26.95, "x": 26.57, "color": "00ff00ff" },
	{ "name": "bone4_skel1_", "parent": "bone3_skel1_", "length": 26.95, "x": 25.97, "color": "00ff00ff" },
	{ "name": "root_skel2_", "parent": "root"  },
	{ "name": "bone1_skel2_", "parent": "root_skel2_", "x": 19.25, "y": 26.63, "color": "fff100ff" },
	{ "name": "bone2_skel2_", "parent": "bone1_skel2_", "x": 27.14, "color": "fff100ff" },
	{ "name": "bone3_skel2_", "parent": "bone2_skel2_", "x": 25.57, "color": "fff100ff" },
	{ "name": "bone4_skel2_", "parent": "bone3_skel2_", "x": 27.14, "color": "fff100ff" }
],
"animations": {
	"animation": {}
}
}
В результате имеем все в одном проекте:
Проблемы могут возникнуть в проектах с скинами, по возможности старайтесь не менять иерархию костей.
Более сложный пример с лягушкой:
(Осторожно, длинные файлы)
Жук
Лягушка
Жук+Лягушка
Skeleton merger tool
Good people wrote a special tool for merging. You can read and download the link . It is quite convenient to use it; automatic renaming of objects is enabled, however, I have often encountered errors.
Duplicate objects with animation
There is no nesting of compositions in the spine (an analogue of precompositions in After Effects or a symbol in Flash), however, as shown above, it is possible to duplicate objects while preserving all the dependencies, but animation keys are not copied in this case. It is not difficult to guess that, in order not to do the animation again, you can reassign it to a duplicate of bones, for this you just need to kill the names in Json. Again, this is easier to do if each bone has its own unique index.
Example
Есть муравей с анимацией. Задача сделать в спайне целую цепочку бегающих друг за другом муравьев. При дублировании муравья анимация не копируется. Обратите внимание, у первого муравья в названии стоит индекс _skel_1_, у второго _skel_2_.
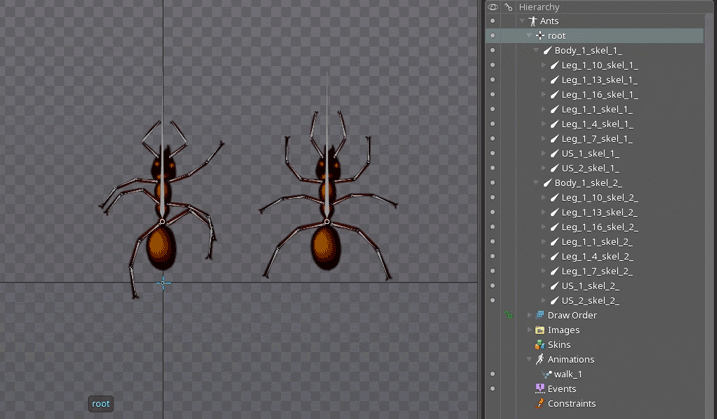
Экспортируем Json и открываем его текстовым редактором. Код анимации walk_1 копируем, находим там все участки _skel_1_:
заменяем их на _skel_2_
Вставляем обратно. Таким образом мы переназначили анимацию на другие кости. Сохраняем json, и импортируем его в спайн путем file — import data. Теперь у нас два бегающих муравья.

Экспортируем Json и открываем его текстовым редактором. Код анимации walk_1 копируем, находим там все участки _skel_1_:
"animations": {
	"walk_1": {
		"bones": {
			"US_2_skel_1_": {
				"rotate": [
					{
						"time": 0,
						"angle": -42.21,
						"curve": [ 0.25, 0, 0.75, 1 ]
					},
					{
						"time": 0.4,
						"angle": -0.92,
						"curve": [ 0.25, 0, 0.75, 1 ]
					},
					{ "time": 0.8, "angle": -42.21 }
				]
			},
....
заменяем их на _skel_2_
....
			"US_2_skel_2_": {
				"rotate": [
					{
						"time": 0,
						"angle": -42.21,
						"curve": [ 0.25, 0, 0.75, 1 ]
					},
					{
						"time": 0.4,
						"angle": -0.92,
						"curve": [ 0.25, 0, 0.75, 1 ]
					},
					{ "time": 0.8, "angle": -42.21 }
			},
...
Вставляем обратно. Таким образом мы переназначили анимацию на другие кости. Сохраняем json, и импортируем его в спайн путем file — import data. Теперь у нас два бегающих муравья.
Roll back to the old version
Projects saved in the newer version will not be compatible with the old ones. Sometimes this can be a problem, and there are several ways to solve it:
Hands kill version in json
"skeleton": { "hash": "", "spine": "3.4.02", "width": 0, "height": 0, "images": "" },It will help if there is a small gap between versions, and there are no fundamental differences in the animation algorithms.
Json rollback tool
You can familiarize yourself with the principle of work and download from the link .
Summary
- Clearly indicate what tasks you are doing.
- Use scripts to speed things up
- Make flexible rigs and don't overdo it with mesh
- Test the material in runtime before sending
- Feel free to get into json if this saves you time
Thank you for your attention, for sure if you read the article before this point you have any questions or comments, I will gladly read everything in the comments.
PS The article was written by the animator for the most part for animators, if you are a programmer and you have a “little hand”, you can comment in the comments.