 November 15, 2016 at 18:37
Creating PostProcess material for treatment effect in Unreal Engine 4
When developing the game, we were faced with the need to display information so that the user noticed it. For example, picking up a first-aid kit, players do not always notice that health is starting to increase in the corner of the screen in the HUD. So there was a task to add a visual effect on top of the gameplay.

Challenge . It is necessary to show the effect of treatment. Pluses fly from the bottom of the screen, each of them sways left and right, changes brightness and gradually disappears in the center. All this done through PostProcess.
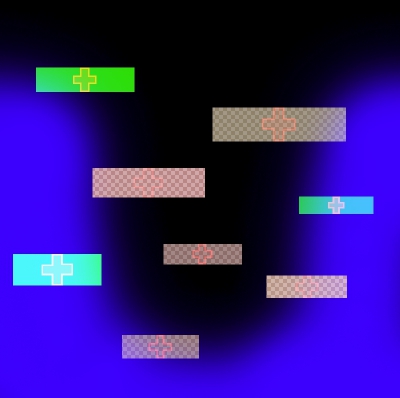
First of all, we prepare the texture with pluses, which will be needed for the effect. Each channel contains certain information:
As a result, we get this texture:
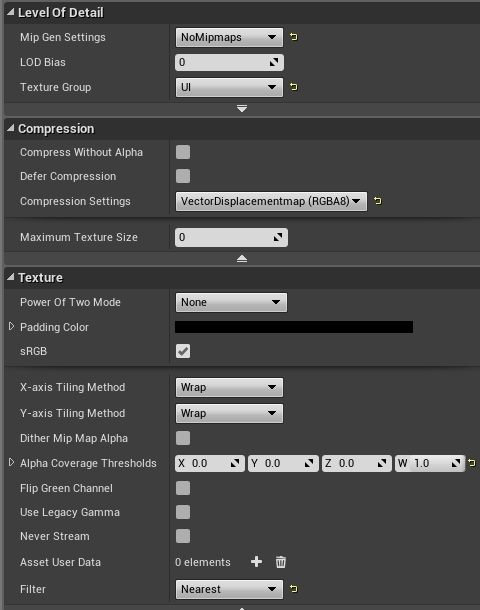
To avoid artifacts above and below the pluses, you need to configure the texture when importing into Unreal Engine as follows:
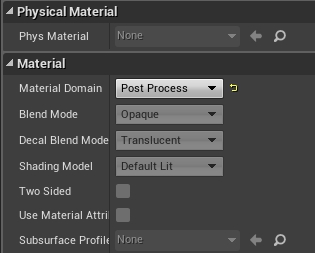
When the texture is ready and imported, create a new material. In the material settings, set the Material Domain property to PostProcess.
The writing of the material itself can be divided into several stages.
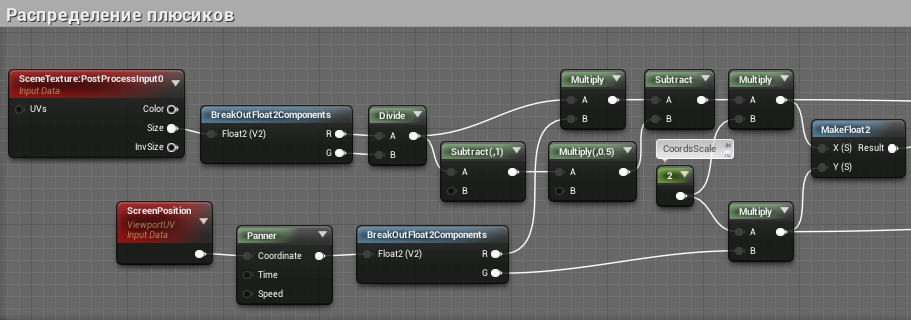
First , you need to add a plus sign upward movement. To do this, call the Panner from Screen Position and specify the speed in Y = 0.2 in the parameters. Thus, our texture will gradually move up.
In order for the pluses to be evenly distributed on the screen and not stretched, we multiply the texture coordinates by X by the ratio of the screen width to height. Add a shift to half the fractional part. And we multiply the texture coordinates by CoordsScale (in our case it is equal to 2) so that there are more pluses and they are smaller (you did not have to spend a lot of time drawing a large number of pluses in the texture).
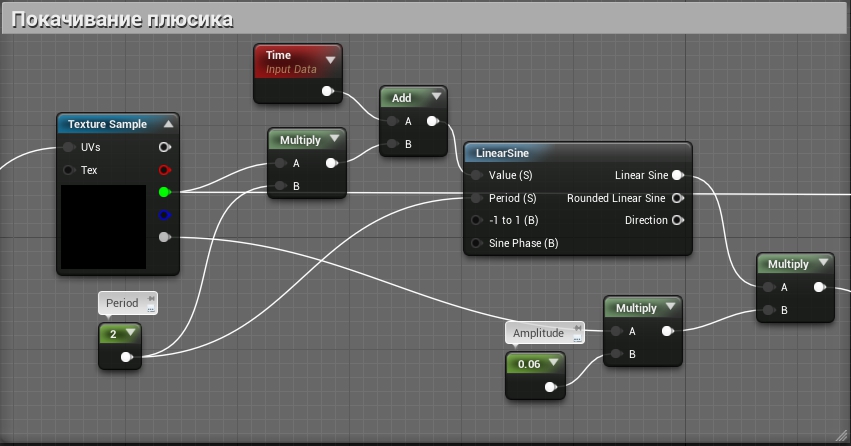
Secondly , add the swing of the pluses. From the green component of the texture, we take the value of the initial shift, multiply by the wiggle period and add the current time, Time. All this is passed to the LinearSine function and the result is multiplied by the swing amplitude. The resulting value is added to the texture coordinate along X.
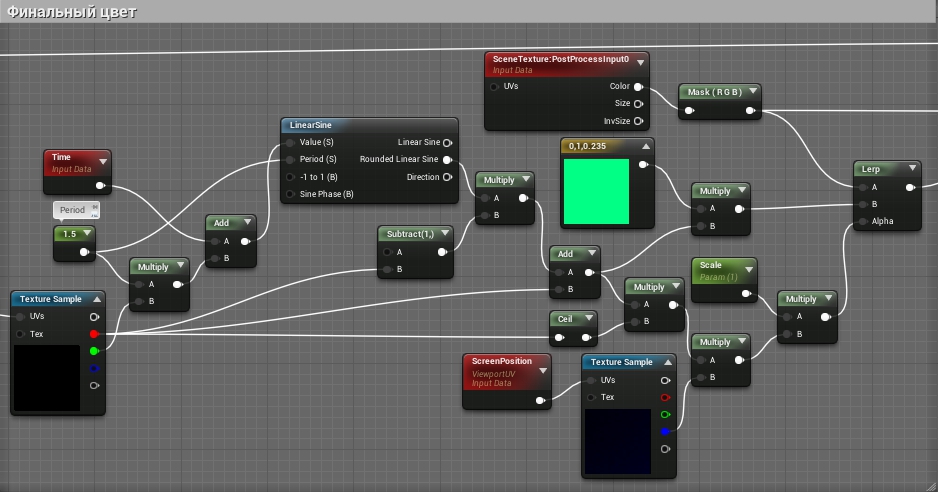
Thirdly , the change in the brightness of the pluses. Using the new texture coordinates, we get the initial brightness value (red channel of the texture), which will change to 1 and vice versa. The resulting brightness is obtained: (1 - red) * RoundedLinearSin + red . Where RoundedLinearSin are values from 0 to 1 from the LinearSine function, and red is the value from the red channel. Multiply the result by the color of the plus sign (light green in our case).
We use brightness for mixing with the current image of the scene in order to impose our effect on top of the gameplay. To do this, multiply it by the rounded up value (Ceil) from the red channel (so that nothing outside the plus sign blinks). Then, to the value from the blue channel, which we take on the screen coordinates. This will add the effect of smooth disappearance of pluses closer to the center of the screen. In addition, we need the Scale parameter, which is useful for the gradual emergence of the treatment effect. We use the obtained value for linear interpolation (Lepr) between the image of the scene and the color of the plus sign.
In order not to perform unnecessary calculations where it is not needed, we add a condition that checks where there is definitely no plus sign. As a result, we got such material (the picture is clickable):

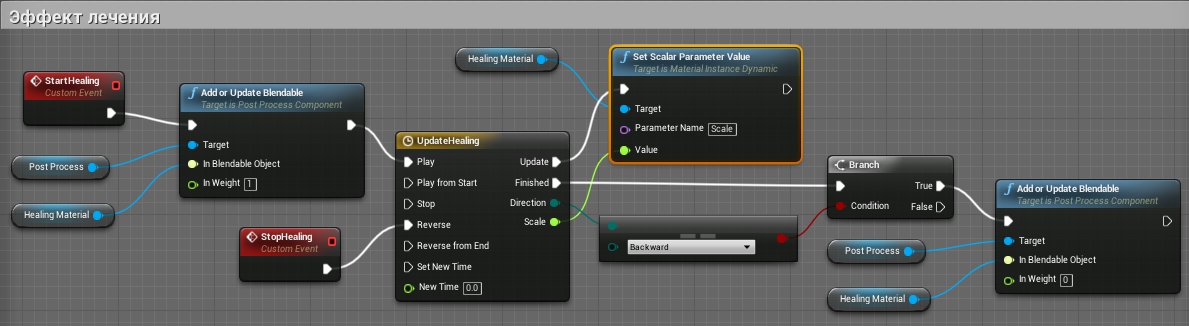
It remains only to cause a smooth appearance and disappearance of the effect when choosing a first-aid kit and at the end of its action. Add a Timeline in which we change the Scale parameter and events to start and end the effect.
And of course the video with the result:
Challenge . It is necessary to show the effect of treatment. Pluses fly from the bottom of the screen, each of them sways left and right, changes brightness and gradually disappears in the center. All this done through PostProcess.
First of all, we prepare the texture with pluses, which will be needed for the effect. Each channel contains certain information:
Red - the minimum brightness of the plus sign.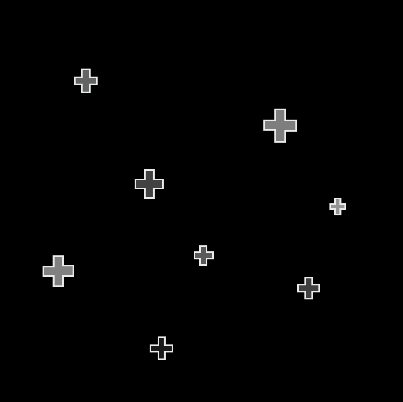
Green - the initial horizontal shift of the plus sign.
Blue - the area in which pluses will be visible (in the center they will disappear almost immediately, flying along the edges above).
Transparency is the amplitude of the plus sign sway.
As a result, we get this texture:
To avoid artifacts above and below the pluses, you need to configure the texture when importing into Unreal Engine as follows:
When the texture is ready and imported, create a new material. In the material settings, set the Material Domain property to PostProcess.
The writing of the material itself can be divided into several stages.
First , you need to add a plus sign upward movement. To do this, call the Panner from Screen Position and specify the speed in Y = 0.2 in the parameters. Thus, our texture will gradually move up.
In order for the pluses to be evenly distributed on the screen and not stretched, we multiply the texture coordinates by X by the ratio of the screen width to height. Add a shift to half the fractional part. And we multiply the texture coordinates by CoordsScale (in our case it is equal to 2) so that there are more pluses and they are smaller (you did not have to spend a lot of time drawing a large number of pluses in the texture).

Secondly , add the swing of the pluses. From the green component of the texture, we take the value of the initial shift, multiply by the wiggle period and add the current time, Time. All this is passed to the LinearSine function and the result is multiplied by the swing amplitude. The resulting value is added to the texture coordinate along X.
Thirdly , the change in the brightness of the pluses. Using the new texture coordinates, we get the initial brightness value (red channel of the texture), which will change to 1 and vice versa. The resulting brightness is obtained: (1 - red) * RoundedLinearSin + red . Where RoundedLinearSin are values from 0 to 1 from the LinearSine function, and red is the value from the red channel. Multiply the result by the color of the plus sign (light green in our case).
We use brightness for mixing with the current image of the scene in order to impose our effect on top of the gameplay. To do this, multiply it by the rounded up value (Ceil) from the red channel (so that nothing outside the plus sign blinks). Then, to the value from the blue channel, which we take on the screen coordinates. This will add the effect of smooth disappearance of pluses closer to the center of the screen. In addition, we need the Scale parameter, which is useful for the gradual emergence of the treatment effect. We use the obtained value for linear interpolation (Lepr) between the image of the scene and the color of the plus sign.

In order not to perform unnecessary calculations where it is not needed, we add a condition that checks where there is definitely no plus sign. As a result, we got such material (the picture is clickable):

It remains only to cause a smooth appearance and disappearance of the effect when choosing a first-aid kit and at the end of its action. Add a Timeline in which we change the Scale parameter and events to start and end the effect.

And of course the video with the result:









