October 25, 2016 at 12:59
MikroTik. Correct dst nat when using 2 or more providers
Starting to complete the task, I counted on a light walk in the shade of an oak park, contemplating nature and indulging in thought ... However, later it became clear that this would be a thorny and difficult trip through mountain rivers with pitfalls, icy rocks and deep caves.
Through meditation, the struggle with the elements andmy own stupidity, overcoming myself, I still achieved the desired nirvana.
In this article, I will not only provide a ready-made set of rules, but I will try to explain as much as possible why and how exactly they work.
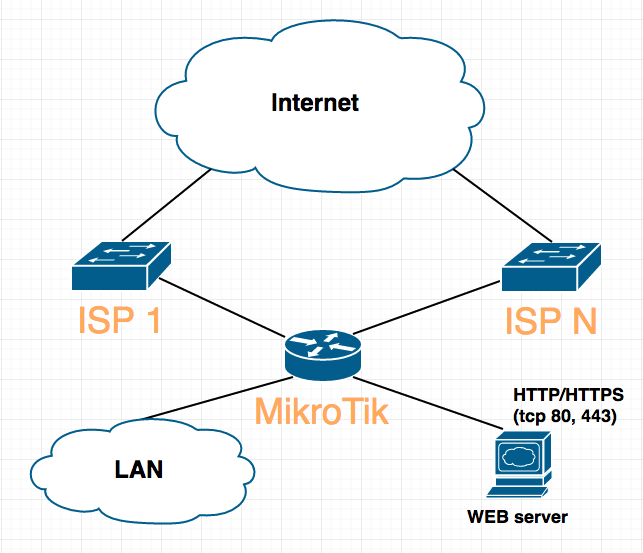
Specifically, in my case, it was necessary to configure the router so that the web server on the local network behind it was accessible via the IP of any of the 3 providers.
To get started, let's go over all the settings so that the most impatient ones can copy and paste without reading.
RouterOS Version:
Interfaces:
I don’t remember starting with which version of RouterOS this feature appeared. It allows you to group interfaces, which is very convenient (for example, in the / ip firewall rules). I have created a group of 3 WAN interfaces.
AcidVenom suggested that in 6.36
IP addresses (addresses, for obvious reasons, are “left”):
Routing:
To organize Failover, I set up recursive routing; I’ll tell you more in the 2nd part.
Firewall (for this publication, I deliberately give rules that allow everything.
Do not do this!):
dst and src nat:
mangle
Let's consider all in more detail.
Routing:
/ ip route
In the first three lines we indicate the default gateway of each of our 3 providers.
Routes have the same weight ( distance ), but work in different routing tables.
In other words, these routes work for packets marked with the corresponding ( routing-mark ) tag . We will hang tags on packets in / ip firewall mangle (about which I will similarly tell below).
The next 3 lines indicate the default routes in the main routing table.
Here it is worth paying attention to:
Under the spoiler, my detailed translation / adaptation of the MikroTik wiki on this topic.
While the most eager for knowledge are read under a spoiler, I’ll tell a little shorter and simpler.
When we specify scope = 10 in the last three lines, we make it clear to MikroTik that:
it is accessible not directly, but recursively through these static routes. One IP per brother-provider.
/ ip firewall mangle
To explain the rules of this section, we invite several assistants.
I divided the rules into groups to make them easier to understand. In the first group there are 6 rules that are responsible for traffic to / from the router itself, and in the second group 6, for transit traffic.
Let's start with the first two.
In the first, we tell the router that all incoming chain = input connections to the ISP1 interface must be marked action = mark-connection new-connection-mark = ISP1-conn , and we also specify passthrough = yes so that the packet, after passing this rule, does not left the table and continued following the rules.
In the second, we tell MikroTik to catch the outgoing chain = output connections marked as ISP1-connand assigned them a routing label (for placement in the corresponding routing table, do you remember the first three routes?), and also inform passthrough = no , as if to say - there is nothing for the packet to do here after this rule, i.e. the packet will leave the table.
Everything described above is true for both ISP2 and ISP3. Thus, we have achieved that the router will respond exactly from the interface to which the request will come to it.
We pass to the final six rules.
It’s already clear, they are also divided into subgroups of 2, for each of our ISPs.
The first of them instructs the router to monitor the FORWARD chain and if a connection occurs through the ISP1 interface, then it is marked action = mark-connection with a new tagnew-connection-mark = ISP1-conn-f (note! different from the traffic tag of the router itself, in this case we mark transit traffic). passthrough = n o, because we do not want the package, after falling into this rule, to be processed in the table somehow else.
The second hangs the desired routing label new-routing-mark = ISP1-route in the PREROUTING chain , i.e. BEFORE making a decision about routing, and monitors the traffic that came to us from the local network in-interface = bridge .
Here we are helped by the CONNECTION TRACKING mechanism , which allows us to catch the connections marked from the rule above from the local network (from the WEB server) and hang them with the necessary routing tag.
This allows transit traffic (here to / from the web server) to go exactly the way it came, i.e. came through ISP1 - leave through it.
I am very glad if my explanations are clear, and this work will be useful.
Gone to meditate, good luck to everyone!
Thank you for attention!
Through meditation, the struggle with the elements and
In this article, I will not only provide a ready-made set of rules, but I will try to explain as much as possible why and how exactly they work.
Specifically, in my case, it was necessary to configure the router so that the web server on the local network behind it was accessible via the IP of any of the 3 providers.
Part 1.
To get started, let's go over all the settings so that the most impatient ones can copy and paste without reading.
RouterOS Version:
# oct/11/2016 22:02:32 by RouterOS 6.37.1
# software id = X62B-STGZ
Interfaces:
/interface list
add name=WAN
/interface list member
add interface=ISP1 list=WAN
add interface=ISP2 list=WAN
add interface=ISP3 list=WAN
I don’t remember starting with which version of RouterOS this feature appeared. It allows you to group interfaces, which is very convenient (for example, in the / ip firewall rules). I have created a group of 3 WAN interfaces.
AcidVenom suggested that in 6.36
IP addresses (addresses, for obvious reasons, are “left”):
/ip address
add address=192.168.0.1/24 comment=defconf interface=bridge network=192.168.0.0
add address=95.11.29.240/24 interface=ISP1 network=95.11.29.0
add address=5.35.59.162/27 interface=ISP2 network=5.35.59.160
add address=5.98.112.30/30 interface=ISP3 network=5.98.112.28
Routing:
/ip route
add distance=1 gateway=95.11.29.254 routing-mark=ISP1-route
add distance=1 gateway=5.35.59.161 routing-mark=ISP2-route
add distance=1 gateway=5.98.112.29 routing-mark=ISP3-route
add check-gateway=ping distance=1 gateway=8.8.8.8
add check-gateway=ping distance=2 gateway=8.8.4.4
add check-gateway=ping distance=3 gateway=1.1.36.3
add distance=1 dst-address=8.8.4.4/32 gateway=5.35.59.161 scope=10
add distance=1 dst-address=8.8.8.8/32 gateway=95.11.29.254 scope=10
add distance=1 dst-address=1.1.36.3/32 gateway=5.98.112.29 scope=10
To organize Failover, I set up recursive routing; I’ll tell you more in the 2nd part.
Firewall (for this publication, I deliberately give rules that allow everything.
Do not do this!):
/ip firewall filter
add action=accept chain=forward
add action=accept chain=input
add action=accept chain=output
dst and src nat:
/ip firewall nat
add action=masquerade chain=srcnat out-interface-list=WAN
add action=dst-nat chain=dstnat comment="HTTP" dst-port=80 \
    in-interface-list=WAN protocol=tcp to-addresses=192.168.0.83 to-ports=80
add action=dst-nat chain=dstnat comment="HTTPs" dst-port=443 \
    in-interface-list=WAN protocol=tcp to-addresses=192.168.0.83 to-ports=443
mangle
/ip firewall mangle
add action=mark-connection chain=input in-interface=ISP1 \
    new-connection-mark=ISP1-conn passthrough=yes
add action=mark-routing chain=output connection-mark=ISP1-conn \
    new-routing-mark=ISP1-route passthrough=no
add action=mark-connection chain=input in-interface=ISP2 new-connection-mark=\
    ISP2-conn passthrough=yes
add action=mark-routing chain=output connection-mark=ISP2-conn \
    new-routing-mark=ISP2-route passthrough=no
add action=mark-connection chain=input in-interface=ISP3 \
    new-connection-mark=ISP3-conn passthrough=yes
add action=mark-routing chain=output connection-mark=ISP3-conn \
    new-routing-mark=ISP3-route passthrough=no
add action=mark-connection chain=forward in-interface=ISP1 \
    new-connection-mark=ISP1-conn-f passthrough=no
add action=mark-routing chain=prerouting connection-mark=ISP1-conn-f \
    in-interface=bridge new-routing-mark=ISP1-route
add action=mark-connection chain=forward in-interface=ISP2 \
    new-connection-mark=ISP2-conn-f passthrough=no
add action=mark-routing chain=prerouting connection-mark=ISP2-conn-f \
    in-interface=bridge new-routing-mark=ISP2-route
add action=mark-connection chain=forward in-interface=ISP3 \
    new-connection-mark=ISP3-conn-f passthrough=no
add action=mark-routing chain=prerouting connection-mark=ISP3-conn-f \
    in-interface=bridge new-routing-mark=ISP3-route
Part 2.
Let's consider all in more detail.
Routing:
Look under the spoiler so you don't flip
/ip route
add distance=1 gateway=95.11.29.254 routing-mark=ISP1-route
add distance=1 gateway=5.35.59.161 routing-mark=ISP2-route
add distance=1 gateway=5.98.112.29 routing-mark=ISP3-route
add check-gateway=ping distance=1 gateway=8.8.8.8
add check-gateway=ping distance=2 gateway=8.8.4.4
add check-gateway=ping distance=3 gateway=1.1.36.3
add distance=1 dst-address=8.8.4.4/32 gateway=5.35.59.161 scope=10
add distance=1 dst-address=8.8.8.8/32 gateway=95.11.29.254 scope=10
add distance=1 dst-address=1.1.36.3/32 gateway=5.98.112.29 scope=10
/ ip route
In the first three lines we indicate the default gateway of each of our 3 providers.
Routes have the same weight ( distance ), but work in different routing tables.
In other words, these routes work for packets marked with the corresponding ( routing-mark ) tag . We will hang tags on packets in / ip firewall mangle (about which I will similarly tell below).
The next 3 lines indicate the default routes in the main routing table.
Here it is worth paying attention to:
- Parameter distance . For each route, different and, accordingly, the "weight" of the routes is also different.
ISP1 - main, followed by ISP2 and ISP3 closes, i.e. in case of ISP1 provider failure, we will work through ISP2, if ISP2 rests in the Bose, then ISP3 will take over. - Somewhat confusing may be the value of the gateway parameter . How did this google DNS and some kind of left IP address suddenly become default routes? The magic lies in the scope parameter from the last three lines, as well as in the Nexthop lookup mechanism itself.
In fact, the traffic will go to the active provider, and then that will send it to the Internet through its uplinks. - About the check-gateway = ping parameter . The bottom line is that in the simplest Failover build scheme, by specifying check-gateway = ping in the default routes, we only check the connection to the provider's router. If the Internet is unavailable behind the provider's router, then we will not understand this. And with the help of a feint with the scope parameter, we check the connection no longer with the provider, but look for it on the Internet.
Under the spoiler, my detailed translation / adaptation of the MikroTik wiki on this topic.
MikroTik. Nexthop_lookup
The English article http://wiki.mikrotik.com/wiki/Manual:IP/Route , in my opinion, is a little overlooked. This is not a Cisco CCNA Exploration, which is read in one breath, but I will try to translate its passage as clearly as possible. If you see the same tenacity somewhere, correct me, please.
First, let's define some terms.
Nexthop - The next jump, literally. The next gateway / router / router on the route of the packet from point A (from my router, for example) to point B (let's say to google DNS 8.8.8.8), i.e. the next transit section where the packet will be processed. The translation will use the phrase "next hop" (sorry for Englishism).
Immediate nexthop- the next gateway / router / router on the route of the packet from point A to point B, accessible directly. For my home MikroTik, with the default route:
89.189.163.1 - this is immediate nexthop, because It is accessible via ether1-gateway. The phrase “directly accessible next hop” will be used in the translation.
Connected route - a connected route. A route whose gateway is directly accessible.
Gateway - network gateway / router / router.
I will use all three translation options.
scope - Used in the next hop search engine, i.e. what kind of hop will be next. The desired route can only be selected among routes whose scope values are less than or equal to the target-scope value. The default values are protocol dependent:
target-scope - Used in the next hop search engine, i.e. what kind of hop will be next. This is the maximum value of the scope parameter for the route through which the next hop can be found. For iBGP, the value is set to 30 by default.
Plate of values for both parameters.

Search for the next hop.
Finding the next hop is part of the route selection process.
Routes located in the FIB need an interface corresponding to each of the gateway addresses. The address of the next hop gateway should be directly accessible through this interface. The interface that should be used to send an outgoing packet to each of the gateways is found by searching for the next hop.
Some routes (for example, iBGP), as a gateway address, may have an address belonging to a router located several hop-gateways from our MikroTik. To install such routes in the FIB, you need to find the address of the gateway that is accessible directly (an immediate nexthop), i.e. directly from us, which will be used to reach the gateway address in this route. The immediate address of the next hop can also be found using the next hop search engine.
The search for the next hop is performed only in the main routing table main, even for routes that have an excellent routing-mark value. This is necessary to limit the installation of routes that can be used to search for directly accessible hop (immediate nexthops). In routes for RIP or OSPF, it is assumed that the next router is directly accessible and should be found using only connected routes.
Routes with the interface name as a gateway are not used in the search for the next hop. If there is a route with an interface name, as well as a route with an active IP address, then a route with an interface is ignored.
Routes with scopemore than the maximum allowed are not used in the search for the next hop. Each route specifies the maximum allowed value for the scope parameter , for its next hop, in the target-scope parameter . The default value for this parameter allows searching for the next hop only through connected routes, with the exception of iBGP routes, which have a higher default value and can also search for the next hop through IGP and static routes.
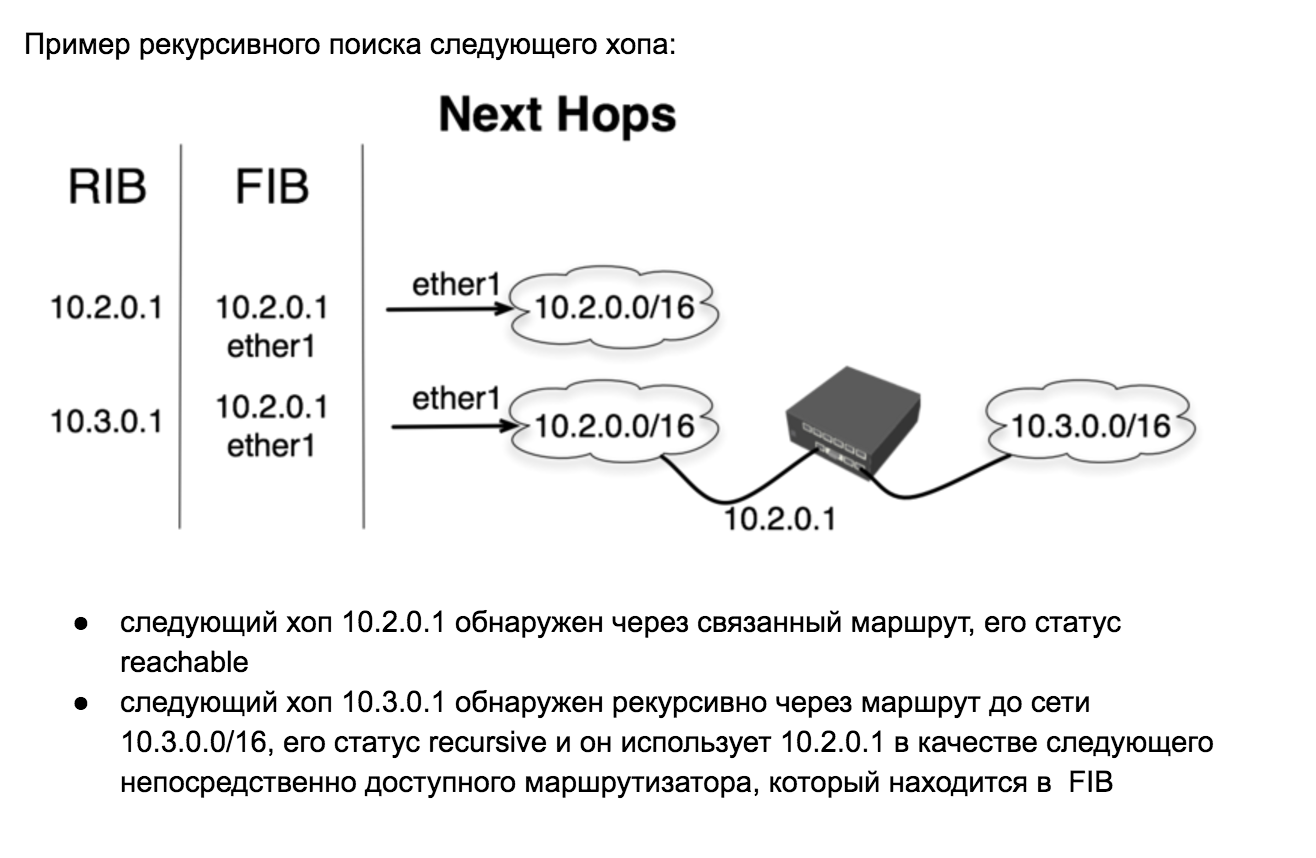
The interface and address of the next directly accessible router are selected based on the search results of the next hop:
And now, as they say in KVN, why did I show this number. Please note that we set scope = 10 for static routes in the last three lines, thereby “making” MikroTik take these routes into account when searching for the next hop.
It accepts, and thus routes by default through:
become recursive, i.e. the gateways of providers will be directly accessible hopes and we will send traffic through them, but check-gateway = ping will check the availability of addresses behind provider networks.
I hope my translation and explanation will be useful to you.
First, let's define some terms.
Nexthop - The next jump, literally. The next gateway / router / router on the route of the packet from point A (from my router, for example) to point B (let's say to google DNS 8.8.8.8), i.e. the next transit section where the packet will be processed. The translation will use the phrase "next hop" (sorry for Englishism).
Immediate nexthop- the next gateway / router / router on the route of the packet from point A to point B, accessible directly. For my home MikroTik, with the default route:
dst-address=0.0.0.0/0 gateway=89.189.163.1 gateway-status=89.189.163.1 reachable via ether1-gateway89.189.163.1 - this is immediate nexthop, because It is accessible via ether1-gateway. The phrase “directly accessible next hop” will be used in the translation.
Connected route - a connected route. A route whose gateway is directly accessible.
Gateway - network gateway / router / router.
I will use all three translation options.
scope - Used in the next hop search engine, i.e. what kind of hop will be next. The desired route can only be selected among routes whose scope values are less than or equal to the target-scope value. The default values are protocol dependent:
- related routes: 10 (if the interface is running)
- OSPF, RIP, MME routes: 20
- static routes: 30
- BGP routes: 40
- related routes: 200 (if the interface is not running)
target-scope - Used in the next hop search engine, i.e. what kind of hop will be next. This is the maximum value of the scope parameter for the route through which the next hop can be found. For iBGP, the value is set to 30 by default.
Plate of values for both parameters.
Search for the next hop.
Finding the next hop is part of the route selection process.
Routes located in the FIB need an interface corresponding to each of the gateway addresses. The address of the next hop gateway should be directly accessible through this interface. The interface that should be used to send an outgoing packet to each of the gateways is found by searching for the next hop.
Some routes (for example, iBGP), as a gateway address, may have an address belonging to a router located several hop-gateways from our MikroTik. To install such routes in the FIB, you need to find the address of the gateway that is accessible directly (an immediate nexthop), i.e. directly from us, which will be used to reach the gateway address in this route. The immediate address of the next hop can also be found using the next hop search engine.
The search for the next hop is performed only in the main routing table main, even for routes that have an excellent routing-mark value. This is necessary to limit the installation of routes that can be used to search for directly accessible hop (immediate nexthops). In routes for RIP or OSPF, it is assumed that the next router is directly accessible and should be found using only connected routes.
Routes with the interface name as a gateway are not used in the search for the next hop. If there is a route with an interface name, as well as a route with an active IP address, then a route with an interface is ignored.
Routes with scopemore than the maximum allowed are not used in the search for the next hop. Each route specifies the maximum allowed value for the scope parameter , for its next hop, in the target-scope parameter . The default value for this parameter allows searching for the next hop only through connected routes, with the exception of iBGP routes, which have a higher default value and can also search for the next hop through IGP and static routes.
The interface and address of the next directly accessible router are selected based on the search results of the next hop:
- If the most accurate active route that was found during the search for the address of the next hop is a connected route, then the interface of this connected route is used as the interface of the next hop and the gateway is marked as reachable. After a router becomes directly accessible via this interface (this is what should be understood as a “connected route” or “connected route”), its address is used as the address of a directly accessible router (immediate nexthop address).
- If the most accurate active route that was found during the search for the next hop address has a gateway address that has already been found, the directly accessible hop and interface are copied from this route, and the gateway is marked as recursive.
- If the most accurate active route that was found during the search for the next hop address is an ECMP route, then the first available router of this route is used.
- If the mechanism for finding the address of the next hop did not find any routes, then the gateway is marked as unreachable.
And now, as they say in KVN, why did I show this number. Please note that we set scope = 10 for static routes in the last three lines, thereby “making” MikroTik take these routes into account when searching for the next hop.
It accepts, and thus routes by default through:
- 8.8.8.8
- 8.8.4.4
- 1.1.36.3
become recursive, i.e. the gateways of providers will be directly accessible hopes and we will send traffic through them, but check-gateway = ping will check the availability of addresses behind provider networks.
I hope my translation and explanation will be useful to you.
While the most eager for knowledge are read under a spoiler, I’ll tell a little shorter and simpler.
When we specify scope = 10 in the last three lines, we make it clear to MikroTik that:
- 8.8.8.8
- 8.8.4.4
- 1.1.36.3
it is accessible not directly, but recursively through these static routes. One IP per brother-provider.
/ ip firewall mangle
the rules are here
/ip firewall mangle
add action=mark-connection chain=input in-interface=ISP1 \
    new-connection-mark=ISP1-conn passthrough=yes
add action=mark-routing chain=output connection-mark=ISP1-conn \
    new-routing-mark=ISP1-route passthrough=no
add action=mark-connection chain=input in-interface=ISP2 new-connection-mark=\
    ISP2-conn passthrough=yes
add action=mark-routing chain=output connection-mark=ISP2-conn \
    new-routing-mark=ISP2-route passthrough=no
add action=mark-connection chain=input in-interface=ISP3 \
    new-connection-mark=ISP3-conn passthrough=yes
add action=mark-routing chain=output connection-mark=ISP3-conn \
    new-routing-mark=ISP3-route passthrough=no
add action=mark-connection chain=forward in-interface=ISP1 \
    new-connection-mark=ISP1-conn-f passthrough=no
add action=mark-routing chain=prerouting connection-mark=ISP1-conn-f \
    in-interface=bridge new-routing-mark=ISP1-route
add action=mark-connection chain=forward in-interface=ISP2 \
    new-connection-mark=ISP2-conn-f passthrough=no
add action=mark-routing chain=prerouting connection-mark=ISP2-conn-f \
    in-interface=bridge new-routing-mark=ISP2-route
add action=mark-connection chain=forward in-interface=ISP3 \
    new-connection-mark=ISP3-conn-f passthrough=no
add action=mark-routing chain=prerouting connection-mark=ISP3-conn-f \
    in-interface=bridge new-routing-mark=ISP3-route
To explain the rules of this section, we invite several assistants.
- MANGLE - this table is intended for the classification and labeling of packets and connections, as well as the modification of packet headers (TTL and TOS fields) (wiki manual).
The mangle table contains the following chains:- PREROUTING - allows you to modify the packet before deciding on routing.
- INPUT - allows you to modify the package intended for the host itself.
- FORWARD - a chain that allows you to modify transit packets.
- OUTPUT - allows you to modify packets coming from the host itself.
- POSTROUTING - allows you to modify all outgoing packets, both generated by the host itself, and transit.
- CONNECTION TRACKING is a special subsystem that monitors the status of connections and allows you to use this information when deciding on the fate of individual packages.
- MikroTik's packet flow
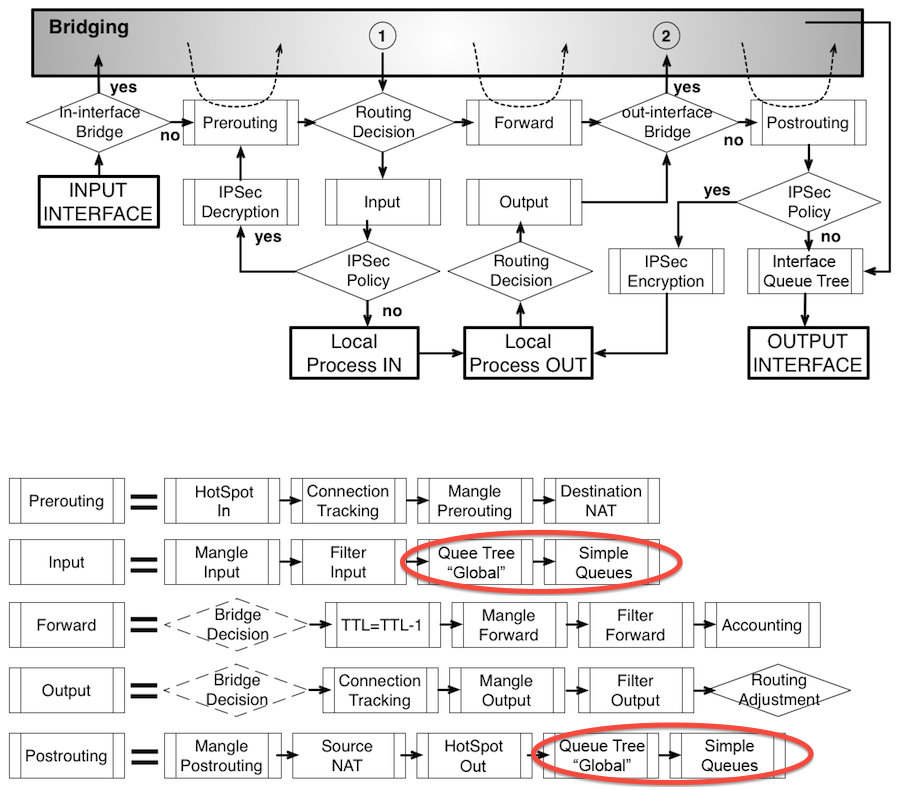
I divided the rules into groups to make them easier to understand. In the first group there are 6 rules that are responsible for traffic to / from the router itself, and in the second group 6, for transit traffic.
Let's start with the first two.
In the first, we tell the router that all incoming chain = input connections to the ISP1 interface must be marked action = mark-connection new-connection-mark = ISP1-conn , and we also specify passthrough = yes so that the packet, after passing this rule, does not left the table and continued following the rules.
In the second, we tell MikroTik to catch the outgoing chain = output connections marked as ISP1-connand assigned them a routing label (for placement in the corresponding routing table, do you remember the first three routes?), and also inform passthrough = no , as if to say - there is nothing for the packet to do here after this rule, i.e. the packet will leave the table.
Everything described above is true for both ISP2 and ISP3. Thus, we have achieved that the router will respond exactly from the interface to which the request will come to it.
We pass to the final six rules.
It’s already clear, they are also divided into subgroups of 2, for each of our ISPs.
The first of them instructs the router to monitor the FORWARD chain and if a connection occurs through the ISP1 interface, then it is marked action = mark-connection with a new tagnew-connection-mark = ISP1-conn-f (note! different from the traffic tag of the router itself, in this case we mark transit traffic). passthrough = n o, because we do not want the package, after falling into this rule, to be processed in the table somehow else.
The second hangs the desired routing label new-routing-mark = ISP1-route in the PREROUTING chain , i.e. BEFORE making a decision about routing, and monitors the traffic that came to us from the local network in-interface = bridge .
Here we are helped by the CONNECTION TRACKING mechanism , which allows us to catch the connections marked from the rule above from the local network (from the WEB server) and hang them with the necessary routing tag.
This allows transit traffic (here to / from the web server) to go exactly the way it came, i.e. came through ISP1 - leave through it.
Conclusion
I am very glad if my explanations are clear, and this work will be useful.
Gone to meditate, good luck to everyone!
Thank you for attention!