October 18, 2016 at 14:00
The book “Learning Arduino. 65 do-it-yourself projects »
 Have you ever looked at any device to think about how it actually works ? Perhaps it was a remote-controlled boat, an elevator, a drinks vending machine, or an electronic toy? Or maybe you wanted to create a robot yourself, come up with electronic controls for a model railroad? Or did you suddenly have a desire to organize the receipt and analysis of a long-term weather forecast? How and where could you start your own project?
The Arduino board will help in practice to reveal some of the secrets of electronics. Created by Massimo Banzi and David Quartillier, the Arduino system offers a low-cost way to create interactive projects and objects, such as remote-controlled robots, GPS-based track record systems and electronic games.
This book reviews 65 projects. An example of one project under a cat.
Chapter 10. Touchscreens
In this chapter you will:
• learn how to connect a resistive touch screen to an Arduino board;
• learn to read the values that the touch screen can return;
• design a simple switch that is triggered by touch;
• design a switch with a light adjustment function.
Touch screens surround us from all sides: smartphones, tablet computers and handheld gaming devices. So why don't we use the touch screen for user interactions?
Touchscreens
Touchscreens can be very expensive, but we will use an inexpensive model manufactured by SparkFun (part number LCD-08977 and BOB-09170), originally developed for the Nintendo DS game console.
This touch screen measures 5 x 7 cm and is shown in fig. 10.1, where it is mounted on a breadboard.
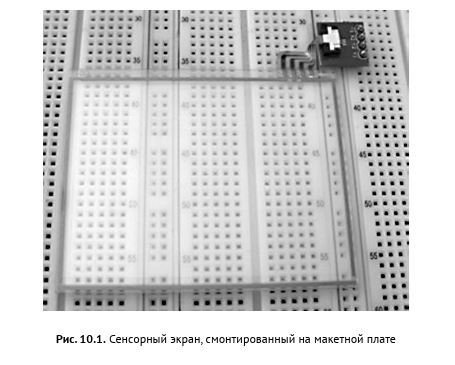
Please note that the touch screen is connected by a loop to a small printed circuit board in the upper right corner (circled in Fig. 10.1). This adapter is used to connect the touch screen to the breadboard and Arduino; in fig. 10.2 shows a larger image of the adapter.
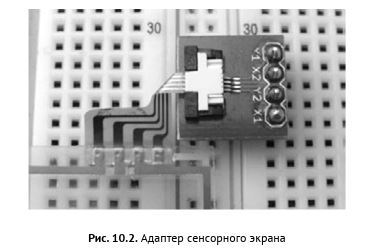
Connecting the touch screen
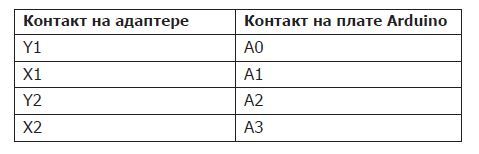
The touch screen adapter is connected to the Arduino board, as shown in the table. 10.1. Table 10.1. Connecting the touch screen adapter to the Arduino board
Project No. 34: Determination of the touch area on the touch screen The
resistive touch screen consists of a glass panel and a flexible plastic membrane, between which there are two layers of resistive coating. One resistive coating acts as the X axis, and the other as the Y axis. The resistance of the resistive coating varies depending on the point of contact, that is, by measuring the voltage on each layer, you can determine the X and Y coordinates of the contact area.
In this project, using the Arduino board, we determine the voltage on each layer and convert it to the integer coordinates of the touch point.
Equipment
The following is the equipment that will be needed for this project:
• Touch screen with adapter.
• One trimmer resistor with a rating of 10 kOhm.
• One LCD with a screen size of 16 x 2 characters.
• Several pieces of wire of different lengths.
• One breadboard.
• Arduino board and USB cable
Connect the touch screen according to table. 10.1 and a liquid crystal indicator, as shown in Fig. 7.2.
Sketch
Enter and download the next sketch. The most important sections of the sketch are provided with comments:
Project 34 - Defining the touch area on the touch screen
#include
LiquidCrystal lcd(4,5,6,7,8,9);
int x,y = 0;
void setup()
{
lcd.begin(16,2);
lcd.clear();
}
int readX() // возвращает координату X на сенсорном экране
{
int xr=0;
pinMode(A0, INPUT);
pinMode(A1, OUTPUT);
pinMode(A2, INPUT);
pinMode(A3, OUTPUT);
digitalWrite(A1, LOW); // подать низкий уровень на A1
digitalWrite(A3, HIGH); // подать высокий уровень на A3
delay(5);
xr=analogRead(0); // сохранить координату X
return xr;
}
int readY() // возвращает координату Y на сенсорном экране
{
int yr=0;
pinMode(A0, OUTPUT); // A0
pinMode(A1, INPUT); // A1
pinMode(A2, OUTPUT); // A2
pinMode(A3, INPUT); // A3
digitalWrite(14, LOW); // подать низкий уровень на A0
digitalWrite(16, HIGH); // подать высокий уровень на A2
delay(5);
yr=analogRead(1); // сохранить координату Y
return yr;
}
void loop()
{
lcd.setCursor(0,0);
lcd.print(" x = ");
x=readX();
lcd.print(x);
y=readY();
lcd.setCursor(0,1);
lcd.print(" y = ");
lcd.print(y);
delay (200);
}
The readX () and readY () ( and ) functions read the voltage across the resistive coatings of the touch screen using analogRead () and return the resulting value. A sketch constantly calls these two functions to ensure the determination of the coordinates of the touch area of the touch screen in real time and their display on the LCD screen ( and ). (The delay delay (5) in each function is necessary, it gives the analog inputs / outputs time to change their state.)
Testing the sketch
During the testing of the sketch, observe the change in the readings on the LCD screen by touching the touch screen, and note how the X values change and Y depending on the position of the touch point. Also pay attention to what values are displayed on the LCD screen when you do not touch the screen (Fig. 10.3).
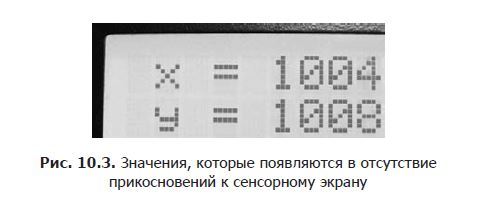
Remember these values - they will come in handy in the event that in the sketch you will determine the fact of the lack of touching the screen.
Touch Screen Calibration
Touching the touch screen in the corners as shown in fig. 10.4, and writing down the received values, you will actually calibrate it. In the simplest case, the coordinates of the corners of the screen will be quite enough. With these values, you can divide the touch screen into small areas and use them to control.
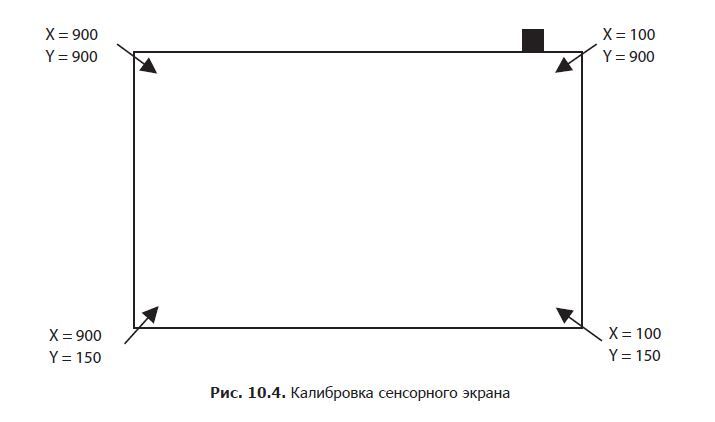
By calibrating the touch screen and dividing it into small areas, you can use the readX () and readY () functions to determine the fact of touching different control areas on the screen and then use if-then instructions to perform certain operations, as shown in project 35.
Project No. 35: Dual-zone switch
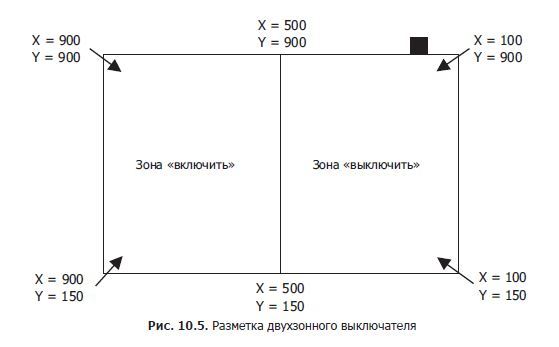
In this project, we will create a simple switch based on the touch screen. First, divide the screen into two zones horizontally, as shown in Fig. 10.5: on the left is the “on” zone, and on the right is “off”.
Comparing the coordinates of the touch point with the boundaries of the zones, the Arduino board will determine the zone in which the touch occurred. After determining the zone, you can set a high or low voltage level at the digital output, but in this sketch we simply display the name of the zone in the port monitor.
Sketch
Enter and download the following sketch:
// Project 35 - Dual Zone Switch
int x,y = 0;
void setup()
{
Serial.begin(9600);
pinMode(10, OUTPUT);
}
void switchOn()
{
digitalWrite(10, HIGH);
Serial.print("Turned ON at X = ");
Serial.print(x);
Serial.print(" Y = ");
Serial.println(y);
delay(200);
}
void switchOff()
{
digitalWrite(10, LOW);
Serial.print("Turned OFF at X = ");
Serial.print(x);
Serial.print(" Y = ");
Serial.println(y);
delay(200);
}
int readX() // возвращает координату X на сенсорном экране
{
int xr=0;
pinMode(A0, INPUT);
pinMode(A1, OUTPUT);
pinMode(A2, INPUT);
pinMode(A3, OUTPUT);
digitalWrite(A1, LOW); // подать низкий уровень на A1
digitalWrite(A3, HIGH); // подать высокий уровень на A3
delay(5);
xr=analogRead(0);
return xr;
}
int readY() // возвращает координату Y на сенсорном экране
{
int yr=0;
pinMode(A0, OUTPUT);
pinMode(A1, INPUT);
pinMode(A2, OUTPUT);
pinMode(A3, INPUT);
digitalWrite(A0, LOW); // подать низкий уровень на A0
digitalWrite(A2, HIGH); // подать высокий уровень на A2
delay(5);
yr=analogRead(1);
return yr;
}
void loop()
{
x=readX();
y=readY();
// Касание в зоне "включить"?
if (x<=900 && x>=500)
{
switchOn();
}
// Касание в зоне "выключить"?
if (x<500 && x>=100)
{
switchOff();
}
}
Principle of operation
Two if statements in the void loop () function determine the zone in which the touch occurred. If the touch point is in the left zone, then the touch is interpreted as the “enable” command . If the touch point is in the right zone, then the touch is interpreted as the “off” command.
Note
The Y coordinate in this project is ignored, because the touch screen is conditionally divided by a vertical border into two horizontal zones. If we also determined the horizontal boundaries, then it would be necessary to check the Y coordinate, as we will see in project 36.
”For more details, see the book on the publisher’s website.
” Contents
” Excerpt
for Khabrozhiteley 25% off coupon -Arduino