Research and refinement of IP video server based on Orange Pi PC
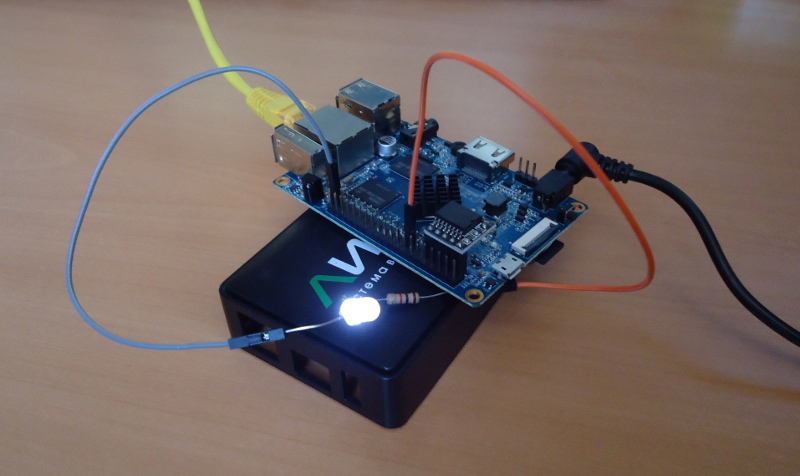
About six months ago, I got a miniature video server, the application of which I found in a garage rented for a motorcycle, where all this time it worked safely in conjunction with two Chinese NoName IP cameras, somehow supporting ONVIF, and a 3G modem, which allowed me to remotely watch video from cameras with motion detection alerts, which fortunately coincided so far only with my arrival in the garage. I myself didn’t let this microserver work quietly further, since when I just got it in my hands, I took it apart out of curiosity and unexpectedly found out that it was built on a single-board Orange Pi PC, which shortly before, due to its low price, was widely lit. on the Internet, including Geektimes, so I roughly imagined its capabilities.
Actually, after six months of use, in addition to the main functions of the video server, I wanted to use the GPIO comb on its board to connect a smoke sensor, a door open sensor and a relay to turn on the siren. In my opinion, the most interesting and difficult stage of this hobby project, I decided to share with the community, hoping to get advice on further development. Attention: the actions described below, most likely, deprived me of the guarantee for the device, I produced them at my own peril and risk and I give them only as food for the mind, but not a guide to action.
Firmware research
First of all, in the hope that the video server uses a full distribution, I tried to connect a monitor and keyboard to the board, but there was no signal at the HDMI output, it seems that the port was simply not involved in the firmware, which, however, the developers say, saying that this is a MicroNVR (Network Video Recorder) class device that does not imply any user interaction with the server, other than remote access. The second goal is ssh, whose port is open on the device, but the server only supports authorization by key, which I could not get in any way.
Fortunately for me, the device is based on the single-board version that goes without eMMC, and the download is done from a regular MicroSD-card protruding from the end of the board. Actually, all that is needed to gain access to the contents of the firmware is to insert the card into the card reader. There are 3 sections on 8Gb SanDisk:
/dev/sdb1 on /media/user/disk type squashfs
/dev/sdb2 on /media/user/UBOOT type vfat
/dev/sdb3 on /media/user/07836191-ddf8-45ab-b02b-1103320c2e5b type ext4
Partition Sizes:
/dev/sdb1	25M   25M     0 100% /media/user/disk
/dev/sdb2	16M  2.2M   14M  14% /media/user/UBOOT
/dev/sdb3	58M  9.4M   45M  18% /media/user/07836191-ddf8-45ab-b02b-1103320c2e5b
The UBOOT section, apparently, is used only by the U-Boot loader. The ext4 section contains the logs (/ log) of the main subsystems (kern, lighttpd, line, netcfgd, syslog) and the settings of the video surveillance server that are available for change by the user (/ lib / line). And on the disk section with squashfs (compressed read-only) are already all the files of the OS and programs. It turns out that the operating system and the logical part with all the Analysts and Clouds fit the developers at 25 MB, which coincides with the size of the updates on their website, i.e. the entire firmware is replaced, and not just the surveillance software.
The main section contains the usual set of directories:
bin   dev  factory  media  root  sbin  tmp  var
boot  etc  lib      proc   run   sys   usr
In general, there is nothing unusual in the directory tree, everything is in its place. Launched runit services are in / etc / service:
dropbear hwclock-fix lighttpd line netcfgd socklog-klog socklog-unixSeeing lighttpd in the list, I decided to check if I could use it for my own purposes. It starts with the configuration:
server.modules += ( "mod_cgi" )
$SERVER["socket"] == ":19587" {
    include_shell "/usr/share/adm/lighttpd-gencert"
    server.document-root = "/usr/share/adm/www"
    cgi.execute-x-only = "enable"
    cgi.assign = ( "" => "" )
}
Contents / usr / share / adm / www:
datetime       firmware  password  profiles  sysinfo   timezones
factory-reset  locale    profile   settings  timezone
By the set of scripts, it is clear that the HTTP server provides opportunities for a utility that allows you to change the system settings of the device and update the firmware, it turns out that all this can be done without its participation via the HTTP protocol. For example, you can also get an archive with information about the system through the browser:
https://192.168.1.2:19587/sysinfoThe server uses a generated self-signed certificate and standard authorization with the ability to change the password (only the hash is stored on the device). A ready-made HTTPS server with authorization and a very simple ability to add your own script saved me a lot of time and I proceeded directly to GPIO.
Firmware revision
A simple google request “Orange Pi PC GPIO” immediately brought me to the commands:
echo 0 > /sys/class/gpio_sw/PA1/data
echo 1 > /sys/class/gpio_sw/PA1/data
Finding port names was not a problem either:
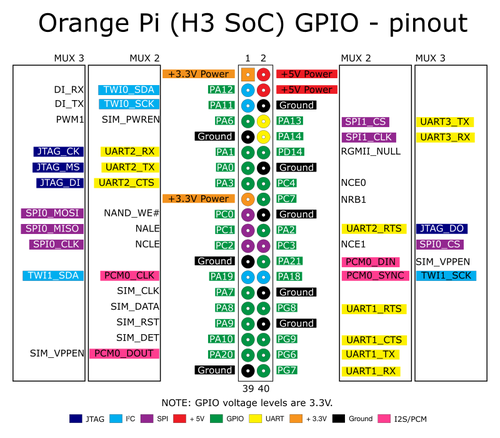
Having looked at the available scripts, I created, following their example, a new one with the name alarm and contents:
#!/bin/sh
set -e
. ../lib/devline/http.sh
. ../lib/devline/auth.sh
is_auth || http_err_unauth
[ "$REQUEST_METHOD" = "PUT" ] || http_err_method PUT
value="$(head -c "$CONTENT_LENGTH" | tr -d '.')"
echo $value > /sys/class/gpio_sw/PA3/data
echo "Content-Type: text/plain"
echo
echo OK
Firmware update
I could only add a new file to the device, which can not be done by normal copying, because The target file system is read-only. There are probably different ways to make changes to squashfs, but I went the simplest in my opinion. The first thing I did was read the image of the partition into a file:
dd if=/dev/sdb2 of=sdb2.imgThen unpacked squashfs into the usual directory:
unsquashfs sdb2.imgI copied the alarm script to the desired path in squashfs-root and compiled a new squashfs image from it:
mksquashfs squashfs-root sdb2-new.imgWhich then uploaded back to the USB flash drive:
dd if=sdb2-new.img of=/dev/sdb2Total
At the moment, I can close the relay on a secure channel:
curl -X PUT -k --data '1' https://admin:[email protected]:19587/alarmand open it:
curl -X PUT -k --data '0' https://admin:[email protected]:19587/alarmBy and large, for me personally it was just an assessment of the technical feasibility of implementing the idea. The assessment is positive: I have access to I / O ports and I can add my logic to the device firmware. As a bonus, I got a ready-to-use HTTPS server.
In my opinion, this was the most interesting part of the development, then for the most part only the routine remains, and I’m not sure if I will finish all the plans in full. In any case, if someone decides to repeat something like this, here are a couple of ideas for further development of the current result:
- Write a script for the service that will monitor the status of inputs with sensors and respond to a trigger (notify, turn on the siren). Everything is clear here, no difficulties are expected with the service or with the notification, even the curl executable file is already on the device, i.e. There are several options for notifications: SMTP and receiving messages via IMAP, ready-made SMS sending services, your own server;
- Get to work over the Internet without a direct IP address. The fact is that only the main video server software works through the cloud, and a lighttp server that implements system settings is accessible only directly, which, of course, is not bad for itself. On this point, I’m not so sure of the ease of implementation, my ideas so far are limited to two options: ssh-tunnel (you need to add your public key to the device) or your server and long polling from the side of the device.
I would be grateful for your ideas.