Learning a machine is a fun thing: modern face recognition with deep learning
- Transfer
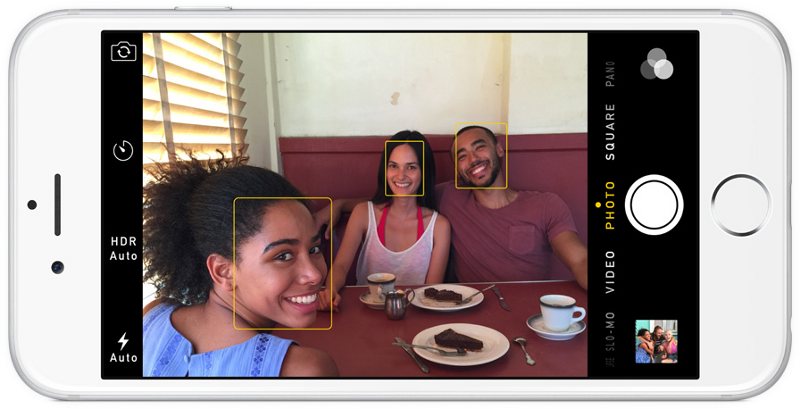
Have you noticed that Facebook has acquired a supernatural ability to recognize your friends in your photos? In the old days, Facebook marked your friends in photographs only after you clicked the corresponding image and entered the name of your friend through the keyboard. Now, after you upload your photo, Facebook marks anyone for you, which looks like magic :

Facebook automatically marks the people in your photos that you marked once before. I can’t decide for myself whether it’s useful or scary!
This technology is called face recognition. Facebook algorithms can recognize the faces of your friends after you tag them only a couple of times. This is an amazing technology: Facebook is able to recognize faces with 98% accuracy- almost the same as man!
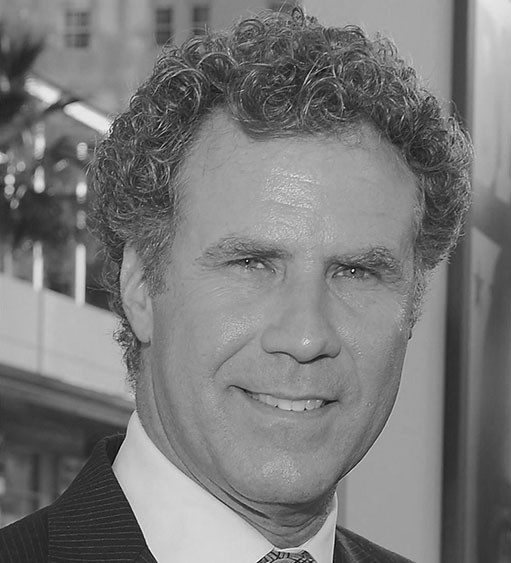
Let's see how modern face recognition works! However, simply recognizing your friends would be too easy. We can go to the border of this technology to solve a more complex problem - we will try to distinguish Will Ferrell (a famous actor) from Chad Smith (a famous rock musician)!

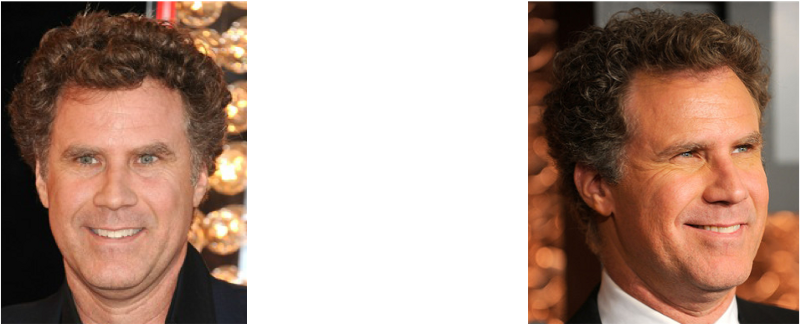
One of these people is Will Ferrell. The other is Chad Smith. I swear these are different people!
Until now, in parts 1 , 2, and 3, we have used machine training to solve isolated problems that have only one step — estimating the cost of a home , creating new data from existing ones, and determining if an image contains an object . All these problems can be solved by choosing one machine learning algorithm, entering data and obtaining a result.
But face recognition is actually a sequence of several related problems:
1. First, you need to look at the image and find all the faces on it.
2. Secondly, it is necessary to focus on each face and determine that, despite an unnatural turn of the face or poor lighting, it is one and the same person.
3. Thirdly, it is necessary to highlight the unique characteristics of the face that can be used to distinguish it from other people - for example, eye size, facial elongation, etc.
4. In conclusion, it is necessary to compare these unique characteristics of a person with the characteristics of other people you know to determine the name of the person.
The human brain does all this automatically and instantly. In fact, people recognize faces extremely well and, ultimately, see faces in everyday objects:

Computers are incapable of such a high level of generalization ( at least for now ...), so you have to learn them every step in this process separately.
It is necessary to build a conveyor on which we will find a solution at each step of the face recognition process separately and pass the result of the current step to the next. In other words, we will combine several machine learning algorithms in one chain:

How the basic face recognition process can work
Let's solve this problem sequentially. At every step we will learn about the new machine learning algorithm. I’m not going to explain each individual algorithm completely so as not to turn this article into a book, but you will learn the basic ideas that are contained in each of the algorithms and learn how to create your own face recognition system in Python using OpenFace and dlib .
The first step on our conveyor is face detection . It is obvious that you need to highlight all the faces in the photo before trying to recognize them!
If you used any photo in the last 10 years, then you probably saw how face detection works:
Face detection is a great thing for cameras. If the camera can automatically detect faces, you can be sure that all faces are in focus before the picture is taken. But we will use this for another purpose - finding image areas that need to be passed to the next stage of our pipeline.
Face detection became the mainstream in the early 2000s when Paul Viola and Michael Jones invented a way to detect faces.that was fast enough to work on cheap cameras. However, now there are much more reliable solutions. We are going to use a method discovered in 2005 - a histogram of directional gradients (in short, HOG ).
To detect faces in the image, we will make our image black and white, because color data is not needed for face detection:
Then we look at each individual pixel in our image sequentially. For each individual pixel, its immediate environment should be considered:
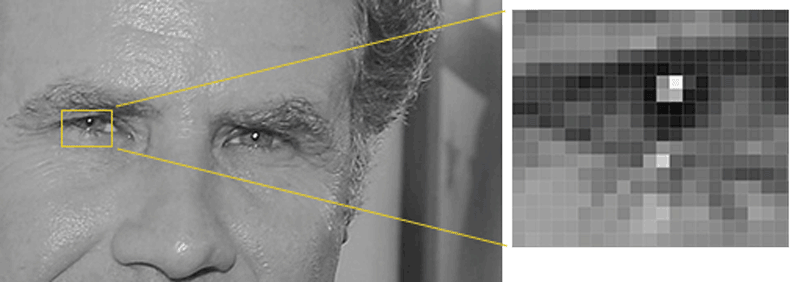
Our goal is to highlight how dark the current pixel is in comparison with the pixels directly adjacent to it. Then draw an arrow showing the direction in which the image becomes darker:

When considering this one pixel and its closest neighbors, it is seen that the image darkens up to the right.
If we repeat this process for each individual pixel in the image, then, in the end, each pixel will be replaced by an arrow. These arrows are called the gradient , and they show the flow from light to dark throughout the image:

It may seem that the result is something random, but there is a very good reason for replacing pixels with gradients. When we analyze pixels directly, dark and light images of the same person will have very different pixel intensities. But if we consider only the directionchanges in brightness, then both dark and light images will have exactly the same representation. This greatly facilitates the solution of the problem!
But preserving the gradient for each individual pixel gives us a way that carries too many details. Ultimately, we do not see the forest because of the trees . It would be better if we could just see the main stream of light / dark at a higher level, thus considering the basic structure of the image.
To do this, we break the image into small squares of 16x16 pixels in each. In each square, you should calculate how many gradient arrows are shown in each main direction (i.e. how many arrows are directed up, up, right, right, etc.). Then, the square in question in the image is replaced by an arrow with the direction prevailing in this square.
In the end result, we turn the original image into a very simple representation, which shows the basic structure of the face in a simple way:

The original image is converted to a HOG representation, showing the basic characteristics of the image regardless of its brightness.
To detect faces in this HOG image, all that is required of us is to find a part of the image that is most similar to the known HOG structure obtained from the group of faces used for training:
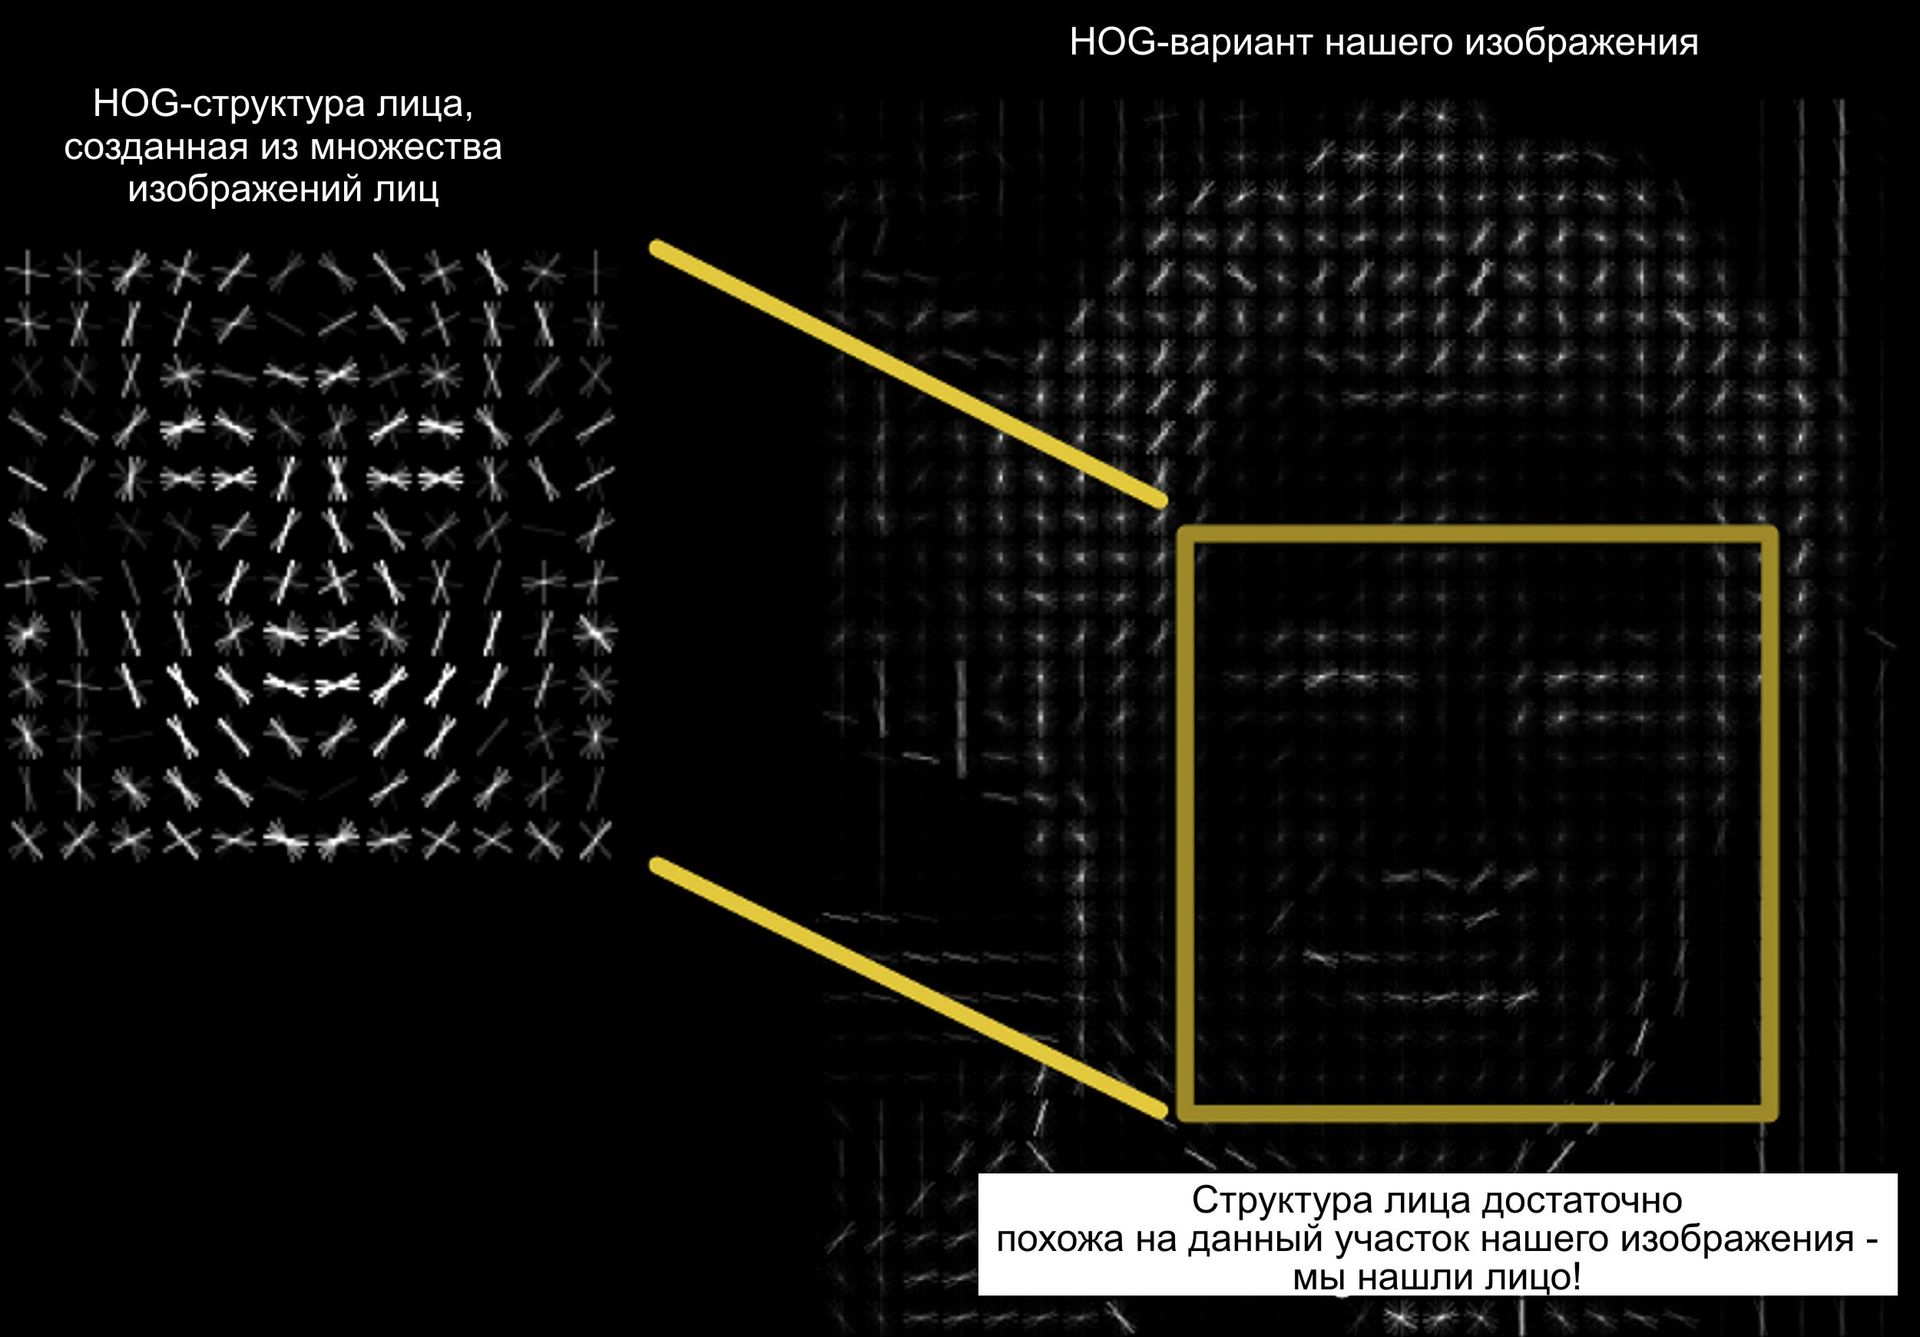
Using this method, you can easily find faces on any image:

If you want to complete this step yourself using Python and dlib, then there is a program that shows how to create and view HOG representations of images.
So, we have identified the faces in our image. But now there is a problem: the same face, viewed from different directions, looks completely different for a computer:
People can easily see that both images refer to actor Will Ferrell, but computers will consider them as faces of two different people.
To take this into account, we will try to transform each image so that the eyes and lips are always in the same place on the image. Comparing faces in the next steps will be greatly simplified.
To do this, we use an algorithm called "assessment of anthropometric points . " There are many ways to do this, but we are going to use the approach proposed in 2014 by Wahid Casemi and Josephine Sullivan .
The main idea is that 68 specific points ( marks ) are found on each face - the protruding part of the chin, the outer edge of each eye, the inner edge of each eyebrow, etc. Then, the machine learning algorithm is set up to search for these 68 specific points on each face: we place

68 anthropometric points on each face.
The following is the result of the location of 68 anthropometric points on our test image: A
BASIC FOR A NEW PROFESSIONAL: this same method can be used to enter your own version 3D real-time face filters on Snapchat!
Now that we know where our eyes and mouth are, we’ll just rotate, scale and moveimage so that the eyes and mouth are centered as best as possible. We will not introduce any unusual 3D deformations, as they can distort the image. We will only do basic image transformations, such as rotation and scaling, which keep the lines parallel (the so-called affine transformations ):

Now, no matter how the face is rotated, we can center our eyes and mouth so that they are approximately in one position in the image. This will make the accuracy of our next step much higher.
If you want to try this step yourself using Python and dlib, then there is a program for finding anthropometric points anda program for converting images based on these points .
Now we come to the core of the problem - the very distinction between faces. This is where the fun begins!
The simplest approach to face recognition is a direct comparison of the unknown face detected in step 2 with all already marked faces. If we find an already marked face, very similar to our unknown, this will mean that we are dealing with the same person. Sounds like a very good idea, doesn't it?
In fact, this approach poses a huge problem. A site like Facebook with billions of users and trillions of photographs cannot cycle through each previously marked face, comparing it with each new uploaded picture. It would take too much time. It is necessary to recognize faces in milliseconds, not hours.
We need to learn how to extract some basic characteristics from each person. Then we could obtain such characteristics from an unknown person and compare with the characteristics of known persons. For example, you can measure each ear, determine the distance between the eyes, the length of the nose, etc. If you have ever watched a television series about the work of the staff of the Las Vegas forensic laboratory ( “CSI: Crime Scene” ), then you know what it is about:

Like in the movies! So it seems like the truth!
Well, but what characteristics should be obtained from each person in order to build a database of famous people? Ear size? The length of the nose? Eye color? Anything else?
It turns out that characteristics that seem obvious to us people (for example, eye color) do not make sense for a computer that analyzes individual pixels in an image. Researchers have found that the most appropriate approach is to let the computer determine the characteristics that need to be collected. Deep learning allows you to better than what people can do to determine the parts of the face that are important for its recognition.
The solution is to train a deep convolutional neural network (which is exactly what we did in Issue 3) But instead of teaching the network to recognize graphic objects, as we did the last time, we are now going to teach it to create 128 characteristics for each person.
The learning process works when considering 3 face images at the same time:
1. Download the educational image of the face of a famous person
2. Download another image of the face of the same person
3. Download the image of the face of some other person
Then the algorithm considers the characteristics that it is currently creating for each of these three images. It slightly adjusts the neural network so that the characteristics created by it for images 1 and 2 are slightly closer to each other, and for images 2 and 3 a little further.
A single "built" learning step:

After repeating this step, millions of times for millions of images of thousands of different people, the neural network is able to reliably create 128 characteristics for each person. Any ten different images of the same person will give approximately the same characteristics.
Specialists in machine training call these 128 characteristics of each person a set of characteristics (attributes) . The idea of reducing complex input data, such as, for example, an image, to a list of computer-generated numbers has proved extremely promising in machine learning (in particular, for translations). This approach for the individuals we use was proposed in 2015 by Google researchers , but there are many similar approaches.
The process of training a convolutional neural network to derive sets of facial characteristics requires a large amount of data and high computer performance. Even on an expensive NVidia Telsa graphics card, it takes about 24 hours of continuous training to get good accuracy.
But if the network is trained, then you can create characteristics for any person, even for one that has never been seen before! Thus, this step needs to be done only once. Fortunately for us, the good people at OpenFace have already done this and have provided access to several trained networks that we can use immediately. Thanks to Brandon Amos and the team!
As a result, all that is required of us is to conduct our images of faces through their pre-trained network and get 128 characteristics for each person. Below are the characteristics for our test image:
But what specific parts of the face do these 128 numbers describe? It turns out that we have no idea about this. However, this does not really matter to us. We should only care that the network produces approximately the same numbers, analyzing two different images of the same person.
If you want to try this step yourself, OpenFace provides a Lua script that creates sets of characteristics of all the images in the folder and writes them to a csv file. You can run it as shown.
The last step is actually the easiest in the whole process. All that is required of us is to find a person in our database of famous persons who has characteristics that are closest to the characteristics of our test image.
This can be done using any basic machine learning classification algorithm. No special deep learning techniques are required. We will use a simple linear SVM classifier , but many other classification algorithms can be applied.
We only need to train a classifier that can take the characteristics of the new test image and tell which famous person has the best fit. The operation of such a classifier takes milliseconds. The result of the classifier is the name of the person!
Let's test our system. First of all, I trained the classifier using character sets from about 20 images of Will Ferrell, Chad Smith and Jimmy Falon:
Oh, these are amazing pictures for learning!
Then I drove a classifier on every frame of the famous YouTube video, where on a Jimmy Fallon show, Will Ferrell and Chad Smith pretend to be each other : It
worked! And look how great it worked for people from many different directions - even in profile!
Consider the required steps:
1. Process the image using the HOG algorithm to create a simplified version of the image. In this simplified image, find the area that is most similar to the created HOG representation of the face.
2. Determine the position of the face by setting the main anthropometric points on it. After positioning these anthropometric points, use them to transform the image to center the eyes and mouth.
3. Pass the centered image of the face through the neural network, trained to determine the characteristics of the face. Save the received 128 characteristics.
4. After reviewing all the faces whose characteristics were taken earlier, determine the person whose facial characteristics are closest to those obtained. It is done!
Now that you know how all this works, look through the instructions from the very beginning to the end on how to carry out the entire face recognition process on your own computer using OpenFace :
Make sure Python, OpenFace, and dlib are installed. You can install them manually or use a pre-configured container image in which all of this is already installed:
Professional advice for a novice: if you use Docker on OSX, you can make the OSX / Users / folder visible inside the container image, as shown below:
Then you can access all your OSX files inside the container image on / host / Users / ...
Create a folder with a name
Create a subfolder for each person you want to recognize. For instance:
Copy all the images of each person into the corresponding subfolders. Make sure that each image has only one face. It is not necessary to crop the image around the face. OpenFace will do this automatically.
Run openface scripts from the openface root directory:
Position detection and alignment must first be performed:
As a result, a new subfolder will be created
Then create views from the aligned images:
The subfolder
Train your face detection model:
A new file with the name will be created
From this moment, you have a working face recognition!
Take a new picture with an unknown face. Pass it through the classifier script, such as the following:
You should get something like this warning:
Here, if you wish, you can configure the python script
Important notes:
• If the results are unsatisfactory, try adding a few more images for each person in step 3 (especially images from different directions).
• This script will always issue a warning, even if it does not know this person. In actual use, it is necessary to check the level of confidence and remove warnings with a low level of confidence, since they are most likely incorrect.
Facebook automatically marks the people in your photos that you marked once before. I can’t decide for myself whether it’s useful or scary!
This technology is called face recognition. Facebook algorithms can recognize the faces of your friends after you tag them only a couple of times. This is an amazing technology: Facebook is able to recognize faces with 98% accuracy- almost the same as man!
Let's see how modern face recognition works! However, simply recognizing your friends would be too easy. We can go to the border of this technology to solve a more complex problem - we will try to distinguish Will Ferrell (a famous actor) from Chad Smith (a famous rock musician)!
One of these people is Will Ferrell. The other is Chad Smith. I swear these are different people!
How to use machine training for a very complex problem
Until now, in parts 1 , 2, and 3, we have used machine training to solve isolated problems that have only one step — estimating the cost of a home , creating new data from existing ones, and determining if an image contains an object . All these problems can be solved by choosing one machine learning algorithm, entering data and obtaining a result.
But face recognition is actually a sequence of several related problems:
1. First, you need to look at the image and find all the faces on it.
2. Secondly, it is necessary to focus on each face and determine that, despite an unnatural turn of the face or poor lighting, it is one and the same person.
3. Thirdly, it is necessary to highlight the unique characteristics of the face that can be used to distinguish it from other people - for example, eye size, facial elongation, etc.
4. In conclusion, it is necessary to compare these unique characteristics of a person with the characteristics of other people you know to determine the name of the person.
The human brain does all this automatically and instantly. In fact, people recognize faces extremely well and, ultimately, see faces in everyday objects:
Computers are incapable of such a high level of generalization ( at least for now ...), so you have to learn them every step in this process separately.
It is necessary to build a conveyor on which we will find a solution at each step of the face recognition process separately and pass the result of the current step to the next. In other words, we will combine several machine learning algorithms in one chain:
How the basic face recognition process can work
Face recognition - step by step
Let's solve this problem sequentially. At every step we will learn about the new machine learning algorithm. I’m not going to explain each individual algorithm completely so as not to turn this article into a book, but you will learn the basic ideas that are contained in each of the algorithms and learn how to create your own face recognition system in Python using OpenFace and dlib .
Step 1. Finding all faces
The first step on our conveyor is face detection . It is obvious that you need to highlight all the faces in the photo before trying to recognize them!
If you used any photo in the last 10 years, then you probably saw how face detection works:
Face detection is a great thing for cameras. If the camera can automatically detect faces, you can be sure that all faces are in focus before the picture is taken. But we will use this for another purpose - finding image areas that need to be passed to the next stage of our pipeline.
Face detection became the mainstream in the early 2000s when Paul Viola and Michael Jones invented a way to detect faces.that was fast enough to work on cheap cameras. However, now there are much more reliable solutions. We are going to use a method discovered in 2005 - a histogram of directional gradients (in short, HOG ).
To detect faces in the image, we will make our image black and white, because color data is not needed for face detection:
Then we look at each individual pixel in our image sequentially. For each individual pixel, its immediate environment should be considered:
Our goal is to highlight how dark the current pixel is in comparison with the pixels directly adjacent to it. Then draw an arrow showing the direction in which the image becomes darker:
When considering this one pixel and its closest neighbors, it is seen that the image darkens up to the right.
If we repeat this process for each individual pixel in the image, then, in the end, each pixel will be replaced by an arrow. These arrows are called the gradient , and they show the flow from light to dark throughout the image:
It may seem that the result is something random, but there is a very good reason for replacing pixels with gradients. When we analyze pixels directly, dark and light images of the same person will have very different pixel intensities. But if we consider only the directionchanges in brightness, then both dark and light images will have exactly the same representation. This greatly facilitates the solution of the problem!
But preserving the gradient for each individual pixel gives us a way that carries too many details. Ultimately, we do not see the forest because of the trees . It would be better if we could just see the main stream of light / dark at a higher level, thus considering the basic structure of the image.
To do this, we break the image into small squares of 16x16 pixels in each. In each square, you should calculate how many gradient arrows are shown in each main direction (i.e. how many arrows are directed up, up, right, right, etc.). Then, the square in question in the image is replaced by an arrow with the direction prevailing in this square.
In the end result, we turn the original image into a very simple representation, which shows the basic structure of the face in a simple way:
The original image is converted to a HOG representation, showing the basic characteristics of the image regardless of its brightness.
To detect faces in this HOG image, all that is required of us is to find a part of the image that is most similar to the known HOG structure obtained from the group of faces used for training:
Using this method, you can easily find faces on any image:
If you want to complete this step yourself using Python and dlib, then there is a program that shows how to create and view HOG representations of images.
Step 2. Location and display of faces
So, we have identified the faces in our image. But now there is a problem: the same face, viewed from different directions, looks completely different for a computer:
People can easily see that both images refer to actor Will Ferrell, but computers will consider them as faces of two different people.
To take this into account, we will try to transform each image so that the eyes and lips are always in the same place on the image. Comparing faces in the next steps will be greatly simplified.
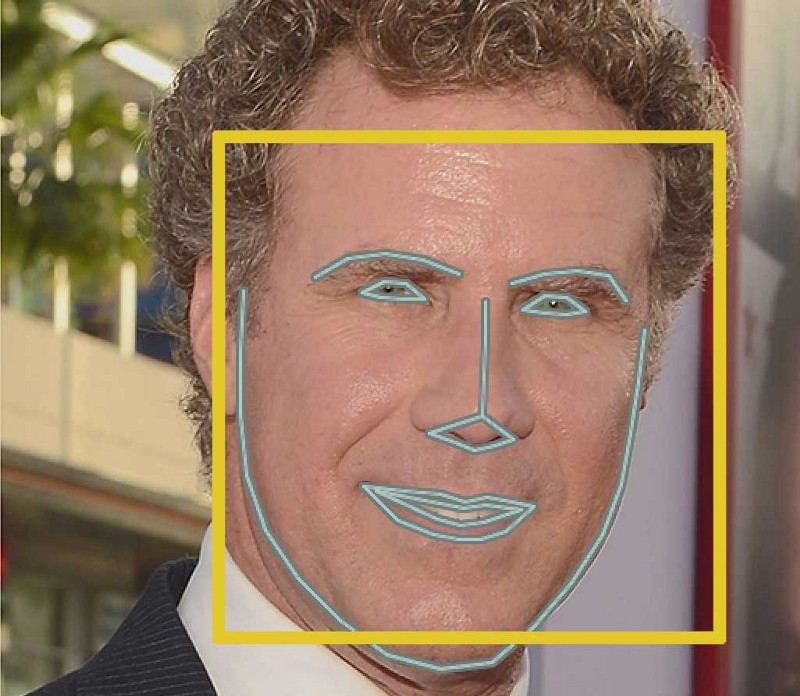
To do this, we use an algorithm called "assessment of anthropometric points . " There are many ways to do this, but we are going to use the approach proposed in 2014 by Wahid Casemi and Josephine Sullivan .
The main idea is that 68 specific points ( marks ) are found on each face - the protruding part of the chin, the outer edge of each eye, the inner edge of each eyebrow, etc. Then, the machine learning algorithm is set up to search for these 68 specific points on each face: we place
68 anthropometric points on each face.
The following is the result of the location of 68 anthropometric points on our test image: A
BASIC FOR A NEW PROFESSIONAL: this same method can be used to enter your own version 3D real-time face filters on Snapchat!
Now that we know where our eyes and mouth are, we’ll just rotate, scale and moveimage so that the eyes and mouth are centered as best as possible. We will not introduce any unusual 3D deformations, as they can distort the image. We will only do basic image transformations, such as rotation and scaling, which keep the lines parallel (the so-called affine transformations ):
Now, no matter how the face is rotated, we can center our eyes and mouth so that they are approximately in one position in the image. This will make the accuracy of our next step much higher.
If you want to try this step yourself using Python and dlib, then there is a program for finding anthropometric points anda program for converting images based on these points .
Step 3. Encoding Faces
Now we come to the core of the problem - the very distinction between faces. This is where the fun begins!
The simplest approach to face recognition is a direct comparison of the unknown face detected in step 2 with all already marked faces. If we find an already marked face, very similar to our unknown, this will mean that we are dealing with the same person. Sounds like a very good idea, doesn't it?
In fact, this approach poses a huge problem. A site like Facebook with billions of users and trillions of photographs cannot cycle through each previously marked face, comparing it with each new uploaded picture. It would take too much time. It is necessary to recognize faces in milliseconds, not hours.
We need to learn how to extract some basic characteristics from each person. Then we could obtain such characteristics from an unknown person and compare with the characteristics of known persons. For example, you can measure each ear, determine the distance between the eyes, the length of the nose, etc. If you have ever watched a television series about the work of the staff of the Las Vegas forensic laboratory ( “CSI: Crime Scene” ), then you know what it is about:
Like in the movies! So it seems like the truth!
The most reliable way to measure your face
Well, but what characteristics should be obtained from each person in order to build a database of famous people? Ear size? The length of the nose? Eye color? Anything else?
It turns out that characteristics that seem obvious to us people (for example, eye color) do not make sense for a computer that analyzes individual pixels in an image. Researchers have found that the most appropriate approach is to let the computer determine the characteristics that need to be collected. Deep learning allows you to better than what people can do to determine the parts of the face that are important for its recognition.
The solution is to train a deep convolutional neural network (which is exactly what we did in Issue 3) But instead of teaching the network to recognize graphic objects, as we did the last time, we are now going to teach it to create 128 characteristics for each person.
The learning process works when considering 3 face images at the same time:
1. Download the educational image of the face of a famous person
2. Download another image of the face of the same person
3. Download the image of the face of some other person
Then the algorithm considers the characteristics that it is currently creating for each of these three images. It slightly adjusts the neural network so that the characteristics created by it for images 1 and 2 are slightly closer to each other, and for images 2 and 3 a little further.
A single "built" learning step:
After repeating this step, millions of times for millions of images of thousands of different people, the neural network is able to reliably create 128 characteristics for each person. Any ten different images of the same person will give approximately the same characteristics.
Specialists in machine training call these 128 characteristics of each person a set of characteristics (attributes) . The idea of reducing complex input data, such as, for example, an image, to a list of computer-generated numbers has proved extremely promising in machine learning (in particular, for translations). This approach for the individuals we use was proposed in 2015 by Google researchers , but there are many similar approaches.
Encoding our face image
The process of training a convolutional neural network to derive sets of facial characteristics requires a large amount of data and high computer performance. Even on an expensive NVidia Telsa graphics card, it takes about 24 hours of continuous training to get good accuracy.
But if the network is trained, then you can create characteristics for any person, even for one that has never been seen before! Thus, this step needs to be done only once. Fortunately for us, the good people at OpenFace have already done this and have provided access to several trained networks that we can use immediately. Thanks to Brandon Amos and the team!
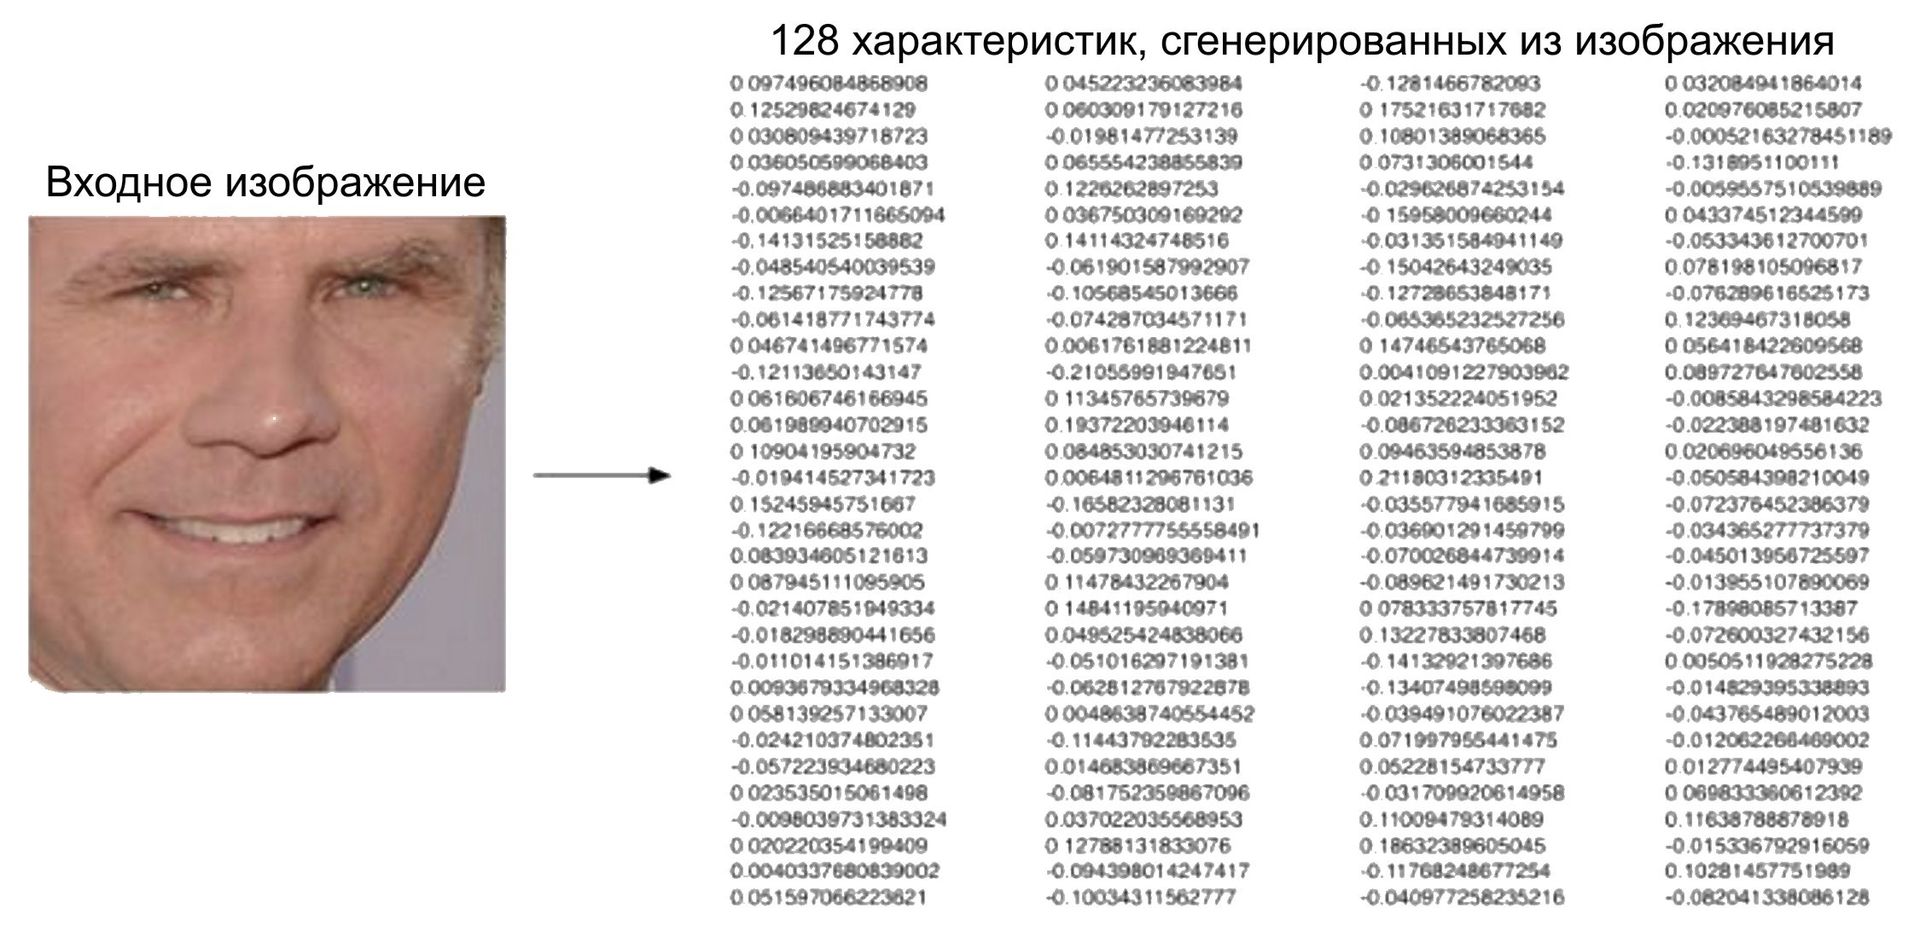
As a result, all that is required of us is to conduct our images of faces through their pre-trained network and get 128 characteristics for each person. Below are the characteristics for our test image:
But what specific parts of the face do these 128 numbers describe? It turns out that we have no idea about this. However, this does not really matter to us. We should only care that the network produces approximately the same numbers, analyzing two different images of the same person.
If you want to try this step yourself, OpenFace provides a Lua script that creates sets of characteristics of all the images in the folder and writes them to a csv file. You can run it as shown.
Step 4. Finding a person’s name after encoding a face
The last step is actually the easiest in the whole process. All that is required of us is to find a person in our database of famous persons who has characteristics that are closest to the characteristics of our test image.
This can be done using any basic machine learning classification algorithm. No special deep learning techniques are required. We will use a simple linear SVM classifier , but many other classification algorithms can be applied.
We only need to train a classifier that can take the characteristics of the new test image and tell which famous person has the best fit. The operation of such a classifier takes milliseconds. The result of the classifier is the name of the person!
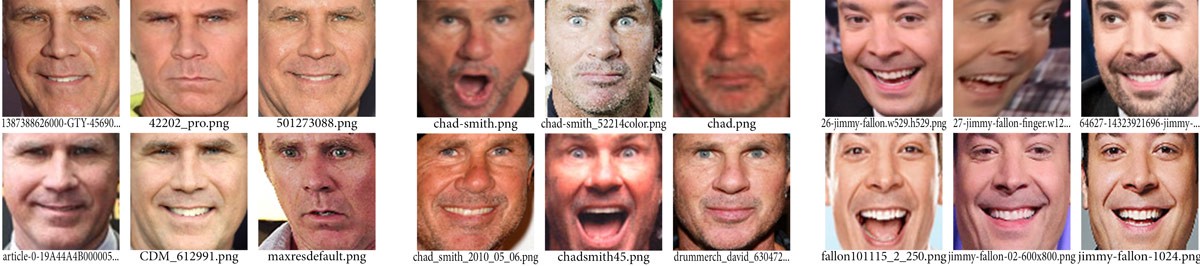
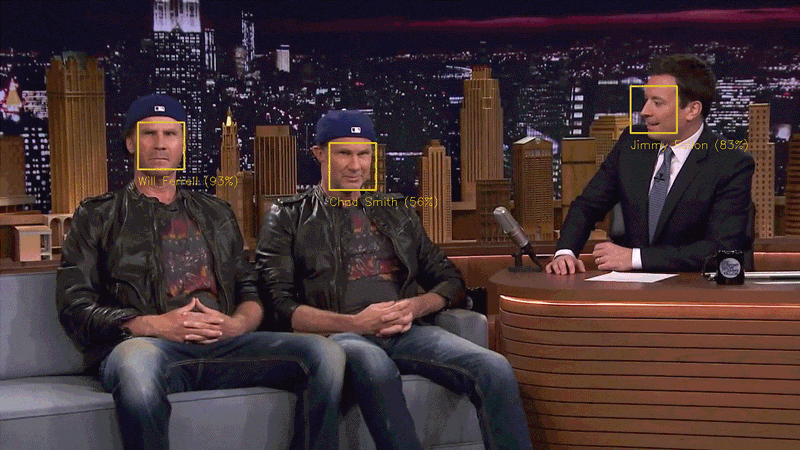
Let's test our system. First of all, I trained the classifier using character sets from about 20 images of Will Ferrell, Chad Smith and Jimmy Falon:
Oh, these are amazing pictures for learning!
Then I drove a classifier on every frame of the famous YouTube video, where on a Jimmy Fallon show, Will Ferrell and Chad Smith pretend to be each other : It
worked! And look how great it worked for people from many different directions - even in profile!
Doing the whole process on your own
Consider the required steps:
1. Process the image using the HOG algorithm to create a simplified version of the image. In this simplified image, find the area that is most similar to the created HOG representation of the face.
2. Determine the position of the face by setting the main anthropometric points on it. After positioning these anthropometric points, use them to transform the image to center the eyes and mouth.
3. Pass the centered image of the face through the neural network, trained to determine the characteristics of the face. Save the received 128 characteristics.
4. After reviewing all the faces whose characteristics were taken earlier, determine the person whose facial characteristics are closest to those obtained. It is done!
Now that you know how all this works, look through the instructions from the very beginning to the end on how to carry out the entire face recognition process on your own computer using OpenFace :
Before you start
Make sure Python, OpenFace, and dlib are installed. You can install them manually or use a pre-configured container image in which all of this is already installed:
docker pull bamos/openface
docker run -p 9000:9000 -p 8000:8000 -t -i bamos/openface /bin/bash
cd /root/openface
Professional advice for a novice: if you use Docker on OSX, you can make the OSX / Users / folder visible inside the container image, as shown below:
docker run -v /Users:/host/Users -p 9000:9000 -p 8000:8000 -t -i bamos/openface /bin/bash
cd /root/openface
Then you can access all your OSX files inside the container image on / host / Users / ...
ls /host/Users/Step 1
Create a folder with a name
./training-images/in the openface folder.mkdir training-imagesStep 2
Create a subfolder for each person you want to recognize. For instance:
mkdir ./training-images/will-ferrell/
mkdir ./training-images/chad-smith/
mkdir ./training-images/jimmy-fallon/
Step 3
Copy all the images of each person into the corresponding subfolders. Make sure that each image has only one face. It is not necessary to crop the image around the face. OpenFace will do this automatically.
Step 4
Run openface scripts from the openface root directory:
Position detection and alignment must first be performed:
./util/align-dlib.py ./training-images/ align outerEyesAndNose ./aligned-images/ --size 96As a result, a new subfolder will be created
./aligned-images/with a cropped and aligned version of each of your test images. Then create views from the aligned images:
./batch-represent/main.lua -outDir ./generated-embeddings/ -data ./aligned-images/The subfolder
./generated-embeddings/will contain a csv file with feature sets for each image. Train your face detection model:
./demos/classifier.py train ./generated-embeddings/A new file with the name will be created
./generated-embeddings/classifier.pk. This file contains the SVM model that will be used to recognize new faces. From this moment, you have a working face recognition!
Step 5. Recognize the faces!
Take a new picture with an unknown face. Pass it through the classifier script, such as the following:
./demos/classifier.py infer ./generated-embeddings/classifier.pkl your_test_image.jpgYou should get something like this warning:
=== /test-images/will-ferrel-1.jpg ===
Predict will-ferrell with 0.73 confidence.
Here, if you wish, you can configure the python script
./demos/classifier.py. Important notes:
• If the results are unsatisfactory, try adding a few more images for each person in step 3 (especially images from different directions).
• This script will always issue a warning, even if it does not know this person. In actual use, it is necessary to check the level of confidence and remove warnings with a low level of confidence, since they are most likely incorrect.