Add depth to 2D sprites using hand-drawn normal maps
- Transfer

Pixel art is eternal, but this does not mean that the tools and techniques for working with it should remain at the level of 1993.
British game developer Cardboard Sword is working on a two-dimensional stealth platformer The Siege and the Sandfox , created in Unreal Engine 4 with Paper2D. The team publishes a series of development diaries introducing other developers on how to use these tools in their own games.
One of the main technical features of The Siege and the Sandfox is the use of hand-drawn tilesets and sprites with normal maps, which allow using three-dimensional lighting methods in this game with a fairly traditional two-dimensional pixel art.
One of the art directors of Cardboard Sword, Kate Duke-Cox, recently told Gamasutra how the company came to use this technique, why it fits the game, and how you can apply these techniques in your own 2D games.
Add a sense of depth
What are the advantages of normal maps compared to traditional flat lighting in a 2D game?
Kate Duke-Cox : the task of the art director is entirely devoted to finding an individual style and achieving the desired effect. We wanted our art to be rich, deep and “bulging”. Normals allowed to achieve this goal, giving a sense of form and strength to the world and its objects.
This image posted by Keith Duke-Cox on Twitter in August 2017 is a terrific example of the implementation of technology.
For example, using normals gives hazards a more tangible appearance. Light reacts more correctly to surfaces, and without normals, a feeling of a very flat “sheet of paper” was created.
When used properly, the normal map can add a sense of depth and weight to objects in the scene that flat 2D images cannot achieve.
The use of normal maps is a visual solution rather than a functional gameplay choice. We wanted the player to immerse himself deeper into the environment, to parkour to give a sense of depth and physical certainty, and not the impression of cut-out paper drawings inherent in some pixel games. If you stick to bright and simple colors or retro-style, then flat lighting is fine.
What really attracted you to using normal maps for 2D lighting? Where did you learn about it, or where did you see the qualitative implementation?
Applying normals to 2D graphics was a natural continuation of their use in 3D, which was not possible on the old systems that inspired us to create style. Of course, we were not the first to use them in modern pixel-art games, but the results were different.
At first, we abandoned the use of this effect, because in the many effects we have seen, it destroyed the charm and aesthetics of pixel art, giving it too much metallic luster. In our first attempt to create hand-drawn normal normal maps for pixel art, we had very detailed normals - this is their main goal in 3D graphics. But each tile in our game is only 32x32 pixels in size, so there are not too many pixels left to transfer information about the surface. As a result, the result turned into a noisy chaos.
But then we saw Gwenael Masse's art for Dead Cells , in which pixel art with normals was done very well, and decided to give it a second chance. [Here is the articleon the use of 3D models in this two-dimensional game.] This time we did not use the normal map for small details of surfaces that can be seen in 3D graphics. Now the normal map was used for “sculpturing” large pixel art forms.
Sculpting Forms with Normal Maps
Can you briefly talk about the development of an asset, especially about the differences from creating a similar simple 2D sprite asset?
Usually, pixel art is drawn based on the “common” direction of light. In our case, for most sprites and foreground tiles, the main light fell from above and slightly to the right, while the background tiles had a more general “camera light” for simulating dark rooms and not to distract the player from the foreground.
This meant that when it came to rendering normals for sprites and tiles, the details and materials of the surfaces were already selected. We found that in fact this approach worked very well. It meant that all the shapes and details that we had to imitate in the normals were already very obvious and noticeable.
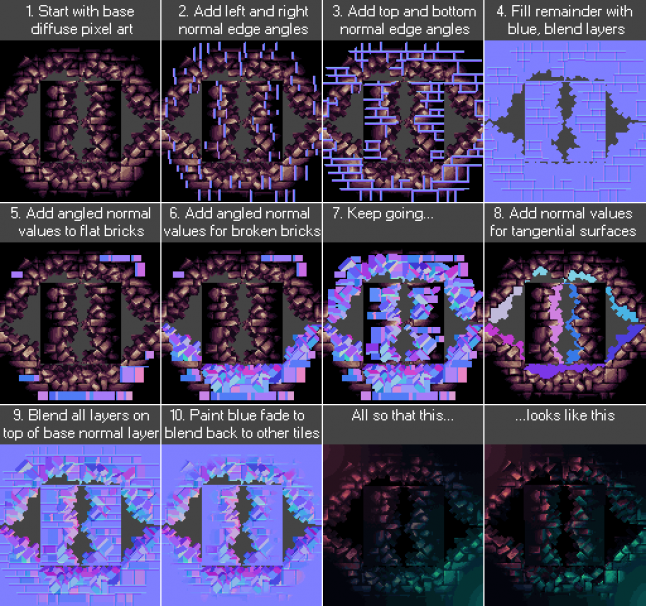
Depending on the nature of the sprite to which the normals were added, we used a combination of drawing colors for normal angles from the “sphere of normal maps” (in fact, this is a sphere serving as a palette of all possible angles that can be drawn on the tangent normal map) and drawing in separate RGB channels grayscale with other tools such as ND, Crazybump or AwesomeBump. They helped with some forms and mixed together different parts of the normals correctly.
We used Nvidia TextureTools for Photoshop to adjust / normalize the vectors after drawing the normal map.
What are the advantages of such a manual drawing of normal maps compared to off-the-shelf tools like Sprite DLight?
When we began to look for ways to create normals for a 2D object without a high-poly model, we found applications that, to a certain extent, perform this task.
We studied tutorials to find out how to create normal maps, but we found out that they either make assumptions based on pixel color values, which gives not entirely accurate or completely incorrect results, or require the presence of several images in gray gradations to simulate light from different directions, essentially creating your own normal map channels.
The program cannot know what height and angle a pixel has in a sprite, especially when it is a pixel-art game with a very limited palette, where one color is used to denote the set of depths and angles of an object. It is worth adding, however, that we actually did not use these programs, but simply evaluated the prospects for their use.
There are two standard methods for accelerated automated generation of normal maps - Grayscale Conversion and Shape Recognition. We conducted tests with all three methods and found that the manual drawing method definitely gives the best results.
Grayscale Conversion and Shape Recognition can create effects better than shown here, but even with significant labor and time costs, they are still not as accurate and good as drawing by hand.
Using normal maps in your own 2D games
What advice can you give to developers who want to go your way?
Creating accurate 2D normals manually is not an easy task. Work on all foreground and background tilesets took about 3 man-months. Therefore, for quality results, be prepared to invest a lot of time.
Quickly created normals for 2D graphics, especially pixel art, usually look bad. Systems like “create a solution with one button” often lead to the creation of weak assets, which, when rendered in a game, look even worse than an unlit pixel-art. Test on a small part of the game (a small sample from the foreground, background, objects and characters) and find out what suits you best and the style of your game.
On the other hand, from the point of view of rendering, the costs of adding normals to our world are very small. Practically for the whole game world we had two normal maps of 2k in size. They do not take up much memory, and a few additional textures for the normal rendering pass do not have much effect on rendering calls. Lighting sources only dynamically perform lighting, they do not cast shadows on everything in the game, therefore they are also very low-cost.
If you do not yet understand how the tangent space normals work and what they mean, then even a brief study will allow you to draw them much easier.
To use this method, you had to adapt existing assets, and not to implement it from the beginning of development. Can you give advice to those who are trying to supplement the already prepared sprite graphics with normal maps?
If we had to do it again, we would have done everything the same way: first create diffuse graphics, and then draw normals using pixel art as a reference.
Perhaps we would draw some objects a little differently. There were problems in pixel art when one pixel could indicate, for example, a protruding nail or rivet, but this pixel in the normal map can correspond to only one corner, so we could make some elements larger to better convey the corners in the image.
If you use a lower resolution than we use in our tilesets (32x32), then perhaps the size will limit you too much. With a resolution of 16x16 or 8x8, you probably will not be able to transfer the form or volume only if one tile is not one big piece, for example a stone or concrete block.
In pixel art, clear gradients do not look as good as solid surfaces with sharp corners. If your graphic style allows, then I suggest using more angles than gradients on normal surfaces. For example, if you have a barrel, then make so that each individual board of which it consists has its own angle, and the barrel itself is octagonal rather than round.
Do you have any advice for developers who want to use these techniques not in Unreal? For example, in Unity or in Gamemaker.
Before starting work, check the orientation of the normal map. The approach to drawing normals is the same for all engines, only what each color channel of the card means is different.
Usually in different engines only the Y axis (green channel) changes. Unreal uses the Y-axis normals of the DirectX coordinate system, but in Unity, the Y + normals of the OpenGL right-side coordinate system are used (as we see it), so the green channel must be reversed.
However, if you drew wrong, then most often it is enough just to turn the green channel. You will see that the channel is confused if the image is lit opposite to the expected result.