OpenSceneGraph: build from source and Hello World
- Tutorial

Introduction
OpenSceneGraph (hereinafter OSG) is an open cross-platform framework written in C ++ and a graphical engine that provides the programmer with an object interface to OpenGL. In our country, this engine is not particularly popular, even on Habré, I saw only one more or less decent publication about it . OSG is used abroad a lot where, for example, it is the basis for the free FlightGear flight simulator , there is an open implementation of the game Morrowind, called OpenMW, the development of which is also transferred to OSG from the Ogre engine . The Russian-language documentation on it is vanishingly small, and among the English-speaking only a series of books from developers can be noted: OpenSceneGraph 3.0. Beginner's Guideand OpenSceneGraph 3. Cookbook .
Nevertheless, the engine is quite interesting for the following reasons:
- Open cross-platform implementation in C ++.
- Modular architecture.
- Extensibility due to built-in plugin system.
- The possibility of multi-threaded processing of graphic data and built-in tools for its implementation
- Dynamic memory management via smart pointer mechanism
I think that Habr's readers will be interested in getting more familiar with this project. Not be superfluous and the completion of the Russian-language knowledge base on OSG. All materials that will be published by me on this topic are based on the book OpenSceneGraph 3.0. Beginner's Guide , but not its translation, but rather the creative processing of the material presented there. If you are interested in this topic, please under the cat.
The only sure way to get the latest version of OSG on your machine is to build a library from source. The existing binary installer for Windows is oriented towards the MS Visual C ++ compiler. I, for my projects, need to use the GCC compiler, or rather its MinGW32 version, which is included in the Qt framework development tools supply. Thus, we will need:
- Qt framework installed and configured with MinGW32 compiler version 5.3 and IDE QtCreator
- Git Client for Windows
- Make utility for windows
It is assumed that the reader is familiar with the QtCreator IDE and the qmake build system used in Qt projects. In addition, it is assumed that the reader is familiar with the basics of using the Git version control system and has non-zero programming skills in principle.
1. Getting the OpenSceneGraph source code
Create a directory on your hard drive where we will build OSG, for example, on the D: \ OSG path.

We will go to this directory and drag the source files from the OSG official repository on Github
D:\OSG> git clone https://github.com/openscenegraph/OpenSceneGraph.gitThe length of the download process depends on how wide your Internet access channel is. Sooner or later we will get a local copy of the OSG repository.
After downloading the sources, we will create a number of directory build-win32-debug.

In this directory we will build the OSG debugging kit. But before
2. Configure cmake
For cmake to work correctly, we need to edit the install-cmake \ share \ cmake-3.13 \ Modules \ CMakeMinGWFindMake.cmake file . By default it looks like this.
# Distributed under the OSI-approved BSD 3-Clause License.  See accompanying# file Copyright.txt or https://cmake.org/licensing for details.find_program(CMAKE_MAKE_PROGRAM mingw32-make.exe PATHS
  "[HKEY_LOCAL_MACHINE\\SOFTWARE\\Microsoft\\Windows\\CurrentVersion\\Uninstall\\MinGW;InstallLocation]/bin"
  c:/MinGW/bin /MinGW/bin
  "[HKEY_CURRENT_USER\\Software\\CodeBlocks;Path]/MinGW/bin"
  )
find_program(CMAKE_SH sh.exe )
if(CMAKE_SH)
  message(FATAL_ERROR "sh.exe was found in your PATH, here:\n${CMAKE_SH}\nFor MinGW make to work correctly sh.exe must NOT be in your path.\nRun cmake from a shell that does not have sh.exe in your PATH.\nIf you want to use a UNIX shell, then use MSYS Makefiles.\n")
  set(CMAKE_MAKE_PROGRAM NOTFOUND)
endif()
mark_as_advanced(CMAKE_MAKE_PROGRAM CMAKE_SH)
Let's comment out a few lines in it, so that the utility does not try to search for our Unix shell in the system, and, having not found it, ends with an error
# Distributed under the OSI-approved BSD 3-Clause License.  See accompanying# file Copyright.txt or https://cmake.org/licensing for details.find_program(CMAKE_MAKE_PROGRAM mingw32-make.exe PATHS
  "[HKEY_LOCAL_MACHINE\\SOFTWARE\\Microsoft\\Windows\\CurrentVersion\\Uninstall\\MinGW;InstallLocation]/bin"
  c:/MinGW/bin /MinGW/bin
  "[HKEY_CURRENT_USER\\Software\\CodeBlocks;Path]/MinGW/bin"
  )
#find_program(CMAKE_SH sh.exe )#if(CMAKE_SH)#  message(FATAL_ERROR "sh.exe was found in your PATH, here:\n${CMAKE_SH}\nFor MinGW make to work correctly sh.exe must NOT be in your path.\nRun cmake from a shell that does not have sh.exe in your PATH.\nIf you want to use a UNIX shell, then use MSYS Makefiles.\n")#  set(CMAKE_MAKE_PROGRAM NOTFOUND)#endif()mark_as_advanced(CMAKE_MAKE_PROGRAM CMAKE_SH)
3. Building and installing debug and release versions of the engine
Now we run the cmd command interpreter, the shortcut to which is located on the path Start-> Programs-> Qt-> Qt 5.11.2-> Qt 5.11.2 for Desktop (MinGW 5.3.0 32bit). A

running command line session sets up the whole environment required for work tools assembly mingw32. Moving to the OSG source directory
C:\Qt\Qt5.11.2\5.11.2\mingw53_32>D:
D:\> cd OSG\build-win32-debug
Give a command
D:\OSG\build-win32-debug>cmake -G "MinGW Makefiles" -DCMAKE_INSTALL_PREFIX=E:\Apps\OSG -DCMAKE_BUILD_TYPE=DEBUG ../OpenSceneGraph
Let us analyze the meaning of the parameters in more detail:
- -G "MinGW Makefiles" - indicates that you need to generate a Makefile for the mingw32-make utility
- -DCMAKE_INSTALL_PREFIX = E: \ Apps \ OSG - set the path that OSG will be installed on
- -DCMAKE_BUILD_TYPE = DEBUG - indicates that the debug version of the engine should be built.
Running the command checks the readiness of the environment for the assembly, generates the assembly script and the next exhaust
Cmake exhaust when setting up an OSG assembly
-- The C compiler identification is GNU 5.3.0-- The CXX compiler identification is GNU 5.3.0-- Check for working C compiler: C:/Qt/Qt5.11.2/Tools/mingw530_32/bin/gcc.exe-- Check for working C compiler: C:/Qt/Qt5.11.2/Tools/mingw530_32/bin/gcc.exe -- works-- Detecting C compiler ABI info-- Detecting C compiler ABI info - done-- Detecting C compile features-- Detecting C compile features - done-- Check for working CXX compiler: C:/Qt/Qt5.11.2/Tools/mingw530_32/bin/g++.exe-- Check for working CXX compiler: C:/Qt/Qt5.11.2/Tools/mingw530_32/bin/g++.exe -- works-- Detecting CXX compiler ABI info-- Detecting CXX compiler ABI info - done-- Detecting CXX compile features-- Detecting CXX compile features - done-- Looking for pthread.h-- Looking for pthread.h - found-- Looking for pthread_create-- Looking for pthread_create - found-- Found Threads: TRUE-- Found OpenGL: opengl32-- Could NOT find EGL (missing: EGL_INCLUDE_DIR)-- Checking windows version...-- Performing Test GL_HEADER_HAS_GLINT64-- Performing Test GL_HEADER_HAS_GLINT64 - Failed-- Performing Test GL_HEADER_HAS_GLUINT64-- Performing Test GL_HEADER_HAS_GLUINT64 - Failed-- 32 bit architecture detected-- Could NOT find Freetype (missing: FREETYPE_LIBRARY FREETYPE_INCLUDE_DIRS)-- Could NOT find JPEG (missing: JPEG_LIBRARY JPEG_INCLUDE_DIR)-- Could NOT find Jasper (missing: JASPER_LIBRARIES JASPER_INCLUDE_DIR JPEG_LIBRARIES)-- Could NOT find LibXml2 (missing: LIBXML2_LIBRARY LIBXML2_INCLUDE_DIR)-- Could NOT find ZLIB (missing: ZLIB_INCLUDE_DIR)-- Could NOT find ZLIB (missing: ZLIB_INCLUDE_DIR)-- Could NOT find GDAL (missing: GDAL_LIBRARY GDAL_INCLUDE_DIR)-- Could NOT find PkgConfig (missing: PKG_CONFIG_EXECUTABLE)-- Could NOT find CURL (missing: CURL_LIBRARY CURL_INCLUDE_DIR)-- Trying to find DCMTK expecting DCMTKConfig.cmake-- Trying to find DCMTK expecting DCMTKConfig.cmake - failed-- Trying to find DCMTK relying on FindDCMTK.cmake-- Please set DCMTK_DIR and re-run configure (missing: DCMTK_config_INCLUDE_DIR DCMTK_dcmdata_INCLUDE_DIR DCMTK_dcmimage_INCLUDE_DIR DCMTK_dcmimgle_INCLUDE_DIR DCMTK_dcmjpeg_INCLUDE_DIR DCMTK_dcmjpls_INCLUDE_DIR DCMTK_dcmnet_INCLUDE_DIR DCMTK_dcmpstat_INCLUDE_DIR DCMTK_dcmqrdb_INCLUDE_DIR DCMTK_dcmsign_INCLUDE_DIR DCMTK_dcmsr_INCLUDE_DIR DCMTK_dcmtls_INCLUDE_DIR DCMTK_ofstd_INCLUDE_DIR DCMTK_oflog_INCLUDE_DIR)-- Could NOT find PkgConfig (missing: PKG_CONFIG_EXECUTABLE)-- Could NOT find GStreamer (missing: GSTREAMER_INCLUDE_DIRS GSTREAMER_LIBRARIES GSTREAMER_VERSION GSTREAMER_BASE_INCLUDE_DIRS GSTREAMER_BASE_LIBRARIES GSTREAMER_APP_INCLUDE_DIRS GSTREAMER_APP_LIBRARIES GSTREAMER_PBUTILS_INCLUDE_DIRS GSTREAMER_PBUTILS_LIBRARIES) (found version "")-- Could NOT find SDL2 (missing: SDL2_LIBRARY SDL2_INCLUDE_DIR)-- Could NOT find SDL (missing: SDL_LIBRARY SDL_INCLUDE_DIR)-- Could NOT find PkgConfig (missing: PKG_CONFIG_EXECUTABLE)-- Could NOT find PkgConfig (missing: PKG_CONFIG_EXECUTABLE)-- Could NOT find PkgConfig (missing: PKG_CONFIG_EXECUTABLE)-- Could NOT find JPEG (missing: JPEG_LIBRARY JPEG_INCLUDE_DIR)-- Could NOT find ZLIB (missing: ZLIB_INCLUDE_DIR)-- Could NOT find PNG (missing: PNG_LIBRARY PNG_PNG_INCLUDE_DIR)-- Could NOT find TIFF (missing: TIFF_LIBRARY TIFF_INCLUDE_DIR)-- g++ version 5.3.0-- Performing Test _OPENTHREADS_ATOMIC_USE_GCC_BUILTINS-- Performing Test _OPENTHREADS_ATOMIC_USE_GCC_BUILTINS - Success-- Performing Test _OPENTHREADS_ATOMIC_USE_MIPOSPRO_BUILTINS-- Performing Test _OPENTHREADS_ATOMIC_USE_MIPOSPRO_BUILTINS - Failed-- Performing Test _OPENTHREADS_ATOMIC_USE_SUN-- Performing Test _OPENTHREADS_ATOMIC_USE_SUN - Failed-- Performing Test _OPENTHREADS_ATOMIC_USE_WIN32_INTERLOCKED-- Performing Test _OPENTHREADS_ATOMIC_USE_WIN32_INTERLOCKED - Success-- Performing Test _OPENTHREADS_ATOMIC_USE_BSD_ATOMIC-- Performing Test _OPENTHREADS_ATOMIC_USE_BSD_ATOMIC - Failed-- Configuring done-- Generating done-- Build files have been written to: D:/OSG/build-win32-debugtells us that you can proceed to the assembly. Give a command
D:\OSG\build-win32-debug>mingw32-make -j9
You can, as in my example, specify the number of threads of the assembly, if you have a multi-core processor (-j switch). The build process begins, which takes about eight minutes on my computer.

After the build is completed, install the library
D:\OSG\build-win32-debug> mingw32-make install
after executing the command, we find the library installed by the path

we set in advance. Now we will assemble the release version of the engine by creating another build directory
D:\OSG\build-win32-debug>cd ..
D:\OSG> mkdir build-win32-release
D:\OSG>cd build-win32-release
D:\OSG\build-win32-release> cmake -G "MinGW Makefiles" -DCMAKE_INSTALL_PREFIX=E:\Apps\OSG ../OpenSceneGraph
D:\OSG\build-win32-release> mingw32-make -j9
D:\OSG\build-win32-release> mingw32-make install
4. Setting Environment Variables
The location of the OSG libraries after installation can be any - it is determined by the wishes of a particular user and his capabilities for placing files on the computer. At the same time, when setting up a specific project that uses the given library, it requires that it strives for some unification, abstracting from the specific location of the libraries.
Create several system environment variables indicating the paths to libraries, header files and OSG plugins. In my example, it will look like this.

You need to create variables whose names are circled in red in the screenshot. After creating the variables, in order for them to be visible by the development tools, in particular, QtCreator needs to be at least logged in to the system (exit and log in as the current user) or, perhaps, to reboot the system (this is Windows!)
After this, the installation procedure OSG on our computer can be considered finished.
5. Writing Hello World in QtCreator
Familiarity with the graphics engine OpenSceneGraph begin with the simplest example, as is customary in programming with some "Hello world!".
Before writing any code, set up our project for the qmake build system, which we will use throughout the cycle of articles. In the file system location of interest to us, create the following directory structure
OSG-lessons/
	|-data/|-OSG-lessons/||-hello/|-include/|-src/
In the hello directory, create a file hello.pro with the following content
Full text hello.pro
Let us examine these letters in more detail.
TEMPLATE = app
TARGET = hello
DESTDIR = ../../bin
win32 {
    OSG_LIB_DIRECTORY = $$(OSG_BIN_PATH)
    OSG_INCLUDE_DIRECTORY = $$(OSG_INCLUDE_PATH)
    CONFIG(debug, debug|release) {
        TARGET = $$join(TARGET,,,_d)
        LIBS += -L$$OSG_LIB_DIRECTORY -losgd
        LIBS += -L$$OSG_LIB_DIRECTORY -losgViewerd
        LIBS += -L$$OSG_LIB_DIRECTORY -losgDBd
        LIBS += -L$$OSG_LIB_DIRECTORY -lOpenThreadsd
    } else {
        LIBS += -L$$OSG_LIB_DIRECTORY -losg
        LIBS += -L$$OSG_LIB_DIRECTORY -losgViewer
        LIBS += -L$$OSG_LIB_DIRECTORY -losgDB
        LIBS += -L$$OSG_LIB_DIRECTORY -lOpenThreads
    }
    INCLUDEPATH += $$OSG_INCLUDE_DIRECTORY
}
unix {
    CONFIG(debug, debug|release) {
        TARGET = $$join(TARGET,,,_d)
        LIBS += -losgd
        LIBS += -losgViewerd
        LIBS += -losgDBd
        LIBS += -lOpenThreadsd
    } else {
        LIBS +=  -losg
        LIBS +=  -losgViewer
        LIBS +=  -losgDB
        LIBS +=  -lOpenThreads
    }
}
INCLUDEPATH += ./include
HEADERS += $$files(./include/*.h)
SOURCES += $$files(./src/*.cpp)
Let us examine these letters in more detail.
TEMPLATE = app
TARGET = hello
DESTDIR = ../../bin
Variables define the project template (app), the name of the executable file (hello), and the directory where the executable file is placed after assembly.
win32 {
    OSG_LIB_DIRECTORY = $$(OSG_BIN_PATH)
    OSG_INCLUDE_DIRECTORY = $$(OSG_INCLUDE_PATH)
    CONFIG(debug, debug|release) {
        TARGET = $$join(TARGET,,,_d)
        LIBS += -L$$OSG_LIB_DIRECTORY -losgd
        LIBS += -L$$OSG_LIB_DIRECTORY -losgViewerd
        LIBS += -L$$OSG_LIB_DIRECTORY -losgDBd
        LIBS += -L$$OSG_LIB_DIRECTORY -lOpenThreadsd
    } else {
        LIBS += -L$$OSG_LIB_DIRECTORY -losg
        LIBS += -L$$OSG_LIB_DIRECTORY -losgViewer
        LIBS += -L$$OSG_LIB_DIRECTORY -losgDB
        LIBS += -L$$OSG_LIB_DIRECTORY -lOpenThreads
    }
    INCLUDEPATH += $$OSG_INCLUDE_DIRECTORY
}
Depending on the OS where the project is assembled, we define variables indicating the paths to the directories of libraries and OSG header files. This is where the OSG_BIN_PATH and OSG_INCLUDE_PATH environment variables come in handy - now it doesn't matter where the OSG library is installed. Anyone wishing to work with this project on their computer will simply register the corresponding environment variables in their system without editing the build script.
CONFIG(debug, debug|release) {
    TARGET = $$join(TARGET,,,_d)
    LIBS += -L$$OSG_LIB_DIRECTORY -losgd
    LIBS += -L$$OSG_LIB_DIRECTORY -losgViewerd
    LIBS += -L$$OSG_LIB_DIRECTORY -losgDBd
    LIBS += -L$$OSG_LIB_DIRECTORY -lOpenThreadsd
} else {
    LIBS += -L$$OSG_LIB_DIRECTORY -losg
    LIBS += -L$$OSG_LIB_DIRECTORY -losgViewer
    LIBS += -L$$OSG_LIB_DIRECTORY -losgDB
    LIBS += -L$$OSG_LIB_DIRECTORY -lOpenThreads
}
We write the script for assembly in unix-like OS
unix {
    CONFIG(debug, debug|release) {
        TARGET = $$join(TARGET,,,_d)
        LIBS += -losgd
        LIBS += -losgViewerd
        LIBS += -losgDBd
        LIBS += -lOpenThreadsd
    } else {
        LIBS +=  -losg
        LIBS +=  -losgViewer
        LIBS +=  -losgDB
        LIBS +=  -lOpenThreads
    }
}
Here we customize the name of the executable file and specify the libraries that should be linked with our program for various build options: both debug and release. OSG debug libraries have the suffix "d" after the file name. The suffix "_d" will be added to the executable file of the project in order to distinguish the debug version from the release version.
INCLUDEPATH += $$OSG_INCLUDE_DIRECTORY
INCLUDEPATH += ./include
HEADERS += $$files(./include/*.h)
SOURCES += $$files(./src/*.cpp)
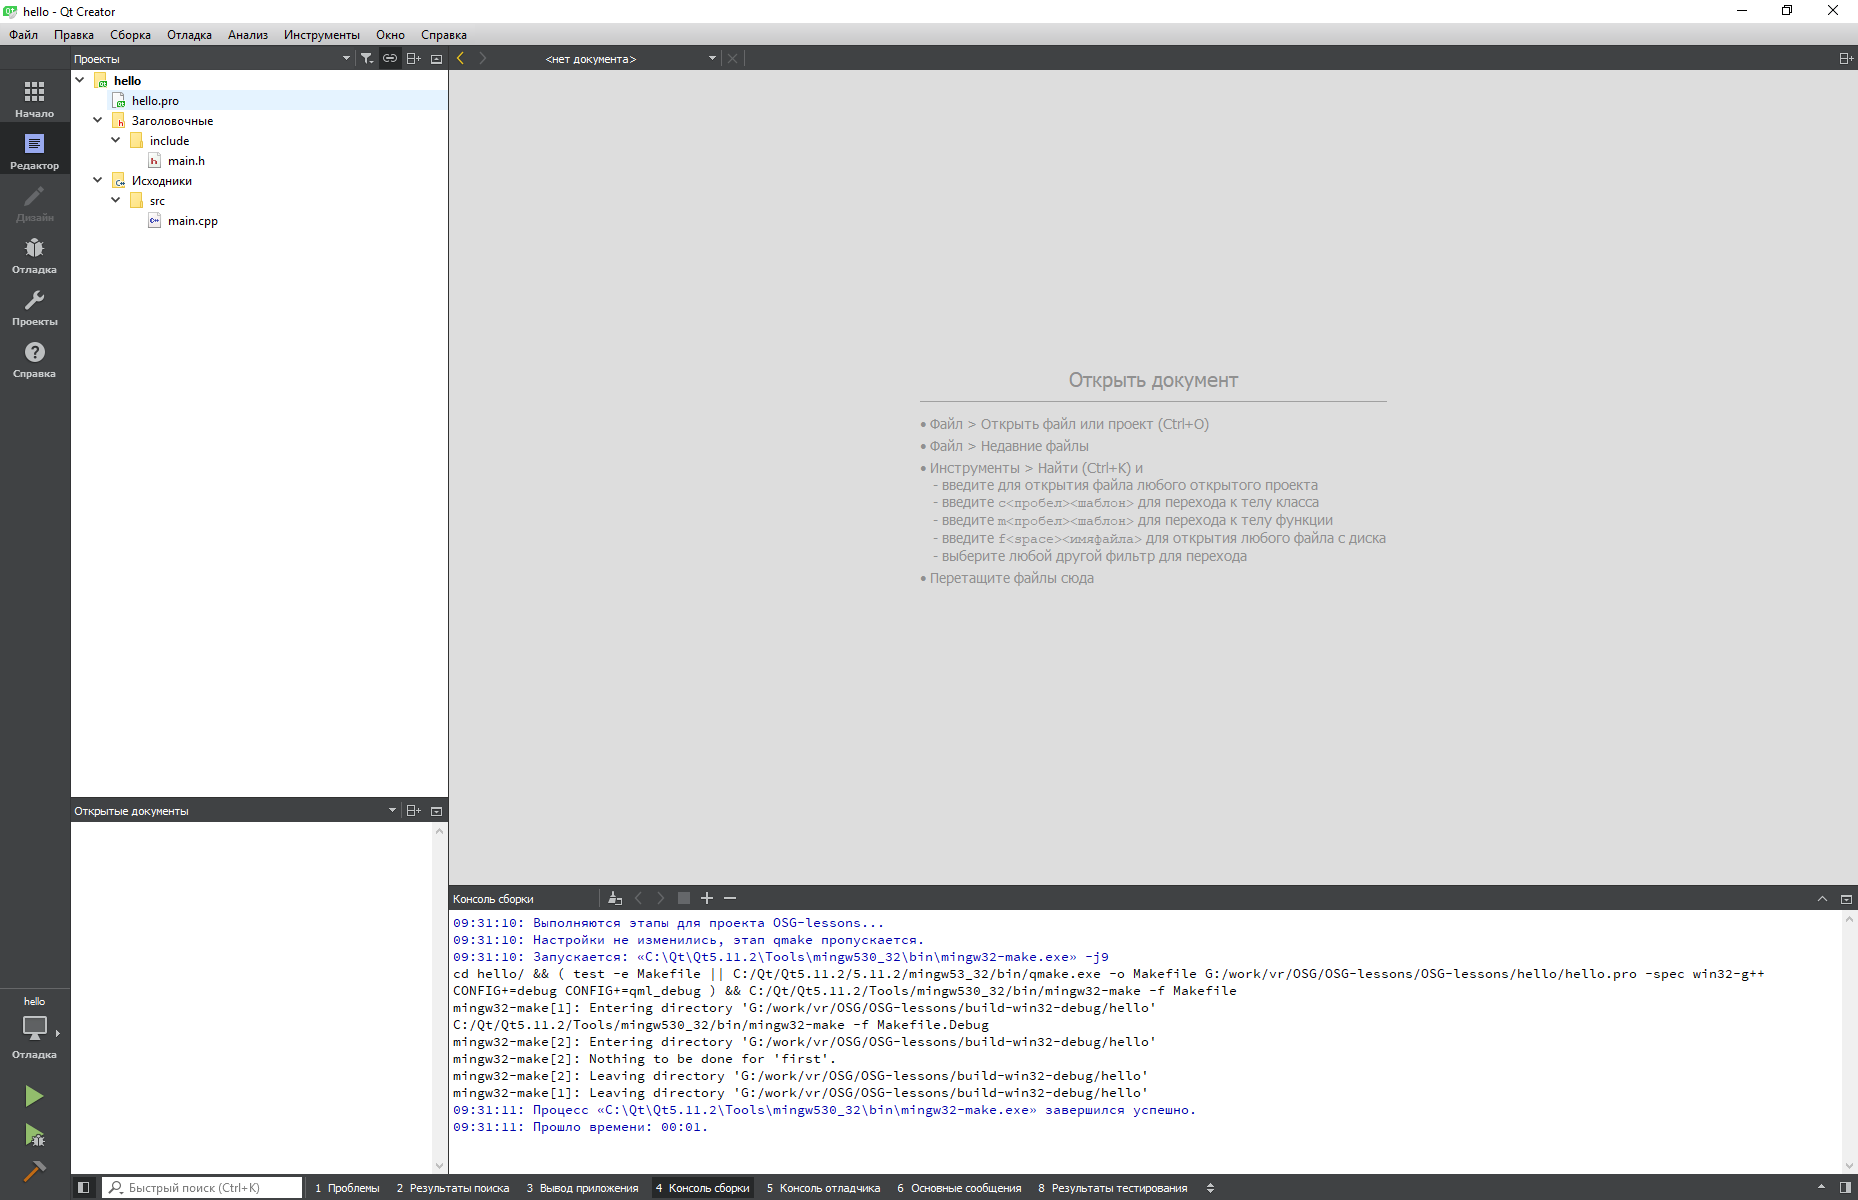
Finally, we define the search paths for header files and files included in the project tree. Create the main.h file in the include / directory, and the main.cpp file in the src / directory. Open this project in QtCreator and set it up as shown in the screenshot.

After opening the project, we will see the following picture.
We write this code in the main.h file.
#ifndef MAIN_H#define MAIN_H#include<osgDB/ReadFile>#include<osgViewer/Viewer>#endifNext, we implement the main body of the program in the main.cpp file.
#include"main.h"intmain(int argc, char *argv[]){
    (void) argc;
    (void) argv;
    osg::ref_ptr<osg::Node> root = osgDB::readNodeFile("../data/cessna.osg");
    osgViewer::Viewer viewer;
    viewer.setSceneData(root.get());
    return viewer.run();
}
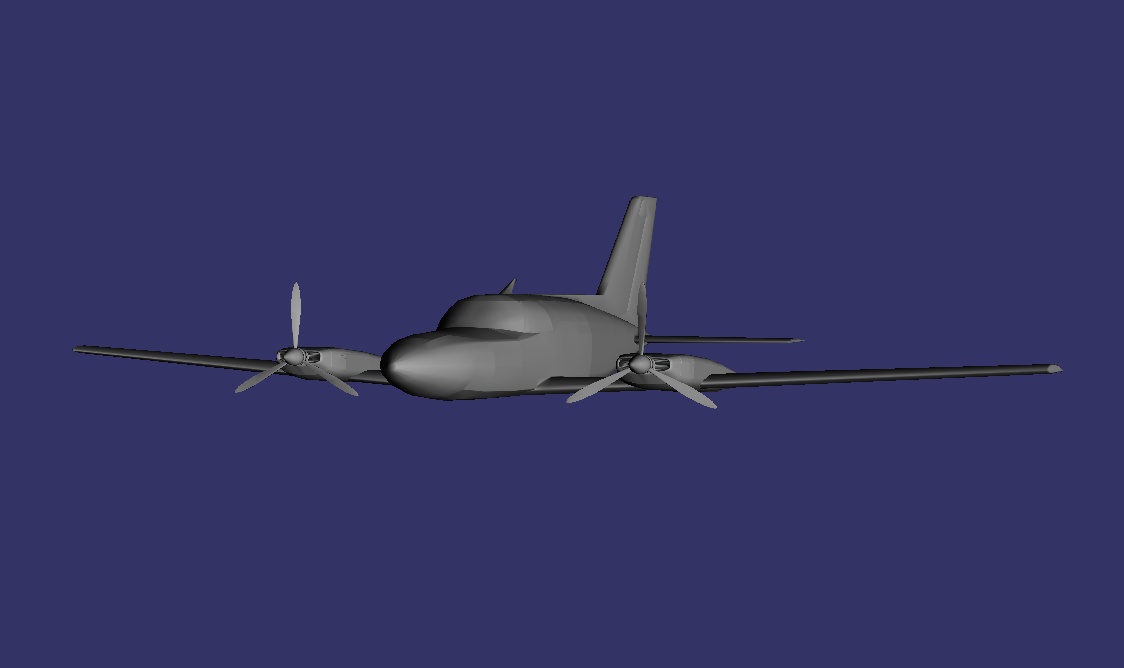
The file with the model aircraft must be copied to the data / directory. This file, as well as much of what will be used in this series of articles, can be downloaded from the OpenSceneGraph-Data repository.
After compiling and running, we will get something like this.
The first two lines of our code
(void) argc;
(void) argv;
mark the input parameters of the function main () as unused in order to avoid the compiler warning. Next, create a root node of the scene, which is the model of the aircraft, loaded from the file cessna.osg
osg::ref_ptr<osg::Node> root = osgDB::readNodeFile("../data/cessna.osg");
Then an instance of the class osgViewer :: Viewer is created - the so-called "viewer" - an object that controls the display of the scene on the screen. Scene data is transmitted to the viewer.
viewer.setSceneData(root.get());
and the scene rendering loop starts
return viewer.run();
This basic code already contains a number of basic concepts used in OSG. But talk about them will go a little later.
Conclusion
The full source code of the examples described hereinafter can be obtained here . I hope that this publication interested readers, to be continued ...