Introduction to Firebase: Writing a Simple Social Application on Swift
Due to Facebook’s unexpected decision to close Parse, many developers wondered what to use instead. Today it’s almost impossible to imagine a fully autonomous application that would be useful to everyone. In this regard, iOS developers in their work use the tools and resources provided by Apple to access data. Backend-as-a-service, or BaaS for short, is a terrific tool for developers.
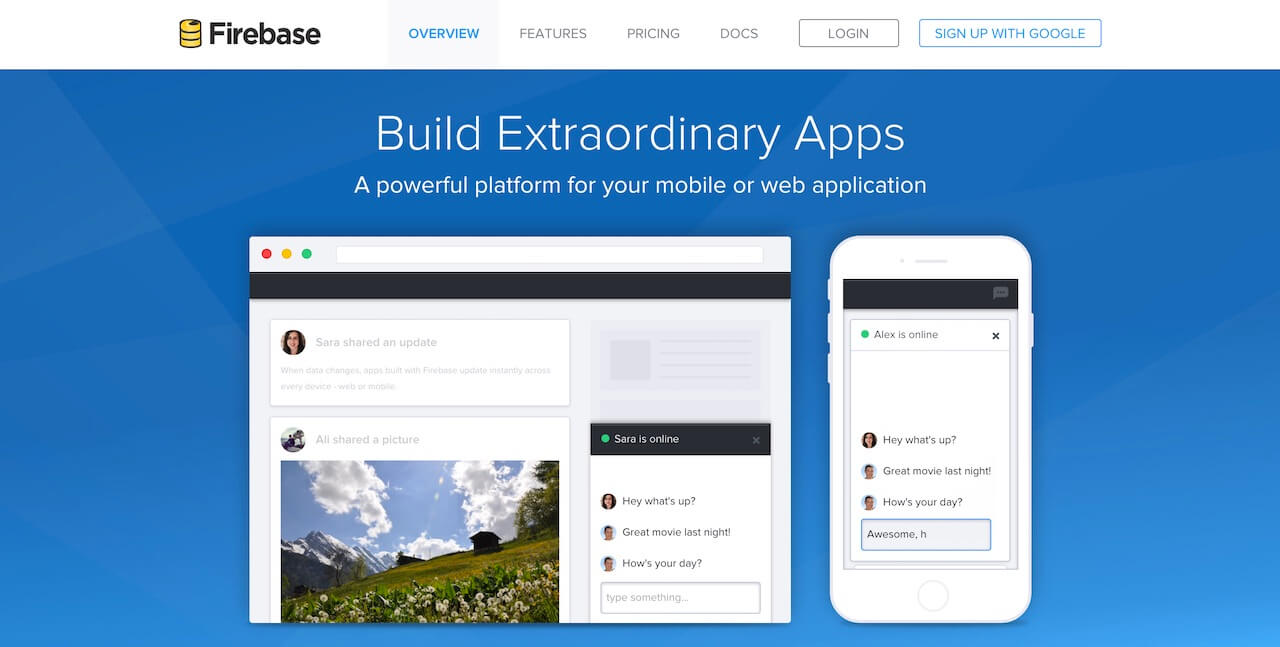
Among the best and most popular BaaSs we can single out Firebase from Google. Essentially, Firebase is absolutely amazing in performance, implementation, and operation. Firebase serves as a database that changes in real time and stores data in JSON. Any changes in the database are immediately synchronized between all clients, or devices that use the same database. In other words, updates in Firebase happen instantly.
Along with storage, Firebase also provides user authentication, and therefore all data is transmitted over a secure SSL connection. We can choose any combination of email and password for authentication, whether it be Facebook, Twitter, GitHub, Google, or something else.
In addition to the iOS SDK, Firebase has an SDK for Android and JavaScript. All platforms can use one database.
It's hard to imagine that Firebase with all these features is a budget solution.
At the time of this writing, in the free package, Firebase can handle up to 100 simultaneous connections. This is quite enough for the popular application. For $ 49 per month, there are no restrictions on network activity.
Today we will create applications with which the user can post various jokes using Firebase. In the application, you can create your account using email and password. There will also be an opportunity to post jokes, the displayed list of jokes will be instantly updated. When another user posts a new joke, the list with jokes will also be updated. Even in the application, we will add the voting function and the funniest jokes will receive the points that they deserve.
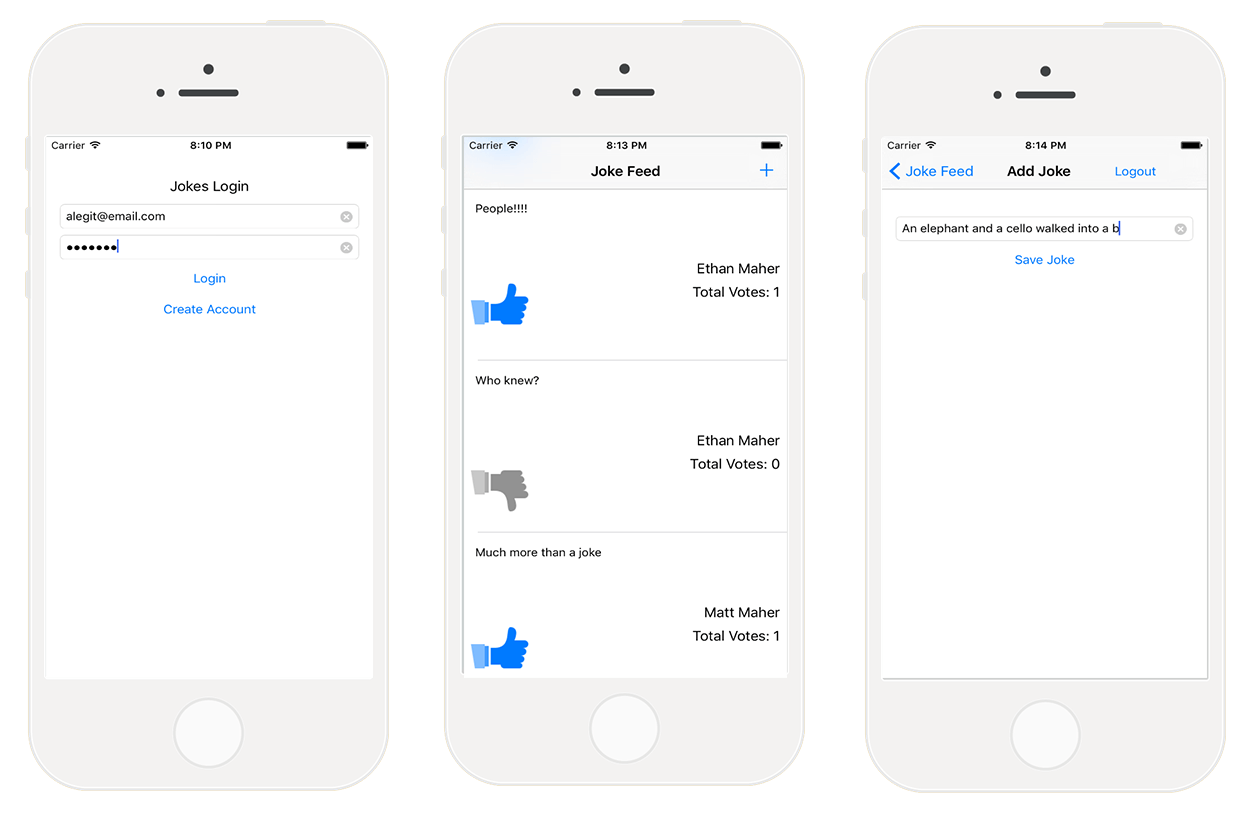
Here is the list of functions that we implement in the FirebaseJokes application:
Let's see the starting project .
First, open Main.Storyboard to get a visual overview of the application.

During the development of the application, we will in practice test the functionality of Firebase and the fact that it is very simple to use. We will have a good time creating FirebaseJokes.
We’ll go to the Firebase page and register a Firebase account, or log into an existing one. We can also register using a GOOGLE account. After registration, we can go through a 5-minute training, but it is intended for applications written in JavaScript.
To see what's happening in Firebase, click the Manage App in My First App. This new environment is known as Firebase Forge. This is a cool debugger, and so it’s worth going through training on it. The Forge tutorial helps you create keys, values, and even child nodes using the plus symbol. It makes sense to take a look at JSON, right? To exit Quick Forge training, click on the toolbar in the upper left corner of the screen.
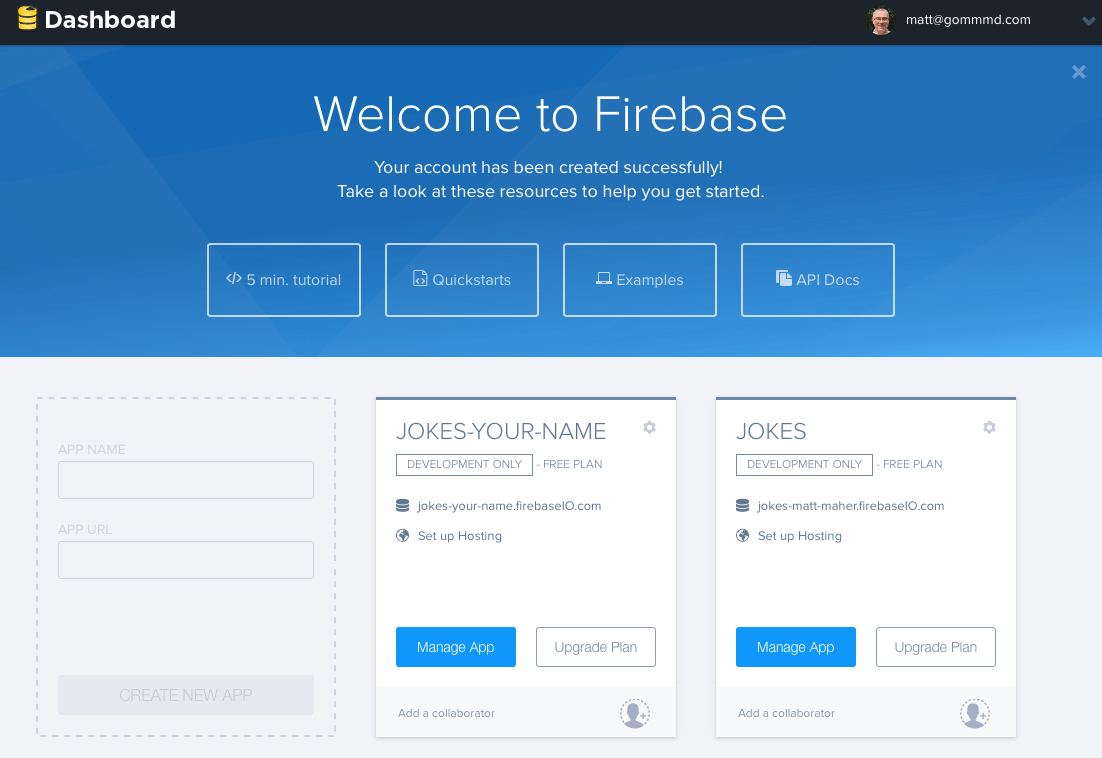
Time to create FirebaseJokes. On the left of My First App, click on the transparent rectangle to create a new application. In the APP NAME field, enter “Jokes”, in the APP URL, enter “jokes-your-name”, where “your-name” is your own name. The field must be unique, because This is the url for your application. Press CREATE NEW APP and after the Manage App.
And here is our own Forge screen. When you add data here, they are automatically updated in our application. We can also add data for the application in the Forge tab. To understand how our application works, in terms of data, we will enter some data manually.
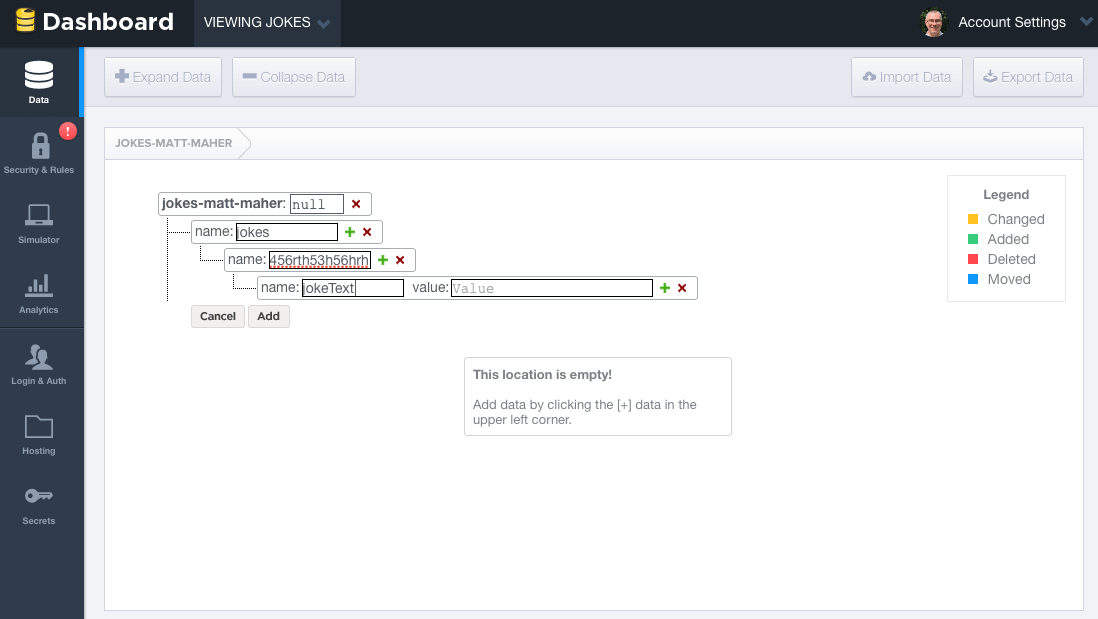
Here is an example of what a jokes object looks like. We will add new jokes to the “jokes” object. We also need the “users” object. It’s interesting to watch how the data created by the application changes in Forge, but at the same time it’s a good practice.
I want to note that all data in the Firebase database is saved as JSON. Unlike Parse, there are no tables or records. When we add data to the Firebase database, they become the key to the JSON structure. For example, the data you just created looks like this:
Now that you have a basic knowledge of the data that is in the Firebas database, it's time to move on.
But before we move on to user authentication, we will delete the created data, just as we will do it programmatically from the application.
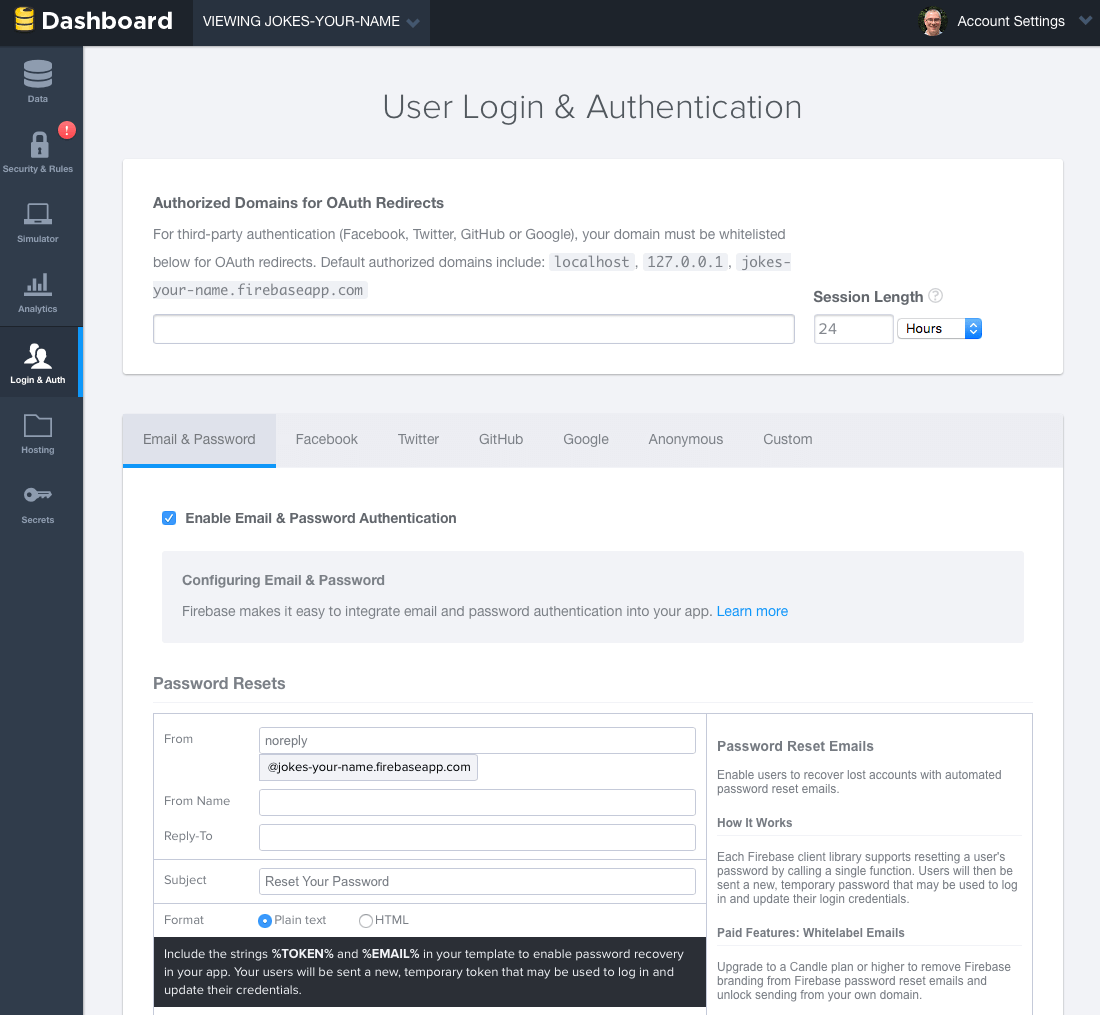
For FirebaseJokes, we use authentication via Email and password. To enable this feature, click Login & Auth in the left pane of Forge. In Email & Password, check the Enable Email & Password Authentication checkbox. Immediately below the pressed cell is information about password recovery. Also, pay attention to other authentication options.
To get the base url for the application, return to the Forge main screen. The current url is the url for the application, so copy and paste it into BASE_URL in Constants.swift Xcode.
It's time to add the Firebase SDK to the application. Before that, you need to install CocoaPods. If you haven't installed it yet, you can find CocoaPods installation instructions.
When CocoaPods is installed, open a terminal. Run the following commands to install Cocoapods in your Xcode project:
Then enter the following command to open the Podfile in Xcode:
Edit it:
Then run the following command to download the Firebase SDK:
Open the created FirebaseJokes.xcworkspace file.
In order for us to import the Firebase SDK, create a new Objective-c File, FileType - Empty File. Name it Temp. When you create a file, the FirebaseJokes-Bridging-Header.h file is automatically created. Write the following line in it:
We delete Temp.m, we will not need it.
To simplify our life a little, first we will do a little setup in DataService.swift. First of all, we need some links:
To use Firebase, you need to import the Firebase framework. The DataService class is used to interact with Firebase. To read or write data, you must create a link to the Firebase database with the Firebase URL. Base URL is the application database URL. Later we will save all users and all jokes as child nodes. To have access to child nodes, you can simply set the child name (that is, users) to the main URL.
We will start with CreateAccountViewController.swift. We need to import our framework.
In the createAccount () method, we take the text that the user entered and try to use it to create a new user. This applies to the Firebase createUser () method. Update your existing method like this:
If the entered information about the new user is correct, the user will be registered and will be able to log into the application. A notification will pop up for any missing information. To do this, insert the following method into the class:
In fact, saving occurs in the createNewAccount () method in DataService.swift.
To save data to the Firebase database, you can simply call the setValue method. In the code above, the user object is saved to the database under the users key above this child uid (approx. / Users / 1283834 /).
In addition to saving the user to the Firebase database, we will save the uid for the user in NSUserDefaults. This will track the current user.
Before moving on, we import Firebase into LoginViewController.swift. So we can track if someone has already logged in or is trying to register a user.
In the viewDidAppear () method, we check whether our saved “uid” is nil and whether the user has an account. If the user has been authorized, he skips the authorization screen. Otherwise, he will be forced to log in.
The tryLogin () method, which is called when authorization is attempted. Update this method as shown below and insert the loginErrorAlert helper method:
Firebase has built-in support for authenticating a user with an email address and password. Our tryLogin () method uses the authUser () method, which allows you to see if the email and password of the user account match. If so, we save the “uid” and get inside the application. If not, we notify the user that he would try to login again.
Now the application is ready for user registration and authorization, it's time to break to the implementation of the application.
Let's move on to Joke.swift and make import Firebase. In our database, the joke is represented by the ID number. This number is automatically generated and contains all the properties of a joke. Here they are:
We initialize a new object in the init () method, where the id of the joke is the key, the joke data is transmitted in the dictionary format.
In AddJokeViewController.swift we do import of Firebase. The user adds a joke, and we send it to our repository, from where it will instantly go to all devices.
In the viewDidLoad () method, we will get the current user username, so that we can specify the author of the new joke.
When the saveJoke () method is called, a newJoke dictionary is created that takes the text with jokeField and sets the value to 0 for votes, the current number of votes, and for the current username - author. These values assign them to the corresponding ids and are passed to the createNewJoke () method in the DataService for storage.
Define the mutable parameter in the AddJokeViewController class:
Update saveJoke method:
We use Dictionary to temporarily store joke data. Actually saving happens in the createNewJoke method in the DataService. In DataService.swift, add the createNewJoke method:
Again, you can save the object using the setValue () method. When the childByAutoId method is called, Firebase generates a unique ID for each joke based on the token, which ensures that the joke gets a unique ID.
Usually this is fixed in the Settings or Profile section, but we will give the user the opportunity to exit to AddJokeViewController.swift.
The logout () method uses the Firebase unauth () method to deauthorize. It is also necessary to remove the user “uid” from our repository and send it back to LoginViewController.
Update the logout method:
If you do not delete the user “uid”, you will have problems entering the new user into the application.
Ultimately, the data comes from Firebase. We make a list of all the jokes in the UITableView located in JokesFeedTableViewController.swift. Not surprisingly, here we will import Firebase.
Let's start with the viewDidLoad () method. Set our observeEventType () method. Firebase data comes by adding an asynchronous listener to the database link. This method is not called in viewDidLoad () when switching to JokesFeedTableViewController.swift, it is called for any changes to jokes from the database side.
The method provides a snapshot. Using the snapshot, we can create a series of jokes to populate our tableView. For Firebase jokes, we will create a list where new jokes will be displayed at the top. Because Firebase will distribute the jokes in chronological order, we can only create the series in the opposite direction.
It would be nice to have a constantly updated array of jokes, we remember about the need to update the data in the tableView so that we can see them.
The rest of the work is distributed between tableView: cellForRowAtIndexPath: and our custom cell, JokeCellTableViewCell.swift. In the tableView: cellForRowAtIndexPath: method, we send the joke to the configureCell () method in JokeCellTableViewCell.swift.
Add the configureCell () method to JokeCellTableViewCell.swift.
In the voteTapped () method, the listener expects a signal. This method saves the "voices" of the current user with a key containing the id of the joke and true value. All this is sent via the created voteRef to the configureCell () method.
The voteTapped () method also relays the signal as a Boolean value to the addSubtractVote () method in Joke.swift. A value of true means that the user voted for the joke; while false means the user has not voted for it yet.
The addSubtractVote () method, in Joke.swift, uses a boolean value to add or subtract vote from joke. Then, the Firebase setValue () method updates the voices with respect to the database.
Now we are testing the application. Create a new user and add some jokes. You will have the opportunity to vote for jokes. And if you look in the toolbar, you will see created users and created jokes.
We did it! This is a pretty funny little app that users will love because of its responsiveness. We also gained experience with Firebase.
You can download the finished FirebaseJokes project on GitHub.
For iOS developers, there is a whole world of new features with Firebase. Working with FirebaseJokes will be good practice, but this is only the beginning.
See other user authentication options, add new features to FirebaseJokes, learn chat functionality, in short, it’s full of possibilities.
A couple of tips on storing images: Firebase provides a relatively modest amount of memory for storing them, so it’s better to store images in a different place.
Good luck working with Firebase in your future projects!
Among the best and most popular BaaSs we can single out Firebase from Google. Essentially, Firebase is absolutely amazing in performance, implementation, and operation. Firebase serves as a database that changes in real time and stores data in JSON. Any changes in the database are immediately synchronized between all clients, or devices that use the same database. In other words, updates in Firebase happen instantly.
Along with storage, Firebase also provides user authentication, and therefore all data is transmitted over a secure SSL connection. We can choose any combination of email and password for authentication, whether it be Facebook, Twitter, GitHub, Google, or something else.
In addition to the iOS SDK, Firebase has an SDK for Android and JavaScript. All platforms can use one database.
It's hard to imagine that Firebase with all these features is a budget solution.
At the time of this writing, in the free package, Firebase can handle up to 100 simultaneous connections. This is quite enough for the popular application. For $ 49 per month, there are no restrictions on network activity.
FirebaseJokes App
Today we will create applications with which the user can post various jokes using Firebase. In the application, you can create your account using email and password. There will also be an opportunity to post jokes, the displayed list of jokes will be instantly updated. When another user posts a new joke, the list with jokes will also be updated. Even in the application, we will add the voting function and the funniest jokes will receive the points that they deserve.
Here is the list of functions that we implement in the FirebaseJokes application:
- Account creation
- Login using email and password
- Sign Out
- Skip registration for registered users
- Adding New Jokes
- Loading jokes into a UITableView indicating author and number of votes
- The ability to cast a vote for a joke
Let's see the starting project .
First, open Main.Storyboard to get a visual overview of the application.
During the development of the application, we will in practice test the functionality of Firebase and the fact that it is very simple to use. We will have a good time creating FirebaseJokes.
Time to get to know Firebase
We’ll go to the Firebase page and register a Firebase account, or log into an existing one. We can also register using a GOOGLE account. After registration, we can go through a 5-minute training, but it is intended for applications written in JavaScript.
To see what's happening in Firebase, click the Manage App in My First App. This new environment is known as Firebase Forge. This is a cool debugger, and so it’s worth going through training on it. The Forge tutorial helps you create keys, values, and even child nodes using the plus symbol. It makes sense to take a look at JSON, right? To exit Quick Forge training, click on the toolbar in the upper left corner of the screen.
Create a new application
Time to create FirebaseJokes. On the left of My First App, click on the transparent rectangle to create a new application. In the APP NAME field, enter “Jokes”, in the APP URL, enter “jokes-your-name”, where “your-name” is your own name. The field must be unique, because This is the url for your application. Press CREATE NEW APP and after the Manage App.
And here is our own Forge screen. When you add data here, they are automatically updated in our application. We can also add data for the application in the Forge tab. To understand how our application works, in terms of data, we will enter some data manually.
- Click the “+” in the jokes-your-name row.
- Enter “jokes” in the name field.
- Click the “+” next to the new joke.
- Enter a random value in the name field.
- Click the “+” next to the random value.
- Enter “jokeText” in the name field.
- Type “What did one computer say to the other? 11001001010101 ”in the value field.
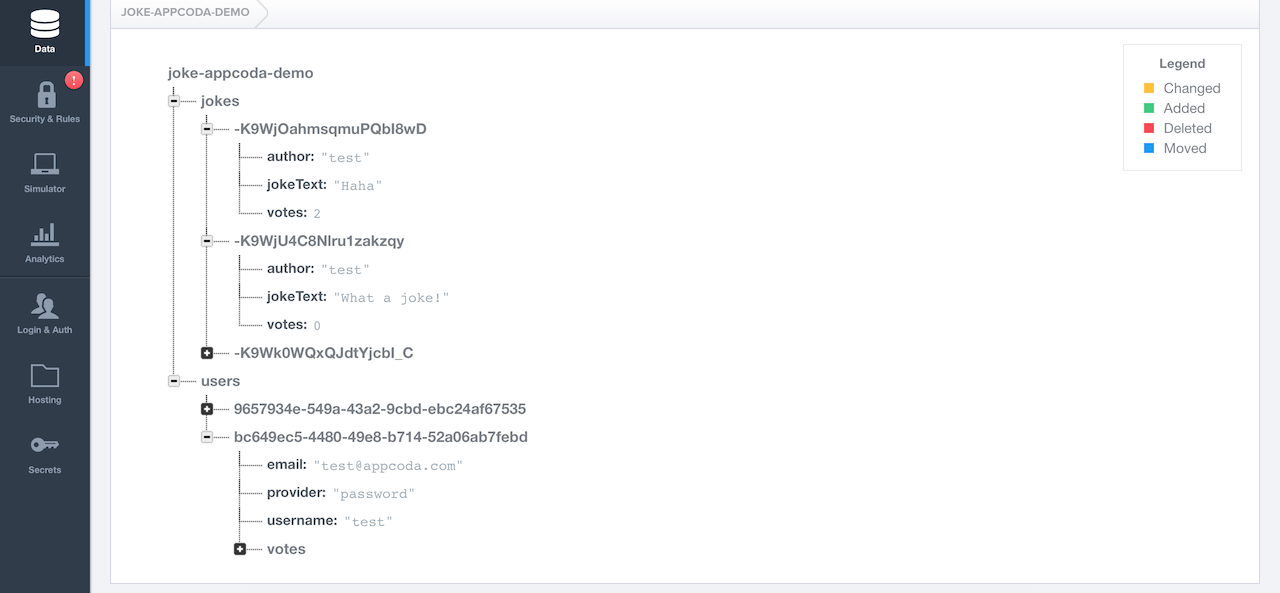
Here is an example of what a jokes object looks like. We will add new jokes to the “jokes” object. We also need the “users” object. It’s interesting to watch how the data created by the application changes in Forge, but at the same time it’s a good practice.
I want to note that all data in the Firebase database is saved as JSON. Unlike Parse, there are no tables or records. When we add data to the Firebase database, they become the key to the JSON structure. For example, the data you just created looks like this:
{
  "jokes" : {
    "e32e223r44" : {
      "jokeText" : "What did one computer say to the other? 11001001010101"
    }
  }
}
Now that you have a basic knowledge of the data that is in the Firebas database, it's time to move on.
But before we move on to user authentication, we will delete the created data, just as we will do it programmatically from the application.
For FirebaseJokes, we use authentication via Email and password. To enable this feature, click Login & Auth in the left pane of Forge. In Email & Password, check the Enable Email & Password Authentication checkbox. Immediately below the pressed cell is information about password recovery. Also, pay attention to other authentication options.
Adding Firebase SDK
To get the base url for the application, return to the Forge main screen. The current url is the url for the application, so copy and paste it into BASE_URL in Constants.swift Xcode.
import Foundation
let BASE_URL = "https://jokes-matt-maher.firebaseio.com"
It's time to add the Firebase SDK to the application. Before that, you need to install CocoaPods. If you haven't installed it yet, you can find CocoaPods installation instructions.
When CocoaPods is installed, open a terminal. Run the following commands to install Cocoapods in your Xcode project:
cd
pod init
Then enter the following command to open the Podfile in Xcode:
open -a Xcode Podfile
Edit it:
platform :ios, '8.0'
use_frameworks!
pod 'Firebase', '>= 2.5.0'
Then run the following command to download the Firebase SDK:
pod install
Open the created FirebaseJokes.xcworkspace file.
In order for us to import the Firebase SDK, create a new Objective-c File, FileType - Empty File. Name it Temp. When you create a file, the FirebaseJokes-Bridging-Header.h file is automatically created. Write the following line in it:
#import We delete Temp.m, we will not need it.
Using Firebase SDK
To simplify our life a little, first we will do a little setup in DataService.swift. First of all, we need some links:
import Foundation
import Firebase
class DataService {
    static let dataService = DataService()
    private var _BASE_REF = Firebase(url: "\(BASE_URL)")
    private var _USER_REF = Firebase(url: "\(BASE_URL)/users")
    private var _JOKE_REF = Firebase(url: "\(BASE_URL)/jokes")
    var BASE_REF: Firebase {
        return _BASE_REF
    }
    var USER_REF: Firebase {
        return _USER_REF
    }
    var CURRENT_USER_REF: Firebase {
        let userID = NSUserDefaults.standardUserDefaults().valueForKey("uid") as! String
        let currentUser = Firebase(url: "\(BASE_REF)").childByAppendingPath("users").childByAppendingPath(userID)
        return currentUser!
    }
    var JOKE_REF: Firebase {
        return _JOKE_REF
    }
}
To use Firebase, you need to import the Firebase framework. The DataService class is used to interact with Firebase. To read or write data, you must create a link to the Firebase database with the Firebase URL. Base URL is the application database URL. Later we will save all users and all jokes as child nodes. To have access to child nodes, you can simply set the child name (that is, users) to the main URL.
Create a new user account
We will start with CreateAccountViewController.swift. We need to import our framework.
import UIKit
import Firebase
class CreateAccountViewController: UIViewController {
In the createAccount () method, we take the text that the user entered and try to use it to create a new user. This applies to the Firebase createUser () method. Update your existing method like this:
@IBAction func createAccount(sender: AnyObject) {
    let username = usernameField.text
    let email = emailField.text
    let password = passwordField.text
    if username != "" && email != "" && password != "" {
        // Set Email and Password for the New User.
        DataService.dataService.BASE_REF.createUser(email, password: password, withValueCompletionBlock: { error, result in
            if error != nil {
                // There was a problem.
                self.signupErrorAlert("Oops!", message: "Having some trouble creating your account. Try again.")
            } else {
                // Create and Login the New User with authUser
                DataService.dataService.BASE_REF.authUser(email, password: password, withCompletionBlock: {
                    err, authData in
                    let user = ["provider": authData.provider!, "email": email!, "username": username!]
                    // Seal the deal in DataService.swift.
                    DataService.dataService.createNewAccount(authData.uid, user: user)
                })
                // Store the uid for future access - handy!
                NSUserDefaults.standardUserDefaults().setValue(result ["uid"], forKey: "uid")
                // Enter the app.
                self.performSegueWithIdentifier("NewUserLoggedIn", sender: nil)
            }
        })
    } else {
        signupErrorAlert("Oops!", message: "Don't forget to enter your email, password, and a username.")
    }
}
If the entered information about the new user is correct, the user will be registered and will be able to log into the application. A notification will pop up for any missing information. To do this, insert the following method into the class:
func signupErrorAlert(title: String, message: String) {
        // Called upon signup error to let the user know signup didn't work.
        let alert = UIAlertController(title: title, message: message, preferredStyle: UIAlertControllerStyle.Alert)
        let action = UIAlertAction(title: "Ok", style: .Default, handler: nil)
        alert.addAction(action)
        presentViewController(alert, animated: true, completion: nil)
    }
In fact, saving occurs in the createNewAccount () method in DataService.swift.
func createNewAccount(uid: String, user: Dictionary) {
        // A User is born.
        USER_REF.childByAppendingPath(uid).setValue(user)
    }
To save data to the Firebase database, you can simply call the setValue method. In the code above, the user object is saved to the database under the users key above this child uid (approx. / Users / 1283834 /).
In addition to saving the user to the Firebase database, we will save the uid for the user in NSUserDefaults. This will track the current user.
User Authorization
Before moving on, we import Firebase into LoginViewController.swift. So we can track if someone has already logged in or is trying to register a user.
In the viewDidAppear () method, we check whether our saved “uid” is nil and whether the user has an account. If the user has been authorized, he skips the authorization screen. Otherwise, he will be forced to log in.
override func viewDidAppear(animated: Bool) {
        super.viewDidAppear(animated)
        // If we have the uid stored, the user is already logger in - no need to sign in again!
        if NSUserDefaults.standardUserDefaults().valueForKey("uid") != nil && DataService.dataService.CURRENT_USER_REF.authData != nil {
            self.performSegueWithIdentifier("CurrentlyLoggedIn", sender: nil)
        }
    }
The tryLogin () method, which is called when authorization is attempted. Update this method as shown below and insert the loginErrorAlert helper method:
@IBAction func tryLogin(sender: AnyObject) {
        let email = emailField.text
        let password = passwordField.text
        if email != "" && password != "" {
            // Login with the Firebase's authUser method
            DataService.dataService.BASE_REF.authUser(email, password: password, withCompletionBlock: { error, authData in
                if error != nil {
                    print(error)
                    self.loginErrorAlert("Oops!", message: "Check your username and password.")
                } else {
                    // Be sure the correct uid is stored.
                    NSUserDefaults.standardUserDefaults().setValue(authData.uid, forKey: "uid")
                    // Enter the app!
                    self.performSegueWithIdentifier("CurrentlyLoggedIn", sender: nil)
                }
            })
        } else {
            // There was a problem
            loginErrorAlert("Oops!", message: "Don't forget to enter your email and password.")
        }
    }
    func loginErrorAlert(title: String, message: String) {
        // Called upon login error to let the user know login didn't work.
        let alert = UIAlertController(title: title, message: message, preferredStyle: UIAlertControllerStyle.Alert)
        let action = UIAlertAction(title: "Ok", style: .Default, handler: nil)
        alert.addAction(action)
        presentViewController(alert, animated: true, completion: nil)
    }
Firebase has built-in support for authenticating a user with an email address and password. Our tryLogin () method uses the authUser () method, which allows you to see if the email and password of the user account match. If so, we save the “uid” and get inside the application. If not, we notify the user that he would try to login again.
Now the application is ready for user registration and authorization, it's time to break to the implementation of the application.
Joke object
Let's move on to Joke.swift and make import Firebase. In our database, the joke is represented by the ID number. This number is automatically generated and contains all the properties of a joke. Here they are:
- jokeText
- jokeVotes
- username (joke author)
We initialize a new object in the init () method, where the id of the joke is the key, the joke data is transmitted in the dictionary format.
class Joke {
    private var _jokeRef: Firebase!
    private var _jokeKey: String!
    private var _jokeText: String!
    private var _jokeVotes: Int!
    private var _username: String!
    var jokeKey: String {
        return _jokeKey
    }
    var jokeText: String {
        return _jokeText
    }
    var jokeVotes: Int {
        return _jokeVotes
    }
    var username: String {
        return _username
    }
    // Initialize the new Joke
    init(key: String, dictionary: Dictionary) {
        self._jokeKey = key
        // Within the Joke, or Key, the following properties are children
        if let votes = dictionary["votes"] as? Int {
            self._jokeVotes = votes
        }
        if let joke = dictionary["jokeText"] as? String {
            self._jokeText = joke
        }
        if let user = dictionary["author"] as? String {
            self._username = user
        } else {
            self._username = ""
        }
        // The above properties are assigned to their key.
        self._jokeRef = DataService.dataService.JOKE_REF.childByAppendingPath(self._jokeKey)
    }
}
Adding New Jokes
In AddJokeViewController.swift we do import of Firebase. The user adds a joke, and we send it to our repository, from where it will instantly go to all devices.
In the viewDidLoad () method, we will get the current user username, so that we can specify the author of the new joke.
override func viewDidLoad() {
        super.viewDidLoad()
        // Get username of the current user, and set it to currentUsername, so we can add it to the Joke.
        DataService.dataService.CURRENT_USER_REF.observeEventType(FEventType.Value, withBlock: { snapshot in
            let currentUser = snapshot.value.objectForKey("username") as! String
            print("Username: \(currentUser)")
            self.currentUsername = currentUser
            }, withCancelBlock: { error in
                print(error.description)
        })
    }
When the saveJoke () method is called, a newJoke dictionary is created that takes the text with jokeField and sets the value to 0 for votes, the current number of votes, and for the current username - author. These values assign them to the corresponding ids and are passed to the createNewJoke () method in the DataService for storage.
Define the mutable parameter in the AddJokeViewController class:
var currentUsername = ""
Update saveJoke method:
@IBAction func saveJoke(sender: AnyObject) {
        let jokeText = jokeField.text
        if jokeText != "" {
            // Build the new Joke.
            // AnyObject is needed because of the votes of type Int.
            let newJoke: Dictionary = [
                "jokeText": jokeText!,
                "votes": 0,
                "author": currentUsername
            ]
            // Send it over to DataService to seal the deal.
            DataService.dataService.createNewJoke(newJoke)
            if let navController = self.navigationController {
                navController.popViewControllerAnimated(true)
            }
        }
    }
We use Dictionary to temporarily store joke data. Actually saving happens in the createNewJoke method in the DataService. In DataService.swift, add the createNewJoke method:
func createNewJoke(joke: Dictionary) {
        // Save the Joke
        // JOKE_REF is the parent of the new Joke: "jokes".
        // childByAutoId() saves the joke and gives it its own ID.
        let firebaseNewJoke = JOKE_REF.childByAutoId()
        // setValue() saves to Firebase.
        firebaseNewJoke.setValue(joke)
}
Again, you can save the object using the setValue () method. When the childByAutoId method is called, Firebase generates a unique ID for each joke based on the token, which ensures that the joke gets a unique ID.
Log out current user
Usually this is fixed in the Settings or Profile section, but we will give the user the opportunity to exit to AddJokeViewController.swift.
The logout () method uses the Firebase unauth () method to deauthorize. It is also necessary to remove the user “uid” from our repository and send it back to LoginViewController.
Update the logout method:
@IBAction func logout(sender: AnyObject) {
        // unauth() is the logout method for the current user.
        DataService.dataService.CURRENT_USER_REF.unauth()
        // Remove the user's uid from storage.
        NSUserDefaults.standardUserDefaults().setValue(nil, forKey: "uid")
        // Head back to Login!
        let loginViewController = self.storyboard!.instantiateViewControllerWithIdentifier("Login")
        UIApplication.sharedApplication().keyWindow?.rootViewController = loginViewController
}
If you do not delete the user “uid”, you will have problems entering the new user into the application.
Display all the jokes on the screen
Ultimately, the data comes from Firebase. We make a list of all the jokes in the UITableView located in JokesFeedTableViewController.swift. Not surprisingly, here we will import Firebase.
Let's start with the viewDidLoad () method. Set our observeEventType () method. Firebase data comes by adding an asynchronous listener to the database link. This method is not called in viewDidLoad () when switching to JokesFeedTableViewController.swift, it is called for any changes to jokes from the database side.
var jokes = [Joke]()
    override func viewDidLoad() {
        super.viewDidLoad()
        // observeEventType is called whenever anything changes in the Firebase - new Jokes or Votes.
        // It's also called here in viewDidLoad().
        // It's always listening.
        DataService.dataService.JOKE_REF.observeEventType(.Value, withBlock: { snapshot in
            // The snapshot is a current look at our jokes data.
            print(snapshot.value)
            self.jokes = []
            if let snapshots = snapshot.children.allObjects as? [FDataSnapshot] {
                for snap in snapshots {
                    // Make our jokes array for the tableView.
                    if let postDictionary = snap.value as? Dictionary {
                        let key = snap.key
                        let joke = Joke(key: key, dictionary: postDictionary)
                        // Items are returned chronologically, but it's more fun with the newest jokes first.
                        self.jokes.insert(joke, atIndex: 0)
                    }
                }
            }
            // Be sure that the tableView updates when there is new data.
            self.tableView.reloadData()
        })
 }
The method provides a snapshot. Using the snapshot, we can create a series of jokes to populate our tableView. For Firebase jokes, we will create a list where new jokes will be displayed at the top. Because Firebase will distribute the jokes in chronological order, we can only create the series in the opposite direction.
It would be nice to have a constantly updated array of jokes, we remember about the need to update the data in the tableView so that we can see them.
The rest of the work is distributed between tableView: cellForRowAtIndexPath: and our custom cell, JokeCellTableViewCell.swift. In the tableView: cellForRowAtIndexPath: method, we send the joke to the configureCell () method in JokeCellTableViewCell.swift.
override func numberOfSectionsInTableView(tableView: UITableView) -> Int {
        return 1
    }
    override func tableView(tableView: UITableView, numberOfRowsInSection section: Int) -> Int {
        return jokes.count
    }
    override func tableView(tableView: UITableView, cellForRowAtIndexPath indexPath: NSIndexPath) -> UITableViewCell {
        let joke = jokes[indexPath.row]
        // We are using a custom cell.
        if let cell = tableView.dequeueReusableCellWithIdentifier("JokeCellTableViewCell") as? JokeCellTableViewCell {
            // Send the single joke to configureCell() in JokeCellTableViewCell.
            cell.configureCell(joke)
            return cell
        } else {
            return JokeCellTableViewCell()
        }
    }
configureCell(), in JokeCellTableViewCell.swift, is where we set the labels and listen for a vote tap.
func configureCell(joke: Joke) {
        self.joke = joke
        // Set the labels and textView.
        self.jokeText.text = joke.jokeText
        self.totalVotesLabel.text = "Total Votes: \(joke.jokeVotes)"
        self.usernameLabel.text = joke.username
        // Set "votes" as a child of the current user in Firebase and save the joke's key in votes as a boolean.
        voteRef = DataService.dataService.CURRENT_USER_REF.childByAppendingPath("votes").childByAppendingPath(joke.jokeKey)
        // observeSingleEventOfType() listens for the thumb to be tapped, by any user, on any device.
        voteRef.observeSingleEventOfType(.Value, withBlock: { snapshot in
            // Set the thumb image.
            if let thumbsUpDown = snapshot.value as? NSNull {
                // Current user hasn't voted for the joke... yet.
                print(thumbsUpDown)
                self.thumbVoteImage.image = UIImage(named: "thumb-down")
            } else {
                // Current user voted for the joke!
                self.thumbVoteImage.image = UIImage(named: "thumb-up")
            }
        })
    }
func configureCell(joke: Joke) {
        self.joke = joke
        // Set the labels and textView.
        self.jokeText.text = joke.jokeText
        self.totalVotesLabel.text = "Total Votes: \(joke.jokeVotes)"
        self.usernameLabel.text = joke.username
        // Set "votes" as a child of the current user in Firebase and save the joke's key in votes as a boolean.
        voteRef = DataService.dataService.CURRENT_USER_REF.childByAppendingPath("votes").childByAppendingPath(joke.jokeKey)
        // observeSingleEventOfType() listens for the thumb to be tapped, by any user, on any device.
        voteRef.observeSingleEventOfType(.Value, withBlock: { snapshot in
            // Set the thumb image.
            if let thumbsUpDown = snapshot.value as? NSNull {
                // Current user hasn't voted for the joke... yet.
                print(thumbsUpDown)
                self.thumbVoteImage.image = UIImage(named: "thumb-down")
            } else {
                // Current user voted for the joke!
                self.thumbVoteImage.image = UIImage(named: "thumb-up")
            }
        })
}
Add the configureCell () method to JokeCellTableViewCell.swift.
var joke: Joke!
var voteRef: Firebase!
override func awakeFromNib() {
    super.awakeFromNib()
    // UITapGestureRecognizer is set programatically.
    let tap = UITapGestureRecognizer(target: self, action: "voteTapped:")
    tap.numberOfTapsRequired = 1
    thumbVoteImage.addGestureRecognizer(tap)
    thumbVoteImage.userInteractionEnabled = true
}
In the voteTapped () method, the listener expects a signal. This method saves the "voices" of the current user with a key containing the id of the joke and true value. All this is sent via the created voteRef to the configureCell () method.
func voteTapped(sender: UITapGestureRecognizer) {
        // observeSingleEventOfType listens for a tap by the current user.
        voteRef.observeSingleEventOfType(.Value, withBlock: { snapshot in
            if let thumbsUpDown = snapshot.value as? NSNull {
                print(thumbsUpDown)
                self.thumbVoteImage.image = UIImage(named: "thumb-down")
                // addSubtractVote(), in Joke.swift, handles the vote.
                self.joke.addSubtractVote(true)
                // setValue saves the vote as true for the current user.
                // voteRef is a reference to the user's "votes" path.
                self.voteRef.setValue(true)
            } else {
                self.thumbVoteImage.image = UIImage(named: "thumb-up")
                self.joke.addSubtractVote(false)
                self.voteRef.removeValue()
            }
        })
    }
The voteTapped () method also relays the signal as a Boolean value to the addSubtractVote () method in Joke.swift. A value of true means that the user voted for the joke; while false means the user has not voted for it yet.
// Add or Subtract a Vote from the Joke.
    func addSubtractVote(addVote: Bool) {
        if addVote {
            _jokeVotes = _jokeVotes + 1
        } else {
            _jokeVotes = _jokeVotes - 1
        }
        // Save the new vote total.
        _jokeRef.childByAppendingPath("votes").setValue(_jokeVotes)
    }
The addSubtractVote () method, in Joke.swift, uses a boolean value to add or subtract vote from joke. Then, the Firebase setValue () method updates the voices with respect to the database.
Application testing
Now we are testing the application. Create a new user and add some jokes. You will have the opportunity to vote for jokes. And if you look in the toolbar, you will see created users and created jokes.
Summarize
We did it! This is a pretty funny little app that users will love because of its responsiveness. We also gained experience with Firebase.
You can download the finished FirebaseJokes project on GitHub.
For iOS developers, there is a whole world of new features with Firebase. Working with FirebaseJokes will be good practice, but this is only the beginning.
See other user authentication options, add new features to FirebaseJokes, learn chat functionality, in short, it’s full of possibilities.
A couple of tips on storing images: Firebase provides a relatively modest amount of memory for storing them, so it’s better to store images in a different place.
Good luck working with Firebase in your future projects!