A mesh router is easy
From the moment cjdns was added to the official OpenWRT repository, the process of preparing a mesh router has become simply trivial. I don’t see any sense in describing the installation of OpenWRT on routers in detail, because This is a popular topic. On many officially supported routers, the task of installing free firmware is reduced to simply downloading the Factory archive and feeding it the standard form of updating the firmware on the factory system. The main thing is that there is no blockage on the installation of third-party firmware, but in this case, as I believe, there will be many workarounds.
Before official support for the cjdns packages appeared, I had to mess around a bit more. You could collect packages yourself or search for packages that someone had assembled and install them. There were also firmware from enthusiasts with the necessary software already installed. In any case, I had to tinker a bit more than now.
So, we have an OpenWRT router that performs the usual functions of a home router. We will administer this whole thing with the left mouse button in LuCY.
Installation
As written above, OpenWrt Chaos Calmer 15.05 has the necessary packages in the official repository. Go to the System -> Software menu. We update the list and install the luci-app-cjdns and cjdns packages. The latter is a dependency of the former and should automatically install.
Mesh mode
After installation, cjdns will immediately start working. Those. A typical installation takes one step. But we want the router to not only connect to cjdns nodes in our local network, but also become an active participant in the mesh network. The section Services -> cjdns appears in the menu. The Overview tab displays all current connections. If cjdns is running on your home computers, it is very likely that the router will establish a connection with them in mesh mode. We need to add 802.11s WiFi network. This is done just as easily:
go to the Network -> WiFi section,
click Add on the desired physical interface,
according to the current agreement on the cjdroute.net forum, select channel 11 in 2.4 GHz,
the Mode field will be 802.11s - WiFi mesh,
Network she will have a separate, because we don’t need these participants to get into the internal Lan network (I created a new one with the name Mesh),
SSID: hyperboria_mesh,
we do not need to protect this network.
In the Network -> Interfaces section, we will have a new network. I chose unmanaged Protocol - we don’t need to assign regular IP addresses to the participants.
You can also add a simple access point without protection with a name, for example, cjdroute.net, which connects devices to this network. This will allow you to connect devices that are not able in 802.11s, but are able in cjdns, to hyperboria.
Now we go to Services -> cjdns -> Settings, go down to the Ethernet Interfaces item and add our new network there (if you forget the name, you can peek in the Network -> Interfaces list). I chose Beacon Mode 2 so that he would not only expect there special Ethernet frames with which he would establish mesh connections, but he would also send such ones. It is also worth making sure that we are also connecting in the home LAN. If the provider provides its own LAN, you can try to connect to other clients of the provider through the WAN interface.
Overlay UDP connections (aka UDP transport)
Naturally, it is foolish to expect that these boxes are already scattered throughout the city, and a full-fledged network operates throughout the country. Moreover, there is an extremely low population density between cities. For additional communication, we will need to add connections via UDP transport. This is the usual overlay mode on top of other networks such as the Internet. This is how TOR works. Only in this case, connections will be established directly without any attempts to anonymize and lose speed.
It is also worth mentioning that there is an incomprehensible to many, but very important point - the need to add such connections manually and establish communication with those with whom you exchanged keys and passwords. At first glance, this procedure is idiotic and creates unnecessary installation difficulties: you don’t need to do this in overlay networks like Tor and I2P - there are bootstrap nodes that give you a list of all the addresses of other participants. However, this convenience is a vulnerability - in the same China, attackers connect to these nodes, get a list of all participants and block connections with these addresses and the node itself. Those. Convenience adds a single point of failure to the system and jeopardizes overall stability.
You can exchange keys and addresses on the same forum cjdroute.netin a special section. Probably later, your friends and colleagues will also join the network and exchange the necessary data with you.
Adding connections is just as easy in the Services -> cjdns -> Peers section. There you can add passwords for incoming connections (remember that for this you need a router to have a white IP address and open an UPD port) and information about outgoing connections. Each new connection increases stability. And thanks to the simplicity of the interface, it will be possible to add new ones between cases within a couple of minutes.
At this point, the configuration of a full-fledged mesh router can be considered complete. Now your router will perform its usual functions as a home router, but when the same conscious neighbors appear, it will create new connections with them, independent of your provider.
Bonus point:
Cjdns secure Internet access is essentially a solution that allows you to create a distributed virtual private network. Thanks to its distributed architecture, this VPN grows into a huge Semi-meh (overlay + mesh) network and builds a new Internet of the future (Hyperboria).
If CJDNS is installed and correctly configured on your computers, it means that they will “see” each other, even if both are located thousands of kilometers from each other behind provider NATs. CJDNS provides IPv6, and all programs supporting it will work just fine. A sort of Hamachi healthy person. But in addition to actually accessing hyperboria and connecting personal devices to a single network, I would like to make a secure tunnel to the regular Internet in a couple of clicks.
Settings on the server that will release us on the Internet.
Let's say we have VPS in some normal country where the Internet is not subjected to aggressive attacks. We configured the same CJDNS node on this VPS and want to be able to access the Internet through it. To do this, in the cjdns config of our VPS, you need to add an incoming tunnel in the ipTunnel -> allowedConnections section. For example: In the console, add an IPv4 address to the tunnel interface and enable Forwarding to issue clients to the Internet. ip addr add dev tun0 192.168.45.1/24 echo 1> / proc / sys / net / ipv4 / conf / all / forwarding Add a route and rules for firewall ip route add dev tun0 192.168.45.0/24 iptables -t nat -A POSTROUTING -o eth0 -j MASQUERADE
iptables -A FORWARD -i eth0 -o tun0 -m state --state RELATED, ESTABLISHED -j ACCEPT
iptables -A FORWARD -i eth0 -o tun0 -j ACCEPT
Now our VPS server can replace us with regular paid VPN services. By the way, according to my feelings, the configuration is much faster and easier than the same OpenVPN.
At this point, I fell into an interesting trap. I wanted to connect both the router and the laptop at once, giving them different IPv4 addresses, but on the same subnet. As it turned out, it was not intended for this, the first entered client was normally routed, and the second simply received the address, but could not even ping the server. If you want to cut several devices, then you need to make different subnets. This can be useful, for example, to provide a secure Internet connection over an untrusted Internet connection.
Settings on the router
It's simple. We go to Services -> cjdns -> IP Tunnel and add the cjdns public key from the config of our VPS node to Outgoing connections. The registered IP is assigned automatically. Routing router clients to the Internet through this VPN is configured by adding the appropriate rules on the firewall.

You can specify the address of our server 192.168.45.1 as a gateway for all connections, or you can simply add static routes and redirect requests only for specific sites: Network -> Static routes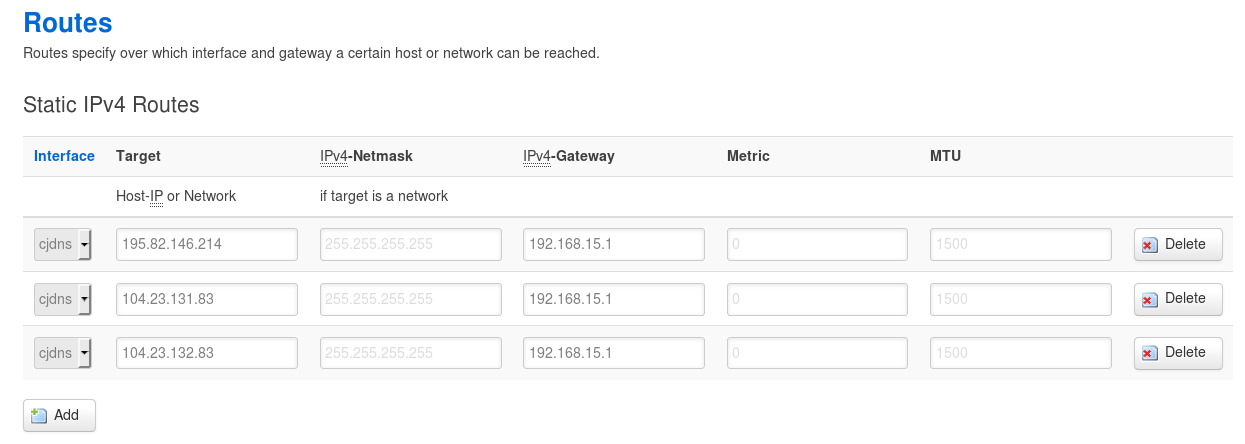
In this case, I made secure and stable connections for all devices in my home network on rutracker and btc-e.com. For some strange reason, I wanted to make connections to these sites more secure.
This bonus item also has the opposite option: to make the router such a server. For example, you are somewhere away or using public WiFi and want to make connections more secure. In the same settings tab of the router, we add incoming connections, and on the laptop outgoing. Slightly different rules for routing - and here you have a more secure connection from anywhere.
Thus, we have achieved the tasks with the left and right mouse buttons. This card, cjdroute.net/map, prompted me to write, perhaps a banal article for habr. Many added their location with a comment that they are ready to join, if they are helped to set everything up. During the first articles about CJDNS, the setup procedure was confusing in some places, and most of the manuals involved manual assembly of OpenWRT and picking of configs. Of course, there are a number of settings that would be nice to add later in the console, but the items described are enough to start. I hope this can turn many people’s desire into an intention. If you have any questions, we are happy to answer on the cjdroute.net forum
Before official support for the cjdns packages appeared, I had to mess around a bit more. You could collect packages yourself or search for packages that someone had assembled and install them. There were also firmware from enthusiasts with the necessary software already installed. In any case, I had to tinker a bit more than now.
So, we have an OpenWRT router that performs the usual functions of a home router. We will administer this whole thing with the left mouse button in LuCY.
Installation
As written above, OpenWrt Chaos Calmer 15.05 has the necessary packages in the official repository. Go to the System -> Software menu. We update the list and install the luci-app-cjdns and cjdns packages. The latter is a dependency of the former and should automatically install.
Mesh mode
After installation, cjdns will immediately start working. Those. A typical installation takes one step. But we want the router to not only connect to cjdns nodes in our local network, but also become an active participant in the mesh network. The section Services -> cjdns appears in the menu. The Overview tab displays all current connections. If cjdns is running on your home computers, it is very likely that the router will establish a connection with them in mesh mode. We need to add 802.11s WiFi network. This is done just as easily:
go to the Network -> WiFi section,
click Add on the desired physical interface,
according to the current agreement on the cjdroute.net forum, select channel 11 in 2.4 GHz,
the Mode field will be 802.11s - WiFi mesh,
Network she will have a separate, because we don’t need these participants to get into the internal Lan network (I created a new one with the name Mesh),
SSID: hyperboria_mesh,
we do not need to protect this network.
In the Network -> Interfaces section, we will have a new network. I chose unmanaged Protocol - we don’t need to assign regular IP addresses to the participants.
You can also add a simple access point without protection with a name, for example, cjdroute.net, which connects devices to this network. This will allow you to connect devices that are not able in 802.11s, but are able in cjdns, to hyperboria.
Now we go to Services -> cjdns -> Settings, go down to the Ethernet Interfaces item and add our new network there (if you forget the name, you can peek in the Network -> Interfaces list). I chose Beacon Mode 2 so that he would not only expect there special Ethernet frames with which he would establish mesh connections, but he would also send such ones. It is also worth making sure that we are also connecting in the home LAN. If the provider provides its own LAN, you can try to connect to other clients of the provider through the WAN interface.
Overlay UDP connections (aka UDP transport)
Naturally, it is foolish to expect that these boxes are already scattered throughout the city, and a full-fledged network operates throughout the country. Moreover, there is an extremely low population density between cities. For additional communication, we will need to add connections via UDP transport. This is the usual overlay mode on top of other networks such as the Internet. This is how TOR works. Only in this case, connections will be established directly without any attempts to anonymize and lose speed.
It is also worth mentioning that there is an incomprehensible to many, but very important point - the need to add such connections manually and establish communication with those with whom you exchanged keys and passwords. At first glance, this procedure is idiotic and creates unnecessary installation difficulties: you don’t need to do this in overlay networks like Tor and I2P - there are bootstrap nodes that give you a list of all the addresses of other participants. However, this convenience is a vulnerability - in the same China, attackers connect to these nodes, get a list of all participants and block connections with these addresses and the node itself. Those. Convenience adds a single point of failure to the system and jeopardizes overall stability.
You can exchange keys and addresses on the same forum cjdroute.netin a special section. Probably later, your friends and colleagues will also join the network and exchange the necessary data with you.
Adding connections is just as easy in the Services -> cjdns -> Peers section. There you can add passwords for incoming connections (remember that for this you need a router to have a white IP address and open an UPD port) and information about outgoing connections. Each new connection increases stability. And thanks to the simplicity of the interface, it will be possible to add new ones between cases within a couple of minutes.
At this point, the configuration of a full-fledged mesh router can be considered complete. Now your router will perform its usual functions as a home router, but when the same conscious neighbors appear, it will create new connections with them, independent of your provider.
Bonus point:
Cjdns secure Internet access is essentially a solution that allows you to create a distributed virtual private network. Thanks to its distributed architecture, this VPN grows into a huge Semi-meh (overlay + mesh) network and builds a new Internet of the future (Hyperboria).
If CJDNS is installed and correctly configured on your computers, it means that they will “see” each other, even if both are located thousands of kilometers from each other behind provider NATs. CJDNS provides IPv6, and all programs supporting it will work just fine. A sort of Hamachi healthy person. But in addition to actually accessing hyperboria and connecting personal devices to a single network, I would like to make a secure tunnel to the regular Internet in a couple of clicks.
Settings on the server that will release us on the Internet.
Let's say we have VPS in some normal country where the Internet is not subjected to aggressive attacks. We configured the same CJDNS node on this VPS and want to be able to access the Internet through it. To do this, in the cjdns config of our VPS, you need to add an incoming tunnel in the ipTunnel -> allowedConnections section. For example: In the console, add an IPv4 address to the tunnel interface and enable Forwarding to issue clients to the Internet. ip addr add dev tun0 192.168.45.1/24 echo 1> / proc / sys / net / ipv4 / conf / all / forwarding Add a route and rules for firewall ip route add dev tun0 192.168.45.0/24 iptables -t nat -A POSTROUTING -o eth0 -j MASQUERADE
 {

 "publicKey": "kdddddgfgsftrtrtrnrmnmnmgnmdfndmfnmdfnmdnfmdfmdndfdf0.k", // Публичный ключ нашего клиента. Для роутера достаем в настройках Services -> cjdns -> Settings

 "ip4Address": "192.168.45.10", // IP адрес клиента, который будет автоматически присвоен

 "ip4Prefix": 24 // Префикс. Соответствует маске 255.255.255.0

 }
iptables -A FORWARD -i eth0 -o tun0 -m state --state RELATED, ESTABLISHED -j ACCEPT
iptables -A FORWARD -i eth0 -o tun0 -j ACCEPT
Now our VPS server can replace us with regular paid VPN services. By the way, according to my feelings, the configuration is much faster and easier than the same OpenVPN.
At this point, I fell into an interesting trap. I wanted to connect both the router and the laptop at once, giving them different IPv4 addresses, but on the same subnet. As it turned out, it was not intended for this, the first entered client was normally routed, and the second simply received the address, but could not even ping the server. If you want to cut several devices, then you need to make different subnets. This can be useful, for example, to provide a secure Internet connection over an untrusted Internet connection.
Settings on the router
It's simple. We go to Services -> cjdns -> IP Tunnel and add the cjdns public key from the config of our VPS node to Outgoing connections. The registered IP is assigned automatically. Routing router clients to the Internet through this VPN is configured by adding the appropriate rules on the firewall.
You can specify the address of our server 192.168.45.1 as a gateway for all connections, or you can simply add static routes and redirect requests only for specific sites: Network -> Static routes
In this case, I made secure and stable connections for all devices in my home network on rutracker and btc-e.com. For some strange reason, I wanted to make connections to these sites more secure.
This bonus item also has the opposite option: to make the router such a server. For example, you are somewhere away or using public WiFi and want to make connections more secure. In the same settings tab of the router, we add incoming connections, and on the laptop outgoing. Slightly different rules for routing - and here you have a more secure connection from anywhere.
Thus, we have achieved the tasks with the left and right mouse buttons. This card, cjdroute.net/map, prompted me to write, perhaps a banal article for habr. Many added their location with a comment that they are ready to join, if they are helped to set everything up. During the first articles about CJDNS, the setup procedure was confusing in some places, and most of the manuals involved manual assembly of OpenWRT and picking of configs. Of course, there are a number of settings that would be nice to add later in the console, but the items described are enough to start. I hope this can turn many people’s desire into an intention. If you have any questions, we are happy to answer on the cjdroute.net forum