 October 5, 2012 at 01:56
E-book as a display
- Tutorial
The unconventional use of common things is what we are always interested in! After all, one sometimes wants to hang another device. Understand how it works and make some adjustments to its work by adding new features.

Displaying your pictures
I will tell you how you can turn an old Sony PRS-505 reader into a convenient display. And also tell you how you can write your own programs for this book
For one device, I needed a display to display graphs and experimental data. Data should be displayed infrequently, but it is desirable that the display be low-power, large and with good resolution.
My source device runs under Linux and has a USB host. At first I looked towards the Vogue display, but dismissed it because of its small size and resolution. He began to search further.
I have long been idle lying around an electronic book PRS-505. I took it out and laid it in front of me, remembering that there was Linux inside and I heard somewhere that you could reach it through the console. But also realizing that this thing is in itself. Put and forget.
After a while I went camping with friend Vshmukand suddenly he saw that he was reading the exact same book. And he told him his thoughts. In response to what was ridiculed - as it turned out, the respected comrade once wrote an article in the Hacker about how to get hardware access to this book, and most importantly, he said that this thing has a framebuffer, like a dekstop, and with you can even work with him.
Normal people on a hike enjoy nature ...
For those who don’t understand linux, I explain that the framebuffer is a Linux file (like any device in general), into which you can (theoretically) stupidly write a snapshot file memory, and display it on the screen. You can also take a hardware screenshot, i.e. just dump the video memory by copying this file to another place and view it by copying (or rather writing to) it back.
When we returned from our epic trek, I tracked down his article www.xakep.ru/magazine/xa/129/092/1.asp and raced further.
Initially, I took apart the book and soldered to the debug console using the ft232rl chip for interface pairing (see my post “UART and what it is eaten for” - habrahabr.ru/post/109395 )
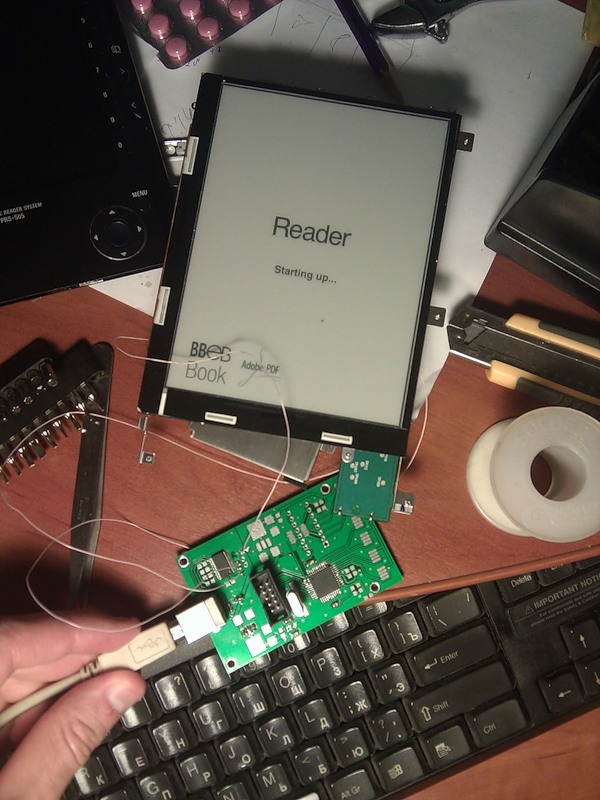
Unpatched reader with a soldered interface
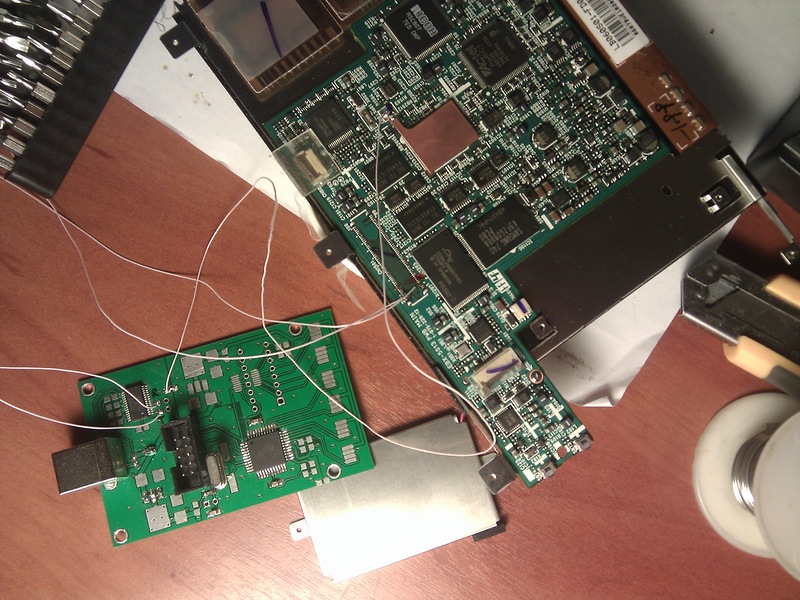
Rear view
Details about how and to which contacts to solder, you can read here: www.the-ebook.org/forum/viewtopic.php?p=120092#120092
I do not want to cite the article by comrade Vshmukhow to log in, what processes need to be killed, etc. It is best to read from him in this article. I can only say: it is empirically established that when a book is connected to a computer via a standard USB, you do not need to kill any processes, everything works like that. As a terminal I use my favorite minicom .
After soldering, I began to study OSes. First of all, I looked at the script, which is mentioned in the article, that it mounts everything and displays a boot image. Let’s take a look at what kind of beast this is:
root @ (none): / # cat /etc/rc.d/rcS.d/S20libromount
from the whole foreshack that fell out there, we are most interested in this:
I decided to try to hammer the screen with a random stuffing, and I made this command:
root @ (none): / # dd if = / dev / urandom of = / dev / fb0 bs = 256 count = 1875
1875 + 0 records in
1875 + 0 records out
But nothing happened ...
Let's try the following command:
root @ (none): / # / opt / sony / ebook / bin / writescreen init 0
latest nblconfig read from 0x00035000
latest nblconfig written to 0x00035800
And ... a miracle did not happen. Moreover, the
root @ (none) command : / # / opt / sony / ebook / bin / writescreen init 1
stupidly extinguishes the screen and everything, after which it no longer showed signs of life.
In general, the problem could not be solved in a snap. Therefore, I switched to the hardware. I began to think how to make a book more accurate for me, because these snot made of thin wires can easily come off. As a result, I brought out the debug console through the headphone jack. There, manufacturers right next to the connector provided zero-resistance resistors, which I safely removed and hung two RX and TX wires there, and left the ground from the headphones. She was not galvanically untied with a number.

Outputted debugging port to the audio jack
After I finished the experiments, I decided to try to drive the files directly through the console. This is necessary so as not to pull two wires and not to spend a flash drive’s resource (recording an image on a USB flash drive, then playback). I completely succeeded in transferring from the book to the computer, but I don’t have it back.
For the experiment, I tried to transfer the picture file. Remember, I already spoke about the boot image output script? He reads it from the NAND flash drive section of the reader and writes it to the framebuffer:
NUM = `grep BootImg / proc / mtd | awk -F: '{print $ 1}' | awk -Fd '{print $ 2}' '
dd if = / dev / mtd $ NUM of = / dev / fb0 bs = 256 count = 1875
/ opt / sony / ebook / bin / writescreen init 0 The
first line defines the section on which picture. We execute this command (which is in single quotes), and find out the number of the section. In my case, it was equal to nine.
Well, then we’ll fix the second command a bit so that the transfer is to the COM port. I experimentally found that the console for receiving and transmitting is the file / dev / tty. We transfer the picture, for this, close the terminal on the computer and execute:
cat / dev / ttyUSB2> bootimg.raw , where ttyUSB2 is my ft232rl-based VCP interface.
Then in the other console of the computer we give the command:
echo “dd if = / dev / mtd9 of = / dev / tty bs = 256 count = 1875”> / dev / ttyUSB2 , which sends the image transfer command through the console through the console.
We convert this picture from the binary cast to png:
echo -e “P5 \ n800 600 \ n255 \ n”> result.pgm
cat bootimg.raw >> result.pgm
convert result.pgm result.png
As a result, we get such a picture. I don’t know why it was so overshooted, but there were clearly some transmission errors.

The resulting picture
By the way, what is a picture that can be written to a framebuffer? This is a bitmask, where each byte is equal to the color of the pixel and it weighs exactly 800x600 = 480000 bytes. Therefore, the image that we want to transfer to the frame buffer should be 800x600 in size and weigh exactly 480000 bytes. In essence, this is a * .pgm file, only with a cut-off header.
Conversely, I was unable to transfer the file. Apparently because the console is a standard input device, and it does not like unprintable characters. Read more about these experiments here: dlinyj.livejournal.com/608961.html .
Realizing that I still couldn’t work with the program, I decided to put the book in the case, since now nothing prevented me from doing this.
After researching the system, scripts, it became clear that it was not possible to display the image using the console tools. They told me that already one friend was solving this problem and even described systemsand.me/sony-prs-300prs-505-hack on his blog . In short, the program will have to be written, although it will be very simple.
I downloaded the toolchain (to put it more simply, the compiler for assembly, although this is not entirely accurate) from here www.mentor.com/embedded-software/sourcery-tools/sourcery-codebench/editions/lite-edition a little steam-up with registration, I rolled it to your favorite ubuntu. And I tried to build hello word
For reference, he was going to use the command arm-none-linux-gnueabi-gcc -mcpu = arm920t hello.c -o hello
The most important thing was how to transfer the received file to the book. I noticed that when the USB is connected, a certain disk with a volume of about 200 meters is seen on the computer. But in the system on the book it is not.
I have all the books of the Knikzhi firmware, and I realized that the hard drive is used in the book application (I mean what the device is intended for). This is the cramfs.Fsk.img file.
I mounted this image on my computer and looked at the sony / ebook / bin / tinyhttp.sh script. How to do this is again described in an article in the Hacker. Trollo pyshch pyshch, nobody reads. This is the very script that we strangle at the very beginning to get the console, according to the article by Vshmuk. And there was such a line:
NUM = `grep Data / proc / mtd | awk -F: '{print $ 1}' | awk -Fd '{print $ 2}'
Again, the first line gets the device number. Having executed the first script (something in quotation mark), I got the number seventeen, and then mounted / dev / mtdblock17 in / tmp / t1. I cannot explain how I understood that this will be a flash drive, but just the logic suggested that it was in this file that the initialization of user data should go.
And as a result, I saw the contents of the disk that I see on my computer.
And I decided to try to run it:
root @ (none): / tmp / t1 # ls
Digital Editions autorun.inf database hello tmp
root @ (none): / tmp / t1 # cp hello / tmp /
root @ (none): / tmp / t1 # cd ...
root @ (none): / tmp # ls
hello t1
root @ (none): / tmp # ./hello
bash: ./hello: No such file or directory
root @ (none): / tmp # chmod + x hello
root @ (none): / tmp # ./hello
bash: ./hello: No such file or directory
Smart people suggested that there might be a lack of necessary libraries, and advised build with the -static option. After that, things got even worse
root @ (none): / tmp # ./hello
Segmentation fault
It became clear that you need to look for a compiler. Thanks to the help of many people, I learned that they are sawing an alternative openinkpot.org/wiki firmware for this book ! Therefore, there should be a toolchain.
I started to google Search “prs-505 toolchain”, it was found here code.google.com/p/prs-plus/downloads/detail?name=arm-toolchain-sony-300.tar.gz&can=4&q=. After that, the Hello Word started up without problems (even without a static!). Well, then a technical matter, according to systemsand.me/sony-prs-300prs-505-hack sketched a small program
Defines were taken from the driver code from the Sony website www.sony.net/Products/Linux/Audio/PRS-505.html file 8track20070714.tgz Compiled by a
primitive command with a minimum of options: path to toolchain / arm-unknown-linux-gnu-gcc - static showpic.c -o showpic
Without static, I did not want to work.
Now in gimp we create a picture with a resolution of 800x600, draw what we want and save it as habrahabr.pgm.
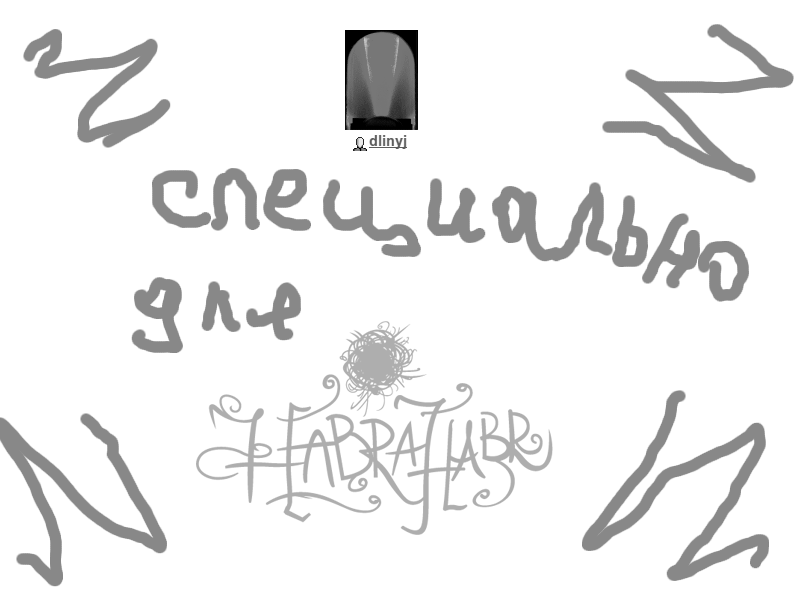
My artwork
You forgive my artwork. I was too lazy to try hard.
Then we open it in any hex editor and delete the entire title to FF.

Delete the title. Fill it
on the hard disk of the book. We climb into the console and execute:
root @ (none): / # cd tmp /
root @ (none): / tmp # mkdir t1
root @ (none): / tmp # mount / dev / mtdblock17 t1
root @ (none): / tmp # cd t1 /
root @ (none): / tmp / t1 # ls
Digital Editions autorun.inf habrahabr.raw showpic
a. out database send.raw tmp
root @ (none): / tmp / t1 # ./showpic habrahabr.raw
Show image
root @ (none): / tmp / t1 #
And we see:

Farshmak
oh! We didn’t turn this picture. We rotate the original image in gimp by 90 degrees and repeat the procedure. As a result, our eyes will see
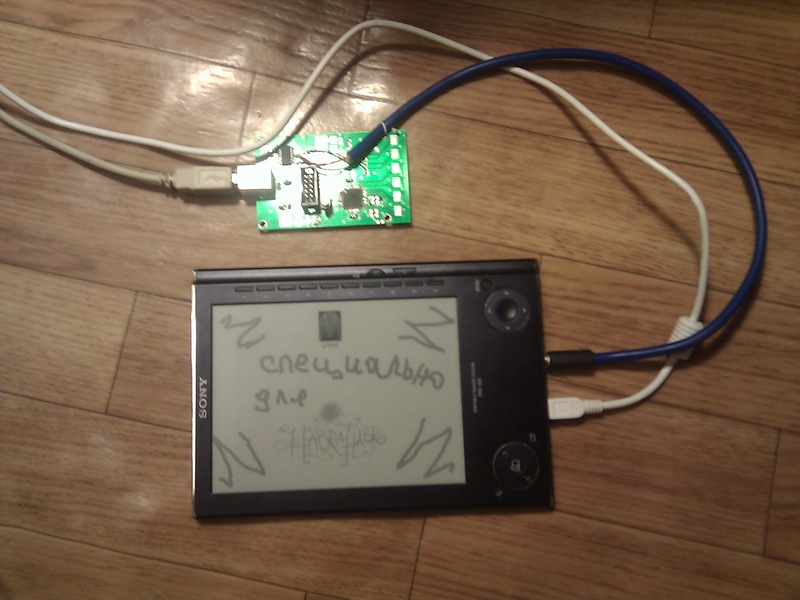
What was required to prove!
I managed to write my program for a book and even display pictures. I must say that the goal is to display gnuplot graphics. This package is perfectly able to generate the pgm files itself, and all that remains is for the dd command to cut off the header.
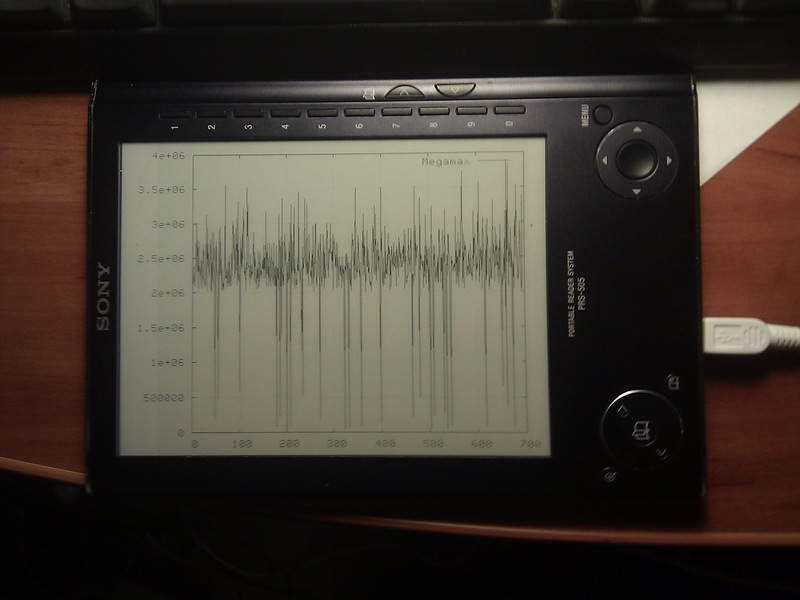
Chart example The
main problem that has not yet been resolved is how to transfer chart files to a book. I wanted to do this directly from the debug console, but for this I need to be able to wean it from being a console and turn it into a regular UART. I don’t know how to do this. Moreover, I think to do it on the fly.
They tell me that you can build a driver so that the device looks like a COM port via USB, but it seems to me that this can result in that same gimmora. I think you can try to create a folder on a USB flash drive, and mount a virtual temporary file system in RAM into it. I have not tried this method yet. But transferring the file through a USB flash drive is an absurd and unreasonable decision.
In general, the question remains open and I am ready to hear all reasonable suggestions on this matter.
I express gratitude to all the people who helped and are helping me in this strange project. I hope there will be more
1. The original article in the Hacker www.xakep.ru/magazine/xa/129/092/1.asp where I started my experiment.
2. Instructions for soldering the book www.the-ebook.org/forum/viewtopic.php?p=120092#120092
3. A similar task was solved by our compatriot so systemsand.me/sony-prs-300prs-505-hack unfortunately he could not help me with source codes and toolchain.
4. Source texts of the firmware of the book and drivers www.sony.net/Products/Linux/Audio/PRS-505.html
5. Open project of alternative firmware openinkpot.org/wiki
6. Working toolchain code.google.com/p/prs- plus / downloads / detail? name = arm-toolchain-sony-300.tar.gz & can = 4 & q =
7. You can read about my torments with a book in my LJdlinyj.livejournal.com/tag/prs-505
PS I am not a very competent person, I will be very grateful for private messages with blots to make the article look more worthy.
PPS Also, I will essentially accept comments with pleasure. I am not a cool Linux software developer, although I would love to become one :).
Remember the best thanks to the author for the post - this is a comment left!
UPD While sleeping I figured out how to solve the problem with text input and the console. Nothing prevents the file from transmitting in text form. It is necessary to rewrite the file a little so that it receives data from kinsoli, and pass two commands to it:
start - the beginning of the transfer and stop- ending. Next, read the transmitted file by bytes on the source computer and split the byte into nibbles (half a byte). The nibble takes a value from 0 to 15 or in HEX from 0 to F. Well, transfer the character from zero to F. On the side of the book, do the inverse conversion of text nibbles to bytes. The start of the transfer means start, the end of stop. We control the console echo transmission.
It will take twice as long, but the solution is the simplest and most obvious.
I ran to write a program!
UPD-UPD After 5 years, he wrote a program that turns a book into a watch. Code githabe github.com/dlinyj/sony_prs-505_clock
Displaying your pictures
I will tell you how you can turn an old Sony PRS-505 reader into a convenient display. And also tell you how you can write your own programs for this book
Formulation of the problem
For one device, I needed a display to display graphs and experimental data. Data should be displayed infrequently, but it is desirable that the display be low-power, large and with good resolution.
My source device runs under Linux and has a USB host. At first I looked towards the Vogue display, but dismissed it because of its small size and resolution. He began to search further.
I have long been idle lying around an electronic book PRS-505. I took it out and laid it in front of me, remembering that there was Linux inside and I heard somewhere that you could reach it through the console. But also realizing that this thing is in itself. Put and forget.
After a while I went camping with friend Vshmukand suddenly he saw that he was reading the exact same book. And he told him his thoughts. In response to what was ridiculed - as it turned out, the respected comrade once wrote an article in the Hacker about how to get hardware access to this book, and most importantly, he said that this thing has a framebuffer, like a dekstop, and with you can even work with him.
For those who don’t understand linux, I explain that the framebuffer is a Linux file (like any device in general), into which you can (theoretically) stupidly write a snapshot file memory, and display it on the screen. You can also take a hardware screenshot, i.e. just dump the video memory by copying this file to another place and view it by copying (or rather writing to) it back.
Why is this needed:
Why do you need this: For example, on the target machine there is video output to a virtual screen, with a resolution equal to the resolution of the book (namely 600x800). Then periodically, a virtual screen framebuffer file is taken and redirected to the som port, and at that end from the com port, with the cat command, this is redirected to the book's framebuffer.
I illustrate that all commands are executed on the target machine, the book is connected via UART, through VCP, which hangs on / dev / ttyUSB0. Commands are called once every few minutes, for example in a krone.
echo "cat / dev / ttyS0> / dev / fb0"> / dev / ttyUSB0
This UART command sends the command to redirect the contents of the COM port file to the framebuffer. Next comes the second command:
cat / dev / fbn> / dev / ttyUSB0
This command transfers the contents of the virtual screen fbn (where the n-number of the screen) to the COM port. Everything should work fine, the transfer will end upon the arrival of the end-of-file character.
I illustrate that all commands are executed on the target machine, the book is connected via UART, through VCP, which hangs on / dev / ttyUSB0. Commands are called once every few minutes, for example in a krone.
echo "cat / dev / ttyS0> / dev / fb0"> / dev / ttyUSB0
This UART command sends the command to redirect the contents of the COM port file to the framebuffer. Next comes the second command:
cat / dev / fbn> / dev / ttyUSB0
This command transfers the contents of the virtual screen fbn (where the n-number of the screen) to the COM port. Everything should work fine, the transfer will end upon the arrival of the end-of-file character.
Getting down to business
When we returned from our epic trek, I tracked down his article www.xakep.ru/magazine/xa/129/092/1.asp and raced further.
Initially, I took apart the book and soldered to the debug console using the ft232rl chip for interface pairing (see my post “UART and what it is eaten for” - habrahabr.ru/post/109395 )
Unpatched reader with a soldered interface
Rear view
Details about how and to which contacts to solder, you can read here: www.the-ebook.org/forum/viewtopic.php?p=120092#120092
I do not want to cite the article by comrade Vshmukhow to log in, what processes need to be killed, etc. It is best to read from him in this article. I can only say: it is empirically established that when a book is connected to a computer via a standard USB, you do not need to kill any processes, everything works like that. As a terminal I use my favorite minicom .
After soldering, I began to study OSes. First of all, I looked at the script, which is mentioned in the article, that it mounts everything and displays a boot image. Let’s take a look at what kind of beast this is:
root @ (none): / # cat /etc/rc.d/rcS.d/S20libromount
from the whole foreshack that fell out there, we are most interested in this:
# display booting image
/usr/local/sony/bin/nblconfig -dump | head -3 | awk '{print $9}' | grep 02 > /dev/null
if [ $? == 0 ]; then
        # init screen load
        grep BootImg /proc/mtd > /dev/null
        if [ $? == 0 ]; then
                NUM=`grep BootImg /proc/mtd | awk -F: '{print $1}' | awk -Fd '{print$2}'`
                dd if=/dev/mtd$NUM of=/dev/fb0 bs=256 count=1875
                /opt/sony/ebook/bin/writescreen init 0
        else
                /opt/sony/ebook/bin/writescreen init 1
                echo no boot image
        fi
else
        /opt/sony/ebook/bin/writescreen init 1
fi
...
I decided to try to hammer the screen with a random stuffing, and I made this command:
root @ (none): / # dd if = / dev / urandom of = / dev / fb0 bs = 256 count = 1875
1875 + 0 records in
1875 + 0 records out
But nothing happened ...
Let's try the following command:
root @ (none): / # / opt / sony / ebook / bin / writescreen init 0
latest nblconfig read from 0x00035000
latest nblconfig written to 0x00035800
And ... a miracle did not happen. Moreover, the
root @ (none) command : / # / opt / sony / ebook / bin / writescreen init 1
stupidly extinguishes the screen and everything, after which it no longer showed signs of life.
In general, the problem could not be solved in a snap. Therefore, I switched to the hardware. I began to think how to make a book more accurate for me, because these snot made of thin wires can easily come off. As a result, I brought out the debug console through the headphone jack. There, manufacturers right next to the connector provided zero-resistance resistors, which I safely removed and hung two RX and TX wires there, and left the ground from the headphones. She was not galvanically untied with a number.
Outputted debugging port to the audio jack
After I finished the experiments, I decided to try to drive the files directly through the console. This is necessary so as not to pull two wires and not to spend a flash drive’s resource (recording an image on a USB flash drive, then playback). I completely succeeded in transferring from the book to the computer, but I don’t have it back.
For the experiment, I tried to transfer the picture file. Remember, I already spoke about the boot image output script? He reads it from the NAND flash drive section of the reader and writes it to the framebuffer:
NUM = `grep BootImg / proc / mtd | awk -F: '{print $ 1}' | awk -Fd '{print $ 2}' '
dd if = / dev / mtd $ NUM of = / dev / fb0 bs = 256 count = 1875
/ opt / sony / ebook / bin / writescreen init 0 The
first line defines the section on which picture. We execute this command (which is in single quotes), and find out the number of the section. In my case, it was equal to nine.
Well, then we’ll fix the second command a bit so that the transfer is to the COM port. I experimentally found that the console for receiving and transmitting is the file / dev / tty. We transfer the picture, for this, close the terminal on the computer and execute:
cat / dev / ttyUSB2> bootimg.raw , where ttyUSB2 is my ft232rl-based VCP interface.
Then in the other console of the computer we give the command:
echo “dd if = / dev / mtd9 of = / dev / tty bs = 256 count = 1875”> / dev / ttyUSB2 , which sends the image transfer command through the console through the console.
We convert this picture from the binary cast to png:
echo -e “P5 \ n800 600 \ n255 \ n”> result.pgm
cat bootimg.raw >> result.pgm
convert result.pgm result.png
As a result, we get such a picture. I don’t know why it was so overshooted, but there were clearly some transmission errors.
The resulting picture
By the way, what is a picture that can be written to a framebuffer? This is a bitmask, where each byte is equal to the color of the pixel and it weighs exactly 800x600 = 480000 bytes. Therefore, the image that we want to transfer to the frame buffer should be 800x600 in size and weigh exactly 480000 bytes. In essence, this is a * .pgm file, only with a cut-off header.
Conversely, I was unable to transfer the file. Apparently because the console is a standard input device, and it does not like unprintable characters. Read more about these experiments here: dlinyj.livejournal.com/608961.html .
Realizing that I still couldn’t work with the program, I decided to put the book in the case, since now nothing prevented me from doing this.
After researching the system, scripts, it became clear that it was not possible to display the image using the console tools. They told me that already one friend was solving this problem and even described systemsand.me/sony-prs-300prs-505-hack on his blog . In short, the program will have to be written, although it will be very simple.
I downloaded the toolchain (to put it more simply, the compiler for assembly, although this is not entirely accurate) from here www.mentor.com/embedded-software/sourcery-tools/sourcery-codebench/editions/lite-edition a little steam-up with registration, I rolled it to your favorite ubuntu. And I tried to build hello word
For reference, he was going to use the command arm-none-linux-gnueabi-gcc -mcpu = arm920t hello.c -o hello
The most important thing was how to transfer the received file to the book. I noticed that when the USB is connected, a certain disk with a volume of about 200 meters is seen on the computer. But in the system on the book it is not.
I have all the books of the Knikzhi firmware, and I realized that the hard drive is used in the book application (I mean what the device is intended for). This is the cramfs.Fsk.img file.
I mounted this image on my computer and looked at the sony / ebook / bin / tinyhttp.sh script. How to do this is again described in an article in the Hacker. Trollo pyshch pyshch, nobody reads. This is the very script that we strangle at the very beginning to get the console, according to the article by Vshmuk. And there was such a line:
NUM = `grep Data / proc / mtd | awk -F: '{print $ 1}' | awk -Fd '{print $ 2}'
Again, the first line gets the device number. Having executed the first script (something in quotation mark), I got the number seventeen, and then mounted / dev / mtdblock17 in / tmp / t1. I cannot explain how I understood that this will be a flash drive, but just the logic suggested that it was in this file that the initialization of user data should go.
And as a result, I saw the contents of the disk that I see on my computer.
And I decided to try to run it:
root @ (none): / tmp / t1 # ls
Digital Editions autorun.inf database hello tmp
root @ (none): / tmp / t1 # cp hello / tmp /
root @ (none): / tmp / t1 # cd ...
root @ (none): / tmp # ls
hello t1
root @ (none): / tmp # ./hello
bash: ./hello: No such file or directory
root @ (none): / tmp # chmod + x hello
root @ (none): / tmp # ./hello
bash: ./hello: No such file or directory
Smart people suggested that there might be a lack of necessary libraries, and advised build with the -static option. After that, things got even worse
root @ (none): / tmp # ./hello
Segmentation fault
It became clear that you need to look for a compiler. Thanks to the help of many people, I learned that they are sawing an alternative openinkpot.org/wiki firmware for this book ! Therefore, there should be a toolchain.
I started to google Search “prs-505 toolchain”, it was found here code.google.com/p/prs-plus/downloads/detail?name=arm-toolchain-sony-300.tar.gz&can=4&q=. After that, the Hello Word started up without problems (even without a static!). Well, then a technical matter, according to systemsand.me/sony-prs-300prs-505-hack sketched a small program
/* showpic.c */
#include
#include
#include
#include
#include
#include
#include
#define FBIO_EINK_GET_TEMPERATURE        0x46A1    //Returns temperature in degree Celsius
#define FBIO_EINK_DISP_PIC                0x46A2    //Displays picture
int main (int argc, char* argv[])
{
    printf ("Show image\n");
    int *fb, *image;
    int pio_fd = open ( "/dev/fb0", O_RDWR);
    int f_image = open ( argv[1], O_RDWR);                                 //open file into arg
    int t= ioctl (pio_fd, FBIO_EINK_GET_TEMPERATURE, NULL);    //configure framebuffer
    fb= mmap(0, 800*600, PROT_WRITE, MAP_SHARED, pio_fd, 0);    //map device into memory
    image= mmap(0, 800*600, PROT_READ, MAP_SHARED, f_image, 0); //load image into memory
    memcpy(fb,image,800*600);
    ioctl (pio_fd, FBIO_EINK_DISP_PIC, 0);
    close(pio_fd);
    close(f_image);
    return 0;
}
Defines were taken from the driver code from the Sony website www.sony.net/Products/Linux/Audio/PRS-505.html file 8track20070714.tgz Compiled by a
primitive command with a minimum of options: path to toolchain / arm-unknown-linux-gnu-gcc - static showpic.c -o showpic
Without static, I did not want to work.
Now in gimp we create a picture with a resolution of 800x600, draw what we want and save it as habrahabr.pgm.
My artwork
You forgive my artwork. I was too lazy to try hard.
Then we open it in any hex editor and delete the entire title to FF.
Delete the title. Fill it
on the hard disk of the book. We climb into the console and execute:
root @ (none): / # cd tmp /
root @ (none): / tmp # mkdir t1
root @ (none): / tmp # mount / dev / mtdblock17 t1
root @ (none): / tmp # cd t1 /
root @ (none): / tmp / t1 # ls
Digital Editions autorun.inf habrahabr.raw showpic
a. out database send.raw tmp
root @ (none): / tmp / t1 # ./showpic habrahabr.raw
Show image
root @ (none): / tmp / t1 #
And we see:
Farshmak
oh! We didn’t turn this picture. We rotate the original image in gimp by 90 degrees and repeat the procedure. As a result, our eyes will see
What was required to prove!
Summary
I managed to write my program for a book and even display pictures. I must say that the goal is to display gnuplot graphics. This package is perfectly able to generate the pgm files itself, and all that remains is for the dd command to cut off the header.
Chart example The
main problem that has not yet been resolved is how to transfer chart files to a book. I wanted to do this directly from the debug console, but for this I need to be able to wean it from being a console and turn it into a regular UART. I don’t know how to do this. Moreover, I think to do it on the fly.
They tell me that you can build a driver so that the device looks like a COM port via USB, but it seems to me that this can result in that same gimmora. I think you can try to create a folder on a USB flash drive, and mount a virtual temporary file system in RAM into it. I have not tried this method yet. But transferring the file through a USB flash drive is an absurd and unreasonable decision.
In general, the question remains open and I am ready to hear all reasonable suggestions on this matter.
Acknowledgments
I express gratitude to all the people who helped and are helping me in this strange project. I hope there will be more
References:
1. The original article in the Hacker www.xakep.ru/magazine/xa/129/092/1.asp where I started my experiment.
2. Instructions for soldering the book www.the-ebook.org/forum/viewtopic.php?p=120092#120092
3. A similar task was solved by our compatriot so systemsand.me/sony-prs-300prs-505-hack unfortunately he could not help me with source codes and toolchain.
4. Source texts of the firmware of the book and drivers www.sony.net/Products/Linux/Audio/PRS-505.html
5. Open project of alternative firmware openinkpot.org/wiki
6. Working toolchain code.google.com/p/prs- plus / downloads / detail? name = arm-toolchain-sony-300.tar.gz & can = 4 & q =
7. You can read about my torments with a book in my LJdlinyj.livejournal.com/tag/prs-505
PS I am not a very competent person, I will be very grateful for private messages with blots to make the article look more worthy.
PPS Also, I will essentially accept comments with pleasure. I am not a cool Linux software developer, although I would love to become one :).
Remember the best thanks to the author for the post - this is a comment left!
UPD While sleeping I figured out how to solve the problem with text input and the console. Nothing prevents the file from transmitting in text form. It is necessary to rewrite the file a little so that it receives data from kinsoli, and pass two commands to it:
start - the beginning of the transfer and stop- ending. Next, read the transmitted file by bytes on the source computer and split the byte into nibbles (half a byte). The nibble takes a value from 0 to 15 or in HEX from 0 to F. Well, transfer the character from zero to F. On the side of the book, do the inverse conversion of text nibbles to bytes. The start of the transfer means start, the end of stop. We control the console echo transmission.
It will take twice as long, but the solution is the simplest and most obvious.
I ran to write a program!
UPD-UPD After 5 years, he wrote a program that turns a book into a watch. Code githabe github.com/dlinyj/sony_prs-505_clock









