We write our own gateway for the Thrift API
- Tutorial
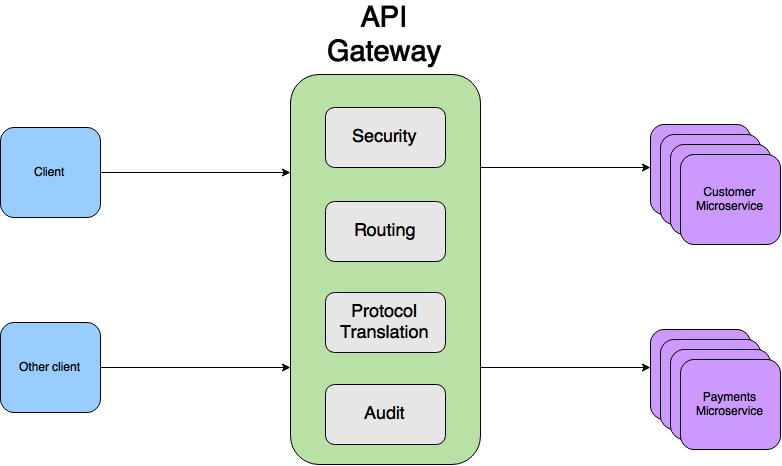
Microservices, whatever one may say, is our everything. You can resist SOAP 2.0 for as long as you want, but sooner or later they will either come for you and turn to their faith, or you will come to them yourself and ask them to baptize themselves with fire and sword. Like any architectural solution, microservices have their drawbacks. One of them is the need for each microservice to include some kind of logic for authorizing requests from external systems or other microservices. This logic can be directly “wired” inside the microservice (and it doesn’t matter that it is a separate library), delegated to another microservice, or it can be declared declaratively. What does it mean declaratively? For example, you can agree that each microservice receives a special HTTP header, or some kind of data structure that contains information about the user making the request. And the data in this structure must be definitely trusted. All three options have their drawbacks, but within the framework of the article we will analyze the latter. For its implementation, the Gateway API design pattern is usually used:
Under the cut all the difficulties of implementing the template in a binary data transfer protocol.
In general, the Gateway API limits the number of requests to internal services, authorizes client requests, logs and audits, distributes requests between clients and converts data if necessary. As an example, you can use regular nginx. Consider the function of authorizing user requests. If the HTTP protocol is used, then it’s common practice to add a certain token (it doesn’t matter how we got it) in the Authorization header:
On the API Gateway side, this header is somehow checked and exchanged for another header containing some knowledge about the user to whom the token was issued, for example, its identifier, and it can already be forwarded to internal services:
Everything seems simple and straightforward, but the trouble is that Apache Thrift consists of several parts:
In the general case, we cannot be tied to a protocol or transport. Of course, you can choose one thing, agree that we use only HTTP, but this limits the ability to replace the transport and forces some external handlers / filters to be done inside the Thrift services themselves (after all, the http headers are not native for them) .
It remains to use the capabilities of the protocol itself, so that during the passage of the request through the API gateway, the external authorization token is replaced with an internal one.
So, let us have the following internal service:
UserData is some information about the user on whose behalf the service is called so that the latter can understand and whose data to pull. It is clear that such a service cannot be exposed. And which one? For example, this:
The whole difference between the services is their first argument and exception, which is raised in case of problems with request authorization (I hope that 98 of our own exceptions will be enough for everyone). Our task at the gateway level is to check the authorization token and replace it with user information.
Unfortunately, the Thrift documentation cried. Almost all the guides, including perhaps the best of them, do not relate to the internal structure of certain protocols. And that is understandable. In 99% of cases, the developer does not have to go inside the protocol, but we need it.
There are three most popular protocols:
Each of the presented protocols has its own implementation, hidden behind the same API. If we consider the binary protocol, then for our service it will look from the point of view of the API as follows:
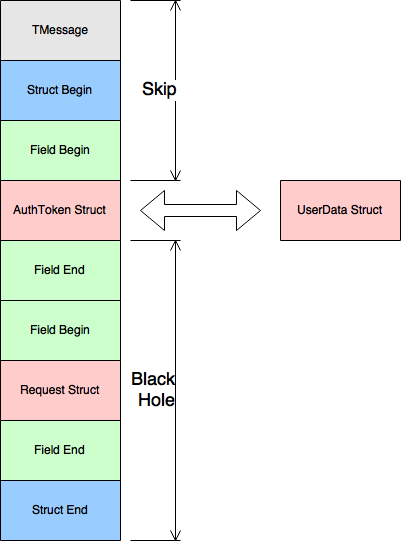
TMessage - meta-information about the message. It consists of the method name, type and order number of the method in the service. The message type can be as follows:
All that is not TMessage is useful information that is wrapped in the structure of an incoming message.
All presented protocols read the byte data array in sequence and store its current index in order to continue reading from the right place.
Therefore, our algorithm should be as follows:
We don’t go without reconnaissance testing, especially since in the case of the binary protocol this is the easiest way to check the performance of your code. For the test, we need the following thrift services:
Create and fill out the external service with test data:
TMemoryBufferWithLength is a specially created class that eliminates the fatal lack of TMemoryBuffer transport for us . The latter is not able to give the real length of the message. Instead, you can get the length of the entire buffer, which is usually greater than the length of the message since part of the byte array is reserved for future data.
The send_getSomeData method serializes the message to our buffer.
We will do the same with the internal service:
Get the byte array of our message:
We introduce a class that will translate our message from the view for the external service to the view for the internal: MessageTransalator .
The implementation of the token exchange ( AuthTokenExchanger ) may be different in different projects, so we will make a separate interface:
createEmptyAuthToken should return an object that represents an empty token filled with MessageTransalator . In the process method, you need to exchange the authorization token for user data. For our test we use a simple implementation:
We write a check:
We run tests, and nothing works. And this is good!
We implement the process method according to the algorithm:
As a protocol, we use TMemoryInputTransport , which allows you to read a message directly from a byte array passed to it.
We will find the token boundaries in a byte array:
We serialize user data:
Run the tests, and ...
So, the tests for Binary and Compact pass, but JSON resists. What is wrong? We go into debug and see what arrays we are comparing:
Did not notice the difference? But she is. After the first “rec” there is not enough colon. We use the same API, but the result is different. The answer came only after carefully reading the code of the TJSONProtocol class . The protocol contains a context that stores various delimiters on the stack when it bypasses the JSON structure for reading or writing.
When reading the structure, the “:” symbol is also read, but it doesn’t come back, because there is no context in the object itself.
Insert the crutch into the seriaizeUserData method :
Run the tests, and now everything is ok.
We are close to the finish line. Ok, remember that we should throw an exception if the request authorization is unsuccessful:
Let's do the exception handling in a separate method processError .
Thrift has several types of exceptions that can occur as a result of calling a service:
An interesting detail. You can pass either a TApplicationException or a custom custom one in the response message to the client , in our case it is an UnauthorizedException . Therefore, we must wrap any errors either in TApplicationException or in UnauthorizedException .
Implementing a TApplicationException entry in the response data packet is quite simple:
According to the protocol, each message has its own sequence identifier and the name of the called method, which must be returned back to the client. To do this, add new fields: seqid and methodName to our MessageTranslator class , which are filled when reading the beginning of the message. Because of this, our class ceases to be thread safe.
To record an arbitrary exception, more gestures are required:
What is interesting here is that for a custom exception, the return message type is not TMessageType.EXCEPTION , but TMessageType.REPLY .
Now we are able to take an incoming message, replace a token in it and correctly give a response to the client if an error occurred during the token verification.
Ok, we did the binary package preparation. Now is the time to make a practical implementation on the popular microservices framework. For example, on Spring Boot . It is good because, on the one hand, you can find ready-made solutions for it, and on the other hand, it is simple and convenient to customize it with annotations, adding new features with two or three lines of code. For routing and processing HTTP requests, take Netflix Zuul , which is part of the Spring Cloud extension set . Zuul's working scheme is shown in the following image:
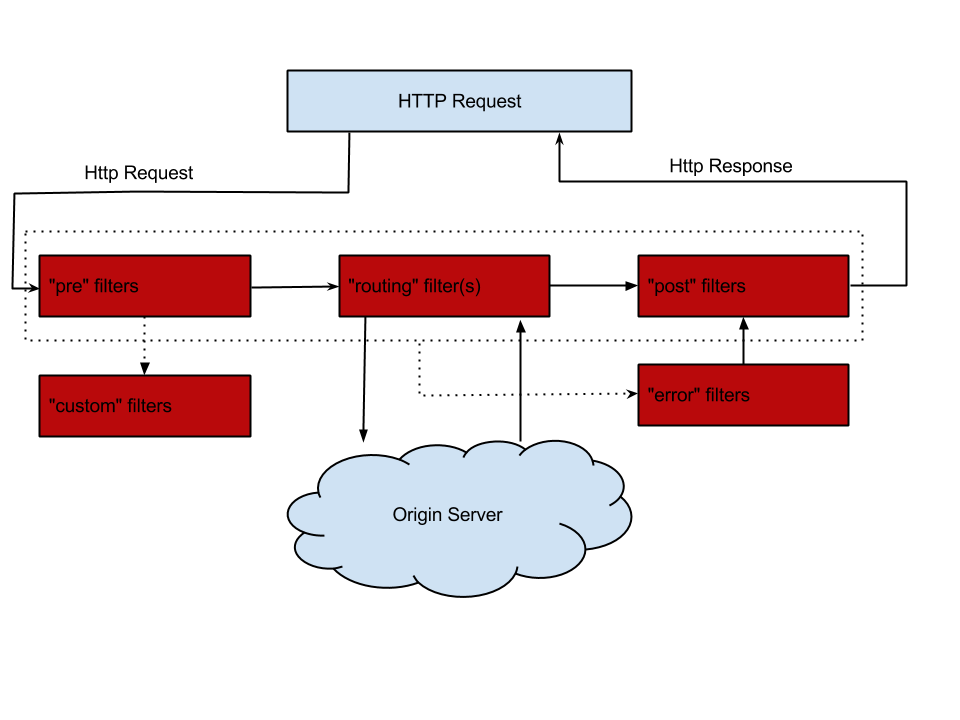
If it’s quite simple, then Netflix ZuulIt is an ordinary servlet with a chain of its own filters, which can either load dynamically or be included in the application. Each filter adds a new behavior, and even the HTTP response record is also implemented by the filter. There are several types of filters that are executed sequentially as shown in the picture above. Inside each type, filters are executed in the order determined by the priority of a particular filter. Connecting Zuul to an application on Spring Boot is as simple as that (well add dependencies):
We want the same thing, but for the API gateway, so that those who will use our solution can concentrate on the business logic of authorizing their application, and not on the problems listed in the article. To do this, create the @EnableThriftGateway annotation :
The ThriftGatewayConfiguration configuration will contain three beans that are created if the annotation is added to the main application class: Application .
ConditionalOnMissingBean annotation will prevent the creation of a default bean if the application declares its own bean of this class. The previously created AuthTokenExchanger interface must be implemented by the developer of a specific project. We cannot, for security reasons, make any default implementation, so an exception is thrown in the method of creating the bean. Also, you need to define the protocol used to transmit thrift messages. By default, this is TBinaryProtocol , but you can always use the one you need for the project by overriding the bean for creating the protocol factory. But the AuthenticationZuulFilter bin is by far the most important part of the configuration.that implements the business logic of the authorization layer.
After receiving the context objects and the HTTP request, create a MessageTransalator .
A positive scenario consists of processing an incoming data packet, writing a new packet in the requestEntity field of the request context, and specifying a new message length instead of the original:
If an error occurs, then it must be processed:
Here we had to apply some non-obvious tricks to prevent further processing of the request and attempt to send the package to the internal service. At first,
Create a new Spring Boot application and add two annotations @EnableZuulProxy and @EnableThriftGateway to it :
We implement a simple authorization logic:
As you can see, if a token with a value of heisours came to us , then we authorize the request, and if not, we throw an error. All that remains is to configure Zuul:
and the Gateway API can be used.
The basic part for converting binary packages: https://github.com/aatarasoff/thrift-api-gateway-core
Magic annotations for Spring: https://github.com/aatarasoff/spring-thrift-api-gateway
Examples: https://github.com/aatarasoff/spring-thrift-api-gateway/tree/master/examples
Under the cut all the difficulties of implementing the template in a binary data transfer protocol.
In general, the Gateway API limits the number of requests to internal services, authorizes client requests, logs and audits, distributes requests between clients and converts data if necessary. As an example, you can use regular nginx. Consider the function of authorizing user requests. If the HTTP protocol is used, then it’s common practice to add a certain token (it doesn’t matter how we got it) in the Authorization header:
Authorization: Bearer On the API Gateway side, this header is somehow checked and exchanged for another header containing some knowledge about the user to whom the token was issued, for example, its identifier, and it can already be forwarded to internal services:
Customer: Everything seems simple and straightforward, but the trouble is that Apache Thrift consists of several parts:
+-------------------------------------------+
| Server                                    |
| (single-threaded, event-driven etc)       |
+-------------------------------------------+
| Processor                                 |
| (compiler generated)                      |
+-------------------------------------------+
| Protocol                                  |
| (JSON, compact, binary etc)               |
+-------------------------------------------+
| Transport                                 |
| (raw TCP, HTTP etc)                       |
+-------------------------------------------+
In the general case, we cannot be tied to a protocol or transport. Of course, you can choose one thing, agree that we use only HTTP, but this limits the ability to replace the transport and forces some external handlers / filters to be done inside the Thrift services themselves (after all, the http headers are not native for them) .
It remains to use the capabilities of the protocol itself, so that during the passage of the request through the API gateway, the external authorization token is replaced with an internal one.
Convention over configuration
So, let us have the following internal service:
service InternalTestService {
    SomeReturnData getSomeData(
        1: UserData userData,
        2: RequestData requestData
    ) throws (1: SomeException e);
}
UserData is some information about the user on whose behalf the service is called so that the latter can understand and whose data to pull. It is clear that such a service cannot be exposed. And which one? For example, this:
service ExternalTestService {
    SomeReturnData getSomeData(
        1: AuthToken authData,
        2: RequestData requestData
    ) throws (1: SomeException e, 99: UnauthorizedException ue);
}
The whole difference between the services is their first argument and exception, which is raised in case of problems with request authorization (I hope that 98 of our own exceptions will be enough for everyone). Our task at the gateway level is to check the authorization token and replace it with user information.
Guts
Unfortunately, the Thrift documentation cried. Almost all the guides, including perhaps the best of them, do not relate to the internal structure of certain protocols. And that is understandable. In 99% of cases, the developer does not have to go inside the protocol, but we need it.
There are three most popular protocols:
- Binary is just a binary data protocol (strings, for example, are transmitted as is in UTF-8)
- Compact - the same binary only compact
- JSON is a very peculiar JSON
Each of the presented protocols has its own implementation, hidden behind the same API. If we consider the binary protocol, then for our service it will look from the point of view of the API as follows:
TMessage - meta-information about the message. It consists of the method name, type and order number of the method in the service. The message type can be as follows:
- CALL = 1 - incoming message
- REPLY = 2 - answer
- EXCEPTION = 3 - an error occurred during execution
- ONEWAY = 4 - the message does not require a response
All that is not TMessage is useful information that is wrapped in the structure of an incoming message.
All presented protocols read the byte data array in sequence and store its current index in order to continue reading from the right place.
Therefore, our algorithm should be as follows:
- Read TMessage
- Read the beginning of the overall message structure
- Read the meta-information about the first field in the message
- Remember current position in byte array
- Read Token Information
- Remember current position in byte array
- Exchange token for user data
- Serialize user data
- Form a new binary array of three parts:
- From the beginning of the original message to the index from point 4
- Byte array of user data structure
- From index from point 6 to the end of the original message
Writing a test
We don’t go without reconnaissance testing, especially since in the case of the binary protocol this is the easiest way to check the performance of your code. For the test, we need the following thrift services:
Spoiler heading
namespace java ru.aatarasoff.thrift
exception SomeException {
    1: string code
}
exception UnauthorizedException {
    1: string reason
}
service ExternalTestService {
    SomeReturnData getSomeData(
        1: AuthToken authData,
        2: RequestData requestData
    ) throws (1: SomeException e, 99: UnauthorizedException ue);
}
service InternalTestService {
    SomeReturnData getSomeData(
        1: UserData userData,
        2: RequestData requestData
    ) throws (1: SomeException e);
}
struct SomeReturnData {
    1: string someStringField,
    2: i32 someIntField
}
struct RequestData {
    1: string someStringField,
    2: i32 someIntField
}
struct AuthToken {
    1: string token,
    2: i32 checksum
}
struct UserData {
    1: string id
}
Create and fill out the external service with test data:
TMemoryBuffer externalServiceBuffer = new TMemoryBufferWithLength(1024);
ExternalTestService.Client externalServiceClient
= new ExternalTestService.Client(protocolFactory.getProtocol(externalServiceBuffer));
externalServiceClient.send_getSomeData(
    new AuthToken().setToken("sometoken").setChecksum(128),
    new RequestData().setSomeStringField("somevalue").setSomeIntField(8)
);
TMemoryBufferWithLength is a specially created class that eliminates the fatal lack of TMemoryBuffer transport for us . The latter is not able to give the real length of the message. Instead, you can get the length of the entire buffer, which is usually greater than the length of the message since part of the byte array is reserved for future data.
The send_getSomeData method serializes the message to our buffer.
We will do the same with the internal service:
internalServiceClient.send_getSomeData(
  new UserData().setId("user1"),
  new RequestData().setSomeStringField("somevalue").setSomeIntField(8)
);
Get the byte array of our message:
byte[] externalServiceMessage = Arrays.copyOf(
    externalServiceBuffer.getArray(),
    externalServiceBuffer.length()
);
We introduce a class that will translate our message from the view for the external service to the view for the internal: MessageTransalator .
public MessageTransalator(TProtocolFactory protocolFactory, AuthTokenExchanger authTokenExchanger) {
        this.protocolFactory = protocolFactory;
        this.authTokenExchanger = authTokenExchanger;
    }
public byte[] process(byte[] thriftBody) throws TException {
    //some actions
}
The implementation of the token exchange ( AuthTokenExchanger ) may be different in different projects, so we will make a separate interface:
public interface AuthTokenExchanger {
    T createEmptyAuthToken();
    U process(T authToken) throws TException;
}
createEmptyAuthToken should return an object that represents an empty token filled with MessageTransalator . In the process method, you need to exchange the authorization token for user data. For our test we use a simple implementation:
@Override
public AuthToken createEmptyAuthToken() {
    return new AuthToken();
}
@Override
public UserData process(AuthToken authToken) {
    if ("sometoken".equals(authToken.getToken())) {
        return new UserData().setId("user1");
    }
    throw new RuntimeException("token is invalid");
}
We write a check:
assert.assertTrue(
    "Translated external message must be the same as internal message",
    Arrays.equals(
      new MessageTransalator(
          protocolFactory,
          new AuthTokenExchanger() {}
      ).process(externalServiceMessage),
      internalServiceMessage
    )
)
We run tests, and nothing works. And this is good!
Green light
We implement the process method according to the algorithm:
TProtocol protocol = createProtocol(thriftBody);
int startPosition = findStartPosition(protocol);
TBase userData = authTokenExchanger.process(
    extractAuthToken(protocol, authTokenExchanger.createEmptyAuthToken())
);
int endPosition = findEndPosition(protocol);
return  ArrayUtils.addAll(
        ArrayUtils.addAll(
            getSkippedPart(protocol, startPosition),
            serializeUserData(protocolFactory, userData)
        ),
        getAfterTokenPart(protocol, endPosition, thriftBody.length)
);
As a protocol, we use TMemoryInputTransport , which allows you to read a message directly from a byte array passed to it.
private TProtocol createProtocol(byte[] thriftBody) {
    return protocolFactory.getProtocol(new TMemoryInputTransport(thriftBody));
}
We will find the token boundaries in a byte array:
private int findStartPosition(TProtocol protocol) throws TException {
    skipMessageInfo(protocol); //пропускаем TMessage
    skipToFirstFieldData(protocol); //ищем начало данных в первом поле
    return protocol.getTransport().getBufferPosition();
}
private int findEndPosition(TProtocol protocol) throws TException {
    return protocol.getTransport().getBufferPosition();
}
private void skipToFirstFieldData(TProtocol protocol) throws TException {
    protocol.readStructBegin();
    protocol.readFieldBegin();
}
private void skipMessageInfo(TProtocol protocol) throws TException {
    protocol.readMessageBegin();
}
We serialize user data:
TMemoryBufferWithLength memoryBuffer = new TMemoryBufferWithLength(1024);
TProtocol protocol = protocolFactory.getProtocol(memoryBuffer);
userData.write(protocol);
return Arrays.copyOf(memoryBuffer.getArray(), memoryBuffer.length());
Run the tests, and ...
Turn on Sherlock
So, the tests for Binary and Compact pass, but JSON resists. What is wrong? We go into debug and see what arrays we are comparing:
//JSON обычного человека
[1,"getSomeData",1,1,{"1":{"rec":{"1":{"str":"user1"}}},"2":{"rec":{"1":{"str":"somevalue"},"2":{"i32":8}}}}]
//JSON курильщика
[1,"getSomeData",1,1,{"1":{"rec"{"1":{"str":"user1"}}},"2":{"rec":{"1":{"str":"somevalue"},"2":{"i32":8}}}}]
Did not notice the difference? But she is. After the first “rec” there is not enough colon. We use the same API, but the result is different. The answer came only after carefully reading the code of the TJSONProtocol class . The protocol contains a context that stores various delimiters on the stack when it bypasses the JSON structure for reading or writing.
TJSONProtocol.JSONBaseContext context_ = new TJSONProtocol.JSONBaseContext();
When reading the structure, the “:” symbol is also read, but it doesn’t come back, because there is no context in the object itself.
Insert the crutch into the seriaizeUserData method :
if (protocol instanceof TJSONProtocol) {
    memoryBuffer.write(COLON, 0, 1); //добавляем ":"
}
Run the tests, and now everything is ok.
Exception throwing
We are close to the finish line. Ok, remember that we should throw an exception if the request authorization is unsuccessful:
service ExternalTestService {
    SomeReturnData getSomeData(
        1: AuthToken authData,
        2: RequestData requestData
    ) throws (1: SomeException e, 99: UnauthorizedException ue);
}
Let's do the exception handling in a separate method processError .
public byte[] processError(TException exception) throws Exception
Thrift has several types of exceptions that can occur as a result of calling a service:
- TApplicationException - application level exception
- TProtocolException - protocol related exception
- TTransportException - message passing exception
- TException - a basic exception from which all other types are inherited
- YourException extends TException - any exception that has been declared in DSL
An interesting detail. You can pass either a TApplicationException or a custom custom one in the response message to the client , in our case it is an UnauthorizedException . Therefore, we must wrap any errors either in TApplicationException or in UnauthorizedException .
public byte[] processError(TException exception) throws Exception {
    TMemoryBufferWithLength memoryBuffer = new TMemoryBufferWithLength(1024);
    TProtocol protocol = protocolFactory.getProtocol(memoryBuffer);
    try {
        throw exception;
    } catch (TApplicationException e) {
        writeTApplicationException(e, protocol);
    } catch (TProtocolException e) {
        writeTApplicationException(createApplicationException(e), protocol);
    } catch (TTransportException e) {
        writeTApplicationException(createApplicationException(e), protocol);
    } catch (TException e) {
        if (TException.class.equals(e.getClass())) {
            writeTApplicationException(createApplicationException(e), protocol);
        } else {
            writeUserDefinedException(exception, protocol);
        }
    }
    return Arrays.copyOf(memoryBuffer.getArray(), memoryBuffer.length());
}
Implementing a TApplicationException entry in the response data packet is quite simple:
private void writeTApplicationException(TApplicationException exception, TProtocol protocol) throws TException {
    protocol.writeMessageBegin(new TMessage(this.methodName, TMessageType.EXCEPTION, this.seqid));
    exception.write(protocol);
    protocol.writeMessageEnd();
}
private TApplicationException createApplicationException(TException e) {
    return new TApplicationException(TApplicationException.INTERNAL_ERROR, e.getMessage());
}
According to the protocol, each message has its own sequence identifier and the name of the called method, which must be returned back to the client. To do this, add new fields: seqid and methodName to our MessageTranslator class , which are filled when reading the beginning of the message. Because of this, our class ceases to be thread safe.
To record an arbitrary exception, more gestures are required:
private static final String ERROR_STRUCT_NAME = "result";
private static final String ERROR_FIELD_NAME = "exception";
private static final short ERROR_FIELD_POSITION = (short) 99;
private static final String WRITE_METHOD_NAME = "write";
private void writeUserDefinedException(TException exception, TProtocol protocol) throws TException, IllegalAccessException, InvocationTargetException, NoSuchMethodException {
    TStruct errorStruct = new TStruct(ERROR_STRUCT_NAME);
    TField errorField = new TField(ERROR_FIELD_NAME, TType.STRUCT, ERROR_FIELD_POSITION);
    protocol.writeMessageBegin(new TMessage(this.methodName, TMessageType.REPLY, this.seqid));
    protocol.writeStructBegin(errorStruct);
    protocol.writeFieldBegin(errorField);
    exception.getClass().getMethod(WRITE_METHOD_NAME, TProtocol.class).invoke(exception, protocol);
    protocol.writeFieldEnd();
    protocol.writeFieldStop();
    protocol.writeStructEnd();
    protocol.writeMessageEnd();
}
What is interesting here is that for a custom exception, the return message type is not TMessageType.EXCEPTION , but TMessageType.REPLY .
Now we are able to take an incoming message, replace a token in it and correctly give a response to the client if an error occurred during the token verification.
Spring breaks into the bar
Ok, we did the binary package preparation. Now is the time to make a practical implementation on the popular microservices framework. For example, on Spring Boot . It is good because, on the one hand, you can find ready-made solutions for it, and on the other hand, it is simple and convenient to customize it with annotations, adding new features with two or three lines of code. For routing and processing HTTP requests, take Netflix Zuul , which is part of the Spring Cloud extension set . Zuul's working scheme is shown in the following image:
If it’s quite simple, then Netflix ZuulIt is an ordinary servlet with a chain of its own filters, which can either load dynamically or be included in the application. Each filter adds a new behavior, and even the HTTP response record is also implemented by the filter. There are several types of filters that are executed sequentially as shown in the picture above. Inside each type, filters are executed in the order determined by the priority of a particular filter. Connecting Zuul to an application on Spring Boot is as simple as that (well add dependencies):
@SpringBootApplication
@EnableZuulProxy
public class Application {
    public static void main(String[] args) {
        SpringApplication.run(Application.class, args);
    }
}
We want the same thing, but for the API gateway, so that those who will use our solution can concentrate on the business logic of authorizing their application, and not on the problems listed in the article. To do this, create the @EnableThriftGateway annotation :
@Target(ElementType.TYPE)
@Retention(RetentionPolicy.RUNTIME)
@Documented
@Inherited
@Import(ThriftGatewayConfiguration.class)
public @interface EnableThriftGateway {
}
The ThriftGatewayConfiguration configuration will contain three beans that are created if the annotation is added to the main application class: Application .
@Configuration
public class ThriftGatewayConfiguration {
    @Bean
    @ConditionalOnMissingBean(AuthTokenExchanger.class)
    AuthTokenExchanger authTokenExchanger() {
        throw new UnsupportedOperationException("You should implement AuthTokenExchanger bean");
    }
    @Bean
    @ConditionalOnMissingBean(TProtocolFactory.class)
    TProtocolFactory thriftProtocolFactory() {
        return new TBinaryProtocol.Factory();
    }
    @Bean
    public AuthenticationZuulFilter authenticationZuulFilter() {
        return new AuthenticationZuulFilter();
    }
}
ConditionalOnMissingBean annotation will prevent the creation of a default bean if the application declares its own bean of this class. The previously created AuthTokenExchanger interface must be implemented by the developer of a specific project. We cannot, for security reasons, make any default implementation, so an exception is thrown in the method of creating the bean. Also, you need to define the protocol used to transmit thrift messages. By default, this is TBinaryProtocol , but you can always use the one you need for the project by overriding the bean for creating the protocol factory. But the AuthenticationZuulFilter bin is by far the most important part of the configuration.that implements the business logic of the authorization layer.
public class AuthenticationZuulFilter extends ZuulFilter {
    @Override
    public String filterType() {
        return "pre";
    }
    @Override
    public int filterOrder() {
        return 6;
    }
    @Override
    public boolean shouldFilter() {
        return true;
    }
    @Override
    public Object run() {
        RequestContext ctx = RequestContext.getCurrentContext();
        HttpServletRequestWrapper request = (HttpServletRequestWrapper) ctx.getRequest();
        //здесь ваши действия
        return null;
    }
}
After receiving the context objects and the HTTP request, create a MessageTransalator .
MessageTransalator messageTransalator = new MessageTransalator(protocolFactory, authTokenExchanger);
A positive scenario consists of processing an incoming data packet, writing a new packet in the requestEntity field of the request context, and specifying a new message length instead of the original:
byte[] processed = messageTransalator.process(request.getContentData());
ctx.set("requestEntity", new ByteArrayInputStream(processed));
ctx.setOriginContentLength(processed.length);
If an error occurs, then it must be processed:
ctx.setSendZuulResponse(false);
ctx.setResponseDataStream(new ByteArrayInputStream(new byte[]{}));
try {
    ctx.getResponse().getOutputStream().write(messageTransalator.processError(e));
} catch (Exception e1) {
    log.error("unexpected error", e1);
    ctx.setResponseStatusCode(HttpStatus.SC_INTERNAL_SERVER_ERROR);
}
Here we had to apply some non-obvious tricks to prevent further processing of the request and attempt to send the package to the internal service. At first,
ctx.setSendZuulResponse(false)
ctx.setResponseDataStream(new ByteArrayInputStream(new byte[]{}))
Putting it all together
Create a new Spring Boot application and add two annotations @EnableZuulProxy and @EnableThriftGateway to it :
@SpringBootApplication
@EnableZuulProxy
@EnableThriftGateway
public class Application {
    public static void main(String[] args) {
        SpringApplication.run(Application.class, args);
    }
}
We implement a simple authorization logic:
@Configuration
public class AuthenticationConfiguration {
    @Bean
    AuthTokenExchanger authTokenExchanger() {
        return new AuthTokenExchanger() {
            @Override
            public Token createEmptyAuthToken() {
                return new Token();
            }
            @Override
            public TName process(Token authToken) throws TException {
                if (authToken.getValue().equals("heisours")) {
                    return new TName("John", "Smith");
                }
                throw new UnauthorizedException(ErrorCode.WRONG_TOKEN);
            }
        };
    }
}
As you can see, if a token with a value of heisours came to us , then we authorize the request, and if not, we throw an error. All that remains is to configure Zuul:
zuul:
  routes:
    greetings:
      #путь в URL, на котором будет спроксирован сервис
      path: /greetings/**
      #идентификатор сервиса
      serviceId: greetings
greetings:
  ribbon:
    listOfServers: localhost:8080  #список серверов, где развёрнут сервис greetings
and the Gateway API can be used.
References
The basic part for converting binary packages: https://github.com/aatarasoff/thrift-api-gateway-core
Magic annotations for Spring: https://github.com/aatarasoff/spring-thrift-api-gateway
Examples: https://github.com/aatarasoff/spring-thrift-api-gateway/tree/master/examples