For quite some time now I have been working in a project that uses the Maven build system. At first, when the project was not yet as large as it is now, the time of its full compilation was relatively reasonable and did not cause any complaints. But over time, the code grew, the number of subprojects increased sharply, and the average time for full compilation increased to 6-10 minutes. Which served as a constant source of reproaches from developers.
It should also be noted. that we did not use parallel assembly, because this regularly caused various problems. Either the artifacts in the local storage will be beaten, or it will simply be collected in the wrong order and the old, non-recompiled code will fall into the final WAR artifact. Of course, some developers used the parallel assembly at their own peril and risk. But sooner or later they got into a situation where they could not figure out what was happening. And a simple recompilation into one thread immediately helped.
This went on for quite some time, until I stumbled upon a rather curious Takari website, which offers ways to improve working methods with Maven.
Also on GitHub they have laid out Maven Wrapper (an analog of the wrapper from Gradle).
Looking ahead, I note that the tools described here not only solve the problem of Maven incorrect operation, but also give a significant increase in build speed.
This improvement is intended to solve the problem of broken artifacts in the local repository.
The fact is that in Maven, working with local storage (essentially a directory on the file system) is implemented in a non-thread-safe way. Those. if projects that are being assembled in parallel begin to pump out the same dependency at the same time, the result is a broken file. It is precisely this problem that this supplement solves.
In order to use it, you must modify the installed Maven directly:
All. No further action is required. Now all operations with the local repository will be safe. In itself, this extension can be used only on CI servers, when many assemblies occur simultaneously and you want to use one repository to save space. But for an ordinary developer, it is more interesting to use it in conjunction with Smart Builder, which works on the assumption that this extension is already installed.
As experience has shown, using this solution, the assembly starts to work a little slower, but more reliable.
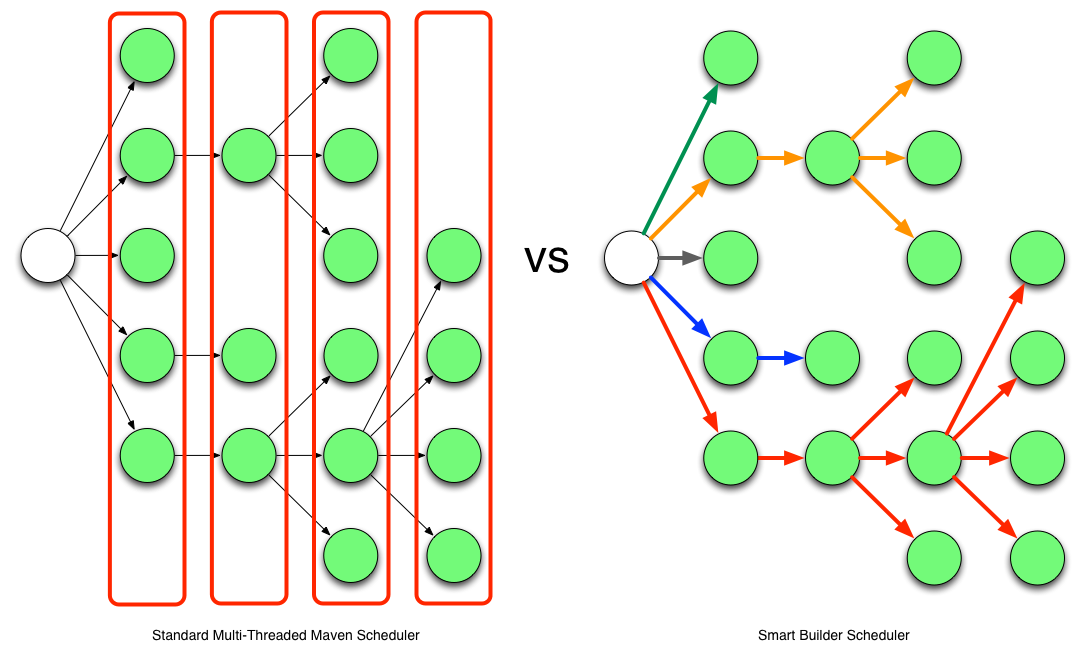
And provides a more advanced algorithm for parallelizing Maven project builds. The difference in the work of the standard Maven assembly scheduler and Smart Builder is illustrated in the diagram below:
The standard Maven parallelization strategy is simple and naive. It is based on calculating the depth of dependencies. Maven runs a parallel build of all projects at the same level until they end and only then moves on to the next level.
Takari Smart Builder, in turn, uses a more advanced strategy. He calculates chains of dependencies, performs topological sorting, and only after that makes a decision about the sequence in which it is necessary to assemble the projects.
Moreover. During compilation, it remembers the compilation time of each project in a file.mvn / timing.properties and uses it as additional information in order to complete the compilation as soon as possible next time.
In order to use this functionality, you must specify an additional key when starting Maven. For instance:
In version Maven 3.3.1, several innovations were implemented. First and foremost, the ability to declare Maven kernel extensions directly in the project. To do this, add the .mvn / extensions.xml file . In the appendix to the previously described, this file may have the following form:
The first option sets the heap size to 2 GB, and the next two optimize the JVM for Maven's needs (spied here ).
maven.config is another file with parameters, but this time for Maven itself. For instance:
--builder smart
-T1.0C
-e
Thus, we can specify that the default is smart builder with the number of threads equal to the number of logical cores. That is, if we just do
mvn clean install
then the assembly will be performed in several threads and using all extensions and optimizations. Moreover, even if we build the embedded module, these settings will still be applied, as Maven searches for the .mvn directory not only in the current directory, but also in its parent.
There really is one caveat. Because Since the assembly goes into several threads, then the assembly log is displayed by these threads competitively. As a result, when problems arise, it is not always clear what happens, due to the fact that the lines are mixed. In this case, if you want to run the assembly in one thread and figure out the causes of the trouble, you have to manually switch the assembly to single-threaded mode:
The Takari Lifecycle is an alternative to the default Maven lifecycle (building JAR files). Its distinctive feature is that instead of five separate plug-ins for one standard life cycle, one universal one with the same functionality, but with much fewer dependencies, is used. As a result - a much faster start, more optimal performance and less resource consumption. Which gives a significant performance boost when compiling complex projects with a large number of modules.
To activate the upgraded life cycle, you must add the takari-lifecycle-plugin as an extension to the assembly:
After that, all projects such as POM, as well as takari-jar projects will be assembled using the new life cycle.
You can also enable this life cycle for all JAR modules (see the documentation), in our case it began to lead to conflicts with various Maven plugins. As a result, it was decided to simply redefine the packaging of modules, where it can be done without compromising on assembly. As practice has shown, this turned out to be more than enough.
It should also be noted that when using the takari-lifecycle-plugin extension, the location of various build settings is changed. They move to the configuration section of this plugin. For instance:
Takari has another nice thing - Maven Wrapper . Similar to Gradle Wrapper, it allows you to start building a project immediately after cloning. Without the need to install and configure Maven on your computer. In addition, this allows you to assign the necessary version of Maven to the project.
The easiest way to add a wrapper to your project is to use the archetype. Run at the root of the project:
mvn -N io.takari:maven:wrapper
After that, in the current directory, we will have two scripts:
mvnw.bat - for Windows
mvnw - for * nix systems
Also, in the .mvn / wrapper directory, the wrapper itself and its configuration file will appear.
All. After that, you can call:
./mvnw clean install
And if another version of Maven is required, then you can set the necessary URL in the .mvn / wrapper / maven-wrapper.properties configuration .
And again, it does not do without nuances. For example, organizations with a closed network often use proxy Maven repositories such as Nexus or Artifactory . In this case, each developer is forced to separately configure a mirror (mirror) Maven for this repository. What slightly contradicts the ideology of the wrapper is the lack of the need for any settings.
Out of the situation as follows: we will create in our project file .mvn / settings.xml species
As a result, the mirror will automatically pick up.
Testing and Results
All of the above would not make sense if it did not give impressive results on accelerating the assembly of the project. And in order not to be unfounded, I will cite the results that were obtained at one of our working projects.
So we have:
Work Computer: Intel Core (TM) i5-3470 CPU @ 3.20GHz
Linux Kubuntu 14.04
Java 8b60
Maven 3.3.3
Multiproject which has 234 pom.xml files. Most of them collect various jar artifacts, but there are also some ejb, war, ear, etc.
Because In the “vanilla” Maven with multi-threaded assembly, there were problems, then (almost) only one thread was always used, which ultimately led to a build time of 5:32 (5 minutes 32 seconds) and higher. After all the optimizations (parallel build + takari lifecycle), the build time turned out to be 1:33. Almost 4 times!
All intermediate results are tabulated below:
How was it going
Number of threads
Time spent
default
1
5:32
default
4
3:25
smart build
4
3:18
smart build + takari-jar
1
3:23
smart build + takari-jar
4
1:33
Smart Build was launched twice, and the second result was recorded, because After the first start, the assembly execution order may be optimized (see the documentation).
Curiously, adding Takari Lifecycle in single-threaded mode gives the same performance boost as building in 4 streams but on vanilla Maven.
In conclusion
I just recently discovered the tools described in this article. So the practice of using them is still very modest. Perhaps some pitfalls will still come out over time. But in any case, such a radical acceleration of the assembly was enough to risk using these opportunities in our technical process. Time will tell what will come of it.
I also want to note that in github Takari repositories there are some more interesting projects. Their description is beyond the scope of this article, but perhaps someone else will be interested in something else.
UPD
As already noted in the comments, feedback began to come from the developers. It turned out that the mvnw.bat file does not perform its functions. A quick fix was made, which brought the functionality into proper form:
Corrected script
@REM ----------------------------------------------------------------------------
@REM Licensed to the Apache Software Foundation (ASF) under one
@REM or more contributor license agreements.  See the NOTICE file
@REM distributed with this work for additional information
@REM regarding copyright ownership.  The ASF licenses this file
@REM to you under the Apache License, Version 2.0 (the
@REM "License"); you may not use this file except in compliance
@REM with the License.  You may obtain a copy of the License at
@REM
@REM    http://www.apache.org/licenses/LICENSE-2.0
@REM
@REM Unless required by applicable law or agreed to in writing,
@REM software distributed under the License is distributed on an
@REM "AS IS" BASIS, WITHOUT WARRANTIES OR CONDITIONS OF ANY
@REM KIND, either express or implied.  See the License for the
@REM specific language governing permissions and limitations
@REM under the License.
@REM ----------------------------------------------------------------------------
@REM ----------------------------------------------------------------------------
@REM Maven2 Start Up Batch script
@REM
@REM Required ENV vars:
@REM JAVA_HOME - location of a JDK home dir
@REM
@REM Optional ENV vars
@REM M2_HOME - location of maven2's installed home dir
@REM MAVEN_BATCH_ECHO - set to 'on' to enable the echoing of the batch commands
@REM MAVEN_BATCH_PAUSE - set to 'on' to wait for a key stroke before ending
@REM MAVEN_OPTS - parameters passed to the Java VM when running Maven
@REM     e.g. to debug Maven itself, use
@REM set MAVEN_OPTS=-Xdebug -Xrunjdwp:transport=dt_socket,server=y,suspend=y,address=8000
@REM MAVEN_SKIP_RC - flag to disable loading of mavenrc files
@REM ----------------------------------------------------------------------------
@REM Begin all REM lines with '@' in case MAVEN_BATCH_ECHO is 'on'
@echo off
@REM enable echoing my setting MAVEN_BATCH_ECHO to 'on'
@if "%MAVEN_BATCH_ECHO%" == "on"  echo %MAVEN_BATCH_ECHO%
@REM set %HOME% to equivalent of $HOME
if "%HOME%" == "" (set "HOME=%HOMEDRIVE%%HOMEPATH%")
@REM Execute a user defined script before this one
if not "%MAVEN_SKIP_RC%" == "" goto skipRcPre
@REM check for pre script, once with legacy .bat ending and once with .cmd ending
if exist "%HOME%\mavenrc_pre.bat" call "%HOME%\mavenrc_pre.bat"
if exist "%HOME%\mavenrc_pre.cmd" call "%HOME%\mavenrc_pre.cmd"
:skipRcPre
@setlocal
set ERROR_CODE=0
@REM To isolate internal variables from possible post scripts, we use another setlocal
@setlocal
@REM ==== START VALIDATION ====
if not "%JAVA_HOME%" == "" goto OkJHome
echo.
echo Error: JAVA_HOME not found in your environment. >&2
echo Please set the JAVA_HOME variable in your environment to match the >&2
echo location of your Java installation. >&2
echo.
goto error
:OkJHome
if exist "%JAVA_HOME%\bin\java.exe" goto chkMHome
echo.
echo Error: JAVA_HOME is set to an invalid directory. >&2
echo JAVA_HOME = "%JAVA_HOME%" >&2
echo Please set the JAVA_HOME variable in your environment to match the >&2
echo location of your Java installation. >&2
echo.
goto error
:chkMHome
if not "%M2_HOME%"=="" goto valMHome
SET "M2_HOME=%~dp0.."
if not "%M2_HOME%"=="" goto valMHome
echo.
echo Error: M2_HOME not found in your environment. >&2
echo Please set the M2_HOME variable in your environment to match the >&2
echo location of the Maven installation. >&2
echo.
goto error
:valMHome
:stripMHome
if not "_%M2_HOME:~-1%"=="_\" goto checkMCmd
set "M2_HOME=%M2_HOME:~0,-1%"
goto stripMHome
:checkMCmd
@rem if exist "%M2_HOME%\bin\mvn.cmd"
goto init
echo.
echo Error: M2_HOME is set to an invalid directory. >&2
echo M2_HOME = "%M2_HOME%" >&2
echo Please set the M2_HOME variable in your environment to match the >&2
echo location of the Maven installation >&2
echo.
goto error
@REM ==== END VALIDATION ====
:init
set MAVEN_CMD_LINE_ARGS=%*
@REM Find the project base dir, i.e. the directory that contains the folder ".mvn".
@REM Fallback to current working directory if not found.
set MAVEN_PROJECTBASEDIR=%MAVEN_BASEDIR%
IF NOT "%MAVEN_PROJECTBASEDIR%"=="" goto endDetectBaseDir
set EXEC_DIR=%CD%
set WDIR=%EXEC_DIR%
:findBaseDir
IF EXIST "%WDIR%"\.mvn goto baseDirFound
cd ..
IF "%WDIR%"=="%CD%" goto baseDirNotFound
set WDIR=%CD%
goto findBaseDir
:baseDirFound
set MAVEN_PROJECTBASEDIR=%WDIR%
cd "%EXEC_DIR%"
goto endDetectBaseDir
:baseDirNotFound
set MAVEN_PROJECTBASEDIR=%EXEC_DIR%
cd "%EXEC_DIR%"
:endDetectBaseDir
IF NOT EXIST "%MAVEN_PROJECTBASEDIR%\.mvn\jvm.config" goto endReadAdditionalConfig
@setlocal EnableExtensions EnableDelayedExpansion
for /F "usebackq delims=" %%a in ("%MAVEN_PROJECTBASEDIR%\.mvn\jvm.config") do set JVM_CONFIG_MAVEN_PROPS=!JVM_CONFIG_MAVEN_PROPS! %%a
@endlocal & set JVM_CONFIG_MAVEN_PROPS=%JVM_CONFIG_MAVEN_PROPS%
:endReadAdditionalConfig
SET MAVEN_JAVA_EXE="%JAVA_HOME%\bin\java.exe"
@rem for %%i in ("%M2_HOME%"\boot\plexus-classworlds-*) do set CLASSWORLDS_JAR="%%i"
set WRAPPER_JAR="".\.mvn\wrapper\maven-wrapper.jar""
set WRAPPER_LAUNCHER=org.apache.maven.wrapper.MavenWrapperMain
%MAVEN_JAVA_EXE% %JVM_CONFIG_MAVEN_PROPS% %MAVEN_OPTS% %MAVEN_DEBUG_OPTS% -classpath %WRAPPER_JAR% "-Dmaven.home=%M2_HOME%" "-Dmaven.multiModuleProjectDirectory=%MAVEN_PROJECTBASEDIR%" %WRAPPER_LAUNCHER% %MAVEN_CMD_LINE_ARGS%
if ERRORLEVEL 1 goto error
goto end
:error
set ERROR_CODE=1
:end
@endlocal & set ERROR_CODE=%ERROR_CODE%
if not "%MAVEN_SKIP_RC%" == "" goto skipRcPost
@REM check for post script, once with legacy .bat ending and once with .cmd ending
if exist "%HOME%\mavenrc_post.bat" call "%HOME%\mavenrc_post.bat"
if exist "%HOME%\mavenrc_post.cmd" call "%HOME%\mavenrc_post.cmd"
:skipRcPost
@REM pause the script if MAVEN_BATCH_PAUSE is set to 'on'
if "%MAVEN_BATCH_PAUSE%" == "on" pause
if "%MAVEN_TERMINATE_CMD%" == "on" exit %ERROR_CODE%
exit /B %ERROR_CODE%
It also turned out that overall assembly under Windows is much slower than under Linux. Why this is not yet clear.
UPD2
Another subtle moment surfaced. The build for SonarQube conflicts with Smart Builder. Because the --builder smart option is enabled by default , for assembly under SonarQube it is not enough
mvn sonar:sonar
You also need to switch back to the standard build strategy:
 September 3, 2015 at 09:47