May 27, 2015 at 14:25
The use of simulators in robotics using the example of the Gazebo simulator and the DARwIn-OP robot playing football
- Tutorial
This article opens a series of lessons in which we will try to understand using the capabilities of modern physical simulators and software platforms to facilitate the development and debugging of software when creating complex robotic systems.
We will take the Gazebo 3D package as a simulator, and the humanoid DARwIn-OP, which we will force to play football, will be used as a universal robotic platform.

DARwIn-OP in the Gazebo Simulator
To learn the lessons, use code examples, and write your own algorithms, you do not need to purchase expensive equipment or software. All software is free, and debugging and demonstration of algorithms will be carried out in the simulator. The completed project will be ported to a real robot to demonstrate the results.
Gazebo 3Ddeveloped by the nonprofit organization OSRF (Open Source Robotics Foundation), has several advantages over other robotic simulators. Firstly, it is free and has an open source code. Secondly, it is very popular among the global robotics community and is the official DARPA competition simulator. Thirdly, Gazebo integrates perfectly with the ROS (Robot Operating System) software platform, which means that the program for managing a virtual robot developed by you in Gazebo and ROS will be relatively easy to transfer to a real robot.
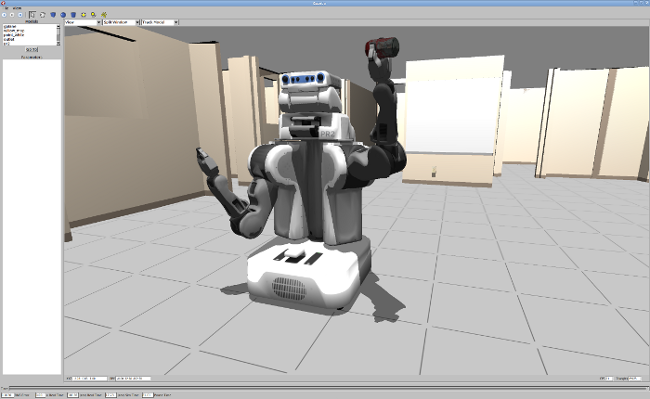
Robot PR2 in Gazebo Simulator
In this tutorial we will learn how to install the latest version of Gazebo, connect it to the ROS software platform, load the physical model of the DARwin robot and make it walk. In the end, we will set up a simple remote control system for robot movement from the keyboard. In parallel, we will master the infrastructure of ROS.
The first and most time-consuming step is to install ROS and Gazebo. To install ROS, we need a Linux PC (for example, Ubuntu 15.04). If you are a Windows or Mac OS user, you can use a virtual machine, such as Virtual Box with Linux Ubuntu installation. I immediately want to note that I was not able to configure normal 3D support under the virtual machine, Gazebo either crashed or worked with brakes. Therefore, as a workout, you can use the virtual machine, but for real development it is advisable to still use Linux.
ROS can be installed in two ways. The first way is relatively simple - installing pre-built Debian packages. This method is suitable if you have installed Ubuntu Saucy (13.10) or Trusty (14.04), or, for example, Debian Wheezy. The second way is more complicated and confusing - this is the installation from the source. Using it, you can install ROS on newer versions of Ubuntu or other Linux distributions.
The installation example below was performed on Linux Ubuntu 15.04.
So let's get started!
Open bash terminal through the program menu or by pressing the key combination ctrl + alt + t. First you need to install utilities for self-loading and initializing ROS. If you use Ubuntu or Debian, you can do this by adding a link to packages.ros.org to the repository.
Initialize rosdep. Rosdep is a command line tool for installing ROS system dependencies.
Now let's build the ROS packages using the catkin utility. Catkin is a set of macros for building and managing your ROS infrastructure.
Create a directory for installing ROS and download key packages.
The rosinstall_generator command creates a list of packages necessary for installing ROS; the minimum installation of ros_comm, the base desktop, or the full desktop_full can be specified as parameters. Setting desktop_full includes Gazebo 2.0. This version is already outdated, the current version is 5.x. Therefore, we will choose the desktop configuration, and we will install Gazebo separately.
After the list of packages for installation is generated in the indigo-desktop-wet.rosinstall file, we will use the wstool utility to initialize the workspace and download packages.
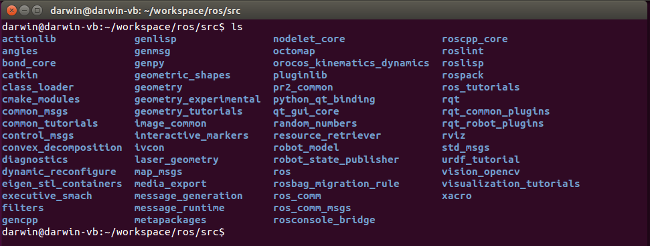
After installation, you can find the downloaded packages in the src directory.
Now we’ll go to the ros root directory and run the rosdep command to install system dependencies for the downloaded packages.
After successfully installing all the dependencies, you can finally compile the packages using the catkin build automation system. This is done with the catkin_make_isolated command or the catkin_make command. Catkin_make_isolated should be used if some of your packages use CMake (another popular build automation system), and catkin, if all packages use catkin, you should use catkin_make. The base repository is of mixed type, so we use the catkin_make_isolated command.
In order for the ROS infrastructure to work, you need to configure environment variables and prescribe all the necessary paths. To do this, run the setup.bash script.
This command will configure environment variables only for the current bash console. If you want to add ROS environment variables to bash by default, you can write the source command to a .bashrc file. This file is executed when opening a new bash console.
Congratulations! This completes the installation of ROS, let's execute a few commands to check if it works correctly.
To list the available commands for managing the ROS infrastructure, type ros in the console and press Tab twice. Since all ROS commands start with the ros prefix, bash will display their names as a result of auto-completion.
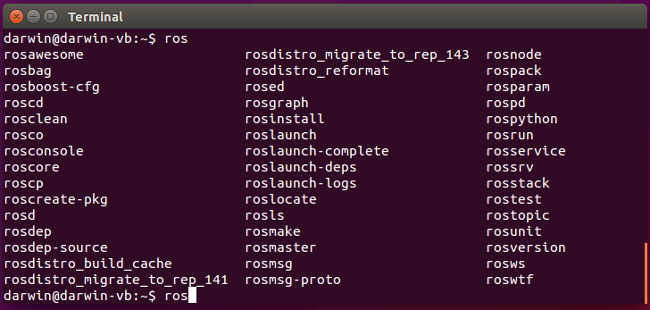
List of ROS Commands. All commands start with the ros prefix.
Let's run something, for example, simple remote control. To begin with, we need an object that we want to manage, let it be a turtle from turtlesim. So, we start the turtlesim server using the rosrun command. To do this, open a new console and execute the command.
A window with a turtle will appear on the screen. Now let's launch the telecontrol module, for this, open a new console and run the command.
Now, use the arrow keys to try moving the turtle. For example, like this.
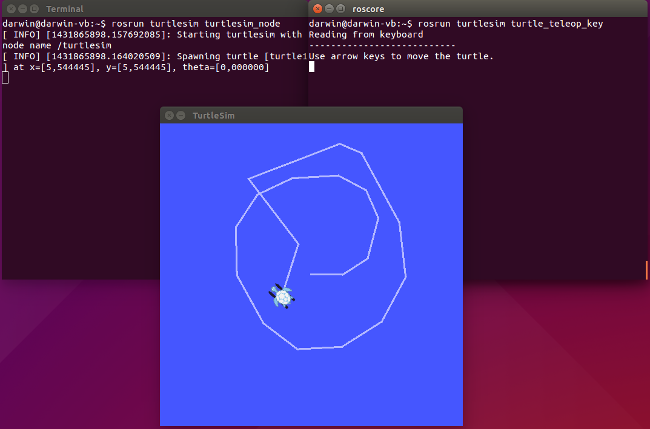
An example of remote control of a turtle
So, we just built a distributed system for remote control, where turtlesim and teleop are independent processes communicating via the ros_comm middleware. The turtlesim and teleop processes can be located on one or on different PCs that are networked. The relationship of these processes can be displayed using the rqt_graph utility.
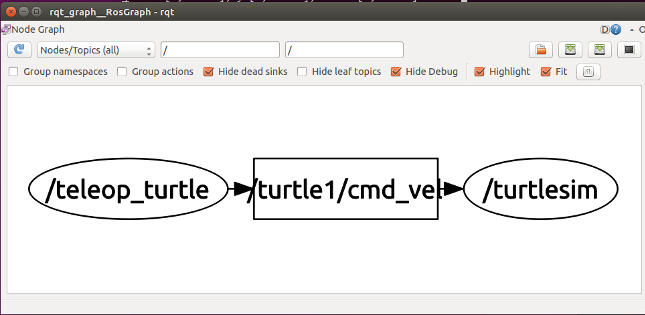
The rqt_graph utility is used to display the topology of a distributed robot control system.
The rqt_graph ovals outline the various processes (nodes) of our control system, and the data types (topics) used to transfer information between processes in rectangles. Arrows indicate the direction of data transfer. Thus, we see that the teleop node publishes the cmd_vel topic containing the given robot speed, and turtlesim is subscribed to this topic.
You can look at the contents of the topic using the rostopic command. The list parameter displays all active topics in the system, and the echo command displays the contents of the specified topic. To display the contents of cmd_vel, do not forget to steer a turtle from a neighboring console, otherwise the data will not be transmitted.
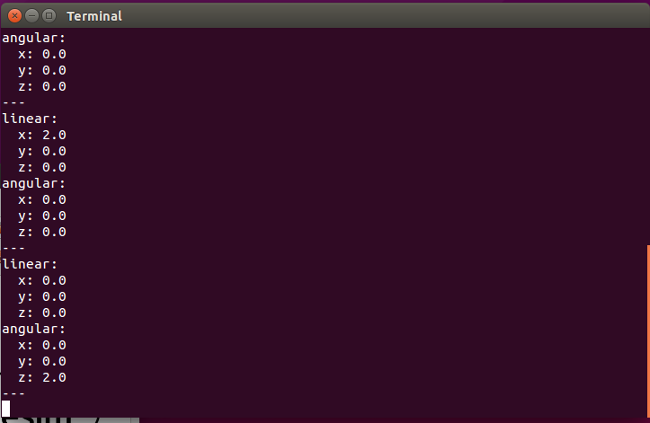
Contents / turtle1 / cmd_vel - set linear and angular speed of the turtle
After successful installation of ROS, we proceed to install the Gazebo simulator.
We will not compile Gazebo from source, but simply install the latest version using the Ubuntu package manager. To do this, we will connect the repository with Gazebo, add the key and install.
Now you need to configure rosdep so that the system ignores the dependency of packages on the older version of Gazebo, which is part of ROS Indigo, and uses the latest version that we just installed. To do this, we will go to the rosdep configuration files directory, create a local.yaml file in which we will specify to ignore the gazebo package. Next, go to the sources.list.d directory and add the newly created script to the 10-local.list. Next, run the update command so that the new configuration takes effect.
At the final stage, it is necessary to install packages connecting the Gazebo simulator with the ROS infrastructure, as well as packages with a description of the 3D model and the DARwIn-OP robot controllers. To simplify this process, we have prepared a small script that will download all the necessary dependencies.
We’ll go to the working directory and load the script from our repository on github.
Next, go to the ros_gazebo_darwin directory, as described earlier, initialize the catkin workspace and download the packages listed in the indigo-gazebo-darwin.rosinstall file.
Next, we compile and install the packages just downloaded.
Now add environment variables and paths for our workspace. To do this, execute the following commands.
Excellent! Installation of Gazebo and the DARwIn-OP model completed successfully, let's run the result as soon as possible.
Finally, after much suffering, it was time to launch a simulator with a robot model. To do this, use the roslaunch command to execute the darwin_gazebo.launch script.
The result of the script should be launching the Gazebo window and loading the 3D model of the robot with the corresponding virtual controllers and sensors. To start the simulation, you must click the play button located at the bottom of the window on the virtual timer panel.
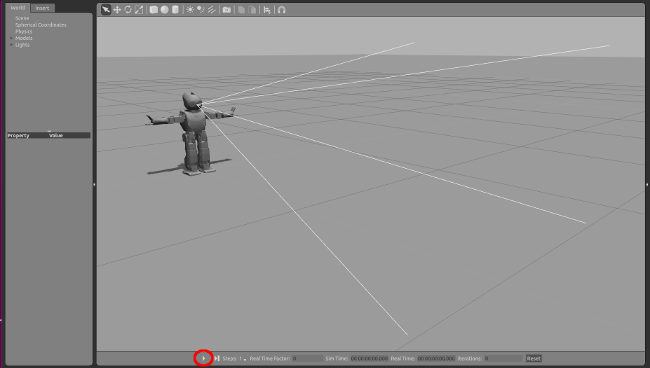
Gazebo simulator with loaded DARwIn-OP robot model. (Do not forget to click on the play button, marked in red)
Now open a new console and run the robot motion control program. It converts speed commands from Cartesian coordinates to the movement of servomotors located in the legs, torso and arms of the robot.
Finally, in the third console, run the remote control program. Its task is to read commands from the keyboard, convert them to a given speed and transmit them to the motion control program.
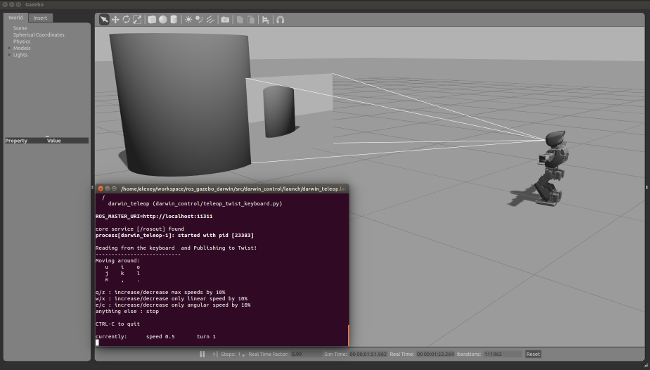
Remote control of the DARwIn-OP robot in the Gazebo simulator
Those who are interested in what the structure of our remote control system looks like can use the rqt_graph utility to graphically display the ROS processes and communication channels that are running.
As you can see, compared to the turtlesim example, this control system is much more complex and has more elements. This number of elements is due to the fact that the Darwin-OP model has 24 virtual servomotors that are controlled by the darwin_walker and walker programs, receiving the set speed from the darwin_teleop program.
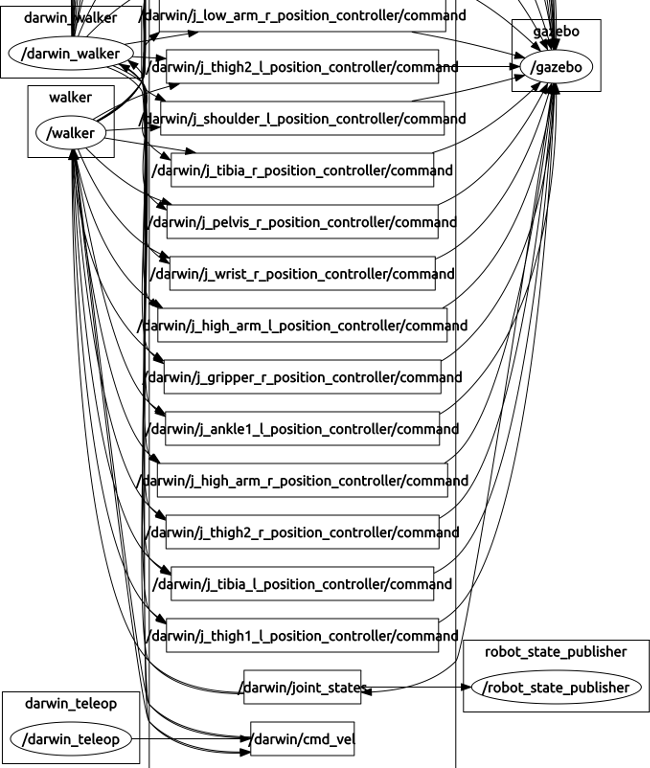
DARwIn-OP robot control system device in the Gazebo simulator
Summarize. In this tutorial, we learned how to install and compile ROS Indigo from source. We did this for educational purposes, in order to understand a little about the device of the ROS system and its commands, as well as in order to connect the latest version of the Gazebo 3D simulator. Next, we downloaded the DARwIn-OP humanoid robot manufactured by Robotis and set up a simple control system. Thanks to the capabilities of ROS, our system is able to work both on one or on several PCs connected to a network.
In the next lesson, we will continue to get acquainted with the capabilities of ROS, try to add new objects to the virtual world of the robot, for example, a ball and a goal. We will write our own program for recognizing the ball and controlling movement to a given point and, of course, will hit the goal!
See you!
Sources:
www.ros.org
www.gazebosim.org
www.generationrobots.com/en/content/83-carry-out-simulations-and-make-your-darwin-op-walk-with-gazebo-and-ros
We will take the Gazebo 3D package as a simulator, and the humanoid DARwIn-OP, which we will force to play football, will be used as a universal robotic platform.
DARwIn-OP in the Gazebo Simulator
To learn the lessons, use code examples, and write your own algorithms, you do not need to purchase expensive equipment or software. All software is free, and debugging and demonstration of algorithms will be carried out in the simulator. The completed project will be ported to a real robot to demonstrate the results.
Gazebo 3Ddeveloped by the nonprofit organization OSRF (Open Source Robotics Foundation), has several advantages over other robotic simulators. Firstly, it is free and has an open source code. Secondly, it is very popular among the global robotics community and is the official DARPA competition simulator. Thirdly, Gazebo integrates perfectly with the ROS (Robot Operating System) software platform, which means that the program for managing a virtual robot developed by you in Gazebo and ROS will be relatively easy to transfer to a real robot.
Robot PR2 in Gazebo Simulator
In this tutorial we will learn how to install the latest version of Gazebo, connect it to the ROS software platform, load the physical model of the DARwin robot and make it walk. In the end, we will set up a simple remote control system for robot movement from the keyboard. In parallel, we will master the infrastructure of ROS.
ROS installation
The first and most time-consuming step is to install ROS and Gazebo. To install ROS, we need a Linux PC (for example, Ubuntu 15.04). If you are a Windows or Mac OS user, you can use a virtual machine, such as Virtual Box with Linux Ubuntu installation. I immediately want to note that I was not able to configure normal 3D support under the virtual machine, Gazebo either crashed or worked with brakes. Therefore, as a workout, you can use the virtual machine, but for real development it is advisable to still use Linux.
ROS can be installed in two ways. The first way is relatively simple - installing pre-built Debian packages. This method is suitable if you have installed Ubuntu Saucy (13.10) or Trusty (14.04), or, for example, Debian Wheezy. The second way is more complicated and confusing - this is the installation from the source. Using it, you can install ROS on newer versions of Ubuntu or other Linux distributions.
The installation example below was performed on Linux Ubuntu 15.04.
So let's get started!
Open bash terminal through the program menu or by pressing the key combination ctrl + alt + t. First you need to install utilities for self-loading and initializing ROS. If you use Ubuntu or Debian, you can do this by adding a link to packages.ros.org to the repository.
$ sudo sh -c 'echo "deb http://packages.ros.org/ros/ubuntu $(lsb_release -sc) main" > /etc/apt/sources.list.d/ros-latest.list'
$ wget https://raw.githubusercontent.com/ros/rosdistro/master/ros.key -O - | sudo apt-key add -
$ sudo apt-get update
$ sudo apt-get install python-rosdep python-rosinstall-generator python-wstool python-rosinstall build-essential
Comment
You can do the same with the pip package manager, but for Ubuntu users, the first option is preferable.
$ sudo apt-get install python-pip
$ sudo pip install -U rosdep rosinstall_generator wstool rosinstall
Initialize rosdep. Rosdep is a command line tool for installing ROS system dependencies.
$ sudo rosdep init
$ rosdep update
Now let's build the ROS packages using the catkin utility. Catkin is a set of macros for building and managing your ROS infrastructure.
Create a directory for installing ROS and download key packages.
$ mkdir ~/workspace/ros -p
$ cd ~/workspace/ros
The rosinstall_generator command creates a list of packages necessary for installing ROS; the minimum installation of ros_comm, the base desktop, or the full desktop_full can be specified as parameters. Setting desktop_full includes Gazebo 2.0. This version is already outdated, the current version is 5.x. Therefore, we will choose the desktop configuration, and we will install Gazebo separately.
$ rosinstall_generator desktop --rosdistro indigo --deps --wet-only --tar > indigo-desktop-wet.rosinstall
After the list of packages for installation is generated in the indigo-desktop-wet.rosinstall file, we will use the wstool utility to initialize the workspace and download packages.
$ wstool init src indigo-desktop-wet.rosinstall
Comment
If, for some reason, the installation is interrupted, you can resume the process with the following command.
$ wstool update -t src
After installation, you can find the downloaded packages in the src directory.
Now we’ll go to the ros root directory and run the rosdep command to install system dependencies for the downloaded packages.
$ cd ~/workspace/ros
$ rosdep install --from-paths src --ignore-src --rosdistro indigo -y
After successfully installing all the dependencies, you can finally compile the packages using the catkin build automation system. This is done with the catkin_make_isolated command or the catkin_make command. Catkin_make_isolated should be used if some of your packages use CMake (another popular build automation system), and catkin, if all packages use catkin, you should use catkin_make. The base repository is of mixed type, so we use the catkin_make_isolated command.
$ ./src/catkin/bin/catkin_make_isolated --install -DCMAKE_BUILD_TYPE=Release
In order for the ROS infrastructure to work, you need to configure environment variables and prescribe all the necessary paths. To do this, run the setup.bash script.
$ source ~/workspace/ros/install_isolated/setup.bash
This command will configure environment variables only for the current bash console. If you want to add ROS environment variables to bash by default, you can write the source command to a .bashrc file. This file is executed when opening a new bash console.
$ echo "source ~/workspace/ros/install_isolated/setup.bash" > ~/.bashrc
Congratulations! This completes the installation of ROS, let's execute a few commands to check if it works correctly.
To list the available commands for managing the ROS infrastructure, type ros in the console and press Tab twice. Since all ROS commands start with the ros prefix, bash will display their names as a result of auto-completion.
List of ROS Commands. All commands start with the ros prefix.
Let's run something, for example, simple remote control. To begin with, we need an object that we want to manage, let it be a turtle from turtlesim. So, we start the turtlesim server using the rosrun command. To do this, open a new console and execute the command.
$ rosrun turtlesim turtlesim_node
A window with a turtle will appear on the screen. Now let's launch the telecontrol module, for this, open a new console and run the command.
$ rosrun turtlesim turtle_teleop_key
Now, use the arrow keys to try moving the turtle. For example, like this.
An example of remote control of a turtle
So, we just built a distributed system for remote control, where turtlesim and teleop are independent processes communicating via the ros_comm middleware. The turtlesim and teleop processes can be located on one or on different PCs that are networked. The relationship of these processes can be displayed using the rqt_graph utility.
$ rosrun rqt_graph rqt_graph
The rqt_graph utility is used to display the topology of a distributed robot control system.
The rqt_graph ovals outline the various processes (nodes) of our control system, and the data types (topics) used to transfer information between processes in rectangles. Arrows indicate the direction of data transfer. Thus, we see that the teleop node publishes the cmd_vel topic containing the given robot speed, and turtlesim is subscribed to this topic.
You can look at the contents of the topic using the rostopic command. The list parameter displays all active topics in the system, and the echo command displays the contents of the specified topic. To display the contents of cmd_vel, do not forget to steer a turtle from a neighboring console, otherwise the data will not be transmitted.
$ rostopic list
$ rostopic echo /turtle1/cmd_vel
Contents / turtle1 / cmd_vel - set linear and angular speed of the turtle
After successful installation of ROS, we proceed to install the Gazebo simulator.
Gazebo Installation
We will not compile Gazebo from source, but simply install the latest version using the Ubuntu package manager. To do this, we will connect the repository with Gazebo, add the key and install.
$ sudo sh -c 'echo "deb http://packages.osrfoundation.org/gazebo/ubuntu `lsb_release -cs` main" > /etc/apt/sources.list.d/gazebo-latest.list'
$ wget http://packages.osrfoundation.org/gazebo.key -O - | sudo apt-key add -
$ sudo apt-get update
$ sudo apt-get install gazebo5 libgazebo-dev
Now you need to configure rosdep so that the system ignores the dependency of packages on the older version of Gazebo, which is part of ROS Indigo, and uses the latest version that we just installed. To do this, we will go to the rosdep configuration files directory, create a local.yaml file in which we will specify to ignore the gazebo package. Next, go to the sources.list.d directory and add the newly created script to the 10-local.list. Next, run the update command so that the new configuration takes effect.
$ cd /etc/ros/rosdep
$ sudo bash -c 'echo "gazebo: { ubuntu: { vivid: [] } }" >  local.yaml'
$ cd ./sources.list.d
$ sudo bash -c 'echo "yaml file:///etc/ros/rosdep/local.yaml" >  10-local.list'
$ rosdep update
At the final stage, it is necessary to install packages connecting the Gazebo simulator with the ROS infrastructure, as well as packages with a description of the 3D model and the DARwIn-OP robot controllers. To simplify this process, we have prepared a small script that will download all the necessary dependencies.
We’ll go to the working directory and load the script from our repository on github.
$ cd ~/workspace
$ git clone https://github.com/robotgeeks/ros_gazebo_darwin.git
Next, go to the ros_gazebo_darwin directory, as described earlier, initialize the catkin workspace and download the packages listed in the indigo-gazebo-darwin.rosinstall file.
$ cd ~/workspace/ros_gazebo_darwin
$ wstool init src indigo-gazebo-darwin.rosinstall
Next, we compile and install the packages just downloaded.
$ catkin_make install
Now add environment variables and paths for our workspace. To do this, execute the following commands.
$ source ~/workspace/ros_gazebo_darwin/install/setup.bash
$ echo "source ~/workspace/ros_gazebo_darwin/install/setup.bash" > ~/.bashrc
Excellent! Installation of Gazebo and the DARwIn-OP model completed successfully, let's run the result as soon as possible.
Work in the simulator Gazebo
Finally, after much suffering, it was time to launch a simulator with a robot model. To do this, use the roslaunch command to execute the darwin_gazebo.launch script.
$ roslaunch darwin_gazebo darwin_gazebo.launch
The result of the script should be launching the Gazebo window and loading the 3D model of the robot with the corresponding virtual controllers and sensors. To start the simulation, you must click the play button located at the bottom of the window on the virtual timer panel.
Gazebo simulator with loaded DARwIn-OP robot model. (Do not forget to click on the play button, marked in red)
Now open a new console and run the robot motion control program. It converts speed commands from Cartesian coordinates to the movement of servomotors located in the legs, torso and arms of the robot.
$ roslaunch darwin_gazebo darwin_walker.launch
Finally, in the third console, run the remote control program. Its task is to read commands from the keyboard, convert them to a given speed and transmit them to the motion control program.
$ roslaunch darwin_control darwin_teleop.launch
Remote control of the DARwIn-OP robot in the Gazebo simulator
Those who are interested in what the structure of our remote control system looks like can use the rqt_graph utility to graphically display the ROS processes and communication channels that are running.
$ rosrun rqt_graph rqt_graph
As you can see, compared to the turtlesim example, this control system is much more complex and has more elements. This number of elements is due to the fact that the Darwin-OP model has 24 virtual servomotors that are controlled by the darwin_walker and walker programs, receiving the set speed from the darwin_teleop program.
DARwIn-OP robot control system device in the Gazebo simulator
Summarize. In this tutorial, we learned how to install and compile ROS Indigo from source. We did this for educational purposes, in order to understand a little about the device of the ROS system and its commands, as well as in order to connect the latest version of the Gazebo 3D simulator. Next, we downloaded the DARwIn-OP humanoid robot manufactured by Robotis and set up a simple control system. Thanks to the capabilities of ROS, our system is able to work both on one or on several PCs connected to a network.
In the next lesson, we will continue to get acquainted with the capabilities of ROS, try to add new objects to the virtual world of the robot, for example, a ball and a goal. We will write our own program for recognizing the ball and controlling movement to a given point and, of course, will hit the goal!
See you!
Sources:
www.ros.org
www.gazebosim.org
www.generationrobots.com/en/content/83-carry-out-simulations-and-make-your-darwin-op-walk-with-gazebo-and-ros