MotoPress Review: Reinventing the Standard WordPress Text Editor
As a blogger, I spend a lot of time using the WordPress Content Editor. Potentially, any enhancements to the posting process can make a big difference to my work, so I was very intrigued by the drag-and-drop MotoPress plugin , which was specifically designed to replace the standard text editor.

Frankly, so far I have not had a problem with a standard text editor, so I did not fully understand what to expect from Motopress: “it works - do not touch it,” right?
Nevertheless, I was going to test several basic features (which are quite a lot) with a fresh look to provide an independent overview of the plugin. And that’s what happened to me.
Firstly, connecting “Motopress” is very simple: after installing and activating it, just start the WordPress editor, as you usually do, and you will see the MotoPress Content Editor button, just below the post title. With one click open its interface.

After starting (note: loading takes several seconds) the interface already looks completely different. The painfully familiar WordPress menu on the left disappears, as does Publish, Categories, and Tags on the right.
Instead, MotoPress displays its own buttons on the left, and the drag-and-drop editor is centered and has two skin options: light and dark. The only familiar element is the WordPress navigation menu at the top of the screen to return to the standard WordPress look. Just click the Close button in the upper corner to close the plugin.
For doubting users, the developers have implemented a Help and Tutorials button, a question mark in the circle next to the Publish button that opens several useful videos - just nine video clips that show everything you need to know about the new interface.
Before I tested the main features of the new plugin, I decided to see how editing an ordinary text post would work.
MotoPress editor can work with posts, pages and custom post types - you can configure this in the menu MotoPress> MotoPress Settings. You can also configure user access there.
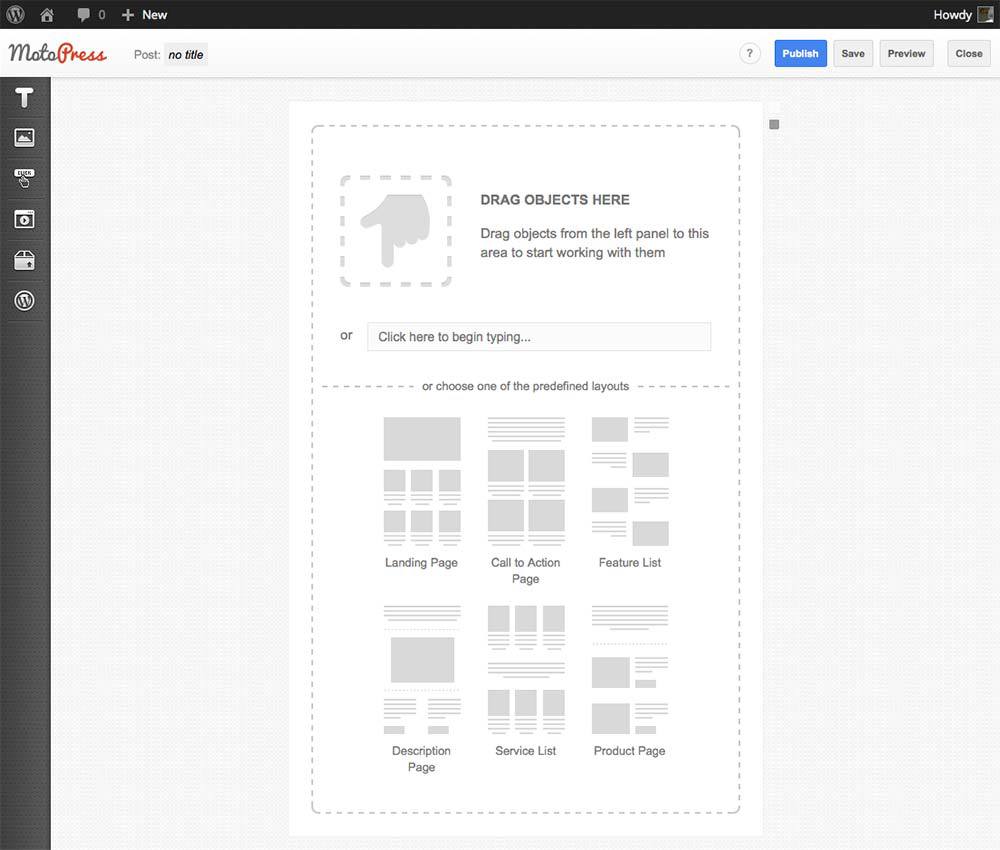
If you are also used to using the standard WordPress editor, it will take you a few minutes to get used to it all. I was asked to either drag and drop objects into the drag-and-drop editor, or just start typing. When you click on “Start Typing”, the “Paragraph” object is automatically added to the WYSIWYG editor - and you can start.

After that, I decided to try some new formatting options. MotoPress displays a useful floating bar above the input field, in which you can choose the formatting of the text, play with font sizes and add links. You can also choose a font style, i.e. Switch between plain text or formatting using h1, h2 or h3 tags.

There is also a side pop-up container that allows you to format the indentation around the module using several predefined settings.
After saving your work, MotoPress will insert a short code into your post or page, which you can then see and add the elements you need in it in a regular WordPress editor - it’s very convenient (keep in mind that after uninstalling MotoPress this code will stop functioning).
Creating posts has become very simple: I really felt that there are more options for managing formatting content.
After writing a simple post, I decided to dig deeper into the capabilities of the plugin.
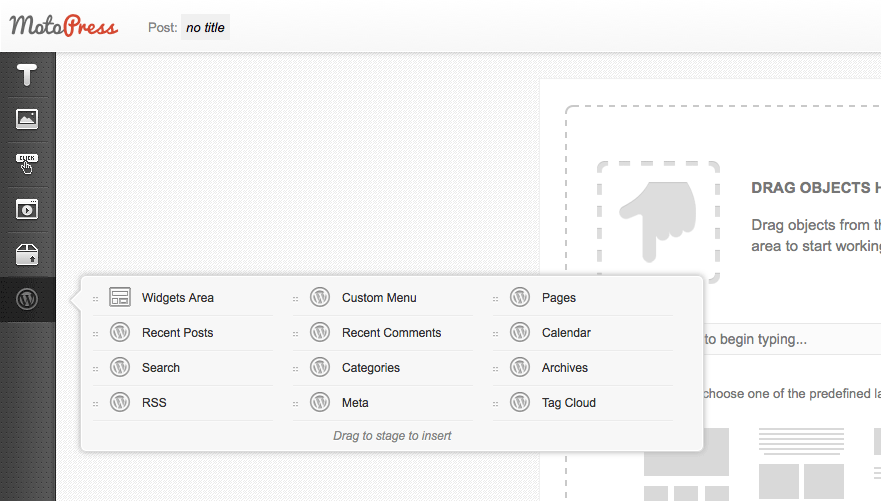
There are about 20 so-called modules for adding to a text editor, located under six headings:
This is an impressive set of supported modules, but the best thing about MotoPress is that you can drag and drop modules into the WYSIWYG editor, giving full control over the layout of elements on the page. You can drag and drop your content until you put it in the right place.
However, adding several modules to the editor is not the fastest thing: each time you add a new one or change the size or position of an existing one, Motopress needs a few seconds to display new content on the screen. However, this is not such a high price for the ease of manipulating the formatting and position of the content.
Adding an image is also very simple: drag the Image module to the place left for it and select a picture to display. You can also easily resize it by pulling the edge.
I was also impressed with the button creation function: MotoPress makes inserting buttons into your content super easy. You can add the desired URL, decide when the link opens in a new window, and choose from many other design options. Buttons and look good - with everything working as in many special plug-ins for creating buttons.

You can also use MotoPress to insert sharing buttons and subscribe to social networks. Motopress supports four platforms: FaceBook, Twitter, Google+ and Pinterest. The icons are small but stylish. In addition, you can choose the shape - round, square or rounded.

My favorite module is probably “Slider” - I added picture carousels before, and that was that task. With Motopress, however, it turned out to be incredibly fast and intuitive. You just drag the slider into place, select the images, and everything works! You can resize the slider in the same way as you resized the image, which allows you to fit this module literally anywhere on your page. Finally, you can choose between dimming or flipping animations, time between slide changes, etc.

In general, I am extremely pleased with the work of the WYSIWYG editor. Use turned out to be intuitive and fun! You can create an infinite number of combinations of modules, resize them and move them all over the page - and it only took me a few minutes to figure it all out.
I used Motopress with pleasure, and was pleasantly surprised by the number of functions supported by it - in principle, you can replace several existing plug-ins with one of them at once.
From a blogger’s point of view, some modules seemed to me a luxury: I don’t think that I would use other modules besides adding and resizing images often. However, if you want to create complex page layouts (especially for landing pages), MotoPress is what you need. Source .
Thank you for reading! We hope you find both our translation and the plugin useful. We have TemplateMonster with a whole line of templates with built-in MotoPress, which can be obtained in this case for free:

A complete set of our templates for WordPress: www.templatemonster.com/en/wordpress-themes-type
Create sites with ease!

Frankly, so far I have not had a problem with a standard text editor, so I did not fully understand what to expect from Motopress: “it works - do not touch it,” right?
Nevertheless, I was going to test several basic features (which are quite a lot) with a fresh look to provide an independent overview of the plugin. And that’s what happened to me.
First impression
Firstly, connecting “Motopress” is very simple: after installing and activating it, just start the WordPress editor, as you usually do, and you will see the MotoPress Content Editor button, just below the post title. With one click open its interface.
After starting (note: loading takes several seconds) the interface already looks completely different. The painfully familiar WordPress menu on the left disappears, as does Publish, Categories, and Tags on the right.
Instead, MotoPress displays its own buttons on the left, and the drag-and-drop editor is centered and has two skin options: light and dark. The only familiar element is the WordPress navigation menu at the top of the screen to return to the standard WordPress look. Just click the Close button in the upper corner to close the plugin.
For doubting users, the developers have implemented a Help and Tutorials button, a question mark in the circle next to the Publish button that opens several useful videos - just nine video clips that show everything you need to know about the new interface.
Standard Blog Posting
Before I tested the main features of the new plugin, I decided to see how editing an ordinary text post would work.
MotoPress editor can work with posts, pages and custom post types - you can configure this in the menu MotoPress> MotoPress Settings. You can also configure user access there.
If you are also used to using the standard WordPress editor, it will take you a few minutes to get used to it all. I was asked to either drag and drop objects into the drag-and-drop editor, or just start typing. When you click on “Start Typing”, the “Paragraph” object is automatically added to the WYSIWYG editor - and you can start.
After that, I decided to try some new formatting options. MotoPress displays a useful floating bar above the input field, in which you can choose the formatting of the text, play with font sizes and add links. You can also choose a font style, i.e. Switch between plain text or formatting using h1, h2 or h3 tags.
There is also a side pop-up container that allows you to format the indentation around the module using several predefined settings.
After saving your work, MotoPress will insert a short code into your post or page, which you can then see and add the elements you need in it in a regular WordPress editor - it’s very convenient (keep in mind that after uninstalling MotoPress this code will stop functioning).
Creating posts has become very simple: I really felt that there are more options for managing formatting content.
WYSIWYG Editor
After writing a simple post, I decided to dig deeper into the capabilities of the plugin.
There are about 20 so-called modules for adding to a text editor, located under six headings:
- Text (Title) - Title, Paragraph, WordPress text, Quote.
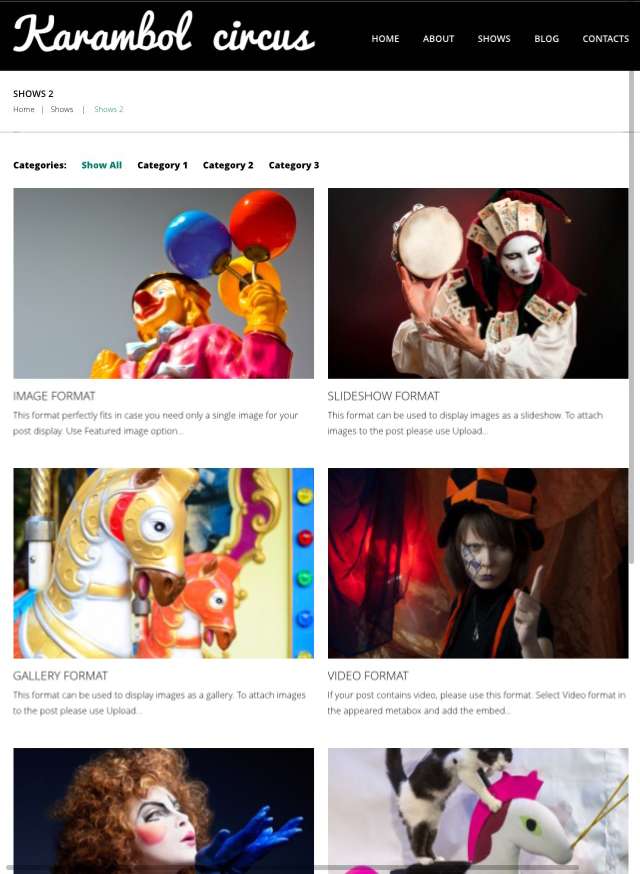
- Images - Images, Slider.
- Buttons - Buttons, Sharing buttons on social networks, Buttons of social networks.
- Video - Video, Audio.
- Custom Code - Post Lattice, Bookmarks, Spaces, Tables, Charts, Google Maps, Embed Code.
- Widgets - Any supported widgets will be displayed here.
This is an impressive set of supported modules, but the best thing about MotoPress is that you can drag and drop modules into the WYSIWYG editor, giving full control over the layout of elements on the page. You can drag and drop your content until you put it in the right place.
However, adding several modules to the editor is not the fastest thing: each time you add a new one or change the size or position of an existing one, Motopress needs a few seconds to display new content on the screen. However, this is not such a high price for the ease of manipulating the formatting and position of the content.
Adding an image is also very simple: drag the Image module to the place left for it and select a picture to display. You can also easily resize it by pulling the edge.
I was also impressed with the button creation function: MotoPress makes inserting buttons into your content super easy. You can add the desired URL, decide when the link opens in a new window, and choose from many other design options. Buttons and look good - with everything working as in many special plug-ins for creating buttons.
You can also use MotoPress to insert sharing buttons and subscribe to social networks. Motopress supports four platforms: FaceBook, Twitter, Google+ and Pinterest. The icons are small but stylish. In addition, you can choose the shape - round, square or rounded.
My favorite module is probably “Slider” - I added picture carousels before, and that was that task. With Motopress, however, it turned out to be incredibly fast and intuitive. You just drag the slider into place, select the images, and everything works! You can resize the slider in the same way as you resized the image, which allows you to fit this module literally anywhere on your page. Finally, you can choose between dimming or flipping animations, time between slide changes, etc.
In general, I am extremely pleased with the work of the WYSIWYG editor. Use turned out to be intuitive and fun! You can create an infinite number of combinations of modules, resize them and move them all over the page - and it only took me a few minutes to figure it all out.
Verdict
I used Motopress with pleasure, and was pleasantly surprised by the number of functions supported by it - in principle, you can replace several existing plug-ins with one of them at once.
From a blogger’s point of view, some modules seemed to me a luxury: I don’t think that I would use other modules besides adding and resizing images often. However, if you want to create complex page layouts (especially for landing pages), MotoPress is what you need. Source .
Thank you for reading! We hope you find both our translation and the plugin useful. We have TemplateMonster with a whole line of templates with built-in MotoPress, which can be obtained in this case for free:
Another eleven templates with Motopress


A complete set of our templates for WordPress: www.templatemonster.com/en/wordpress-themes-type
Create sites with ease!