Introduction to Amazon EC2 Container Service
- Tutorial
The success of containerization technologies in general and the Docker platform as a successful practical solution in particular is no longer a secret (or even news) for anyone today. Everyone who at least once tried to pack their application in a container experienced this feeling of purely childish happiness from the understanding that here it is - a packaged and ready-to-work component that will deploy anywhere, in any quantities and work there too well, how it worked on the developer's computer. Deployment was a pleasure, not a punishment. “Flexibility” and “scalability” have ceased to be marketing nonsense from advertising booklets and have become realizable things. Writing microservices has become not just “fashionable”, but simply logical and practical. Containers have changed the world forever. (There was, here the truth, yesterday the thought thatcontainers are evil , but they seem to figure out in the comments that it’s not a disaster, but a general approach to security)
Not even 100 years have passed, as Amazon noticed, having released at the end of 2014 its new service - Amazon EC2 Container Service. The general purpose of the service is to enable the deployment of Docker containers in a convenient way. “Convenient” - means without having to delve deeper into the interior of Docker, and indeed do something with your hands in the console of the host machine. You simply create a new cluster, add virtual machines to it, on which containers will work, and then indicate how many and which containers you need to run. Everything else (the choice on which machine to launch the container, access rights, port forwarding) Amazon takes over. In addition, you can use the entire Amazon infrastructure from the Docker container - save files to S3, use SQS queues, screw the Amazon load balancer at the input, and the output is Amazon logs and analytics services. Containers can “see” each other, share (or not share) resources, start and be stopped from the AWS console (manually or by predefined rules).
Let's try to launch something in Amazon EC2 Container Service. For example, let's raise Wordpress + Mysql.
In principle, you can go here , click the “Get started” button and go through the wizard, which will lead you through the process of setting up a cluster and tasks, but I personally don’t like this approach - you don’t see the whole power of the system and the flexibility of settings. Close the wizard. Open the “Clusters” tab , on which we do not have a single cluster.

Well then, let's create one!

And open:
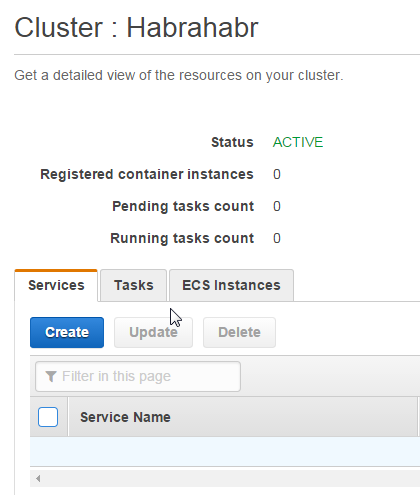
So, we see that the cluster is created and is in an active state, though nothing has been happening in it yet. Well, this is no wonder - so far we have not given him any tasks. In order to get things going, we need to tell the cluster what tasks and on which machines it should perform.
ECS Instances
These are EC2 virtual machines that you allocate for cluster operation. You can run any number of any types of virtual machines in one cluster. Well, not any, the limitation is 1000 machines per cluster, which should be enough? There are only two requirements for the machine: Docker must be installed there and Amazon ECS Container Agent must be installed there - such a utility from Amazon for managing the cluster. Sources are open - github.com/aws/amazon-ecs-agent . It is put simply:
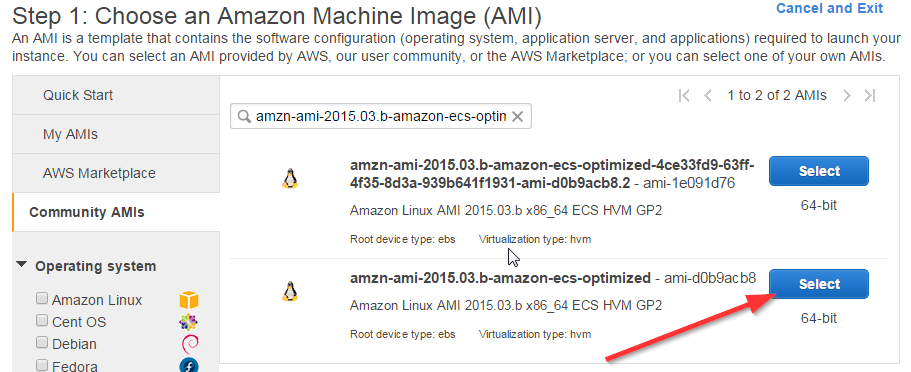
But, in general, installing Docker and agent on a more or less standard Linux is a trivial and uninteresting task, so Amazon has already made images for virtual machines with everything you need, here they are:
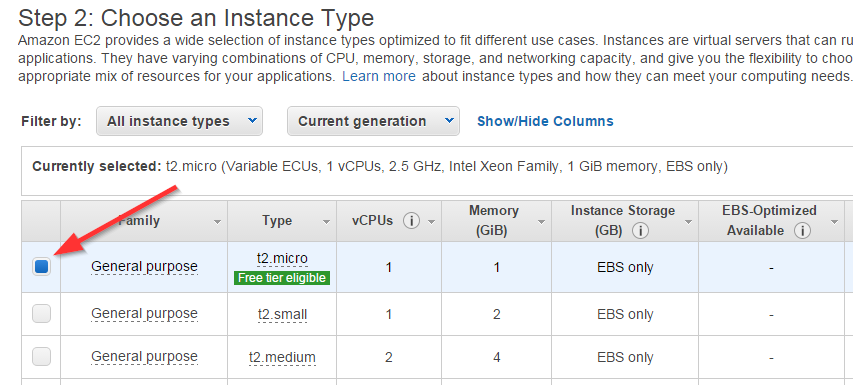
So, we need to start at least one such virtual machine from the EC2 control panel :
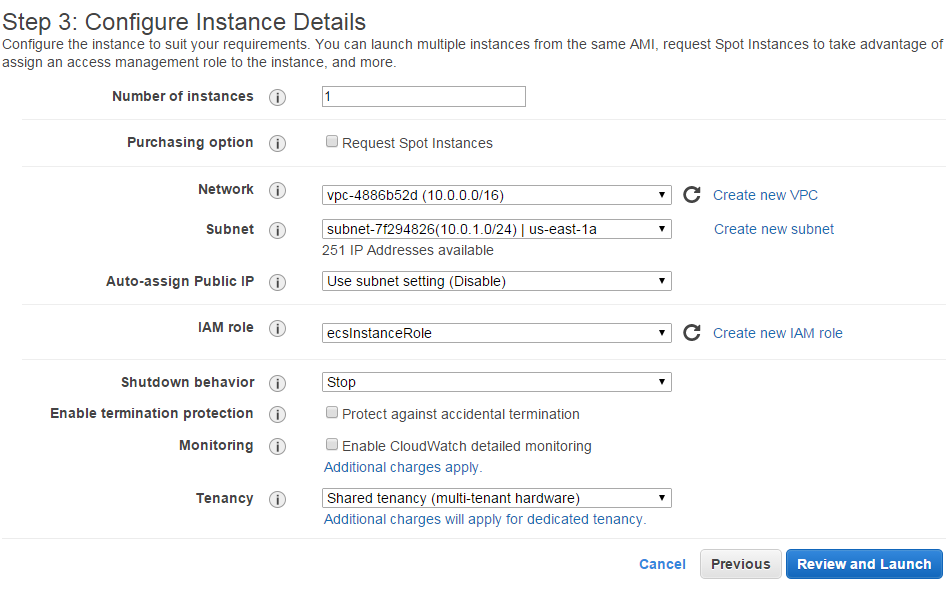
In the previous step, you may need to create IAM User, IAM Role and VPC. What is it, why, and how it is created can be read here .
In the next step, make sure that the security rules allow access to port 80 (we were going to raise WordPress, do you still remember?):

We wait a couple of minutes until our virtual machine goes into the “Running” state:

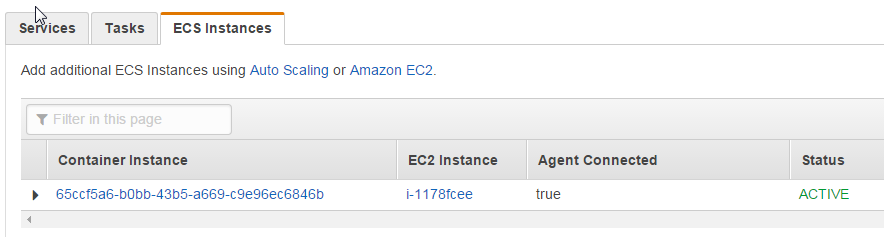
Now on the tab of our cluster we can see the added into it node:
If you need more cars - it's time to start them, but for now, one is enough for us.
Tasks is a description of what will actually work in our cluster. The task includes one or several related Docker containers, a description of their environment, their resource requirements, mount points, port mapping, startup parameters, etc. Here is a task that describes two related Docker containers: one for Wordpress and one for Mysql.
Let's briefly describe what’s where:
There are more parameters in the documentation , some of them (entryPoint, cmd, mountPoints) are taken directly from the Docker documentation.
Let's add the task described above:

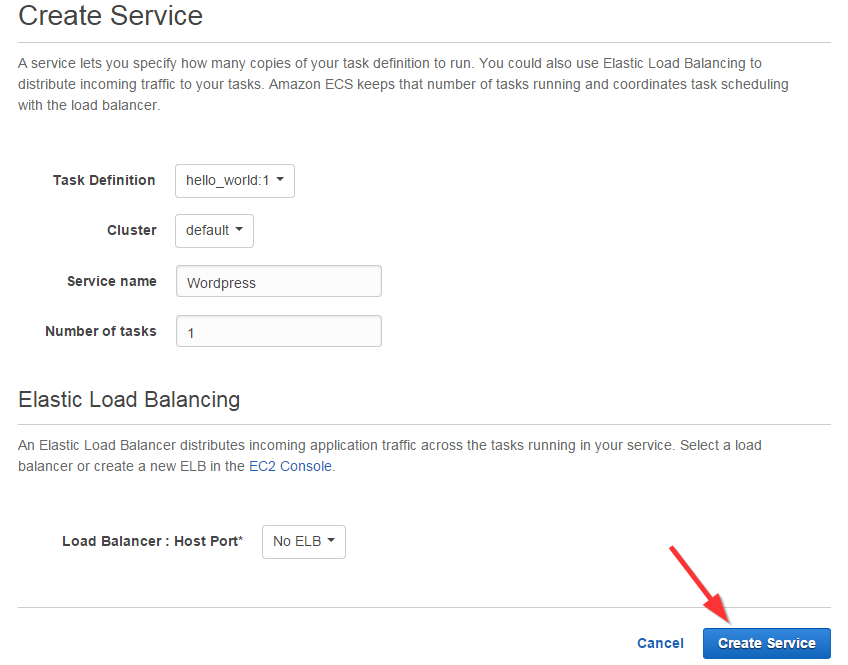
Now the task needs to be started. You can do this on the page of our cluster, and in two ways:
One would think that the difference is that the service allows you to set the launch of several tasks, but no - this can be done in the first way. The difference is in the concept: in the first case, it is believed that we are launching some “background” task, which should work out and die. In the second case, we raise some service that should be accessible from the outside for a long time, therefore, firstly, we can immediately turn on the Elastic Load Balancer for the service, and secondly, the service will raise the fallen tasks (and even collapsed virtual machines) so that maintain the number of active tasks at a given level.
Since our Wordpress is more like a “service” in ECS terms, we will launch it like this:
The task will hang for some time in the “Pending” state (you still need to download, assemble and launch two containers) and go to “Running”:

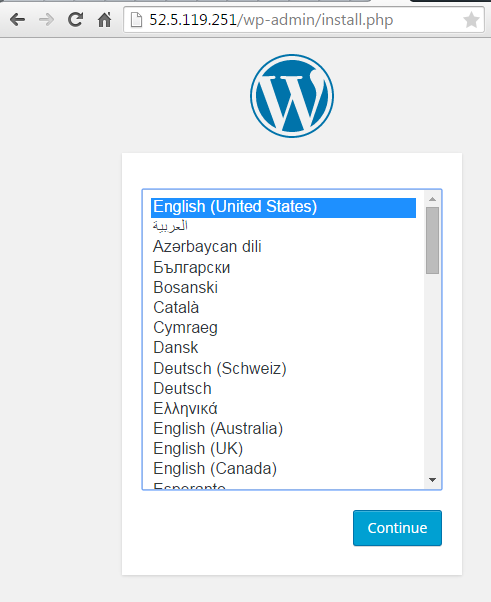
All you can, take the virtual machine’s address in EC2 and open it in a browser:
Not even 100 years have passed, as Amazon noticed, having released at the end of 2014 its new service - Amazon EC2 Container Service. The general purpose of the service is to enable the deployment of Docker containers in a convenient way. “Convenient” - means without having to delve deeper into the interior of Docker, and indeed do something with your hands in the console of the host machine. You simply create a new cluster, add virtual machines to it, on which containers will work, and then indicate how many and which containers you need to run. Everything else (the choice on which machine to launch the container, access rights, port forwarding) Amazon takes over. In addition, you can use the entire Amazon infrastructure from the Docker container - save files to S3, use SQS queues, screw the Amazon load balancer at the input, and the output is Amazon logs and analytics services. Containers can “see” each other, share (or not share) resources, start and be stopped from the AWS console (manually or by predefined rules).
Let's try to launch something in Amazon EC2 Container Service. For example, let's raise Wordpress + Mysql.
In principle, you can go here , click the “Get started” button and go through the wizard, which will lead you through the process of setting up a cluster and tasks, but I personally don’t like this approach - you don’t see the whole power of the system and the flexibility of settings. Close the wizard. Open the “Clusters” tab , on which we do not have a single cluster.
Well then, let's create one!
And open:
So, we see that the cluster is created and is in an active state, though nothing has been happening in it yet. Well, this is no wonder - so far we have not given him any tasks. In order to get things going, we need to tell the cluster what tasks and on which machines it should perform.
ECS Instances
These are EC2 virtual machines that you allocate for cluster operation. You can run any number of any types of virtual machines in one cluster. Well, not any, the limitation is 1000 machines per cluster, which should be enough? There are only two requirements for the machine: Docker must be installed there and Amazon ECS Container Agent must be installed there - such a utility from Amazon for managing the cluster. Sources are open - github.com/aws/amazon-ecs-agent . It is put simply:
touch /etc/ecs/ecs.config
mkdir -p /var/log/ecs
docker run --name ecs-agent -d -v /var/run/docker.sock:/var/run/docker.sock -v /var/log/ecs:/log -p 127.0.0.1:51678:51678 --env-file /etc/ecs/ecs.config -e ECS_LOGFILE=/log/ecs-agent.log amazon/amazon-ecs-agent
But, in general, installing Docker and agent on a more or less standard Linux is a trivial and uninteresting task, so Amazon has already made images for virtual machines with everything you need, here they are:
| Region | AMI Name | AMI ID |
|---|---|---|
| us-east-1 | amzn-ami-2015.03.b-amazon-ecs-optimized | ami-d0b9acb8 |
| us-west-2 | amzn-ami-2015.03.b-amazon-ecs-optimized | ami-6b88b95b |
| eu-west-1 | amzn-ami-2015.03.b-amazon-ecs-optimized | ami-ed7c149a |
| ap-northeast-1 | amzn-ami-2015.03.b-amazon-ecs-optimized | ami-c6c609c6 |
| ap-southeast-2 | amzn-ami-2015.03.b-amazon-ecs-optimized | ami-39017e03 |
So, we need to start at least one such virtual machine from the EC2 control panel :
In the previous step, you may need to create IAM User, IAM Role and VPC. What is it, why, and how it is created can be read here .
In the next step, make sure that the security rules allow access to port 80 (we were going to raise WordPress, do you still remember?):
We wait a couple of minutes until our virtual machine goes into the “Running” state:
Now on the tab of our cluster we can see the added into it node:
If you need more cars - it's time to start them, but for now, one is enough for us.
Tasks
Tasks is a description of what will actually work in our cluster. The task includes one or several related Docker containers, a description of their environment, their resource requirements, mount points, port mapping, startup parameters, etc. Here is a task that describes two related Docker containers: one for Wordpress and one for Mysql.
{
 "containerDefinitions": [
 {
 "name": "wordpress",
 "links": [
 "mysql"
 ],
 "image": "wordpress",
 "essential": true,
 "portMappings": [
 {
 "containerPort": 80,
 "hostPort": 80
 }
 ],
 "memory": 300,
 "cpu": 10
 },
 {
 "environment": [
 {
 "name": "MYSQL_ROOT_PASSWORD",
 "value": "password"
 }
 ],
 "name": "mysql",
 "image": "mysql",
 "cpu": 10,
 "memory": 300,
 "essential": true
 }
 ],
 "family": "hello_world"
}
Let's briefly describe what’s where:
- name is the name of the container. Used to link one container to another
- links - link of one container to another. Please note that the Wordpress container refers to Mysql, which means that it will be able to open the database server port without additional port mapping.
- image - a link to the container repository on the Docker Hub. In the example above, we deploy two images: registry.hub.docker.com/_/wordpress and registry.hub.docker.com/_/mysql
- essential - notes the criticality of the container. Stopping a “critical” container may be a reason to stop the entire task (and possibly restarting it). Stopping a non-critical container does not affect anything
- portMappings - port forwarding from the container to the host machine. In the example above, we open the 80th port
- memory, cpu - requirements for free resources of the host machine. The memory is considered in megabytes, but the processor resources are in conditional parrots, which are allocated 1024 for each core of the virtual machine. Those. you can run two containers with cpu = 500 on a single-core machine, but the third one will not start
- environment - environment variables passed to the container
There are more parameters in the documentation , some of them (entryPoint, cmd, mountPoints) are taken directly from the Docker documentation.
Let's add the task described above:
Now the task needs to be started. You can do this on the page of our cluster, and in two ways:
- Run the task as such (Cluster-Tasks-Run new task- <select our task> -Run task)
- Launch the service consisting of our task (Cluster-Services-Create- <select the task, service name, number of tasks> -Create service)
One would think that the difference is that the service allows you to set the launch of several tasks, but no - this can be done in the first way. The difference is in the concept: in the first case, it is believed that we are launching some “background” task, which should work out and die. In the second case, we raise some service that should be accessible from the outside for a long time, therefore, firstly, we can immediately turn on the Elastic Load Balancer for the service, and secondly, the service will raise the fallen tasks (and even collapsed virtual machines) so that maintain the number of active tasks at a given level.
Since our Wordpress is more like a “service” in ECS terms, we will launch it like this:
The task will hang for some time in the “Pending” state (you still need to download, assemble and launch two containers) and go to “Running”:
All you can, take the virtual machine’s address in EC2 and open it in a browser: