Xcode: plugins for plugins

Interested in publishing “Writing your Xcode plugin”, I decided to write a simple time tracker for Xcode. The process I went through is the essence of this article. In it, we will analyze several plugins that will help you write other plugins faster and more efficiently.
The main idea of any plug-in with an interface is that it integrates into the XI UI and looks as native to it as possible. But as soon as we look at the Xcode window, the question immediately arises: “How to understand where which object is and how we can integrate into the one we need?” So the first plug-in appears on our way. We will write a simple plugin that will load into Xcode and say where which object is located.
First plugin
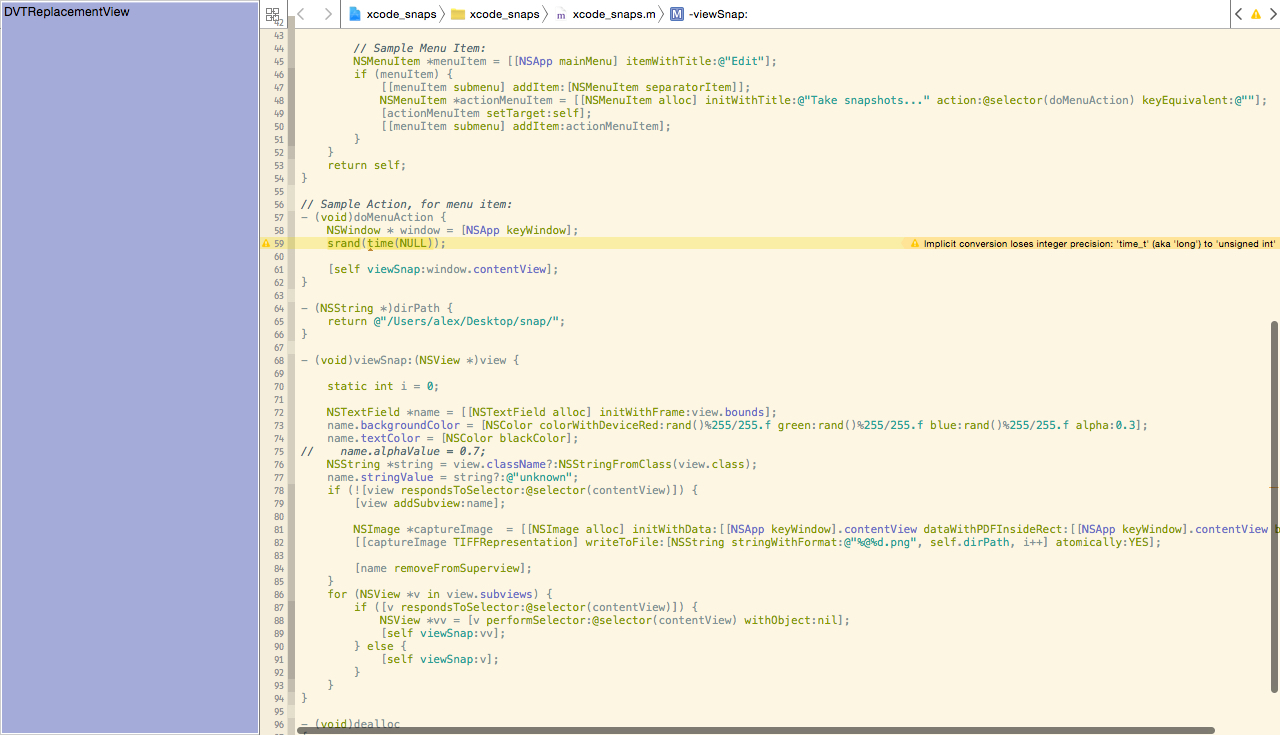
To get started, install the template for plugins and create a plugin. Then everything is simple: in order to understand what Xcode consists of, you need to display its objects in the log. To do this, you can write logs to a file or display them with dialogs and close them each time. Ah, how convenient it would be to output this information directly to the Xcode console, you say? Well, nothing, we will solve this problem with our second plugin, but more on that a little later. In the meantime, in order not to deal with the location of objects from the logs, we will take a screenshot of the Xcode window with a shaded area of objects and save all this to a file.
Our first plugin will consist of just one method, which will go through all the 'NSView', colorize them and take a screenshot of the current window. It sounds simple, but in practice there is one small nuance: some of the 'NSView' objects in Xcode cannot have anything but one single 'contentView' and we cannot add our own to it. But this does not matter, we will simply ignore such objects and delve into them.
Method Text
And the method call:
- (void)viewSnap:(NSView *)view {
    static int i = 0;
    //создаем text field с именем объекта
    NSTextField *name = [[NSTextField alloc] initWithFrame:view.bounds];
    name.backgroundColor = [NSColor colorWithDeviceRed:rand()%255/255.f green:rand()%255/255.f blue:rand()%255/255.f alpha:0.3];
    name.textColor = [NSColor blackColor];
    NSString *string = view.className?:NSStringFromClass(view.class);
    name.stringValue = string?:@"unknown";
    if (![view respondsToSelector:@selector(contentView)]) {//можем ли мы добавить text field?
        [view addSubview:name];
        //делаем снимок и сохраняем в файл
        NSImage *captureImage  = [[NSImage alloc] initWithData:[[NSApp keyWindow].contentView dataWithPDFInsideRect:[[NSApp keyWindow].contentView bounds]]];
        [[captureImage TIFFRepresentation] writeToFile:[NSString stringWithFormat:@"%@%d.png", self.dirPath, i++] atomically:YES];
        [name removeFromSuperview];
    }
    for (NSView *v in view.subviews) {
        if ([v respondsToSelector:@selector(contentView)]) {
            NSView *vv = [v performSelector:@selector(contentView) withObject:nil];
            [self viewSnap:vv];
        } else {
            [self viewSnap:v];
        }
    }
}
And the method call:
- (void)doMenuAction {
    NSWindow * window = [NSApp keyWindow];
    srand(time(NULL));
    [self viewSnap:window.contentView];
}
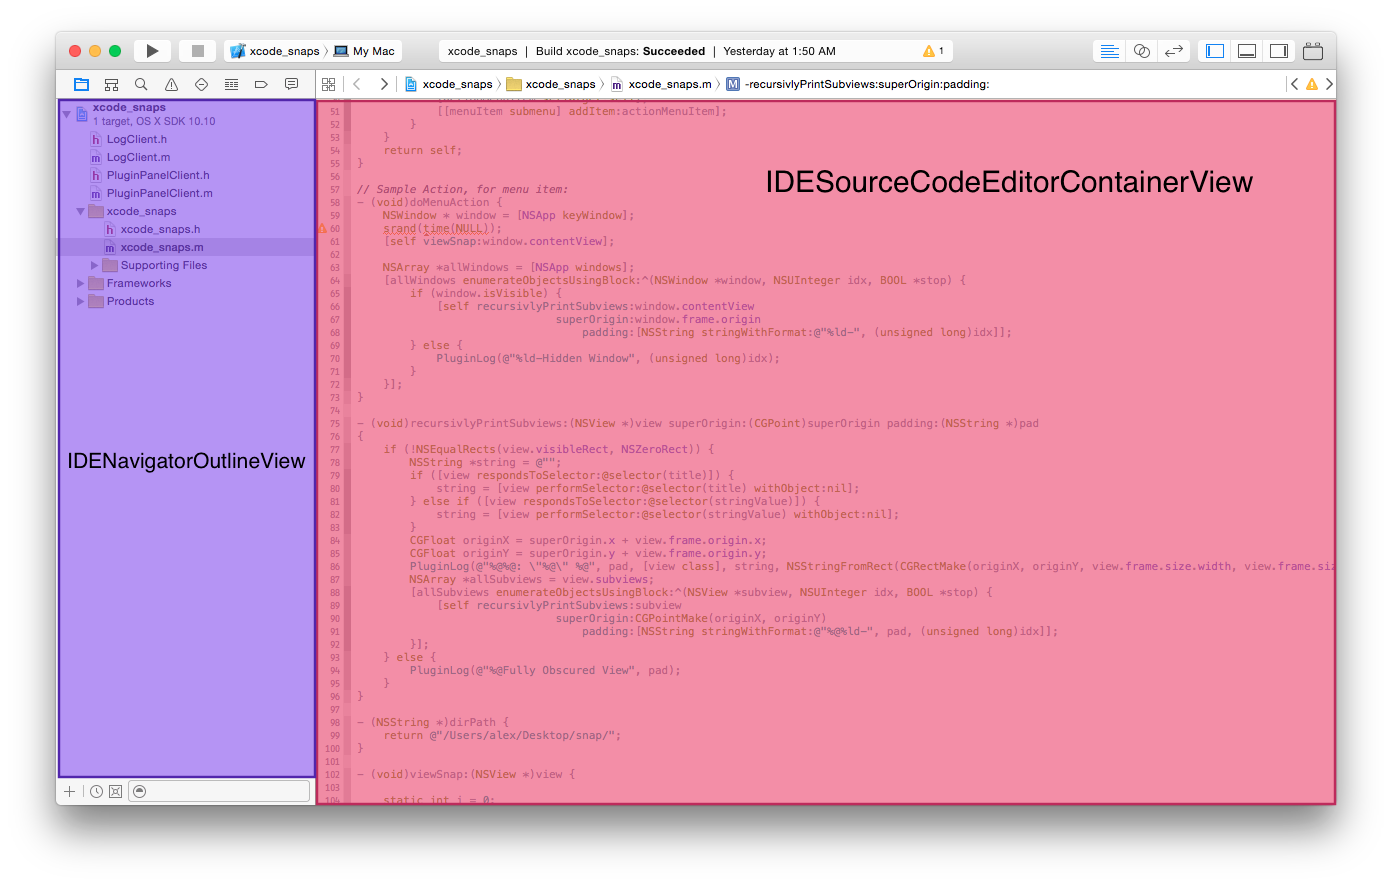
After that, you can open the folder where you saved the pictures and enjoy. It is worth playing with the size of the text, depending on the size of the 'NSView'.
Here is the result:

And here are the results in a more beautiful form and after manual processing:
Some pictures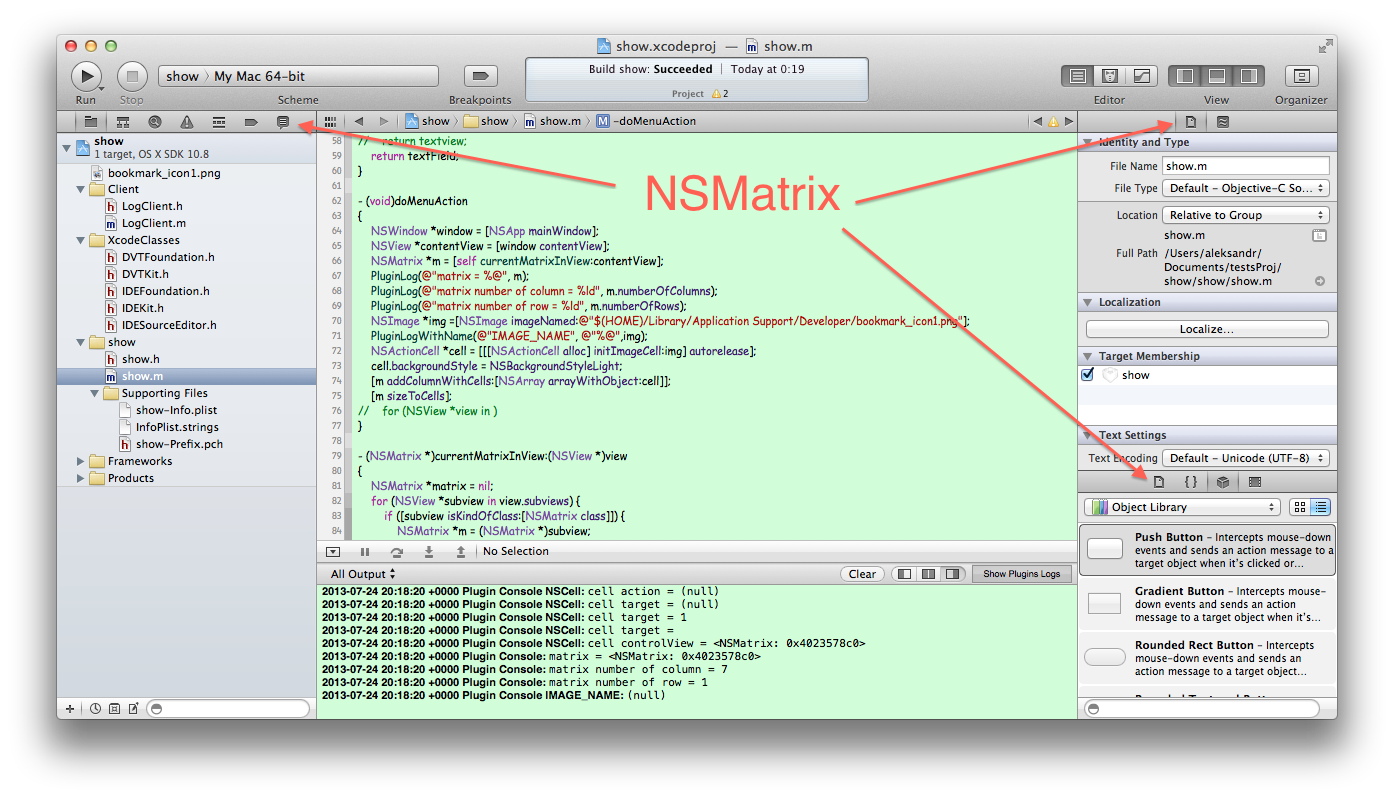


Immediately move on to the second plugin. We will output information from plugins in the Xcode console.
Second plugin
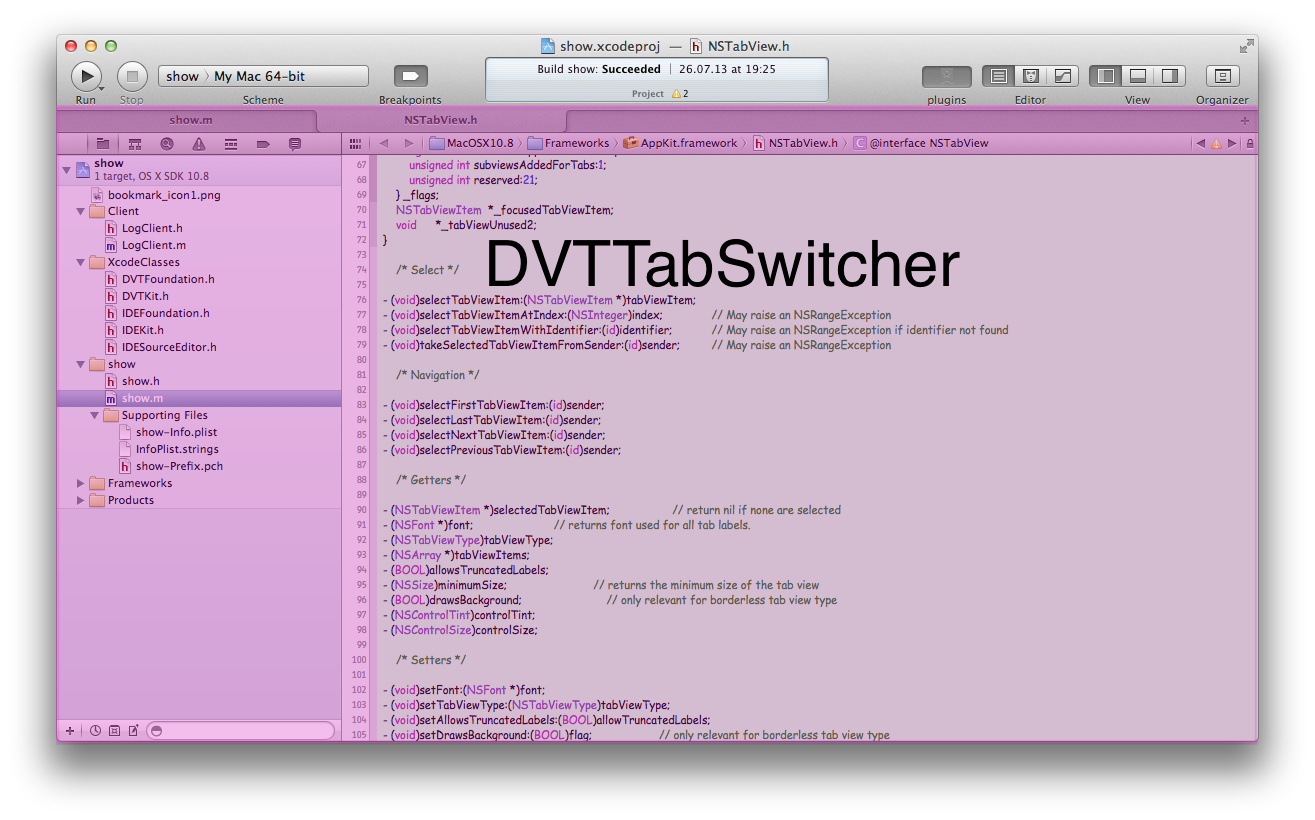
From the first plugin, we learned that the console in Xcode is the 'IDEConsoleTextView' class. But what kind of class is it and what methods does it have? There are several ways to find out:
1. Write a plug-in that will find the console in the window and output all its methods to a file
2. Use class-dump to pull all the headers from private frameworks and try to find this class there.
3. Go to the XVim project page and take all the private readers there.
Absolutely does not matter which way you go, the main thing that you will find that the console - a subclass of 'NSTextView' and that it contains the following methods: insertText: , insertNewLine:. Well, now we can find the console in the window and write down the lines of information we need there.
Now we need to add a button responsible for the log mode and get information from other plugins.
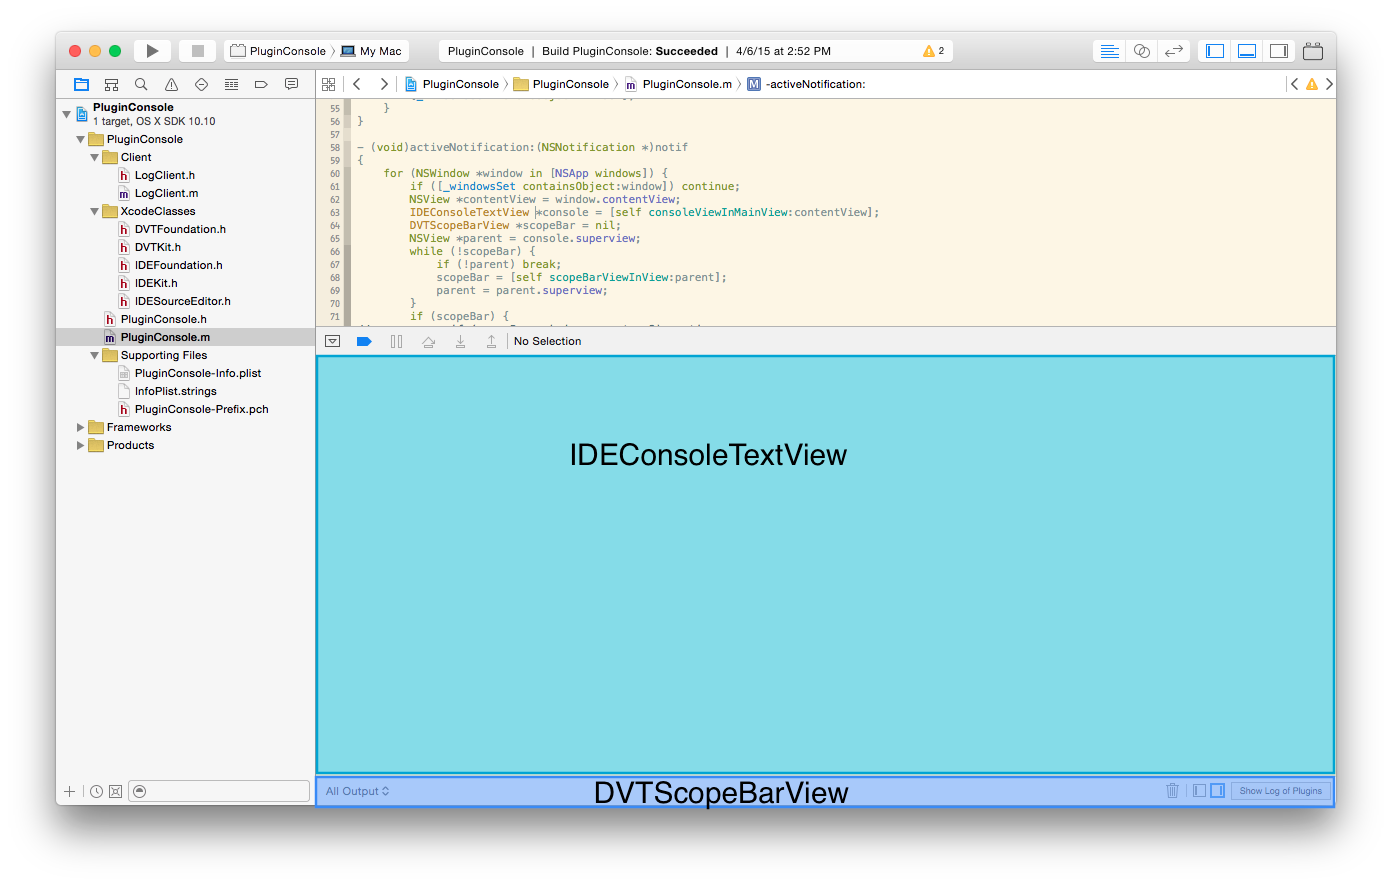
After the first plugin, we know that next to the console there is a 'DVTScopeBarView' containing the controls. There we put our button. We look at the 'DVTScopeBarView' header and see that the class contains the addViewOnRight: method . Very good, so we can add our button to the bar and not worry about the position of other elements.
Search for IDEConsoleTextView and DVTScopeBarView
- (IDEConsoleTextView *)consoleViewInMainView:(NSView *)mainView
{
    for (NSView *childView in mainView.subviews) {
        if ([childView isKindOfClass:NSClassFromString(@"IDEConsoleTextView")]) {
            return (IDEConsoleTextView *)childView;
        } else {
            NSView *v = [self consoleViewInMainView:childView];
            if ([v isKindOfClass:NSClassFromString(@"IDEConsoleTextView")]) {
                return (IDEConsoleTextView *)v;
            }
        }
    }
    return nil;
}
- (DVTScopeBarView *)scopeBarViewInView:(NSView *)view {
    for (NSView *childView in view.subviews) {
        if ([childView isKindOfClass:NSClassFromString(@"DVTScopeBarView")]) {
            return (DVTScopeBarView *)childView;
        } else {
            NSView *v = [self scopeBarViewInView:childView];
            if ([v isKindOfClass:NSClassFromString(@"DVTScopeBarView")]) {
                return (DVTScopeBarView *)v;
            }
        }
    }
    return nil;
}
- (void)someMethod {
        NSWindow *window = [NSApp keyWindow];
        NSView *contentView = window.contentView;
        IDEConsoleTextView *console = [self consoleViewInMainView:contentView];//ищем консоль
        DVTScopeBarView *scopeBar = nil;
        NSView *parent = console.superview;
        while (!scopeBar) {
            if (!parent) break;
            scopeBar = [self scopeBarViewInView:parent];
            parent = parent.superview;
        }
        //... добавляем кнопку на бар
}
Now we have added a button to the bar and we can find the console on the window. It remains to somehow get information from other plugins and display it. The easiest option: use the 'NSNotificationCenter'. Since plugins are loaded into the Xcode environment and can catch notifications from it, it is possible to send and catch them between plugins. Just subscribe to the notifications we need and tell the console to display a log. To do this, we create a function in client files (files that other plugins will use) that will send the notifications we need and catch them in our plugin.
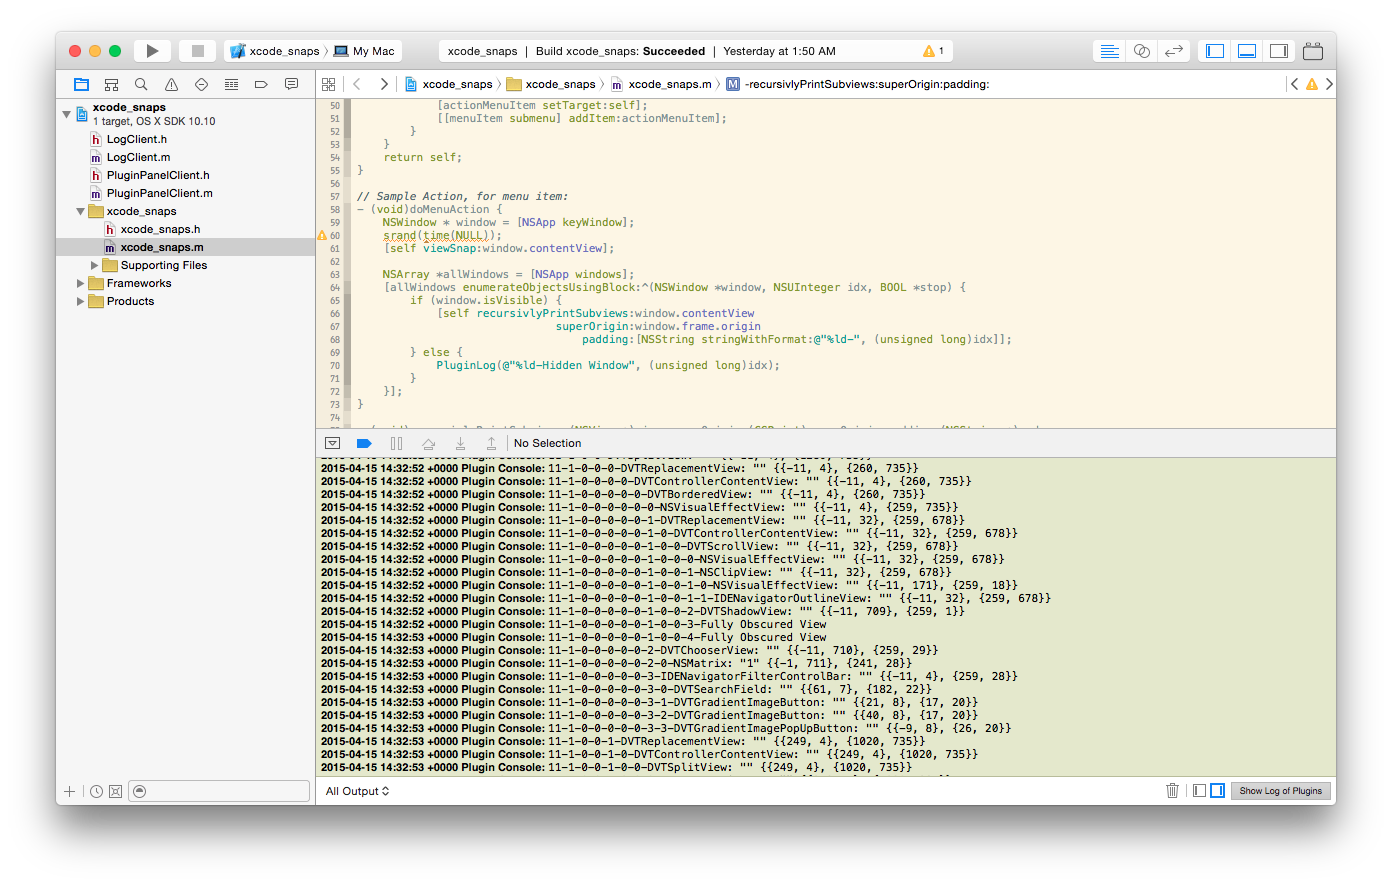
Log Features and Console Display
As you can see, the log can be displayed in absolutely any font.
void PluginLogWithName(NSString *pluginName, NSString *format, ...) {
    NSString *name = @"";
    if (pluginName.length) {
        name = pluginName;
    }
    va_list argumentList;
    va_start(argumentList, format);
    NSString *string = [NSString stringWithFormat:@"%@ Plugin Console %@: ", [NSDate date], name];
    NSString* msg = [[NSString alloc] initWithFormat:[NSString stringWithFormat:@"%@%@",string, format] arguments:argumentList];
    NSMutableAttributedString *logString = [[NSMutableAttributedString alloc] initWithString:msg attributes:nil];
    [logString setAttributes:[NSDictionary dictionaryWithObject:[NSFont fontWithName:@"Helvetica-Bold" size:15.f] forKey:NSFontAttributeName] range:NSMakeRange(0, string.length)];
    [[NSNotificationCenter defaultCenter] postNotificationName:PluginLoggerShouldLogNotification object:logString];
    va_end(argumentList);
}
- (void)addLog:(NSNotification *)notification {//ловим уведомление
    for (NSWindow *window in [NSApp windows]) {//выводим лог во все окна
        NSView *contentView = window.contentView;
        IDEConsoleTextView *console = [self consoleViewInMainView:contentView];//находим консоль
        console.logMode = 1;//переключаем консоль в режим редактирования
        [console insertText:notification.object];//вставляем текст
        [console insertNewline:@""];//переводим каретку на следующую строку
    }
}
As you can see, the log can be displayed in absolutely any font.
So the second plugin is ready. Full sources can be found here . The plugin looks like this:
Third plugin
Oh, how nice it would be if the plugins were nearby and access was the same as the sections in the left panel of Xcode ...
Let's add our panel to Xcode so that anyone can add their own plugin without thinking about integrating the plugin with the window Xcode
Both previous plugins will come in handy here. At least they came in handy for me. You do not have to worry with logs, catch endless crashes, understand them and dig into endless header files. I’ll just talk about the results.
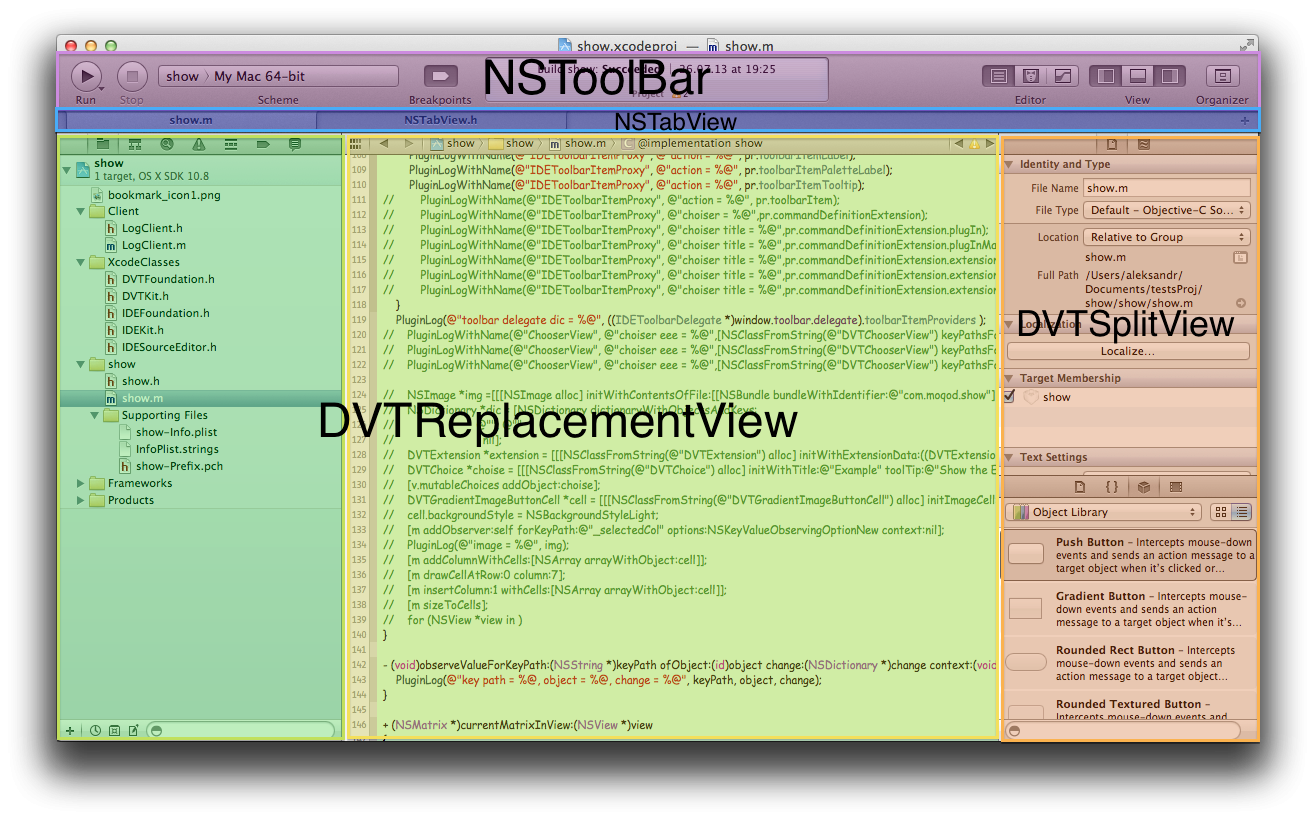
We have a window 'NSToolbar', where we will add a button. The hardest part is that the toolbar has no methods to directly add an element. A delegate who “redefines” we, of course, cannot. The only method that has a toolbar for adding elements:insertItemWithItemIdentifier: atIndex: but the element itself generates a delegate. The only way out is to see who the delegate is. Maybe there are some approaches to it? We display the delegate class in the logs and get the class 'IDEToolbarDelegate'. Ok, now we go to the private headers that we got with class-dump or got from XVim, and look for this class there. Immediately we see the properties of interest to us in this class: toolbarItemProviders and allowedItemIdentifiers . Presumably, our delegate contains a dictionary of objects that just provide elements. Conclusions In the current contents of the logs toolbarItemProviders and see something like this dictionary:
{
  "some_id":,
  "some_other_id":,
}
Great, now we have one more clue - this is the class 'IDEToolbarItemProxy'. We also look at its interface in the headers and see that it is initialized with an identifier (most likely the identifier of an element in 'NSToolbar') and has the providerClass property . But what is providerClass and how do we implement it? To understand what this class should contain, there are two ways:
1. Derive these classes and their methods for all providers from the dictionary toolbarItemProviders ;
2. Write an empty class, add it to the dictionary and catch Xcode crashes telling us which methods are missing.
I went the second way, although the first, it seems to me more correct. But when I wrote this plugin, for some reason this idea did not come to me.
So, create a class and add it to our delegate:
The code
IDEToolbarDelegate *delegate = (IDEToolbarDelegate *)window.toolbar.delegate;//берём делегат у тулбара
if ([delegate isKindOfClass:NSClassFromString(@"IDEToolbarDelegate")]) {
    IDEToolbarItemProxy * proxy = [[NSClassFromString(@"IDEToolbarItemProxy") alloc] initWithItemIdentifier:PluginButtonIdentifier];//создаем наш прокси и нужным идентификатором
    proxy.providerClass = [PluginButtonProvider class];//устанавливаем ему наш провайдер класс(пока пустой)
    NSMutableDictionary *d = [NSMutableDictionary dictionaryWithDictionary:delegate.toolbarItemProviders];//берем словарь у делегата
    [d setObject:proxy forKey:proxy.toolbarItemIdentifier];//добавляем наш прокси
    delegate.toolbarItemProviders = d;//возвращаем словарь делегату
    NSMutableArray *ar = [NSMutableArray arrayWithArray:delegate.allowedItemIdentifiers];//добавляем наш идентификатор в делегат
    [ar addObject:proxy.toolbarItemIdentifier];
    delegate.allowedItemIdentifiers = ar;
    [window.toolbar insertItemWithItemIdentifier:PluginButtonIdentifier atIndex:window.toolbar.items.count];//вставляем наш элемент последним в тулбар
}
Install the plugin, restart Xcode, and immediately catch the crash. We look at the logs and understand that our class needs the + (id) itemForItemIdentifier: (id) arg1 forToolbarInWindow: (id) arg2 method . This method is described in the protocol 'IDEToolbarItemProvider'. Uninstall the plugin, run Xcode and add this method. By the name of the method, it is clear that at the input we get an identifier and a window, and at the output we need to get an object. By such manipulations, namely by trial and error, through the Nth number of crashes and Xcode restarts, you can find out that this is an object of the class 'DVTViewControllerToolbarItem'. And it, in turn, is initialized with the class 'DVTGenericButtonViewController'. The object 'DVTGenericButtonViewController' itself has the following initialization:
Up to version 6 of Xcode:initWithButton: actionBlock: itemIdentifier: window:
From the 6th version: initWithButton: actionBlock: setupTeardownBlock: itemIdentifier: window:
By the name of the method it is clear that it needs a button, a block that is called when it is clicked, an identifier and a window.
Create a simple button and initialize the controllers we need:
Code drop
DVTGenericButtonViewController *bvc = [(DVTGenericButtonViewController*)[NSClassFromString(@"DVTGenericButtonViewController") alloc] initWithButton:button actionBlock:^(NSButton *sender){} setupTeardownBlock:nil itemIdentifier:PluginButtonIdentifier window:arg2];
DVTViewControllerToolbarItem *c = [ NSClassFromString(@"DVTViewControllerToolbarItem") toolbarItemWithViewController:bvc];
Install the plugin and restart Xcode. Now our button has been added to Xcode. It remains to write a handler for our button. When we click on the button, we want the right panel to open if it is not open, and our object will be added to this panel. Open the right panel and launch our first plugin. After reviewing its results, it becomes clear that the panel is a 'DVTSplitView' object. In addition, you must determine how to programmatically open the right panel, if it is hidden. To do this, output all the 'NSToolbarItem' from the toolbar of our window to the log. We know that the object we need is the last (if our button has not been added yet). We take the 'NSToolbarItem' we need and see who controls it, that is, we look at the 'target' property. The target of our 'NSToolbarItem' is an object of class' _IDEWorkspacePartsVisibilityToolbarViewController '. We do not need to look at its interface, since we only need it in order to find the 'NSToolbarItem' we need in the window in the future (suddenly they will be located in a different sort or someone will add an element to us). All preparations are ready, now we can display the right panel, find it in the window and add our object to it.
Button Processing
NSWindow *window = arg2;
NSToolbarItem *item = nil;
for (NSToolbarItem *it in [[window toolbar] items]) {//ищем нужный нам тулбар айтем
    if ([it.target isMemberOfClass:NSClassFromString(@"_IDEWorkspacePartsVisibilityToolbarViewController")]) {
        item = it;
        break;
     }
}
NSSegmentedControl *control = (NSSegmentedControl *)item.view;//берем сегмент контрол из него
if ([sender state] == NSOnState) {//если кнопка включилась
    if (![control isSelectedForSegment:2]) {//если правая панель спрятана
        [control setSelected:YES forSegment:2];//включаем правую панель на сегменте
        [item.target performSelector:item.action withObject:control];//и потравляем экшн
    }
    DVTSplitView *splitView = [PluginButtonProvider splitViewForWindow:window];//ищем правю панель
    PanelView *myView = [[PluginPanel sharedPlugin] myViewForWindow:window];//создаем/получаем наш объект для окна
    myView.frame = splitView.bounds;//устанавливаем размеры
    [myView setAutoresizingMask:NSViewWidthSizable | NSViewHeightSizable];
    for (NSView *sub in splitView.subviews) {//прячем все предыдущие элементы на панели
        [sub setHidden:YES];
    }
    [splitView addSubview:myView];//добавляем наш объект
} else {
    DVTSplitView *splitView = [PluginButtonProvider splitViewForWindow:window];//ищем панель
    PanelView *myView = [[PluginPanel sharedPlugin] myViewForWindow:window];//создаем/ищем наш объект
    [myView removeFromSuperview];//удаляем наш объект из панели
    for (NSView *sub in splitView.subviews) {//отображаем все оставшие элементы на панели
         [sub setHidden:NO];
    }
}
Our object will be the 'NSView' object, which will contain the 'DVTChooserView' and the regular 'NSView' into which the plugin content will be added. Why 'DVTChooserView'? I would like the panel to fit the Xcode window as much as possible. To do this, run the first plugin, look at the left panel and find that 'DVTChooserView' is just what we need. 'DVTChooserView' contains a 'NSMatrix' with buttons and a good delegate that allows us to determine when a button was turned on / off. Also, this object receives 'DVTChoice' objects as input and manipulates them. This is most convenient, given that the 'DVTChoice' contains an icon, a signature and an object that will process this object.
Our object and adding elements
//создаем и настраиваем DVTChooserView
_chooserView = [[NSClassFromString(@"DVTChooserView") alloc] initWithFrame:NSZeroRect];
_chooserView.allowsEmptySelection = NO;
_chooserView.allowsMultipleSelection = NO;
_chooserView.delegate = self;
//метод делегата
- (void)chooserView:(DVTChooserView *)view userWillSelectChoices:(NSArray *)choices {
    DVTChoice *choice = [choices lastObject];//получаем выбранный элемент
    self.contentView = [[choice representedObject] view];//отображаем его контент
}
//добавляем DVTChoice в наш объект
DVTChoice *plugin = note.object;//приходит от других плагинов
if (plugin) {
        NSWindow *window = [[note userInfo] objectForKey:PluginPanelWindowNotificationKey];//для какого окна добавить элемент
        PanelView *panel = [self myViewForWindow:window];//берём наш объект для окна
        [panel.chooserView.mutableChoices addObject:plugin];//добавляем плагин в DVTChooserView
        if (!panel.contentView) {
            panel.contentView = [[[[panel.chooserView mutableChoices] lastObject] representedObject] view];//если нет выбранных плагинов, отображаем его контент
        }
}
That's all. We went through the most interesting places of our third plugin. All sources are here .
Add a plugin to our panel
We just added a whole panel to Xcode. Now let's fill it with something.
Due to the fact that we no longer need to understand the intricacies of Xcode, we can add our plugin to the panel with only three lines of code.
Three magic lines
NSImage *image  = [[NSImage alloc] initWithContentsOfFile:[[NSBundle bundleForClass:[self class]] pathForImageResource:@"plugin_icon"]];//загружаем иконку из бандла плагина
//создаем контроллер, который будет отображать плагин. 1-ая строчка
TPViewController *c = [[TPViewController alloc] initWithNibName:@"TPView" bundle:[NSBundle bundleForClass:self.class]];
//Создаем DVTChoice для отображения иконки плагина. 2-ая строчка
DVTChoice *choice = [[NSClassFromString(@"DVTChoice") alloc] initWithTitle:@"Time" toolTip:@"Time management plugin" image:image representedObject:c];
//Отправляем уведомление нашей панели, что бы она добавила наш плагин к себе. 3-яя строчка
PluginPanelAddPlugin(choice, [[note userInfo] objectForKey:PluginPanelWindowNotificationKey]);
Now we have our own panel in the Xcode window and we can add any plugin to it. Now part of the plugins can be located in one place.
Finally - an example of using the panel - a simple time tracker for Xcode.
Timeplugin
