Turning an Android phone into a network SQL database (MyMobileSQLServer - Utesov)
- Tutorial
Recently, I started doing another project for mobile devices. Its by-product was an application with which you can deploy a network database to your favorite Android phone, tablet, etc. ... The proposed solution is a SQLite database network provider.
The application is multi-user, each user has his own database, which is not available to other users. The code is open, the license is Apache 2.0.
To demonstrate the declared capabilities, a simple application was written that allows you to make SQL queries to the server and get the results of their execution, its code will be considered here. Development time is 10 minutes. For testing, one device is enough (if two or more are used, then a WiFi connection is required). Go!
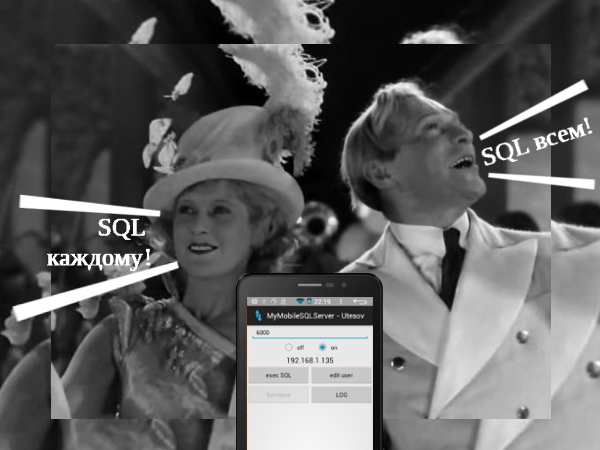
Shot from the film "Jolly Fellows" (revised)
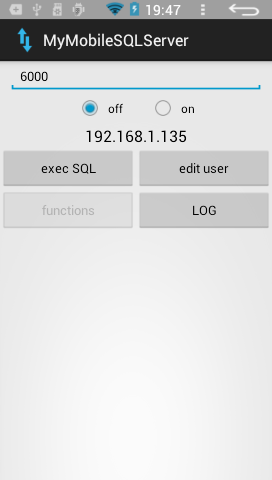
First of all, install the application (server) MyMobileSQLServer - Utesov from PlayMarket, Yandex.Store or from the repository . Next, you need to create a user to access the data and the database itself. To do this, select “edit user” -> “Add user” on the main screen. Fill in the form fields. Then return to the main screen of the application and launch it using the “on” button. Pay attention to the port and IP address to connect.
Let's move on to the direct creation of an application to access the network database.
1 - Create a new project. We copy the library file “ myMobileSQLClient.jar ” into the directory for storing libraries and do the necessary actions so that it becomes available for the project
2 - Configure the project manifest, add a directive for the possibility of using a network connection:
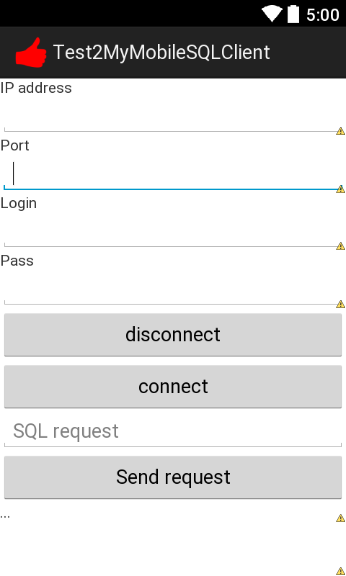
3 - We throw on the form:
five input fields: IP address, port number, text for sql request, login, password ;
three buttons: connect, disconnect, send a request ;
field for information output .
You should have something like this:
Copy the following code with the necessary adjustments:
Now let's see what happens.
This object is responsible for working with a remote database:
MainMobileSQLClient mainMobileSQLClient;
The following methods are redefined in it:
onMessage - a message came from the server;
onConnection - the client connects to the server;
onConnect - the client is connected to the server;
onDisconnect - the client disconnected from the server;
onErrAuthentication - authentication error;
onCompleteAuthentication - authentication was successful;
When creating the main object, the server IP address and port for connection are set. The client is launched using the startClient () method. The beginning of the connection is followed by the onConnection method. If a connection error occurs, the onDisconnect method is called, which is also called when the client disconnects from the server (for example, when the connection is disconnected or the server is disconnected). If everything happened in the normal mode, then the completion of the connection process will mark the onConnect method.
Next, you need to register the user on the server, it is best to do this after the connection is completed, directly in the onConnect method:
If authentication succeeds, the onCompleteAuthentication method will be called, otherwise onErrAuthentication. If authentication does not occur, then most likely your username and password do not match those that were registered on the server.
Now the matter remains small - to make requests and process the reaction to incoming data.
To initiate an SQL query, you must call the method (example):
String id_request = mainMobileSQLClient.sendSQLRequest ('' select * from test; '');
It, in turn, will return the request identifier as a text string. This is important, as it is a network application, it runs asynchronously. When a new response arrives from the server, the onMessage method (String id, DATA_parser data) is called, which passes the request identifier (id), to which the response and the data themselves came. Data is provided in the form of a DATA_request object, in which the following objects are available:
status - String - status of the result of the data request, if “ok”, then the request was processed successfully, otherwise “err” (in the future, the statuses will probably be updated);
recordsCount - int — the number of records received from the server that are the result of the request;
structure- String [] - a text array that is an enumeration of the names of all fields of the response request;
listData - ArrayList- a list of data arrays. The number of items in the list corresponds to the number of entries from the server. Each element contains a text array, with the number of elements equal to the number of elements in the structure array.
The correctness of processing each request so far falls on the shoulders of the programmer, i.e. You will have to track each response received from the server and compare it with the identifiers in the query tables that you need to keep. But this solution gives the developer complete freedom and control in processing all the results coming from the server.
All is ready! Now start testing, send any SQL queries to the server (creating tables, inserting / modifying data, deleting records, etc.) and get the corresponding execution results.
Repository with server, client, library and sample application - https://github.com/gc986/MyMobileSQLServer_Utesov
(Currently, the repository contains the very first version of the project prepared in ADT Eclipse format. The next step will be to transfer the project to AndroidStudio format)
Question to habrauditoriums: where can this solution be applied?
The application is multi-user, each user has his own database, which is not available to other users. The code is open, the license is Apache 2.0.
To demonstrate the declared capabilities, a simple application was written that allows you to make SQL queries to the server and get the results of their execution, its code will be considered here. Development time is 10 minutes. For testing, one device is enough (if two or more are used, then a WiFi connection is required). Go!
Shot from the film "Jolly Fellows" (revised)
First of all, install the application (server) MyMobileSQLServer - Utesov from PlayMarket, Yandex.Store or from the repository . Next, you need to create a user to access the data and the database itself. To do this, select “edit user” -> “Add user” on the main screen. Fill in the form fields. Then return to the main screen of the application and launch it using the “on” button. Pay attention to the port and IP address to connect.
Let's move on to the direct creation of an application to access the network database.
1 - Create a new project. We copy the library file “ myMobileSQLClient.jar ” into the directory for storing libraries and do the necessary actions so that it becomes available for the project
2 - Configure the project manifest, add a directive for the possibility of using a network connection:
3 - We throw on the form:
five input fields: IP address, port number, text for sql request, login, password ;
three buttons: connect, disconnect, send a request ;
field for information output .
You should have something like this:
Copy the following code with the necessary adjustments:
import ru.gc986.SQLClient.MainMobileSQLClient;
import ru.gc986.SQLClient.parse.DATA_request;
import android.app.Activity;
import android.os.Bundle;
import android.view.View;
import android.widget.Button;
import android.widget.EditText;
import android.widget.TextView;
public class MainActivity extends Activity {
	MainMobileSQLClient mainMobileSQLClient;
	@Override
	protected void onCreate(Bundle savedInstanceState) {
		super.onCreate(savedInstanceState);
		setContentView(R.layout.activity_main);
		// Подключение к серверу
		Button bt_connect = (Button) findViewById(R.id.button_connect);
		bt_connect.setOnClickListener(new View.OnClickListener() {
			@Override
			public void onClick(View v) {
				EditText et_ip = (EditText) findViewById(R.id.editText_ip);
				EditText et_port = (EditText) findViewById(R.id.editText_port);
				mainMobileSQLClient = new MainMobileSQLClient(et_ip.getText().toString(),Integer.parseInt(et_port.getText().toString())){
					/**Пришло новое сообщение с сервера*/
					@Override
					public void onMessage(String id, DATA_parser data){
						super.onMessage(id, data);
						TextView tv_log = (TextView) findViewById(R.id.textView_log);
						String message = "";
						for(int i = 0 ; i < data.recordsCount ; i ++){
							for(int i1 = 0 ; i1 < data.structure.length ; i1++)
							{
								message = message + "\n" + data.structure[i1] + " : " + data.listData.get(i)[i1];
							}
							message = message + "\n" + "-----";
						}
						message = "Status - " + data.status + "\n" + message + "\n" + "======" + "\n";
						tv_log.setText(message + tv_log.getText().toString());
					}
					/**Начинается процесс подключения к серверу*/
					@Override
					public void onConnection(){
						super.onConnection();
					}
					/**Подключились к серверу*/
					@Override
					public void onConnect(){
						super.onConnect();
						// Аутентификация
						EditText et_login = (EditText) findViewById(R.id.editText_login);
						EditText et_pass = (EditText) findViewById(R.id.editText_pass);
						onAuthentication(et_login.getText().toString(), et_pass.getText().toString());
					}
					/**Сообщаем что отключились от сервера*/
					@Override
					public void onDisconnect(){
						showAllView();
					}
					/**Ошибка регистрации на сервере*/
					@Override
					public void onErrAuthentication(){
						showAllView();
					}
					/**Регитрация прошла успешно*/
					@Override
					public void onCompleteAuthentication(){
					}
				};
				mainMobileSQLClient.startClient();
			}
		});
		// Отключение от сервера
		Button bt_disconnect = (Button) findViewById(R.id.button_disconnect);
		bt_disconnect.setOnClickListener(new View.OnClickListener() {
			@Override
			public void onClick(View v) {
				if(mainMobileSQLClient!=null)
					mainMobileSQLClient.stopClient();
			}
		});
		// Отправить сообщение
		Button bt_request = (Button) findViewById(R.id.button_request);
		bt_request.setOnClickListener(new View.OnClickListener() {
			@Override
			public void onClick(View v) {
				EditText et_request = (EditText) findViewById(R.id.editText_sql_request);
				if(mainMobileSQLClient!=null)
					mainMobileSQLClient.sendSQLRequest(et_request.getText().toString());
			}
		});
	}
}
Now let's see what happens.
This object is responsible for working with a remote database:
MainMobileSQLClient mainMobileSQLClient;
The following methods are redefined in it:
onMessage - a message came from the server;
onConnection - the client connects to the server;
onConnect - the client is connected to the server;
onDisconnect - the client disconnected from the server;
onErrAuthentication - authentication error;
onCompleteAuthentication - authentication was successful;
When creating the main object, the server IP address and port for connection are set. The client is launched using the startClient () method. The beginning of the connection is followed by the onConnection method. If a connection error occurs, the onDisconnect method is called, which is also called when the client disconnects from the server (for example, when the connection is disconnected or the server is disconnected). If everything happened in the normal mode, then the completion of the connection process will mark the onConnect method.
Next, you need to register the user on the server, it is best to do this after the connection is completed, directly in the onConnect method:
onAuthentication(''user_name'', ''pass_pass'');
If authentication succeeds, the onCompleteAuthentication method will be called, otherwise onErrAuthentication. If authentication does not occur, then most likely your username and password do not match those that were registered on the server.
Now the matter remains small - to make requests and process the reaction to incoming data.
To initiate an SQL query, you must call the method (example):
String id_request = mainMobileSQLClient.sendSQLRequest ('' select * from test; '');
It, in turn, will return the request identifier as a text string. This is important, as it is a network application, it runs asynchronously. When a new response arrives from the server, the onMessage method (String id, DATA_parser data) is called, which passes the request identifier (id), to which the response and the data themselves came. Data is provided in the form of a DATA_request object, in which the following objects are available:
status - String - status of the result of the data request, if “ok”, then the request was processed successfully, otherwise “err” (in the future, the statuses will probably be updated);
recordsCount - int — the number of records received from the server that are the result of the request;
structure- String [] - a text array that is an enumeration of the names of all fields of the response request;
listData - ArrayList
The correctness of processing each request so far falls on the shoulders of the programmer, i.e. You will have to track each response received from the server and compare it with the identifiers in the query tables that you need to keep. But this solution gives the developer complete freedom and control in processing all the results coming from the server.
All is ready! Now start testing, send any SQL queries to the server (creating tables, inserting / modifying data, deleting records, etc.) and get the corresponding execution results.
Repository with server, client, library and sample application - https://github.com/gc986/MyMobileSQLServer_Utesov
(Currently, the repository contains the very first version of the project prepared in ADT Eclipse format. The next step will be to transfer the project to AndroidStudio format)
Question to habrauditoriums: where can this solution be applied?