Backup to Cloud Storage

No serious project can do without performing regular backups. In addition to selecting and configuring a data archiving system, you need to decide where to store the data. Moreover, it is desirable not to be on the same server where the backup is done, but to be able to store data in some independent reliable place.
Especially for this, our "cloud storage" is perfect. Storage of 1 GB of data will cost only 3 rubles per month.
Where to begin?
To start using the "cloud storage" you need to register (full registration takes about 5 minutes). For all new accounts, 10 bonus rubles are available, with which you can fully test the service. If you are already our client and want to test the service - upon request through the ticket system you will be credited 10 bonus rubles. Now everything is ready to go.
In the control panel, in the "Cloud Storage" → "Files" section, there is a web interface for the file manager. Create in it a private container for storing backups (access to the private container is possible only after authorization - it is more secure when storing important data), for example, "backups". To upload files to the storage, it is better to create an additional user who will have a minimum set of rights - this will protect the main user, who always has full access rights.
Creating an additional user is in the tab “Cloud Storage” → “Access Settings”. Enter any name for the user and click "Create" - a user settings dialog will appear.
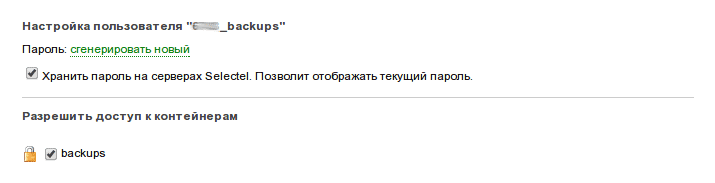
In the user settings you need to generate a new password. The option of storing a password is optional, but then, in the future, it will be impossible to spy on the password in the user settings, but only generate a new one. And be sure to tick the containers to which the user will have access. Remember to save the settings by clicking “Save Access Changes”.
Now you are ready to configure the backup process on the server.
Simple option
If you have a medium-sized site with a MySQL database that you want to back up regularly, then just download two specially prepared scripts and specify the necessary settings.
The first thing you need is the supload utility — it allows you to conveniently upload files to the repository. It is installed as follows (presumably Debian OS is installed on your server):
$ wget https://raw.github.com/selectel/supload/master/supload.sh
$ mv supload.sh /usr/local/bin/supload
$ chmod +x /usr/local/bin/supload
Next, you need to download and configure the script to perform backup:
$ wget https://raw.github.com/selectel/storage/master/utils/sbackup.sh
$ chmod +x sbackup.sh
Open the “backup.sh” script using “your favorite text editor” and change the following values:
- SS_USER - user for authorization in the repository (the additional user that we created earlier);
- SS_PWD - password for the user;
- SS_CONTAINER - the name of the container into which backups will be loaded;
- TARGET_DIR - the path where the site files are located;
- BACKUP_DIR - the path on the server where backups will temporarily be added;
- EXCLUDE_LIST - a list of files that do not need to be included in the archive;
- DB_NAME - the name of the MySQL database, to back up all available databases, specify __ALL__ as the value;
- DB_USER and DB_PWD - user and password for connecting to MySQL;
- EMAIL - email where the report on backup execution will be sent to (you can specify it empty to disable the report);
- EMAIL_ONLY_ON_ERROR - if you specify yes, then the report will be sent only in case of problems / errors;
- DELETE_BACKUPS_AFTER_UPLOAD - if you specify yes, then the created backup files will be deleted from the temporary folder after a successful upload to the repository;
- STORAGE_EXPIRE - the option allows you to specify how many days the backup file should be stored in the repository, after which it will be automatically deleted.
To check and run the backup, you can run the script manually:
$ ./sbackup.sh
The result of the execution will be displayed in the console.

Now you need to configure the frequency of backup, this can be done using cron. To do this, simply move the script to a special directory:
$ mv backup.sh /etc/cron.daily/50_sbackup
After that, cron will automatically run the archiving script once a day.
How to recover data?
If it happened that you need to get data from a backup, then you can do this in the following way.
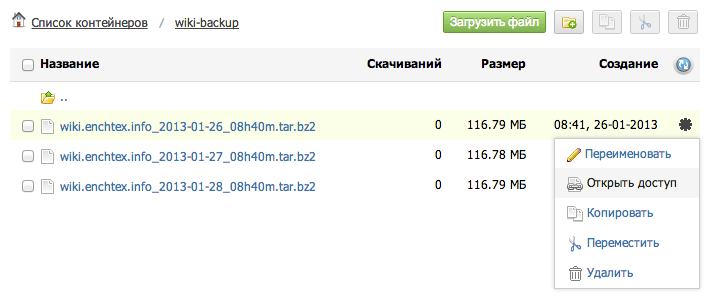
Most likely you downloaded the backup files to a private container, from there the file itself can be easily downloaded using the file manager web interface. But as a rule, it is more convenient to download the file directly to the server or to provide access to it to another person. This can be done using special links - this will allow you to safely download the file on the server or transfer it to someone else without changing the type of container to public.
To do this, in the web interface of the file manager we find the desired file, click on the operations icon to the right of it (it looks like a gear) and select the “Open access” option:
For the link, you can limit the duration of the action, the number of file downloads and, if desired, also set password:
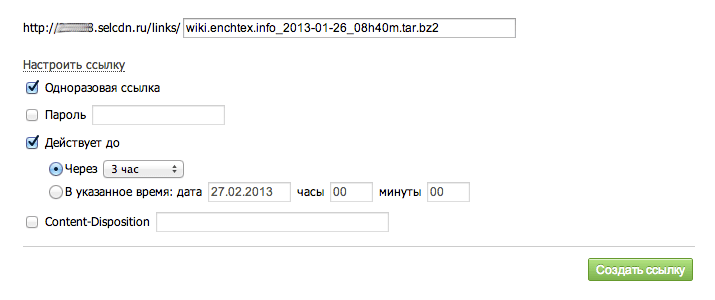
After creating the link, you will receive a link by clicking on which you can download the file. The link itself will be stored in the “links” container, where you can once again peep the download link.
After downloading the backup file to the server, you need to unpack the data:
$ mkdir backup_files
  # распаковка файлов из архива в папку backup_files
$ tar xvf backupname_2013-01-26_08h40m.tar.bz2 -C backup_files/
  # восстановление БД (эта операция может перезатереть текущее состояние базы данных)
$ bzcat mysql_backupname_ALL_2013-01-26_08h40m.bz2 | mysql
More sophisticated backup scripts
The script "sbackup" has a fairly limited functionality and in some cases it may not be enough. But, it can always be modified to fit your needs.
Often, some kind of automated backup system is already used on the servers; some CMS or control systems allow you to create and configure data archiving. You can use such “ready-made” systems and “teach” them how to upload archive data to the cloud storage. If the system provides for the execution of external scripts after archiving is completed, then this can be used to perform data loading using the “supload” utility.
Using "supload"
Supload ( GitHub ) is a utility specially created to simplify uploading files to the Selectel repository. It is written in bash and uses "standard" utilities that are installed on almost any basic Linux system, so it will be enough to download the script and it will work right away.
Utility features:
- uploading a local file to the repository;
- recursive download of all files in the specified folder and subfolders;
- Guaranteed file downloads by checking checksums
- Download only changed and new files;
- setting auto-delete files in the repository.
Once again about the installation:
$ wget https://raw.github.com/selectel/supload/master/supload.sh
$ mv supload.sh /usr/local/bin/supload
$ chmod +x /usr/local/bin/supload
Uploading one local file “my.doc” to the “files” container of the storage (the container must be created in advance):
$ supload -u USERNAME -k USERKEY files my.doc
You can also upload to the desired folder inside the container:
$ supload -u USERNAME -k USERKEY files/docs/ my.doc
In this case, before downloading the file, its checksum (MD5) is calculated and the download is considered successful only if the checksums match.
To download all files from a specific folder, use the -r option:
$ supload -u USRNAME -k USERKEY -r files local/docs/
For each downloaded file, a checksum will also be performed.
Checking the checksums provides another additional opportunity - if you run the utility again, that is, the data is already in the storage and the checksums match, the file is skipped. This is allowed to upload only new or changed files.
The storage supports automatic deletion of files, “supload” allows you to specify how long it takes to store the file:
$ supload -u USERNAME -k USERKEY -d 7d files my.doc
The -d option indicates after what time in minutes (m), hours (h) or days (d) the vault will automatically delete the file. This option also works with recursive file uploads. If the file has already been downloaded, then restarting the command does not change the previously set (or not specified at all) file storage period.
This property can be interestingly used - for example, your archiving system puts backup files in the / var / backups / site / folder and controls the deletion of files after a certain period of time. You can configure periodic launch of "supload" to download all files with a limited storage time, for example:
$ supload -u USERNAME -k USERKEY -d 31d -r backups /var/backups/sites
Then each new downloaded backup file will be stored in the storage for 31 days, and for previously downloaded backups, their storage period will gradually decrease and they will be automatically deleted the same after 31 days from the moment of their download. For such a scheme to work correctly, your archiving system must have a shorter file deletion time than specified in supload, otherwise the old files may be reloaded.
The supload utility is well suited both for manual file uploads and for use in archiving system scripts. The only limitation is the maximum size of one uploaded file is 5 GB.
Download large files
To download files larger than 5 GB in storage, you need to use a special upload method - upload by segments. In this case, the file is divided into virtual parts and loaded separately. Downloading such a file back occurs “transparently” as a single whole file, “gluing” segments occurs unnoticed on the storage side.
Python-swiftclient is one of the utilities that allows you to upload files by segments. You can download as follows:
$ swift upload container -S 1073741824 large_file
In this case, the file will be "on the fly" divided into segments of 1 GB and uploaded to the repository. The -S option indicates the size of one segment in bytes, the maximum segment size is 5 GB (5368709120 bytes).
Link to this post on our blog.