Assembler with C ++ in Visual Studio 2013
The idea of this article is by no means new, but since I had to spend two days analyzing all the compilation and link errors, as well as finding answers to my questions, I decided that the readers of Habr deserve to save time. Those who want to quickly learn how to use both * .asm and * .cpp files in a project, how to call C ++ methods from assembler and vice versa, welcome under cat.
It all started with my reading the publication “Assembler for Windows using Visual Studio” (hence the almost identical code). They examined the use of Visual Studio 2005, and for the 2013th studio the process is similar, but there are several differences that will make an unprepared user look for solutions to all problems with the assembly for a long time.
For those who have absolutely no time to read: at the end of the article (in the appendix) there is a link to the finished project template and to the add-on for syntax highlighting.
There is an add-on for Visual Studio - asmHighlighter , however, at the time of writing, there was no version for VS2013. However, looking through the Discussions section, I found a message from the Trass3r user who, fortunately, shared the repository with the version of the add-on for VS2013. After installing the Visual Studio SDK, I was able to assemble the project and now the * .vsix package is freely available .
In order to avoid compilation and / or binding errors, remember the following:
Actually, the full source code of the example:
The finished project template can be found here .
A package for highlighting asm syntax can be found here .
PS thanks ilynxy for the “deserve to” fix))
Foreword
It all started with my reading the publication “Assembler for Windows using Visual Studio” (hence the almost identical code). They examined the use of Visual Studio 2005, and for the 2013th studio the process is similar, but there are several differences that will make an unprepared user look for solutions to all problems with the assembly for a long time.
Content
- TL; DR
- Project creation
- Setting syntax highlighting
- The subtleties of calling methods between C ++ and Asm
- application
TL; DR
For those who have absolutely no time to read: at the end of the article (in the appendix) there is a link to the finished project template and to the add-on for syntax highlighting.
Project creation
Illustrated version
Turn on Visual Studio, select File -> New -> Project ... :

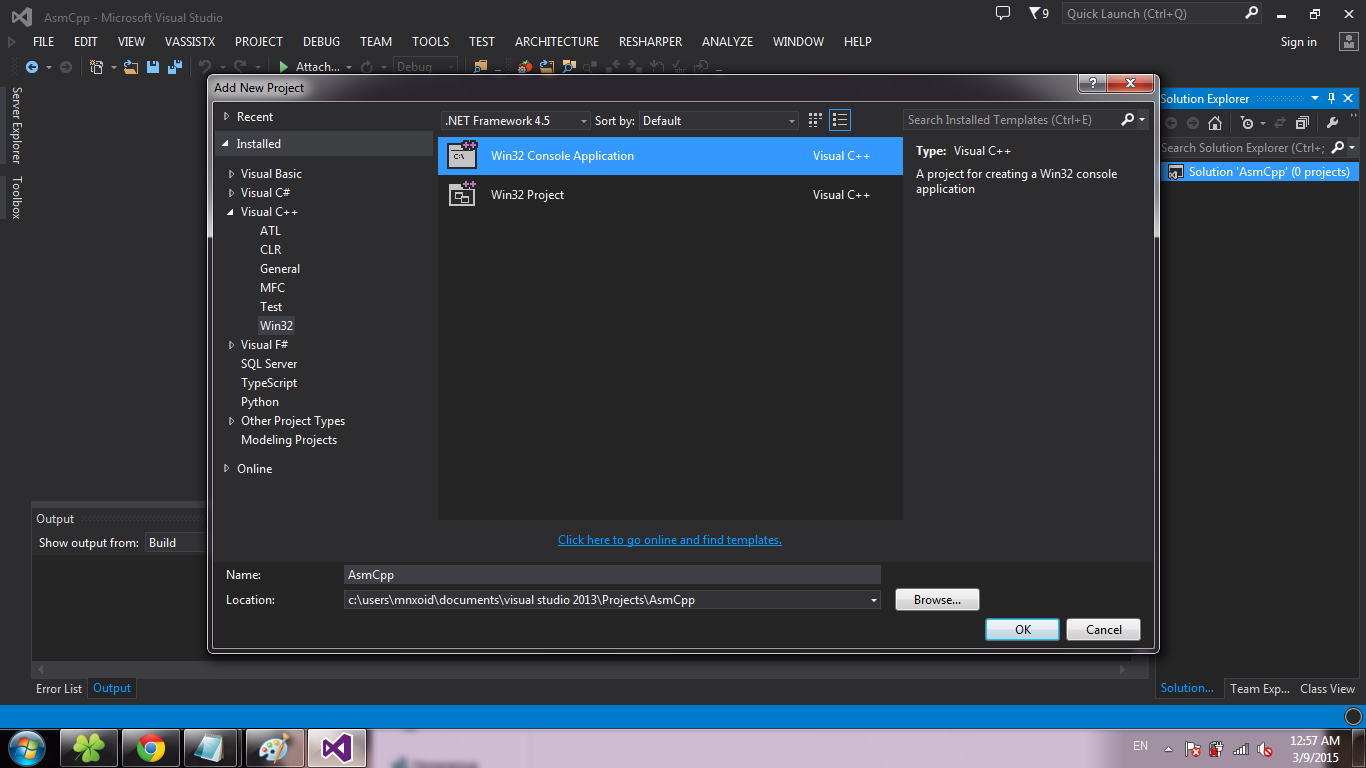
Select the Win32 Console Application template , click OK :
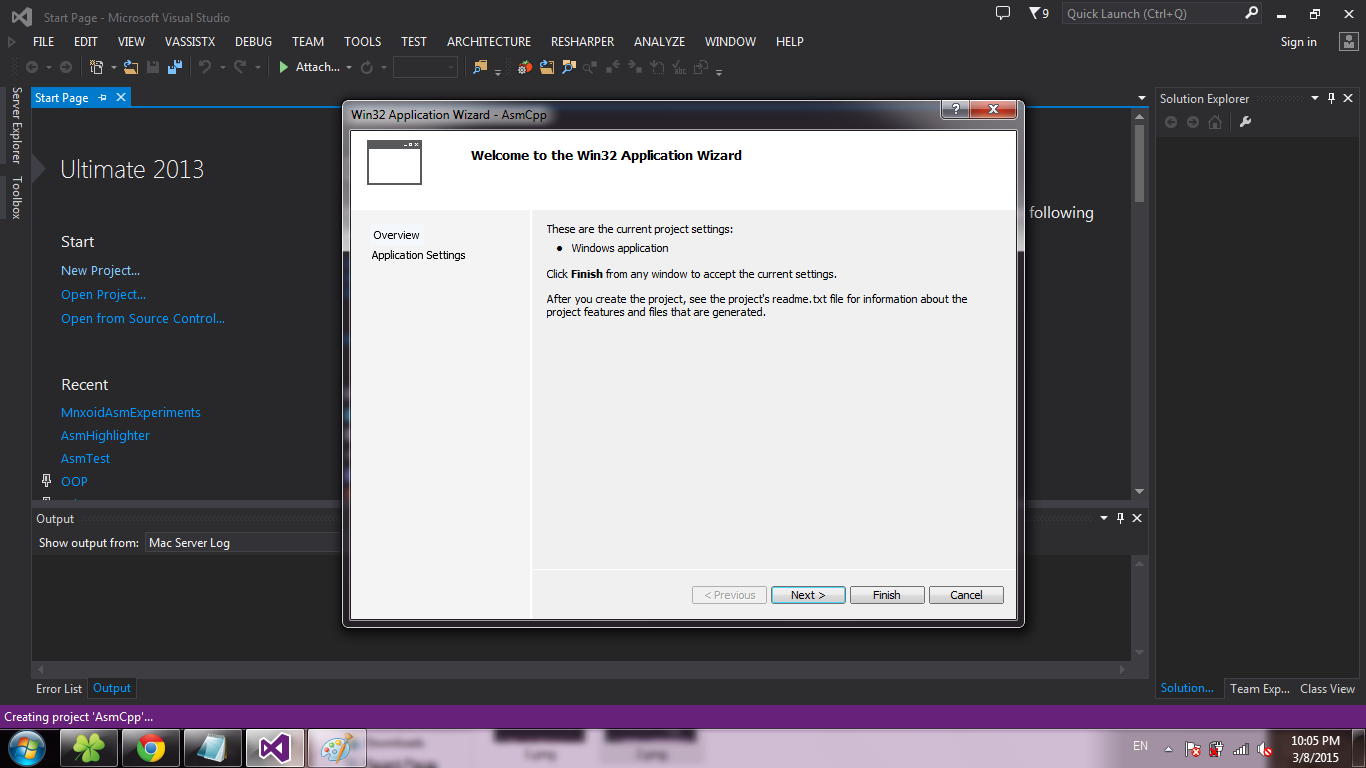
Click Next :
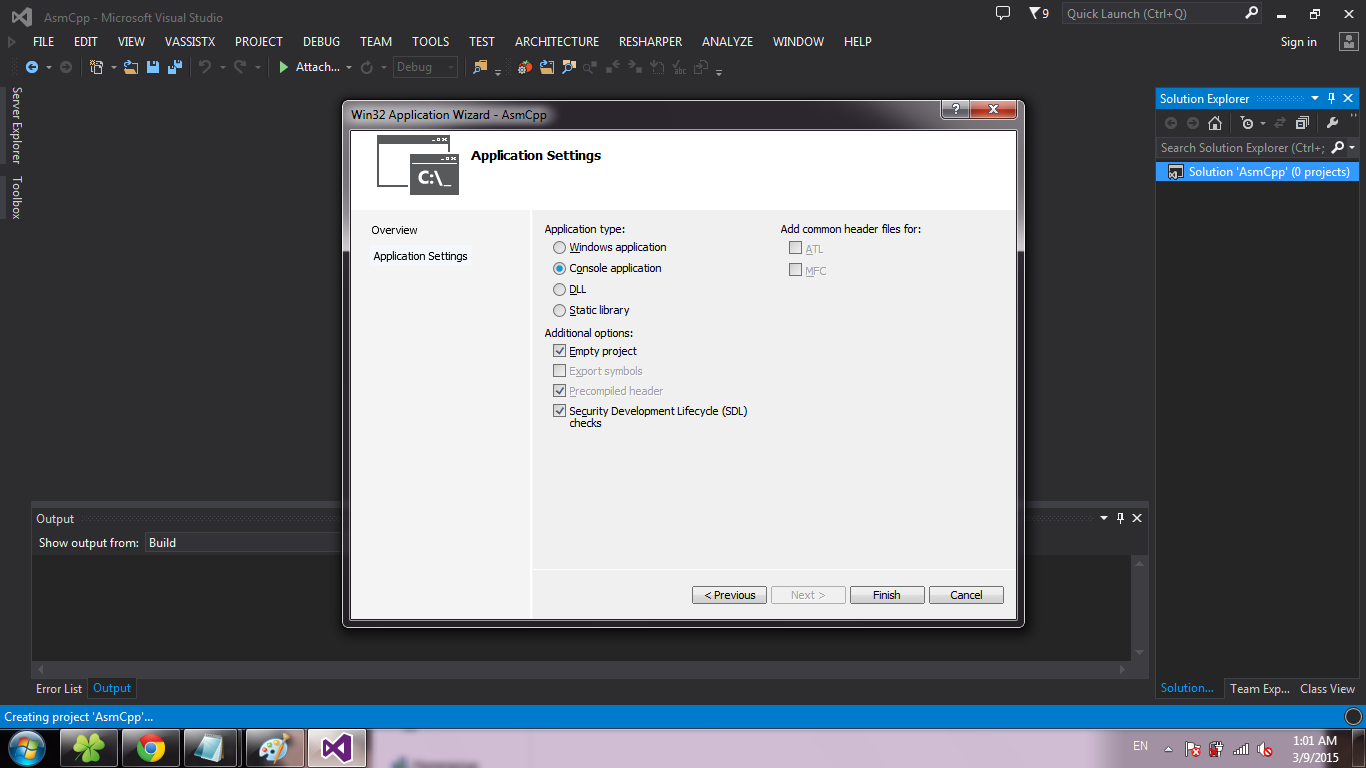
Check the Empty project checkbox and click Finish :
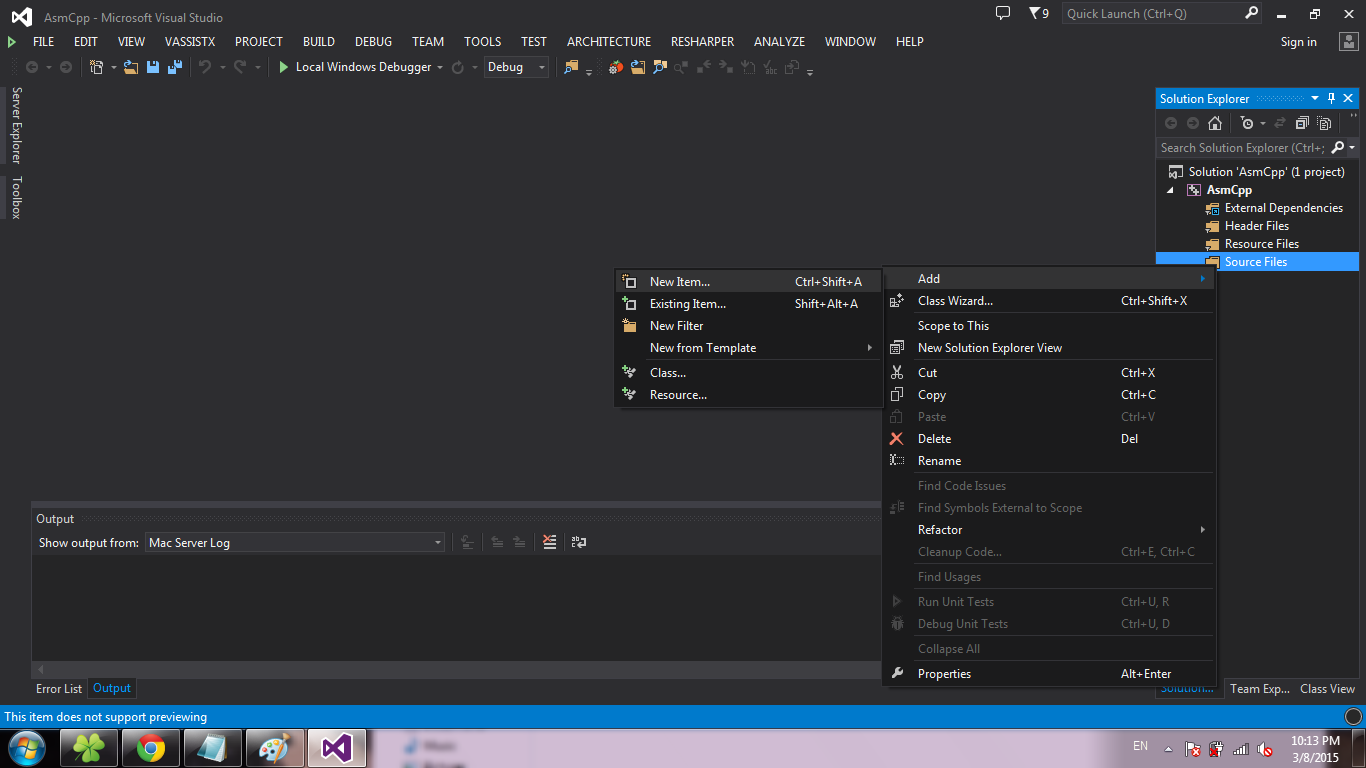
Create source. To do this, right-click on Source Files , select Add -> New Item ... :
Select C ++ File and click Add :
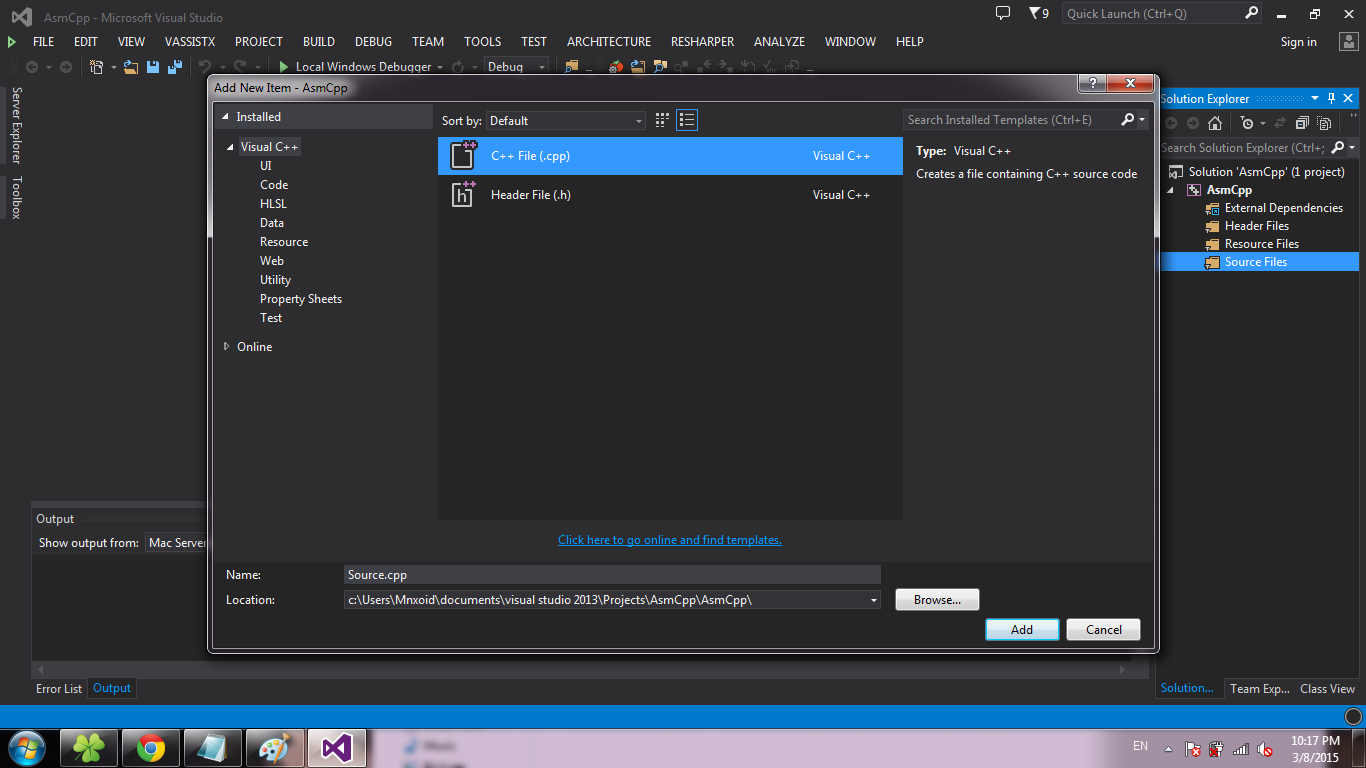
Similarly, create a * .asm file (just change the extension in the Name field ):
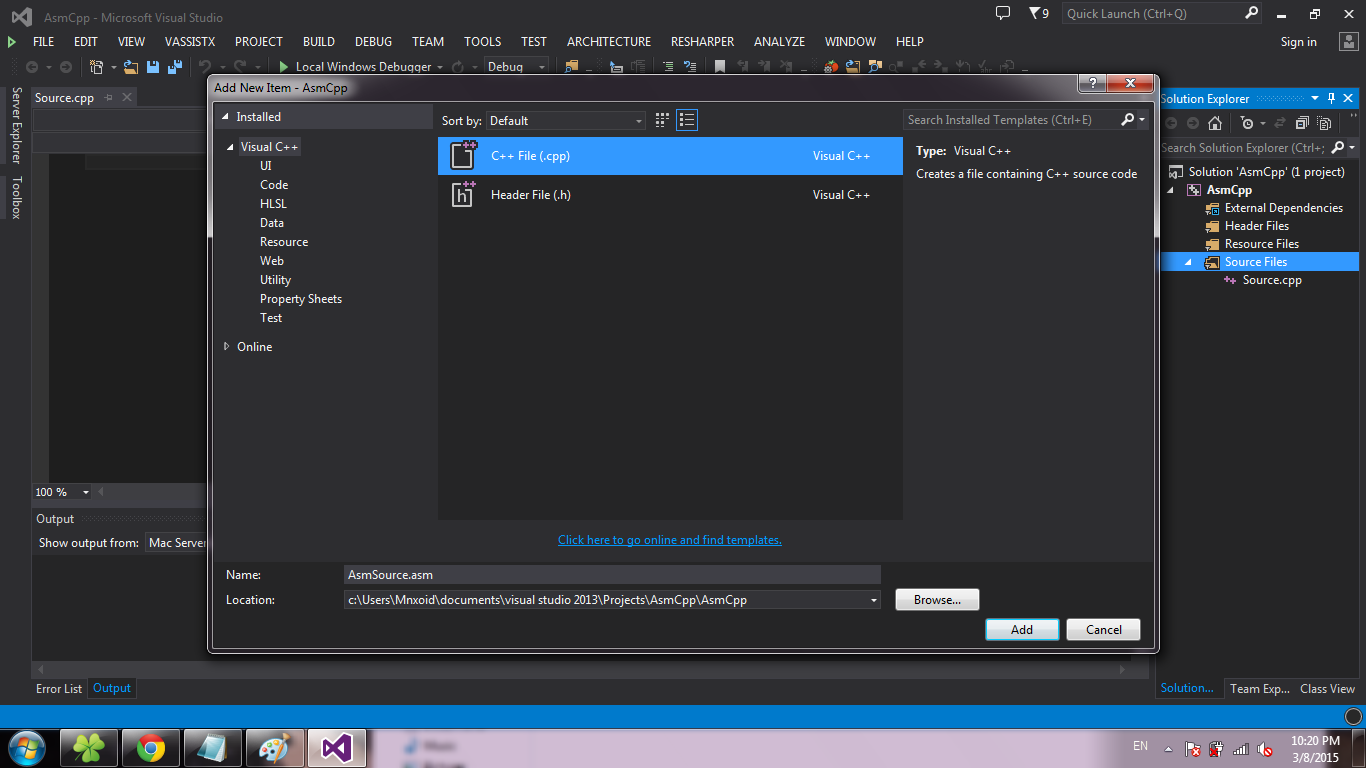
Important: the file names must be different (not considering the extension), otherwise when creating * .obj files there will be a problem of overwriting one object file with another .
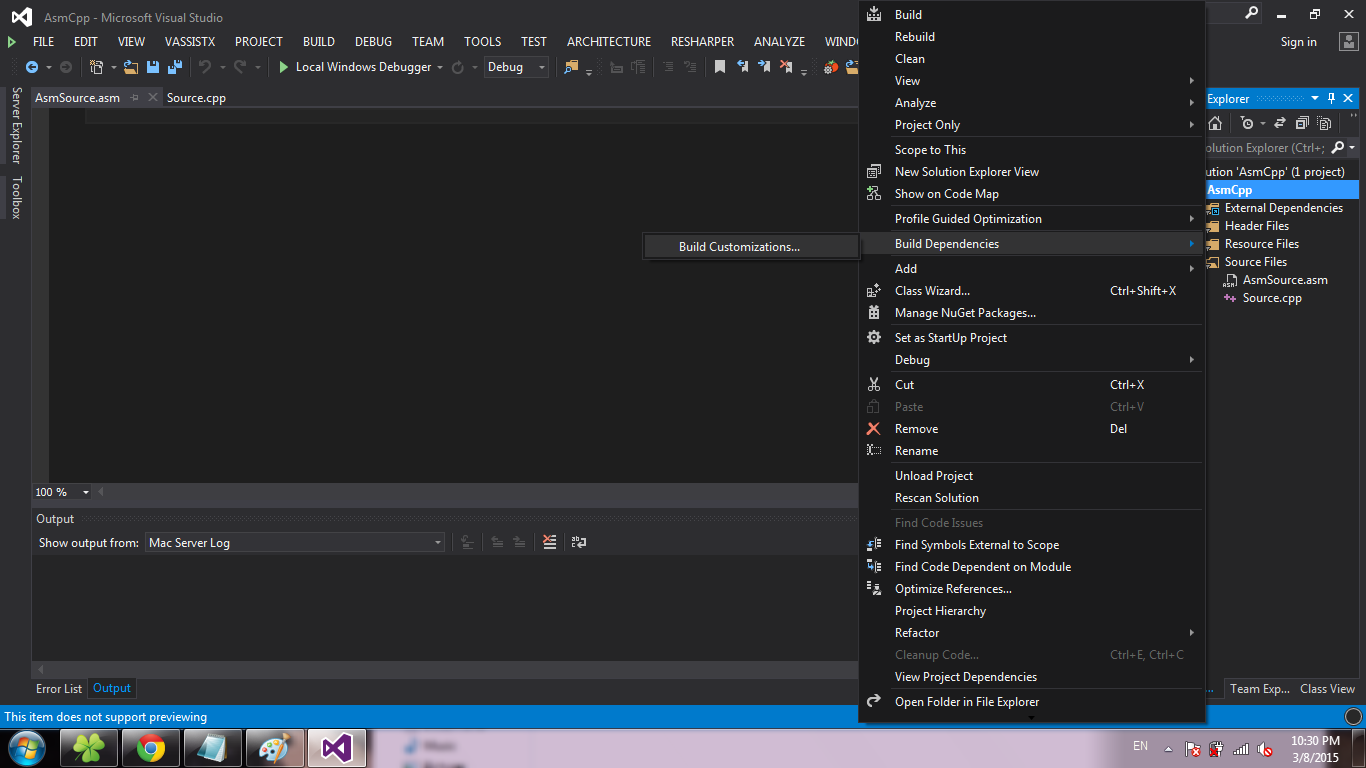
Now the settings. We right-click on the project, select Build Dependencies -> Build Customizations ...
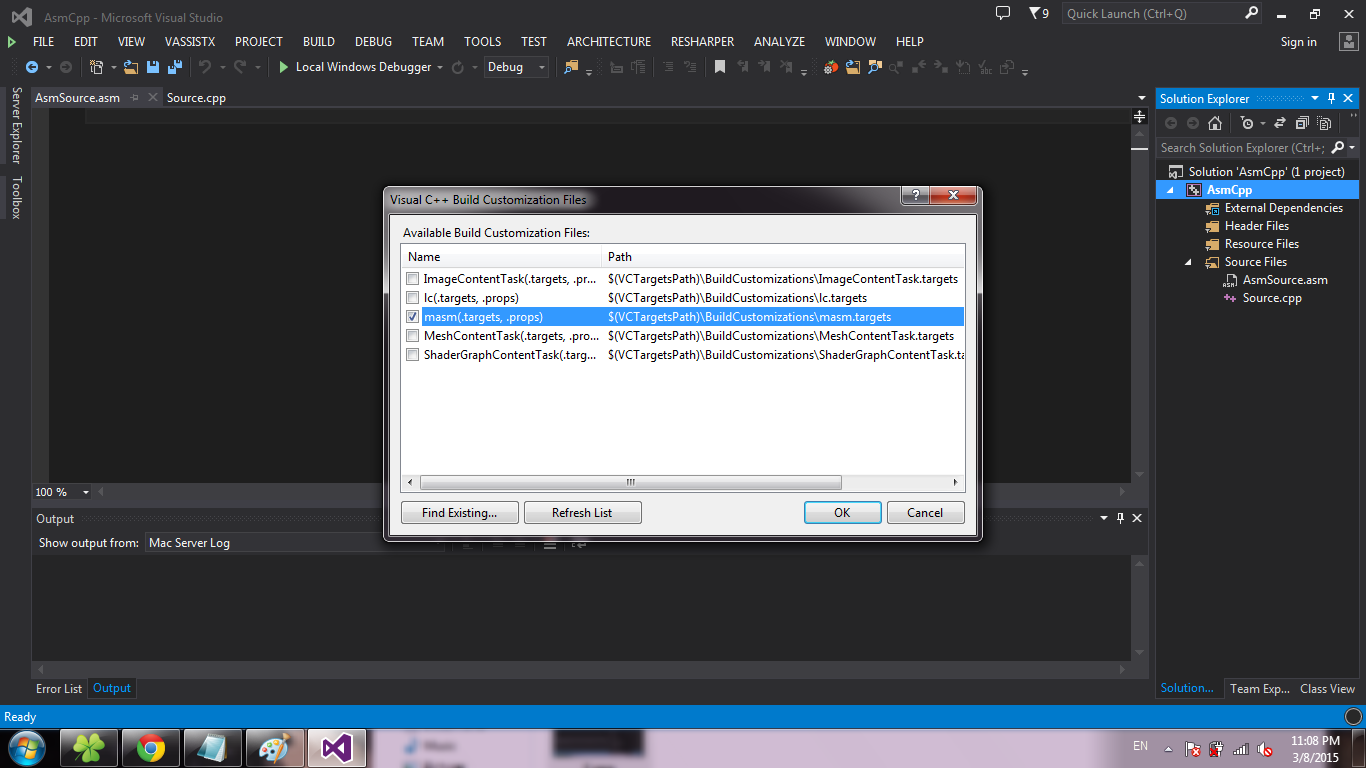
Put a checkmark in front of masm and click OK :
Right-click on the * .asm file, select Properties ... :

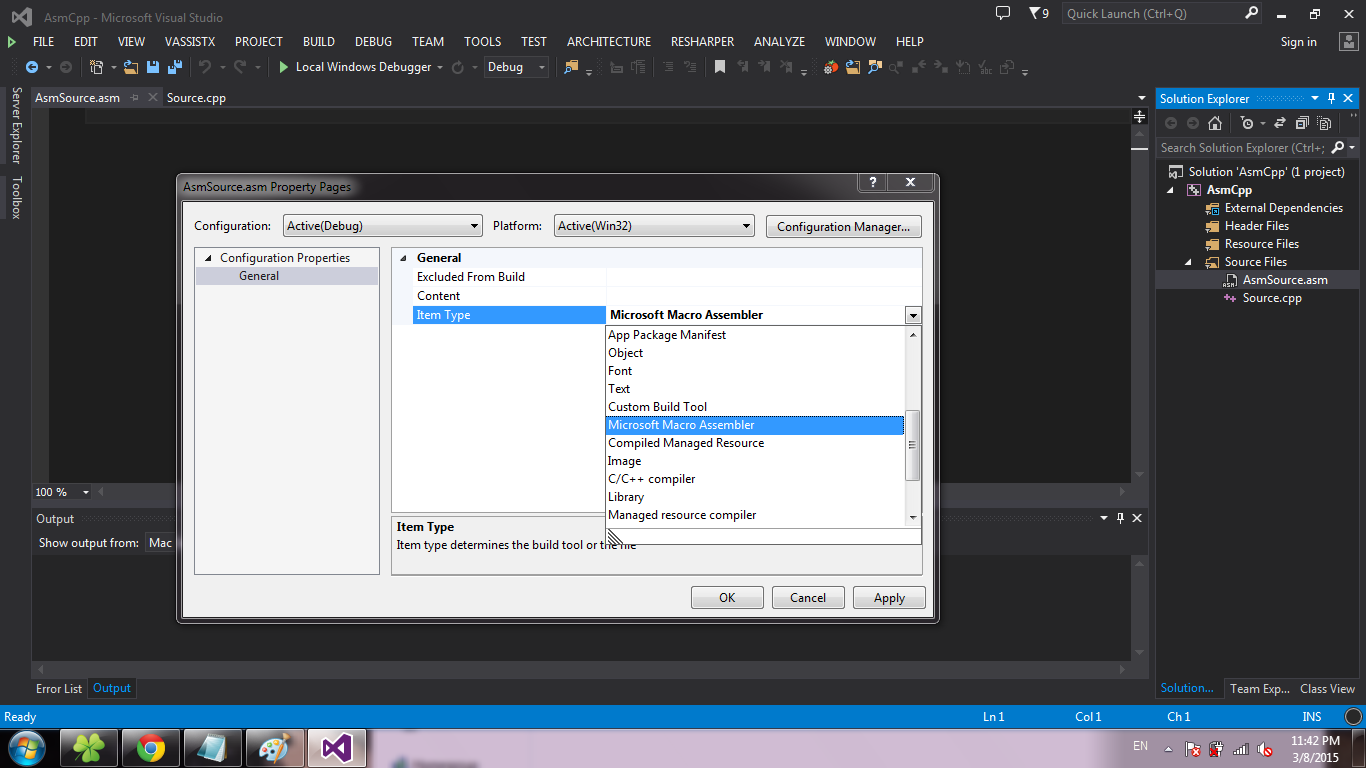
In the Item Type field, select Microsoft Macro Assembler and click OK :
Select Project -> Properties ... :

Select Configuration Properties -> Microsoft Macro Assembler -> Listing File. In the Assembled Code Listing File field, enter $ (ProjectName) .lst :

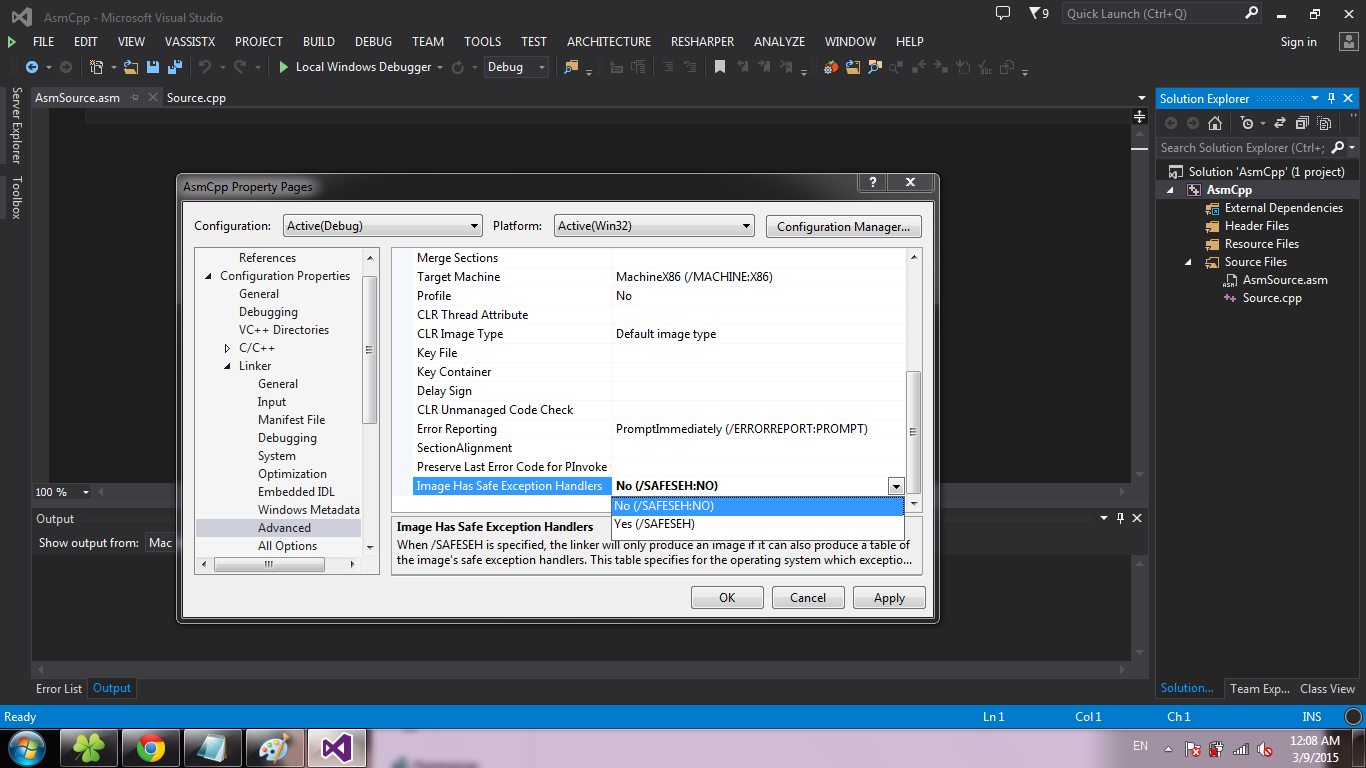
Select Configuration Properties -> Linker -> Advanced . In the Image Has Safe Exception Handlers select the value No . Click OK :
At this stage, the project can be considered created. Code writing is discussed in the section Subtleties of calling methods between C ++ and Asm .
Select the Win32 Console Application template , click OK :
Click Next :
Check the Empty project checkbox and click Finish :
Create source. To do this, right-click on Source Files , select Add -> New Item ... :
Select C ++ File and click Add :
Similarly, create a * .asm file (just change the extension in the Name field ):
Important: the file names must be different (not considering the extension), otherwise when creating * .obj files there will be a problem of overwriting one object file with another .
Now the settings. We right-click on the project, select Build Dependencies -> Build Customizations ...
Put a checkmark in front of masm and click OK :
Right-click on the * .asm file, select Properties ... :
In the Item Type field, select Microsoft Macro Assembler and click OK :
Select Project -> Properties ... :
Select Configuration Properties -> Microsoft Macro Assembler -> Listing File. In the Assembled Code Listing File field, enter $ (ProjectName) .lst :
Select Configuration Properties -> Linker -> Advanced . In the Image Has Safe Exception Handlers select the value No . Click OK :
At this stage, the project can be considered created. Code writing is discussed in the section Subtleties of calling methods between C ++ and Asm .
Text only
Visual Studio include, select the File -> the New -> by Project ... .
Select the Win32 Console Application template , click OK .
Click Next .
We put a tick in front of the Empty project and click Finish .
We create source codes. To do this right click on the Source Files , choose the Add -> the New Item ... .
Select C ++ File and click Add .
Similarly, create a * .asm file (just change the extension in the Name field ).
Important: the file names must be different (not considering the extension), otherwise when creating * .obj files there will be a problem of overwriting one object file with another .
Now the settings. We right-click on the project, select Build Dependencies -> Build Customizations ...
Put a checkmark in front of masm and click OK .
Right-click on the * .asm file, select Properties ...
In the Item Type field, select Microsoft Macro Assembler and click OK .
Select Project -> Properties ...
Select Configuration Properties -> Microsoft Macro Assembler -> Listing File . In fieldAssembled Code Listing File, enter $ (ProjectName) .lst .
Select Configuration Properties -> Linker -> Advanced . In the Image Has Safe Exception Handlers select the value No . Click OK .
At this stage, the project can be considered created. Code writing is discussed in the section Subtleties of calling methods between C ++ and Asm .
Select the Win32 Console Application template , click OK .
Click Next .
We put a tick in front of the Empty project and click Finish .
We create source codes. To do this right click on the Source Files , choose the Add -> the New Item ... .
Select C ++ File and click Add .
Similarly, create a * .asm file (just change the extension in the Name field ).
Important: the file names must be different (not considering the extension), otherwise when creating * .obj files there will be a problem of overwriting one object file with another .
Now the settings. We right-click on the project, select Build Dependencies -> Build Customizations ...
Put a checkmark in front of masm and click OK .
Right-click on the * .asm file, select Properties ...
In the Item Type field, select Microsoft Macro Assembler and click OK .
Select Project -> Properties ...
Select Configuration Properties -> Microsoft Macro Assembler -> Listing File . In fieldAssembled Code Listing File, enter $ (ProjectName) .lst .
Select Configuration Properties -> Linker -> Advanced . In the Image Has Safe Exception Handlers select the value No . Click OK .
At this stage, the project can be considered created. Code writing is discussed in the section Subtleties of calling methods between C ++ and Asm .
Setting syntax highlighting
There is an add-on for Visual Studio - asmHighlighter , however, at the time of writing, there was no version for VS2013. However, looking through the Discussions section, I found a message from the Trass3r user who, fortunately, shared the repository with the version of the add-on for VS2013. After installing the Visual Studio SDK, I was able to assemble the project and now the * .vsix package is freely available .
The subtleties of calling methods between C ++ and Asm
In order to avoid compilation and / or binding errors, remember the following:
- If you need to call library methods from assembler, it is enough to indicate at the beginning of the code section which methods we are going to use.
EXTRN printf : proc ;we'll use printf
Next, you can simply use call :;printf(ebx,eax) push eax; push ebx call printf add esp, 8 ;pop x2 - If you need to call custom methods, then in addition to item 1, you must also write extern “C” before defining the method.
extern "C"
void* readName()
{
	char* name = (char*)calloc(1, 255);
	scanf("%s", name);
	while (getchar() != '\n');
	return name;
}
Accordingly, in the * .asm file:
andEXTRN readName : proc ;and void* readName()call readName ;eax = readName() - In the case of using Asm methods in C ++, you just need to specify a prototype:
extern "C"
{
	void sayHello();
}
This prototype corresponds to such an Asm method declaration:sayHello PROC call readName ;eax = readName() lea ebx, helloFormat ;ebx = &helloFormat ;printf(ebx,eax) push eax push ebx call printf add esp, 8 ;pop x2 retn sayHello ENDP
Actually, the full source code of the example:
Source.cpp
#define _CRT_SECURE_NO_WARNINGS
#include
#include
extern "C"
{
	void sayHello();
}
void main()
{
	printf("Hello, what is your name?\n");
	sayHello();
	while (getchar() != '\n');
}
extern "C"
void* readName()
{
	char* name = (char*)calloc(1, 255);
	scanf("%s", name);
	while (getchar() != '\n');
	return name;
}
AsmSource.asm
.686
.MODEL FLAT, C
.STACK
.DATA
;-----------Local data------------------------------
helloFormat BYTE "Hello, %s!", 10, 13, 0
.CODE
;-----------External usage--------------------------
EXTRN  printf : proc;// we'll use printf
EXTRN  readName : proc;//and void* readName()
;-----------Function definitions--------------------
sayHello PROC
call readName; eax = readName()
lea ebx, helloFormat; ebx = &helloFormat
;printf(ebx,eax)
push eax
push ebx
call printf
add esp, 8;pop x2
retn
sayHello ENDP
END
application
The finished project template can be found here .
A package for highlighting asm syntax can be found here .
PS thanks ilynxy for the “deserve to” fix))