How we made a board game with a remote control
Board games - one of the oldest entertainment, which gathers around itself friends, family and just lovers of live communication and emotions during the game.
Today I want to tell you about how my friend and I decided to create our board game, but not simple, but “smart” .
The second part can be found here: link
Attention! A lot of pictures on.
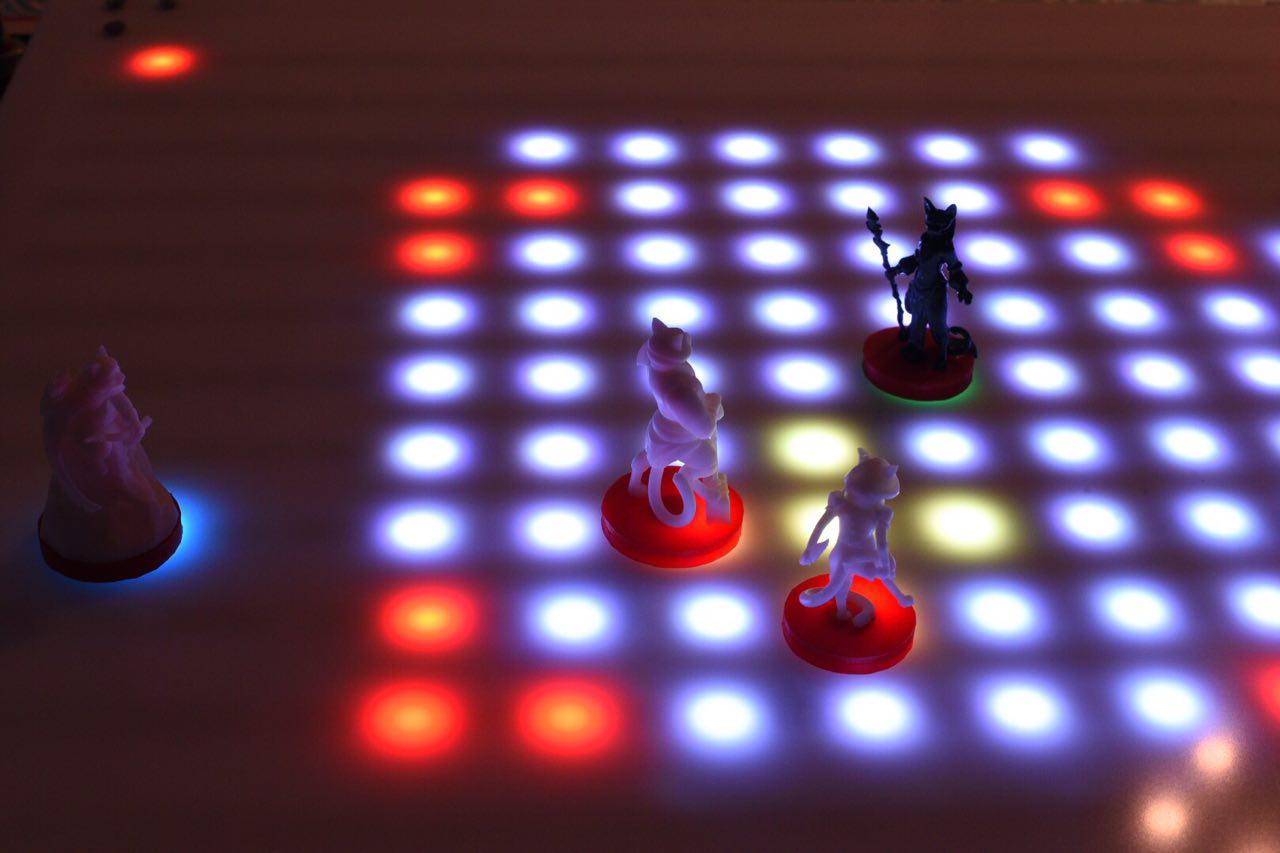
Our game is a tabletop MoBA , in which each of the players controls their unique hero, with their own characteristics and abilities. At the moment we have the first version of the prototype, made from Arduino and plywood.
The main feature of our game is that there is no need to touch the pieces during the game, the game should move them and display all the abilities used. The player can only watch and manage his hero from a mobile phone.
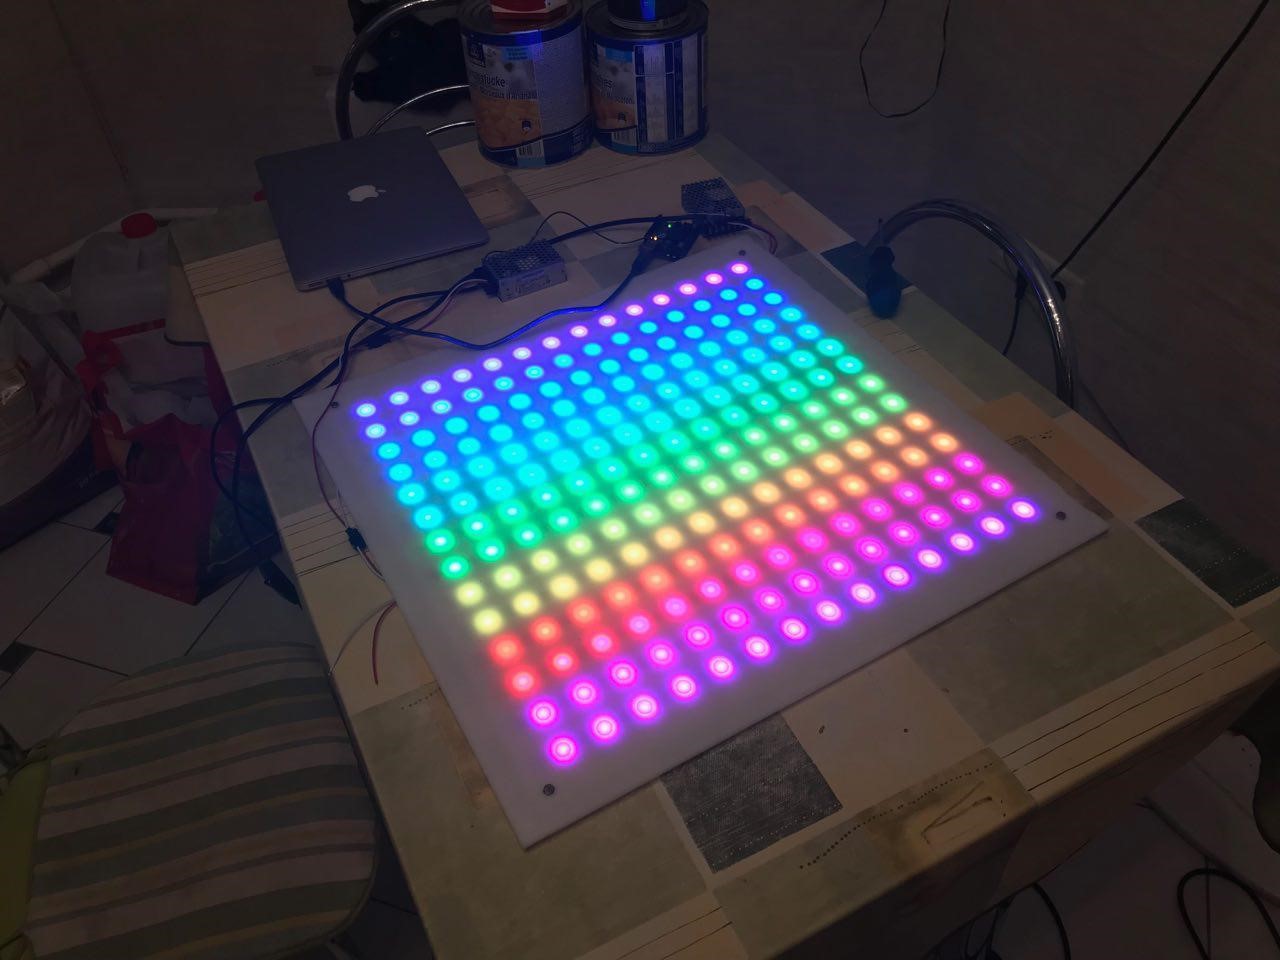
Here’s what our first build build looks like:

Once I bought a desktop “Horror Arkham”. After the store, immediately went to friends to play. However, unfortunately, none of us had played it before, and we could not manage the 26 pages of rules.
That is what made me think that it would be great to make a board game that will independently monitor the implementation of the rules, calculate the necessary values (without dice, rulers and a written sheet of paper), etc.
One of my friends really liked the idea, and he agreed to participate.
We had no experience at all in the development of hardware devices (none of us even held Arduino in our hands), and the programming experience was limited to the university and the development of small Android applications. However, it only added interest and desire.
After discussing all the details, we came to the following:
We didn’t come to CoreXY right away. At the very beginning, when implementing kinematics, we were inspired by various DIY guides on the assembly of 3D printers.
Below is a photo of our very first attempt:

To create components, we bought a cheap, used 3D printer, on which 6200 meters of plastic were printed and it works fine to this day.
However, this option had a lot of flaws:
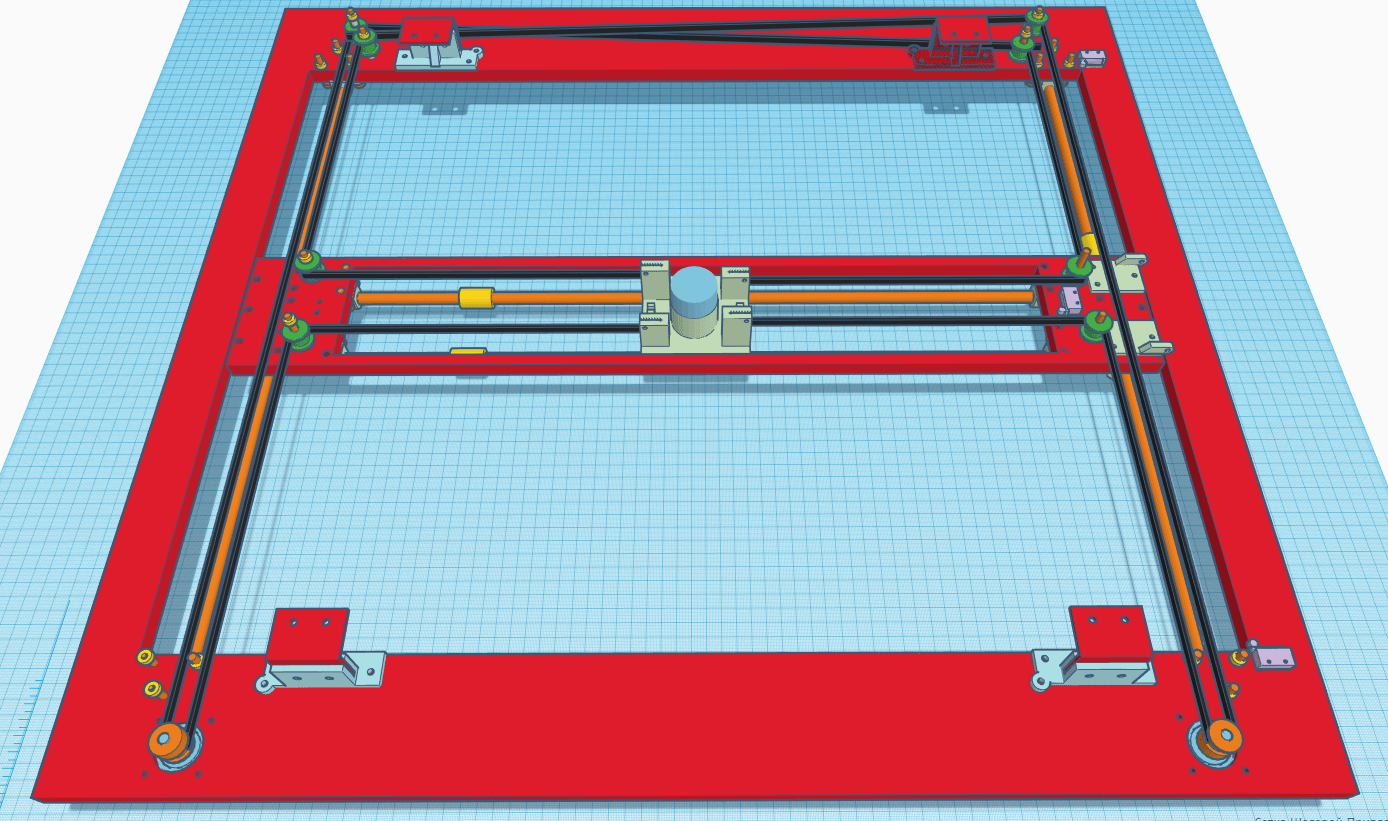
At one point, we came across an article describing the kinematics of CoreXY and decided to choose it. She has both pluses:
So and cons:
To avoid all the problems to the maximum, we made our model in Tinkercad, after which we started ordering and printing components.
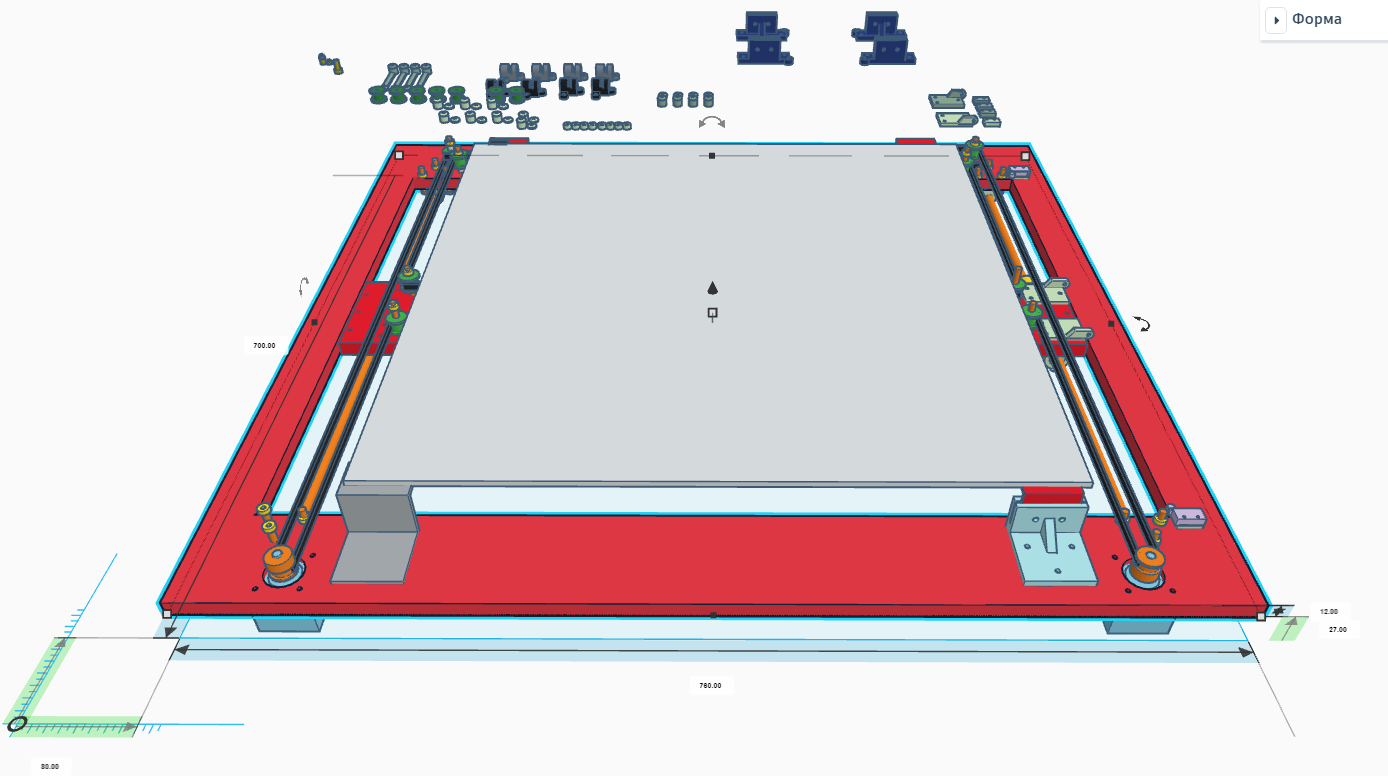
The game currently has the following physical parameters:
Width: 780 mm Length: 700 mm Height: 85 mm
Playing field: square with a side of 462 mm.
Basis: plywood 12 mm thick, with cut-out holes on the CNC for fastening parts and engines.
When the model was ready, she seemed tiny and light ... However, when she was alive, she was very big and heavy. Now we understand that the whole structure should be optimized:
Below I will describe the features that we encountered during assembly:
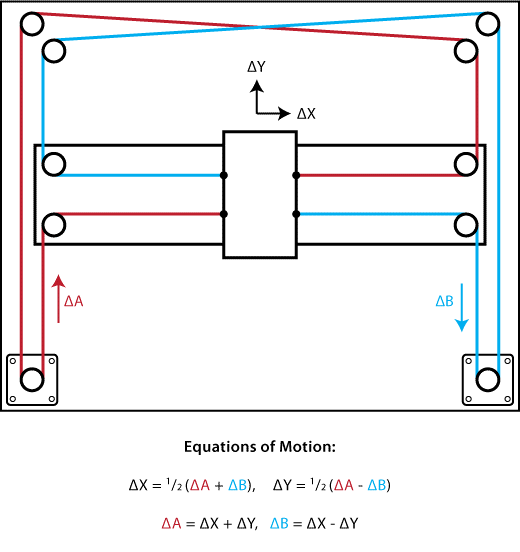
To calculate the distance in X and Y, you must use the following formula:
To highlight the playing field, we chose the LED strip with pixel addressing WS2812b, which is great for our purposes.
The WS2812b is a 4-pin RGB LED in an SMD5050 package: VDD, VSS, DIN and DOUT.
What are the requirements for the field:
As a result, the playing field conventionally consists of 3 parts: the substrate, to which the LED strip is attached, the tape itself and the surface coating, along which the figures slide.
The main problem we are facing is what to make the substrate from?
At the moment we are using plexiglass, in which we have cut out grooves under the tape with a depth of 2 mm (height of the tape and LED) on the CNC. Naturally, this sheet has completely lost at least some stiffness and flexes strongly along the cutting lines. Therefore, we simply glued the substrate to the surface. Perhaps in the next version we replace plexiglass with monolithic polycarbonate.

As the surface, we also selected all plexiglass, which was lying around after repair on a balcony, 4 mm thick, milky in color, with good dispersion indicators.
As a result, after sitting in the evening with a soldering iron, we got the following:
There are tapes with different density of LEDs. Usually it is: 144, 90, 60, 30 per meter. We stopped on the tape with 30 LEDs per meter, because Using a tape with a higher density of LEDs - it is difficult to move the figures without collisions and the power required for power increases.
It is worth noting that the LEDs are connected in series. Therefore, if your first LED fails, the rest will not work.
Our field has a size - 14 * 14 cells, only 196 pixels. The tape works with a voltage of 5V. One pixel in the tape consists of 3 LEDs - R, G, B, each of which consumes 20 mA at maximum brightness. It’s easy to calculate that if we want to light all 196 pixels in white, then we need almost 12 A ...
Finding a compact power supply unit or DC-DC converter that can produce such a current at 5V is very problematic. Therefore, we decided that in our game the field should not be filled by more than 60%, and do not use white / gray color (the color at which all 3 LEDs turn on), i.e. maximum 40 mA per pixel. The result is that the table should not consume more than 5 A.
Often I saw a recommendation that it is necessary to feed the tape from two sides so that there is no voltage loss. But we are connected to the tape on the one hand, every 100 LEDs, and we do not observe visible voltage subsidence.
Management of all parts of the game takes place with the help of the Arduino Mega 2560. The following functions are assigned to it:
The first prototype was assembled on a breadboard and included the following components:

After we were convinced that everything was working, we decided that we had to make our own shield for the Arduino Mega and finally get rid of the installation and the heap of wires.
Due to the lack of experience in developing software, we decided to entrust this business to a professional. As a result, one of our friends fully developed the board and made the installation of all components. The result can be seen below:

I can not judge the quality of performance due to lack of experience, but the board works without complaints. Schematic diagram can be found here .
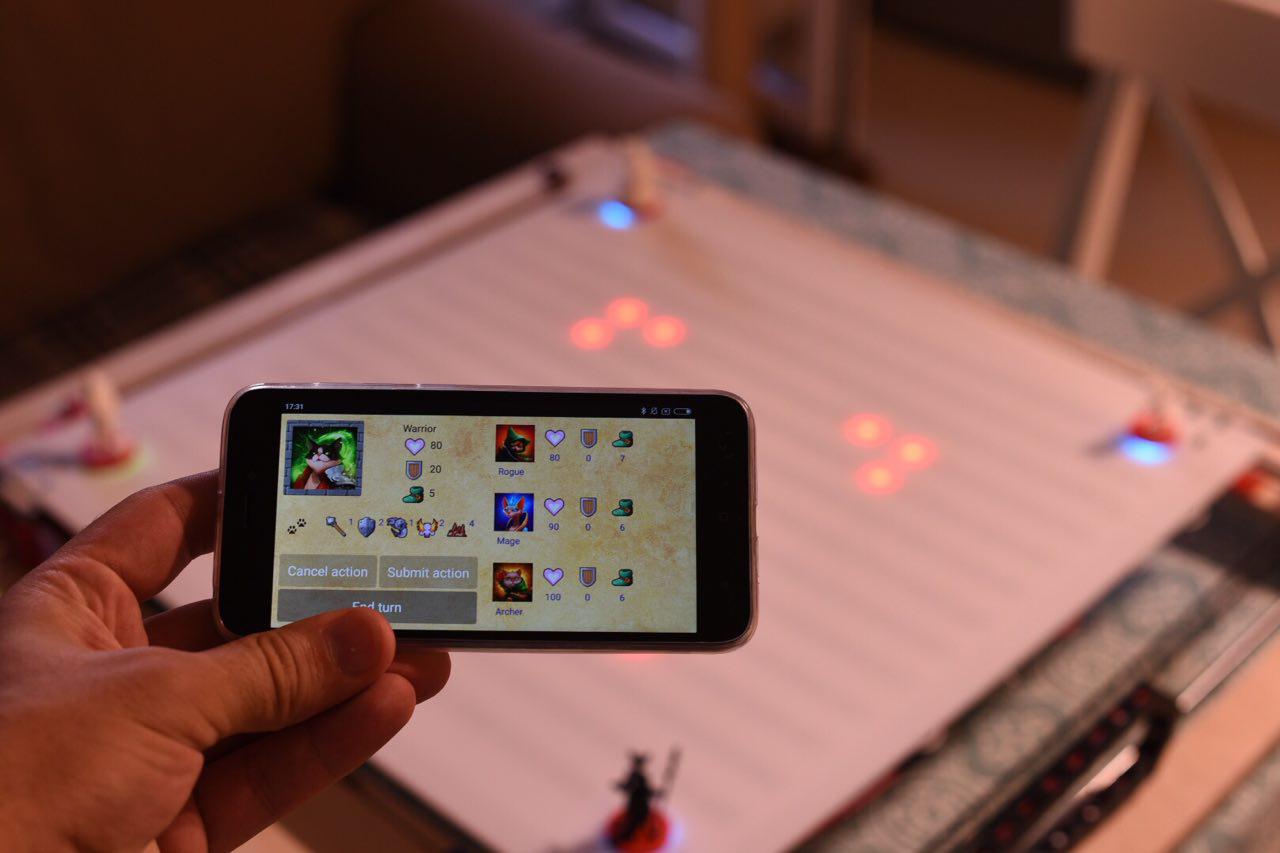
Mobile application - the "brain" of our game. It is the application that contains all the information about the state of the game, characters, etc. Anroid was chosen as the development platform, the main requirement is BLE support (since it is planned to add a version of the game for iOS in the future).
Unlike electronics, we had little experience in developing mobile applications, so we planned to complete this stage fairly quickly. However, as usual, everything did not turn out as planned.
We quickly realized that in fact we would have to write a full-fledged mobile game, in which the means of displaying information is not only the mobile phone screen, but also the surface of the board game.
The main functionality of the current application:
We have no feelings of beauty, as well as friends of UX / UI-designers, so they did the design themselves as best they could. In the future, we plan to add a lore, a description, as well as a PVE mode in which players will fight against the bosses in the arena.
At the moment we have a fully functional prototype in which you can play (albeit on 1 smartphone), and on which we polish the rules and mechanics of the game. We spent about a year creating it, working on weekends and occasional evenings, when there was free time.
Our plan is ambitious: to find like-minded people, to finalize the prototype, to completely “lick” the balance and rules of the game and try to get on Kickstarter , because it will be just a fantastic experience.
If it is interesting, in the next article I will tell you more about the mobile application, the game itself, how we made our miniatures and what came of it.
Today I want to tell you about how my friend and I decided to create our board game, but not simple, but “smart” .
The second part can be found here: link
Attention! A lot of pictures on.
Our game is a tabletop MoBA , in which each of the players controls their unique hero, with their own characteristics and abilities. At the moment we have the first version of the prototype, made from Arduino and plywood.
The main feature of our game is that there is no need to touch the pieces during the game, the game should move them and display all the abilities used. The player can only watch and manage his hero from a mobile phone.
Several gifs of gameplay
What should be able to do "smart" game:
- Independently move the figures across the field.
- Highlight the playing field (in whole or in a separate block) in any color.
- To display to the player what he can / cannot / should do, thereby making the rules of the game transparent.
- Share data with each player's smartphone.
Here’s what our first build build looks like:
How did the idea
Once I bought a desktop “Horror Arkham”. After the store, immediately went to friends to play. However, unfortunately, none of us had played it before, and we could not manage the 26 pages of rules.
That is what made me think that it would be great to make a board game that will independently monitor the implementation of the rules, calculate the necessary values (without dice, rulers and a written sheet of paper), etc.
One of my friends really liked the idea, and he agreed to participate.
Implementation
We had no experience at all in the development of hardware devices (none of us even held Arduino in our hands), and the programming experience was limited to the university and the development of small Android applications. However, it only added interest and desire.
After discussing all the details, we came to the following:
- Figures across the field moves CoreXY, on the carriage of which the electromagnet is located at 12V.
- For the movement are responsible two stepper motors Nema 17 17HS4401 and drivers DRV8825.
- The LED strip with pixel addressing WS2812b is used to highlight the field.
- The management is responsible for Arduino Mega 2560, on which the shield developed by us is installed.
- For transferring data between the game and the players' smartphones, 4 BLE-modules HM10 are responsible.
- It powers all this power supply unit at 12V, 120W power and 5V DC-DC converter.
- On the side of the smartphone is a mobile application (currently under Android), which in fact is the core of the whole game. From him on the BLE are commands for the movement, on / off of the magnet and LEDs.
Mechanics
We didn’t come to CoreXY right away. At the very beginning, when implementing kinematics, we were inspired by various DIY guides on the assembly of 3D printers.
Below is a photo of our very first attempt:
To create components, we bought a cheap, used 3D printer, on which 6200 meters of plastic were printed and it works fine to this day.
However, this option had a lot of flaws:
- The assembly was painful - the slightest inaccuracy in the location of the shafts - the carriage stopped driving.
- At least one bad bearing - the carriage stopped driving.
- The height of the whole structure is too high.
- We did not like the idea that the engine should be located on a moving part.
At one point, we came across an article describing the kinematics of CoreXY and decided to choose it. She has both pluses:
- The assembly is simple, because All “custom” parts are created on a CNC or 3D printer.
- Small height of the structure, which is limited by the height of the stepper motor.
- Stepper motors are fixed.
So and cons:
- Big sizes. From the picture with the 3D model, it is clear that the total area is much larger than the area of the working surface.
- Long straps that you need to manage to pull.
- The specific way to move the carriage, which I will discuss below.
To avoid all the problems to the maximum, we made our model in Tinkercad, after which we started ordering and printing components.
The game currently has the following physical parameters:
Width: 780 mm Length: 700 mm Height: 85 mm
Playing field: square with a side of 462 mm.
Basis: plywood 12 mm thick, with cut-out holes on the CNC for fastening parts and engines.
When the model was ready, she seemed tiny and light ... However, when she was alive, she was very big and heavy. Now we understand that the whole structure should be optimized:
- Replace plywood for a lighter and thinner material.
- The length and width of the outer contour should not greatly exceed the size of the playing field (you may have to change the kinematics).
Below I will describe the features that we encountered during assembly:
- So that the movement of the internal contour and the carriage is smooth and without extraneous sounds, it is important that the belts are parallel to the shafts. It is also desirable to lubricate the shafts. We used ordinary sewing machine oil.
- As a linear bearing, we first used Uncle Liao's LM8UU, but we often come across defective items that play, instantly crumbled and scratched the shaft. Therefore, it was decided to change them to graphite bushings.
- There are some features in motion using the kinematics of CoreXY. So, if we start only 1 stepper motor, then the carriage will go diagonally. For horizontal movement it is necessary to start the engines in the same direction. For vertical - in opposite directions.
To calculate the distance in X and Y, you must use the following formula:
Playing field
To highlight the playing field, we chose the LED strip with pixel addressing WS2812b, which is great for our purposes.
The WS2812b is a 4-pin RGB LED in an SMD5050 package: VDD, VSS, DIN and DOUT.
What are the requirements for the field:
- Small thickness, so that the electromagnet could drag the figure behind him.
- Smooth surface on which the slide will be carried out without problems.
As a result, the playing field conventionally consists of 3 parts: the substrate, to which the LED strip is attached, the tape itself and the surface coating, along which the figures slide.
The main problem we are facing is what to make the substrate from?
At the moment we are using plexiglass, in which we have cut out grooves under the tape with a depth of 2 mm (height of the tape and LED) on the CNC. Naturally, this sheet has completely lost at least some stiffness and flexes strongly along the cutting lines. Therefore, we simply glued the substrate to the surface. Perhaps in the next version we replace plexiglass with monolithic polycarbonate.
As the surface, we also selected all plexiglass, which was lying around after repair on a balcony, 4 mm thick, milky in color, with good dispersion indicators.
As a result, after sitting in the evening with a soldering iron, we got the following:
There are tapes with different density of LEDs. Usually it is: 144, 90, 60, 30 per meter. We stopped on the tape with 30 LEDs per meter, because Using a tape with a higher density of LEDs - it is difficult to move the figures without collisions and the power required for power increases.
It is worth noting that the LEDs are connected in series. Therefore, if your first LED fails, the rest will not work.
Our field has a size - 14 * 14 cells, only 196 pixels. The tape works with a voltage of 5V. One pixel in the tape consists of 3 LEDs - R, G, B, each of which consumes 20 mA at maximum brightness. It’s easy to calculate that if we want to light all 196 pixels in white, then we need almost 12 A ...
Finding a compact power supply unit or DC-DC converter that can produce such a current at 5V is very problematic. Therefore, we decided that in our game the field should not be filled by more than 60%, and do not use white / gray color (the color at which all 3 LEDs turn on), i.e. maximum 40 mA per pixel. The result is that the table should not consume more than 5 A.
Often I saw a recommendation that it is necessary to feed the tape from two sides so that there is no voltage loss. But we are connected to the tape on the one hand, every 100 LEDs, and we do not observe visible voltage subsidence.
Electronics
Management of all parts of the game takes place with the help of the Arduino Mega 2560. The following functions are assigned to it:
- Perform a calibration, as a result of which we will know how many steps a stepping motor must take in order to overcome 1 cell.
- Receive commands and data from the mobile application and send the execution status back to BLE.
- Move the carriage from point A to point B according to the coordinates of the data received from the mobile application.
- Turn on / off the electromagnet.
- Light a certain pixel on the table in a certain color. The pixel number and color is transmitted by the mobile application.
The first prototype was assembled on a breadboard and included the following components:
- Arduino Mega 2560;
- 2 drivers of the stepping motor DRV8825;
- 4 limit switches;
- BLE-module HM-10;
- Transistor IRF530N - to control the electromagnet;
- BP MeanWell 12V 10A;
- DC-DC MeanWell down converter from 12V to 5V, 10A;
After we were convinced that everything was working, we decided that we had to make our own shield for the Arduino Mega and finally get rid of the installation and the heap of wires.
Due to the lack of experience in developing software, we decided to entrust this business to a professional. As a result, one of our friends fully developed the board and made the installation of all components. The result can be seen below:
I can not judge the quality of performance due to lack of experience, but the board works without complaints. Schematic diagram can be found here .
Mobile app
Mobile application - the "brain" of our game. It is the application that contains all the information about the state of the game, characters, etc. Anroid was chosen as the development platform, the main requirement is BLE support (since it is planned to add a version of the game for iOS in the future).
Unlike electronics, we had little experience in developing mobile applications, so we planned to complete this stage fairly quickly. However, as usual, everything did not turn out as planned.
We quickly realized that in fact we would have to write a full-fledged mobile game, in which the means of displaying information is not only the mobile phone screen, but also the surface of the board game.
The main functionality of the current application:
- Search for BLE devices, identification of a suitable device for connection. Identification includes “handshakes” - the phone must make sure that the connected device is really a bluetooth module of the board game, not a TV.
- The choice of players (at least 2) of the available characters, which currently 4.
- Providing all necessary information to the current player: about available abilities, about their cooldowns , about opponents, etc.
- Making moves - each player controls his own moves with the help of a “joystick”, which he selects cells for applying abilities, moving, etc.
We have no feelings of beauty, as well as friends of UX / UI-designers, so they did the design themselves as best they could. In the future, we plan to add a lore, a description, as well as a PVE mode in which players will fight against the bosses in the arena.
Result
At the moment we have a fully functional prototype in which you can play (albeit on 1 smartphone), and on which we polish the rules and mechanics of the game. We spent about a year creating it, working on weekends and occasional evenings, when there was free time.
Our plan is ambitious: to find like-minded people, to finalize the prototype, to completely “lick” the balance and rules of the game and try to get on Kickstarter , because it will be just a fantastic experience.
If it is interesting, in the next article I will tell you more about the mobile application, the game itself, how we made our miniatures and what came of it.