IPv6 SLAAC Attack

I recently read the article “IPv6 under the gun” and decided to write in more detail about the SLAAC attack (SLAAC Attack), because I’ve been holding this attack in my head for a long time, I haven’t found detailed material in Russian, and it was interesting to repeat it myself.
Essence of the attack
What is the essence of the attack? Firstly, it is very simple and reliable, because uses standard OS technologies and tools. In fact, you simply become the only IPv6 router on the network and distribute to your clients an IPv6 subnet from which clients take addresses either automatically generating them (SLAAC) or asking your DHCPv6 server. Let me remind you that IPv6 is enabled by default in allmodern desktop, mobile and server operating systems, takes precedence over IPv4 (except in some cases), an IPv6 address, unlike IPv4, can be obtained at any time, and not just at the time of connection, and large websites have long been available through IPv6. The attack works both in wired networks and in wireless. Not all switches, even modern ones, support Router Advertisement filtering, and, I believe, not all enable this function, even if it is supported by a switch, assuming that there is no IPv6 on the network, then you do not need to filter anything. By the way, at the moment, the Router Advertisement filter can be bypassed on all switches, using the implementation flaws.
I was able to come up with two implementations of the attack:
Implementation No. 1
Using this method, you can only intercept real IPv6 traffic to hosts that have an AAAA record. You will need an IPv6 subnet of length / 64 and some software for Router Advertisement, I used dnsmasq. 6to4 IPv6 subnet will not work, as all 6to4 addresses have a lower priority than IPv4, so you need to use a tunnel broker. We will only distribute the range of addresses to clients, without DNS, and without using DHCPv6.
The dnsmasq daemon can take the subnet directly from the interface, for this it is enough to specify the following line in the configuration file:
dhcp-range=::, constructor:wlp3s0, ra-only2001:470::/64on the interface, start dnsmasq, look in wireshark: 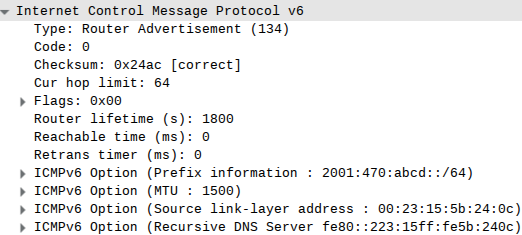
All computers on the network immediately assigned themselves an IPv6 address and set the default route:
 % ip -6 r
2001:470:abcd::/64 dev enp4s0  proto kernel  metric 256  expires 3542sec
fe80::/64 dev enp4s0  proto kernel  metric 256
default via fe80::223:15ff:fe5b:240c dev enp4s0  proto ra  metric 1024  expires 1781sec
Remember to enable routing!
# sysctl net.ipv6.conf.all.forwarding=1The disadvantage of this implementation is that only IPv6 traffic will go through your router. Again, most likely, your computer’s IPv4 address will be behind NAT, which means that getting an IPv6 subnet may not be so easy, because the most popular tunneling protocol - SIT - does not work for NAT. You need to use either tunneling using the AYIYA protocol, which is supported by a minority of tunnel brokers, or come up with your own forwarding schemes. An attack can be seen if the attacker uses an IP-linked site. But, this attack is technically very simple and can be applied in literally a minute.
Implementation No. 2
What to do if the host we need does not have an IPv6 address, and we really want to make an inconspicuous MITM attack? There is a wonderful way out of this situation - NAT64 + DNS64. NAT64 allows you to map the entire IPv4 range to the / 96 IPv6 address range, and DNS64 can give these addresses to clients.
Under Linux, there are three NAT64 daemons: TAYGA (userspace) and Ecdysis (kernelspace), Jool (kernelspace), and DNS64 support is in Bind9, Unbound, and the special totd daemon, which is abandoned but still compiling and working.
First of all, we must choose some 2 subnets that we will distribute to our customers. The first subnet is needed for address mapping, and the second for routing. I decided to use
2001:db8:1:ffff::/96(from the “for documentation” range) as the first subnet, and as the second - fde4:8dba:82e1:ffff::/64( IPv6 ULA , an analog of the intranet ranges in IPv4). Reconfiguring dnsmasq:
dhcp-range=fde4:8dba:82e1:ffff::1, fde4:8dba:82e1:ffff::ff, slaacprefix 2001:db8:1:ffff::/96forwarder 74.82.42.42 port 53
prefix 2001:db8:1:ffff::
port 53And run all the demons. As a result, it turns out somehow like this:
% dig aaaa habrahabr.ru
; <<>> DiG 9.9.2-P2 <<>> aaaa habrahabr.ru
;; ANSWER SECTION:
habrahabr.ru.		2363	IN	AAAA	2001:db8:1:ffff::d418:2c8d
habrahabr.ru.		2363	IN	AAAA	2001:db8:1:ffff::d418:2c85
All traffic sent to the 2001: db8: 1: ffff :: / 96 range will actually go through IPv4.
Unfortunately, DNS is set only when connected, because Router Advertisement accepts the kernel, and you need DHCPv6 to get DNS, which the kernel no longer does. A similar behavior is observed in Windows 7 (I have not tried other versions).
Conclusion
I really like this attack. It is very simple, reliable and works where there are protection against ARP Spoofing and IPv4 ACLs. There is another, but very similar in essence attack - Rogue RA, which will allow MITM to be performed even with the existing IPv6 infrastructure, but about it some other time.