Using the MSP430-Launchpad as a programmer
Hello! I want to share with the habrasociety one unusual application of the MSP430-Launchpad debug board .
The manual is intended for those who already have the MSP430-Launchpad, have mastered the MSP430-ValueLine microcontrollers and are thinking about upgrading to the more advanced MSP430 MKs, but have not yet decided to purchase a professional MSP430-JTAG or MSP430-UIF programmer. But this is not scary. As a programmer, you can still use Launchpad. Under the cut, I’ll tell you how to do it.
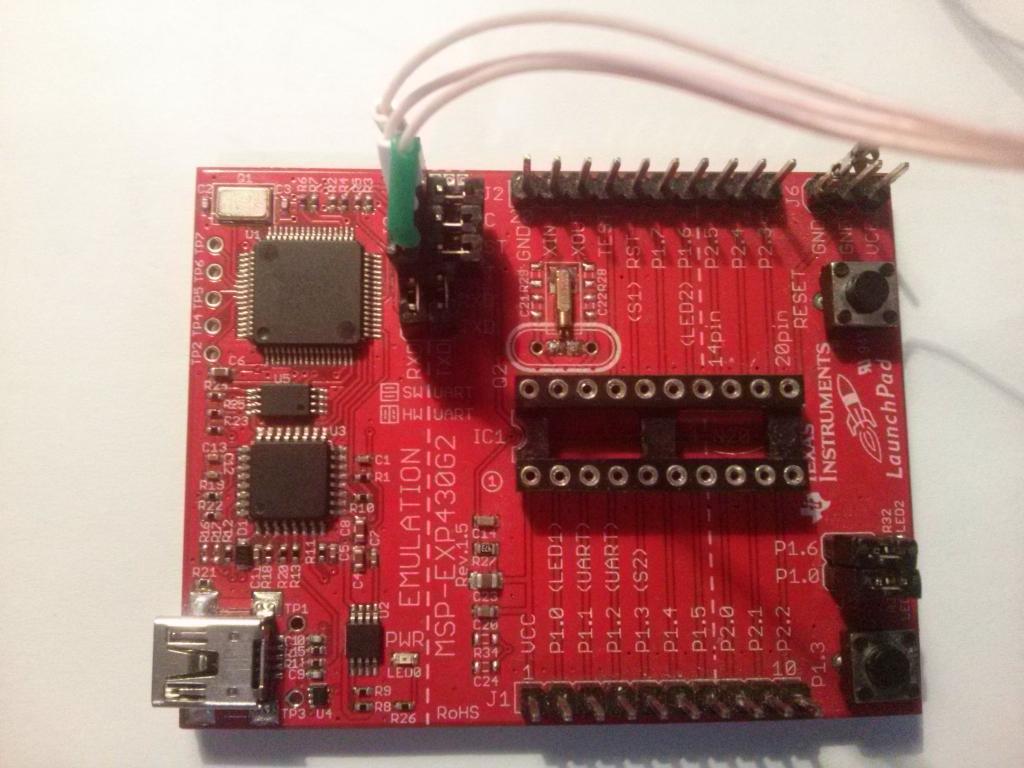
It turns out that the programmer included in the Launchpad board can flash any MSP430 microcontroller (MK) that has a SpyByWire (SBW) interface. Apparently, there are no restrictions on the MK model. Whether this is a bug of Launchpad or the idea of Texas Instrunmets is unknown. The SBW interface is programmed including MK MSP430G2553 and MSP430G2452, which come with the board. You can make sure that the microcontroller has an SBW interface by looking at its datasheet. We will use a home-made debug board with the MSP430F5438A microcontroller as a test board. SBW interface in this MK is. The board looks like this:

Now you need to remove the jumpers that connect the top of the Launchpad to the bottom and remove the wires from the contacts RST, TEST, VCC, VSS. These wires must be connected with a homemade cable to the legs of the MK in the following order (the numbering of the terminals for the MSP430F5438A MK is given in brackets):
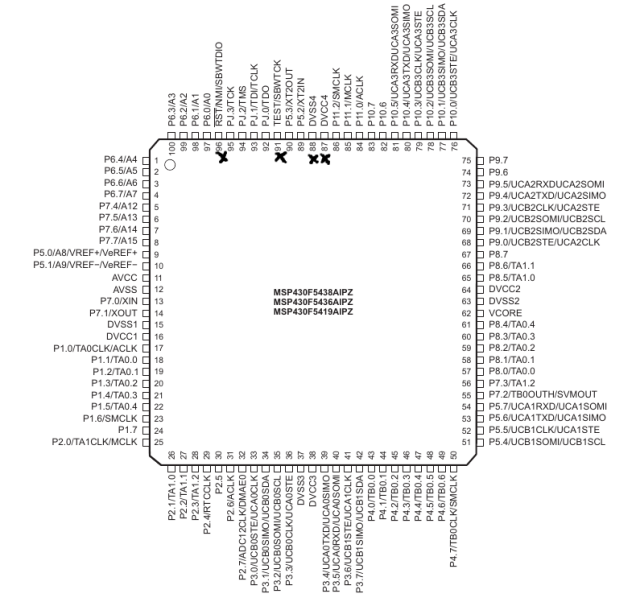
In the next picture, the legs of the MSP430F5438 to which you want to connect are marked with a cross:
Now we make a homemade cable, connect it to the MSP430F5438 and to Launchpad. It should turn out something like this:
MK from the DIP-20 outlet must be removed. In this case, the MK on the experimental debug board will be powered by Launchpad, which in turn is powered by USB. Now you can connect the USB cable to Launchad and connect it to the computer. If everything is done correctly, then on the Launchpad the green PWR LED should be on. If VSS and VDD are mixed up, then the LED is off.
Now you can check whether the microcontroller is recognized. Next, I will use the Linux OS and the mspdebug utility. If you have another toolchain for the MSP430 then see the documentation for it. Now let's check if our MK is recognized. In the console, type:
The board should give this answer:
As a result, we should get into the mspdebug console. To exit from there, enter exit. If MK did not answer, then check the cable.
If you got this answer, then the MK was recognized and you can program it with the command:
Through Launchpad, programming is very slow. 8kB is stitched for several minutes. Otherwise, there are no restrictions.
It should also be noted that after we turned off the bottom of the Launchpad, the RESET button is no longer functional. If there is no such button on the board, then you can send the MK to the reset from the command line:
In general, the professional programmer will not replace the above method, but you can not only familiarize yourself with the "adult" MK MSP430 series, but also fully work if you do not pay attention to the low firmware speed.
The manual is intended for those who already have the MSP430-Launchpad, have mastered the MSP430-ValueLine microcontrollers and are thinking about upgrading to the more advanced MSP430 MKs, but have not yet decided to purchase a professional MSP430-JTAG or MSP430-UIF programmer. But this is not scary. As a programmer, you can still use Launchpad. Under the cut, I’ll tell you how to do it.
It turns out that the programmer included in the Launchpad board can flash any MSP430 microcontroller (MK) that has a SpyByWire (SBW) interface. Apparently, there are no restrictions on the MK model. Whether this is a bug of Launchpad or the idea of Texas Instrunmets is unknown. The SBW interface is programmed including MK MSP430G2553 and MSP430G2452, which come with the board. You can make sure that the microcontroller has an SBW interface by looking at its datasheet. We will use a home-made debug board with the MSP430F5438A microcontroller as a test board. SBW interface in this MK is. The board looks like this:
Now you need to remove the jumpers that connect the top of the Launchpad to the bottom and remove the wires from the contacts RST, TEST, VCC, VSS. These wires must be connected with a homemade cable to the legs of the MK in the following order (the numbering of the terminals for the MSP430F5438A MK is given in brackets):
Launchpad <---------> MSP430F5438A
           VCC <---------> VDD (87)
           RST <---------> SBWTDIO (96)
          TEST <---------> SBWTCK (91)
           GND <---------> VSS (88)
In the next picture, the legs of the MSP430F5438 to which you want to connect are marked with a cross:
Now we make a homemade cable, connect it to the MSP430F5438 and to Launchpad. It should turn out something like this:
MK from the DIP-20 outlet must be removed. In this case, the MK on the experimental debug board will be powered by Launchpad, which in turn is powered by USB. Now you can connect the USB cable to Launchad and connect it to the computer. If everything is done correctly, then on the Launchpad the green PWR LED should be on. If VSS and VDD are mixed up, then the LED is off.
Now you can check whether the microcontroller is recognized. Next, I will use the Linux OS and the mspdebug utility. If you have another toolchain for the MSP430 then see the documentation for it. Now let's check if our MK is recognized. In the console, type:
mspdebug rf2500
The board should give this answer:
vvk@linux-bmx0:~> mspdebug rf2500
MSPDebug version 0.21 - debugging tool for MSP430 MCUs
Copyright (C) 2009-2012 Daniel Beer
This is free software; see the source for copying conditions.  There is NO
warranty; not even for MERCHANTABILITY or FITNESS FOR A PARTICULAR PURPOSE.
Trying to open interface 1 on 004
Initializing FET...
FET protocol version is 30394216
Set Vcc: 3000 mV
Configured for Spy-Bi-Wire
Device ID: 0x0580
  Code start address: 0x5c00
  Code size         : 262144 byte = 256 kb
  RAM  start address: 0x1c00
  RAM  end   address: 0x5bff
  RAM  size         : 16384 byte = 16 kb
Device: MSP430F5438A
Number of breakpoints: 8
fet: FET returned NAK
warning: device does not support power profiling
Chip ID data: 05 80 17
Available commands:
    =           erase       isearch     opt         run         setwatch_w
    alias       exit        load        power       save_raw    simio
    break       fill        load_raw    prog        set         step
    cgraph      gdb         locka       read        setbreak    sym
    delbreak    help        md          regs        setwatch    verify
    dis         hexout      mw          reset       setwatch_r  verify_raw
Available options:
    color                       gdb_loop
    enable_bsl_access           gdbc_xfer_size
    enable_locked_flash_access  iradix
    fet_block_size              quiet
Type "help " for more information.
Press Ctrl+D to quit.
(mspdebug) exit
As a result, we should get into the mspdebug console. To exit from there, enter exit. If MK did not answer, then check the cable.
If you got this answer, then the MK was recognized and you can program it with the command:
mspdebug rf2500 "prog имя_файла_с_прошивкой.elf"
Through Launchpad, programming is very slow. 8kB is stitched for several minutes. Otherwise, there are no restrictions.
It should also be noted that after we turned off the bottom of the Launchpad, the RESET button is no longer functional. If there is no such button on the board, then you can send the MK to the reset from the command line:
mspdebug rf2500 reset
In general, the professional programmer will not replace the above method, but you can not only familiarize yourself with the "adult" MK MSP430 series, but also fully work if you do not pay attention to the low firmware speed.