LoJax: the first known UEFI rootkit used in a malicious campaign
The Sednit cyber group, also known as AP28, Strontium and Fancy Bear, has been operating since at least 2004. It is believed that the group is behind a number of resonant cyber attacks. Some security companies and the US Department of Justice called Sednit responsible for hacking the National Democratic Committee before the US elections in 2016. The group is credited with hacking the global television network TV5Monde, e-mail leakage of the World Anti-Doping Agency (WADA) and other incidents. Sednit has many goals and a wide range of tools, some of which we have already documented earlier, but in this paper we will describe for the first time the use of a UEFI rootkit in detail.

We found that, at least since the beginning of 2017, Sednit has been using a trojanized version of the old user agent program to protect devices against theft from the developer Absolute Software - LoJack. The tool attracted the attention of information security specialists because of the use of the UEFI / BIOS module as a mechanism for ensuring persistence. We called the trojanized version of this program LoJax .
The presence of well-known Sednit tools along with LoJax samples in the infected systems, and the fact that some command servers used by trojanized agents were previously part of the Sednit infrastructure, allow us to link the UEFI rootkit with this group with a high degree of confidence.
Together with the LoJax agents, tools were found to read the UEFI system firmware, and in one of the cases this tool could dump, patch and rewrite part of the system's SPI flash memory. The ultimate goal of the tool is to install a malicious UEFI module into a system whose SPI flash memory protection is vulnerable or misconfigured.
The UEFI module is responsible for introducing the LoJax agent into the system; this is the first UEFI rootkit of the Sednit group identified. Since it is in the system firmware, it can survive reinstalling Windows and replacing the hard disk.
There was at least one case where this rootkit was successfully installed into the system SPI flash memory. According to our information, this is the first UEFI rootkit detected in-the-wild.
The Sednit group uses a number of malware families. We gave a detailed description of the frequently used tools of the group in the report .
We have been monitoring Sednit for several years and have released many reports on the work of the group, from describing zero-day vulnerabilities to custom programs such as Zebrocy . The components described in this report form a separate group.
UEFI rootkits have been described in the reports of information security companies earlier. Known, for example, rkloader, which appeared in the presentation about data leakage in the Hacking Team, and DerStarke, the implant in the macOS EFI / UEFI download, from Vault7 documents. We know about the existence of these tools, but reports on UEFI’s compromise by rootkits were not issued.
Now we have not only proved the in-the-wild use of the firmware with the malicious LoJax UEFI module, but also discovered the whole range of tools that were most likely used to install it. It is interesting to note that Sednit uses the DownDelph bootkit, which was used in 2013 and 2014 for the persistence of Downdelph, one of the Sednit backdoors of the first stage. The idea is similar, but in the new version of UEFI, the use of bootkits is no longer possible. Thus, these two components are significantly different in behavior.
This work is divided into three sections. In the first, we will examine the early LoJack / Computrace security studies and the possibilities of malicious use of the program. The second section is devoted to the research process, which eventually led us to the UEFI rootkit. Finally, in the third section, we describe in detail the various components of LoJax and how they ensure persistence in the system even after reinstalling Windows and replacing the hard disk.
While many vendors have already made statements regarding the Sednit group in the past, ESET does not in any way determine the geopolitical affiliation. Since the publication of the study in 2016, our position has not changed. Identifying the source of a cyber attack based on a scientific approach is a complex task that is outside the scope of the competence of ESET specialists. What we call the “Sednit group” is simply a collection of software and an associated network infrastructure that we cannot authoritatively link to any particular organization.
During the study, we found a small number of different images of LoJax. Based on our telemetry data and the study of other Sednit programs found in-the-wild, we are confident that this particular module was rarely used in comparison with other tools. The targets were mainly state organizations located in the Balkans, in Central and Eastern Europe.
LoJack - software to protect computers from theft and loss, developed by Absolute Software. Early versions of the agent are known as Computrace. As the previous name suggests, after activating the service, the computer can contact its command server — the owner will be notified of the device's location in case of loss or theft.
The rest of this section describes the old LoJack architecture. Only the old version of the software was trojanized by the attackers, so we will focus on it. In addition, Absolute Software released in May 2018 a statement that the vulnerabilities described below do not affect the performance of the latest versions of their agents.
The Computrace program attracted the attention of information security specialists because it used an unusual method of ensuring persistence. Its purpose is to protect against theft, so resistance to reinstalling the OS and replacing the hard disk is important for it - all this is implemented in the UEFI / BIOS module that can survive after these actions. The solution is pre-installed in the firmware of a significant part of laptops from different manufacturers, the user only needs to activate this function. Activation can be performed in the BIOS, as shown in the figure below.

Figure 1. Activating Computrace in BIOS
One of the first reportsThe implementation of LoJack / Computrace was published in 2009. The global product architecture, the UEFI / BIOS module dropping the user agent to disk and the way the agent communicates with the web server managed by Absolute Software was disclosed. The scheme can be understood from the figure below.
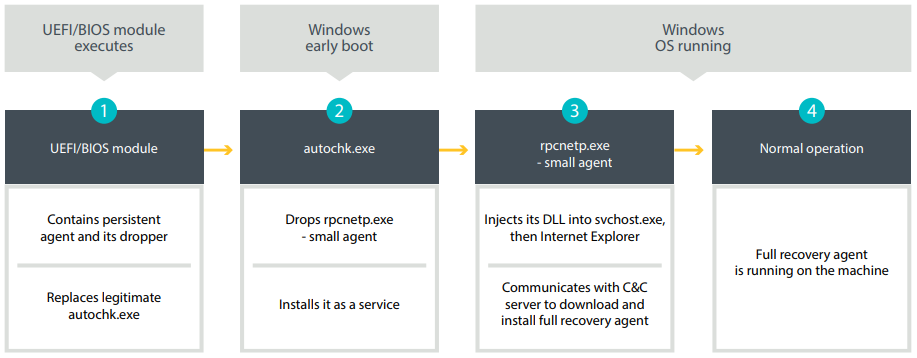
Figure 2. LoJack persistence mechanism (approximately 2008)
The following is a description of the steps listed above:
1. If activated, the UEFI / BIOS module is executed at boot. He is trying to find the partition FAT / FAT32 / NTFS. Then, using the NTFS driver, he creates a backup file
2. When a modified one is launched
3. Mini-agent
4. Now the full-featured agent works on the system and can use the Computrace features for tracking and recovery.
DescriptionThis process and the network protocol involved between the mini-agent and the C & C server was published in 2014. Due to the lack of an authentication mechanism, if attackers control the server with which the mini-agent communicates, they can force it to download arbitrary code. There are several mechanisms that allow an attacker to communicate directly with a mini-agent. The most important for us is using the method of getting the address of the C & C server by the mini-agent. In fact, this information is stored in the configuration file in the executable file itself.

Figure 3. Encrypted LoJack configuration file with partial decryption on the right
The figure shows the LoJack mini-agent configuration file. The “encryption” method used is a simple XOR with a single-byte key. The key 0xB5 is the same for all studied mini-agents. As can be seen from the figure, the C & C domain is specified in the file. The four preceding bytes contain the IP address of the command C & C server. In the absence of validation of the contents of the configuration file, attackers with write permissions
In May 2018, Trojanized LoJack mini-agent samples were described in the Arbor Network blog

Figure 4. Left - legitimate configuration file, right - modified
The differences between legitimate and trojanized agents are extremely small; almost everything is listed above. Samples mini agent LoJax, we were able to detect - troyanizirovannye version of the same sample mini Computrace agent
At the time of publication, we found various LoJax mini-agents used in attacks on various organizations in the Balkans, in Central and Eastern Europe, but we had no idea how to install them. An obvious explanation would be the installation using one of the famous Sednit backdoors. Do not forget that LoJack, as a well-proven tool, has been whitelisted by many anti-virus vendors. Thus, even if only a mini-agent was used in this campaign, which did not survive after reinstalling Windows, it still had an advantage - less likelihood of being detected as malware. But what if the compromise was even deeper, and the attackers tried to copy LoJack to get to the system firmware?
We recorded LoJax attacks targeting several organizations in the Balkans, in Central and Eastern Europe. In all of them we managed to find traces of Sednit malware, including:
We found traces of the Sednit tools in most of the systems studied, which became LoJax targets, as well as a pair of systems where only LoJax was present. It can be assumed that in some cases LoJax was used as a separate tool, probably as an additional backdoor to restore access to Sednit operators to the network.
The XAgent backdoor usually drops additional modules into a compromised system, so it immediately comes to mind that LoJax samples were delivered in the same way, without any other mechanisms. One would assume that Sednit borrowed only a mini-agent from the LoJack solution. However, soon after the beginning of the analysis, we found several clues indicating that the source of inspiration was somewhat more extensive.
The first piece of evidence was found thanks to the custom tool of the attackers, who, when executed, downloaded the information about the settings of the lower level system into a text file. The tool was found along with some LoJax samples. The following figure shows a fragment of a file with the logs of this tool under a logical name

Figure 5. Extract from log files generated by info_efi .exe
To read this type of information, the tool has a driver called

Figure 6. Code signing certificate RwDrv.sys RWEverything
software comes with a graphical user interface that allows you to access all of this information.
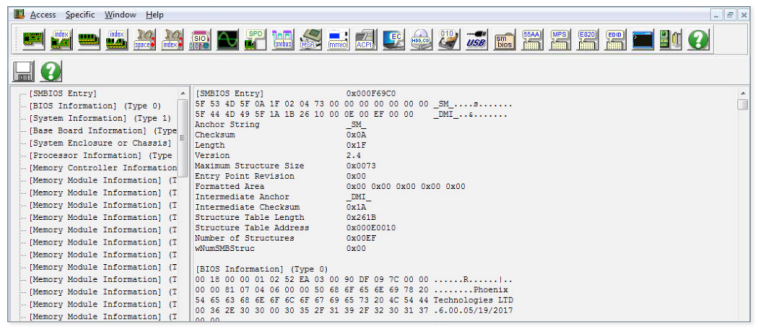
Figure 7. Screenshot of the RWEverything Interface
Detection Tool
The final clue that allowed us to find the first UEFI rootkit of the Sednit group was two tools — to dump the SPI flash memory and to write to it.
The first piece of the puzzle was a file called
RwDrv.sys: supported IOCTL codes:
0x22280c - writes to the memory area allocated for I / O
0x222808 - reads the memory area allocated for I / O
0x222840 - reads dword from the specified PCI 0x222834 configuration
register- writes a byte to the specified PCI configuration register,
The next task of the tool is to obtain the base address of the BIOS memory in SPI and its size. This information is contained in the main SPI interface register as the BIOS Flash Primary Region. All registers are mapped in memory in the Root Complex Register Block (RCRB), the base address of which can be obtained by reading the desired configuration register PCI Configuration Register.
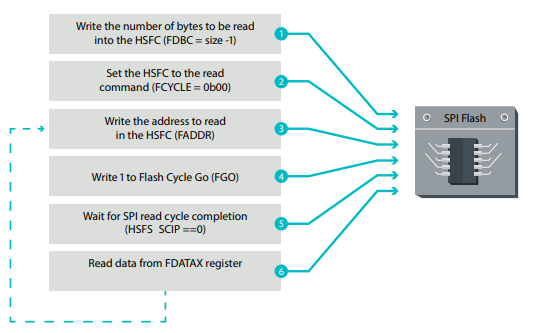
Figure 8. Working sequence of reading from SPI flash memory
In addition to the first two steps, performed only once, the operations are repeated in a loop until all the data from the SPI flash memory has been read. The process is also well described here . Then
The second piece of the puzzle was a file called
After the flash memory contents have been uploaded and verified by the above tool, a malicious UEFI module is added to the image. For this, the UEFI image must be analyzed to highlight the necessary information.
The data stored in the UEFI image is expanded into volumes using the file system (FFS). As the name suggests, this is a special file system for storing firmware images. Volumes contain files with GUIDs. Each file usually consists of a set of sections, one of which contains the actual PE / COFF executable, which is a UEFI image. Below for a simpler understanding of the scheme, there is a screenshot from UEFITool , an open source project for working with UEFI firmware images.
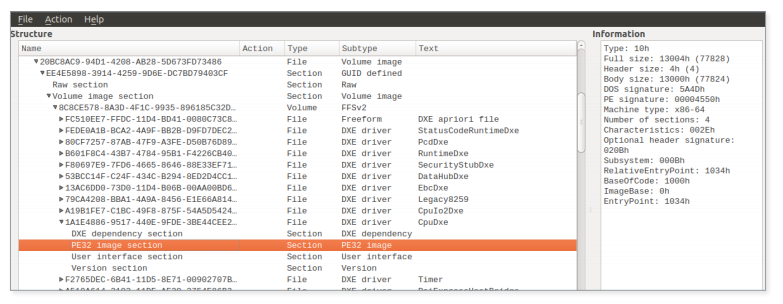
Figure 9. An example of a UEFI firmware image downloaded into UEFITool
ReWriter_binary analyzes all the firmware volumes found in the BIOS SPI flash memory and searches for specific files:
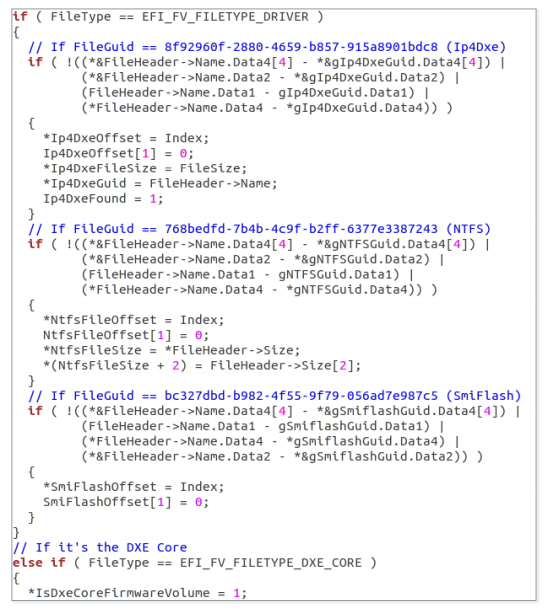
Figure 10. The result of using the Hex-Rays decompiler in the
Ip4Dxe and NtfsDxe firmware volumes — DXE drivers. In UEFI firmware, DXE drivers are PE / COFF images created either for hardware abstraction or for organizing services for use by other DXE drivers or UEFI applications. Such drivers are discovered and loaded by the DXE Foundation via the DXE dispatcher (DXE core) at an early stage of the boot process. After completing this phase, all services, such as the OS loader, are available to work with UEFI applications. Normally, DXE drivers are stored in the same volume. However, the DXE dispatcher may be separate.
NtfsDxe - AMI NTFS DXE driver. If it is present in the firmware volume, its location is saved and later used to remove this file from the volume. In the section on UEFI rootkit, we will see why it deletes this file.
As for the SmiFlash image, the information relating to it is stored, but is not used anywhere in Malvari. What is interesting is the imagevulnerable . Therefore, we believe that Sednit operators can work on exploiting these vulnerabilities. This may allow them to write flash memory to even properly configured systems in SPI. As we will describe further, in the current view, the tool can only write to the BIOS area of incorrectly configured or fairly old systems (on motherboards with chipsets older than Platform Controller Hub, introduced around 2008).
After selecting the necessary metadata, it

Figure 11. UEFITool view of the SecDxe file
Finally, if the NtfsDxe driver is present in the image, it will be deleted. The firmware file system stores the files and their contents sequentially, so the process is quite simple:
After successfully making changes to the firmware image, the next step is to write it back to the SPI flash memory. Before diving into this process, we need to characterize some of the BIOS write protections that are important in this case. Other existing mechanisms, such as BIOS Range Write Protection, remain on the sidelines, as ReWriter_binary does not check them.
The platform uses several defense mechanisms to block unauthorized attempts to write to the BIOS area. It must be said that these mechanisms are not included by default. The firmware is responsible for their correct setting. These configurations are listed in the BIOS control register (BIOS_CNTL). It contains the BIOS Write Enable (BIOSWE) bit, which must be switched to “1” to enable writing to the BIOS area of the SPI flash memory. Since the platform should not allow any attempts to write to the BIOS area, there is another bit in BIOS_CNTL to protect the BIOSWE - this is BIOS Lock Enable (BLE). When set, the mechanism should block the BIOSWE bit and leave a value of "0". However, the solution has a vulnerability. When the BIOSWE bit request request comes to "1", the BIOSWE bit is set to "1",
In this version of the solution there are many problems. First, the SMI handler is left for the developers of the firmware. Therefore, if this code is not implemented in the firmware, the BLE bit is useless, since the BIOSWE bit will not be set back to “0”. Secondly, in this case, we have a “ race condition vulnerability, ” which allows you to completely bypass this mechanism, even if the SMI handler is implemented correctly. To exploit this vulnerability, an attacker needs to start a stream that continuously sets the BIOSWE to “1”, while another stream must write data to the SPI flash memory. According to the work of Kallenberg and Wojtchuk, this attack runs on multi-core processors and can also be successfully used on single-core processors with Hyper-Threading technology enabled.
To solve this problem, a new protection mechanism has been added to the platform, configured via BIOS_CNTL. It is introduced in the Intel Platform Controller Hub (PCH) chipset family. If the configuration bit is set, SMM BIOS Write Protect Disable (SMM_BWP) will provide the ability to write to the BIOS area only if all the cores are running in System Management Mode (SMM) and the BIOSWE is set to the value "1". This effectively protects the system from the “race condition vulnerability” described above. However, as in the case of BLE, SMM_BWP must be activated from the firmware side. Therefore, the firmware in which these mechanisms are incorrectly configured leaves in the system the risk of granting unauthorized write rights to the BIOS area.
First, it checks whether the BIOSWE is set. If so, it goes into the recording phase. If BIOSWE is disabled, it checks the value of the BLE bit. If it is not installed, it changes the value of the BIOSWE bit and starts recording the patched firmware. If the BLE bit is set, it checks the disabled SMM_BWP state and applies the “race condition vulnerability” described above. If the SMM_BWP bit is set, the operation fails. The figure below illustrates the process.

Figure 12. Decision-making tree during the recording process
Assuming that the particular file being analyzed was
In a manner very similar to the reading procedure, writing to the SPI flash memory takes place:

Figure 13. The writing sequence to the SPI flash memory
Besides the first two steps, which are performed only once, these operations are repeated in a loop until all the information is written to the SPI flash memory. .
When the write process is done, the contents of the SPI flash are unloaded once again into the file
If any bytes are different, their address is logged. The presence or absence of differences does not affect the progress of the malicious program. This information is recorded only so that the operators understand what is happening.
At the final stage, the registry key is set to the value:
Then the RwDrv service is stopped and deleted. It is important that the key of the Windows system registry is assigned the value of this string, since the UEFI rootkit searches for this string to change it and execute its component during the Windows startup process. We will tell you more about this when we describe the UEFI rootkit and its components.
The tool for dumping, patching and writing to SPI flash memory is customized for a specific firmware image and cannot be used on any system. In this case, the full module UEFI can be selected. The first thing we did after receiving this module was to study the telemetry data to find out if it had been encountered before. In this, we had to rely on a new UEFI scanner that can scan the system firmware. We found that the UEFI module of the Sednit group was installed in the system at least once, which means that this rootkit is actually in-the-wild.
It is not yet established how malicious tools were delivered to compromised systems. Most likely, other programs were used for this - for example, XAgent. Tools for dumping and writing were found in the same system, but at different times, the operators probably worked in several stages. At first they unloaded the firmware on the target machine, made sure that the tool for making adjustments to the program works without failures, and then re-uploaded it and in fact patched the firmware. We found only one version of the tool for dumping and writing, but there is a possibility that there are other versions for other firmware with vulnerabilities that they could find.
The figure below presents an overview of the operation of the UEFI rootkit up to the OS boot. First, the SecDxe DXE driver is loaded by the DXE controller. This is how the event group notification function is configured
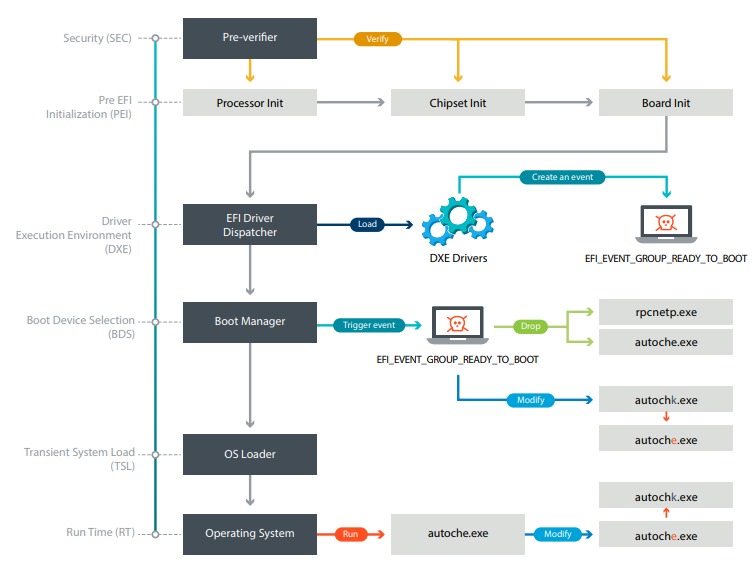
Figure 14. The boot process of a UEFI rootkit-infected system
In this section, we will reveal the sequence of events occurring in the compromised system. Let's start with a description of the rootkit, and then follow the chain of events down to the final components deployed at the operating system level.
The UEFI rootkit of the Sednit group is a DXE driver with a GUID identifier
It is not signed, so it cannot be run on a system with Secure Boot protection enabled. After being deployed to one of the firmware volumes, the DXE Foundation loads it on every system startup.
SecDxe is a small DXE driver that basically does two things. It establishes a protocol defined by GUID

Figure 15. The result of the Hex-Rays decompiler passing through the event creation process
The notification function uses the Sednit rootkit UEFI malicious behavior. She writes components to the NTFS Windows file system. As a rule, the UEFI firmware alone works with the EFI partition, so the NTFS driver is usually not included. Only FAT file systems are supported as partitions for download. Therefore, UEFI firmware does not necessarily come bundled with NTFS drivers. For this reason, SecDxe has its own built-in NTFS driver. This driver is loaded first and connects to the disk device. That is, it installs
Now that you are ready to write files to the Windows partitions, SecDxe resets
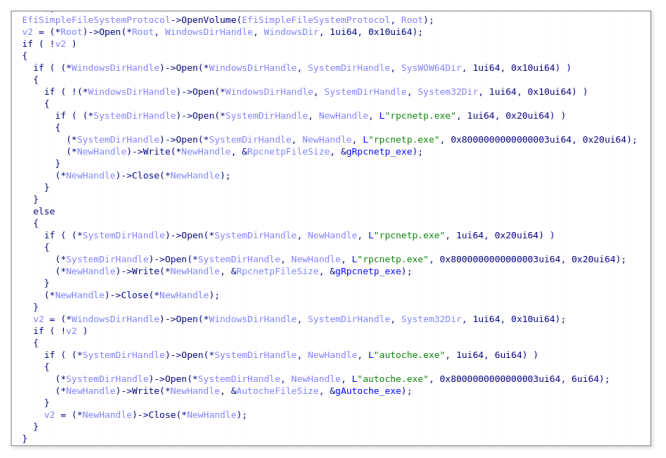
Figure 16. The result of the Hex-Rays decompiler passing through the process of writing files to a disk.
Then SecDxe opens a
As previously discussed, the NTFS driver is built into the SecDxe module. There is strong evidence that the Sednit operators did not write their own driver, but compiled a copy of the published NTFS DXE driver from the Hacking Team.
Their NTFS driver uses the ntfs-3g project as the kernel. This is just a wrapper to make it work as a UEFI DXE driver. The Hacking Team driver's INF file itself lists the ntfs-3g project file names. Many of these file names are also listed in the SecDxe NTFS driver code lines: It is interesting to note that the path to the project is the same as what is found in vector-edk, the Hacking Team project for developing EFI. There is a subproject in vector-edk
Comparing the source code that has leaked to the network with what we got at the output of the Hex-Rays decompiler, it becomes obvious that this is the same project. The figure below shows an example of comparing a function
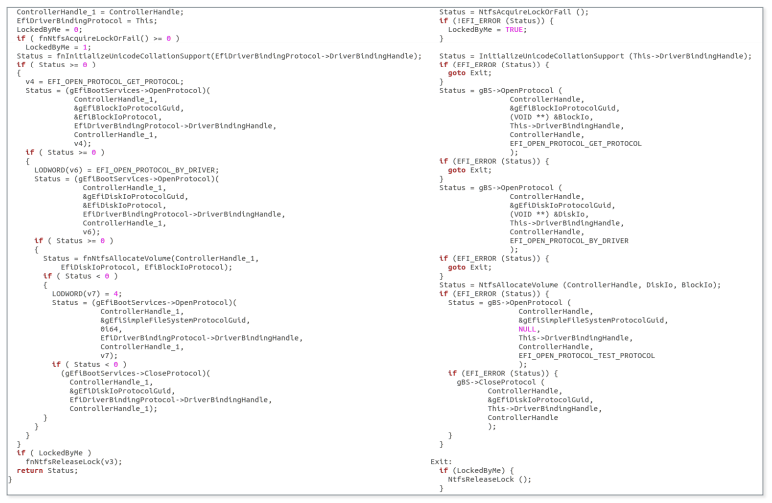
Figure 17. Comparison of results at the output of the Hex-Rays NTFS decompiler of the Sednit driver (left) and the NTFS HT driver (right)
Above is the code for developers from the Hacking Team, not in the open source ntfs-3g. As mentioned in the section
We analyzed the driver and found that it can only perform read operations. Since the file system entry is not available, the developers could not use it for their own purposes. It is also likely that the Sednit operators encountered difficulties due to the fact that there is already another NTFS driver in the firmware, so they decided to just remove it. In addition to the implementation of the ability to read and write, the Hacking Team driver does not comply with file permissions. For example, it can rewrite the file as read only, without causing any error.
At this point, we have already described the various operations to compromise the system performed by the UEFI rootkit. We also discussed the reasons why we believe that the Sednit operators used the Hacking Team vector-edk source code to develop their NTFS driver to write files to the NTFS partitions of Windows. Later in the paper we will present an analysis of the components delivered by SecDxe.
Malicious is

Figure 18. Malicious autoche .exe configures the rpcnetp.exe persistence.
It should be noted that the service name is the same as the legitimate Computrace agent uses. After creating the service, it restores the previous value of the registry key
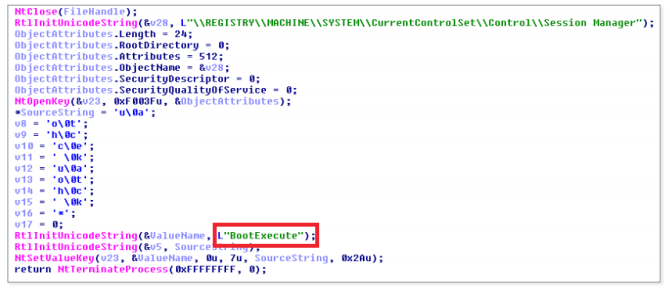
Figure 19. Malicious autoche.exe restores the original value of the registry key BootExecute
Since the process occurs during Windows startup, the user is unlikely to notice a change in the key value
While the mini-agent
During the investigation, we discovered various versions of the LoJax mini-agent. The list of compromise indicators shows their hashes and corresponding domains / IP addresses. As we have said, all the samples found were a trojanized version of the same old Computrace agent compiled in 2008.
We have never seen the LoJax agent download and install additional modules, but we know that such functionality exists. Since the best qualities of LoJax are stealth and persistence, it can be accurately used to provide access to key resources.
To prevent an attack, a complex ecosystem of many active components is needed.The first security mechanism that could block such an attack is the Secure Boot. When Secure Boot is enabled, each firmware downloadable component of the firmware itself must be properly signed, thus ensuring its integrity. We recommend enabling Secure Boot, this is a basic protection against attacks on UEFI firmware.
As with software, the UEFI firmware should always be updated in a timely manner. Visit the website of the motherboard manufacturer to make sure you have the latest version available.
You should also make sure that all your systems are equipped with modern chipsets with Platform Controller Hub (starting with Intel Series 5 chipsets and beyond). This will ensure the operation of security mechanisms against the “race condition vulnerability”, which, as we have indicated , is present in the platform.
Another part of the security firmware in the hands of vendors UEFI / BIOS. The security mechanisms provided by the platform must be properly configured with system firmware in order to truly ensure its protection. Therefore, the firmware should be initially built with an understanding of security measures. Fortunately, more and more security researchers are paying attention to the security of the firmware, attracting the attention of vendors. Also worth mentioning is CHIPSEC, an open source framework that performs a low-level security assessment, which allows you to determine if the platform is properly configured.
The elimination of the consequences of compromising through the UEFI firmware is a difficult task. There are no easy ways to clean up the system from such threats, and there are no special security products that could fix everything. In the case described here, to remove the rootkit, you need to flash the SPI flash memory. This is not a trivial task, it is not suitable for the average user. Upgrading the UEFI firmware can remove the rootkit if the entire SPI area of the flash memory is copied. If a UEFI flashing is not possible, the only solution is to replace the motherboard of the infected system.
UEFI rootkit is one of the most dangerous and powerful tools of attackers due to the high persistence and immunity to reinstalling the OS and replacing the hard disk, as well as the exceptional difficulty of detection and removal. Although the UEFI system image is difficult to change, few solutions allow you to scan UEFI modules and identify malicious ones among them. Moreover, cleaning the UEFI firmware means flashing it, not an ordinary operation that a regular user cannot perform. These advantages explain why cyber-groups that are not limited in resources will continue attacks on UEFI systems.
For any questions about this work, please contact threatintel@eset.com.
We would like to thank those who work on the opensecuritytraining.info project. CourseIntroduction to BIOS & SMM helped us a lot when we analyzed interactions with the SPI flash chip.
See Intel specifications for more detailed abbreviations.
- BIOS_CNTL: BIOS Control Register
- BIOSWE: BIOS Write Enabled
- BLE: BIOS Lock Enabled
- FADDR: Flash Address
- FDATAX: Flash Data from FDATA0 to FDATAN
- FDBC: Flash Data Byte Count
- FGO: Flash Cycle Go
- HSFC: Hardware Sequencing Flash Control
- HSFS: Hardware Sequencing Flash Status
- IOCTL: Input / Output Control
- PCH: Platform Controller Hub
- RCBA: Root Complex Register Address
Block
- RCRB: Root Complex Register Block - SCIP: SPI Cycle in Progress
- SMI: System Management Interrupt
- SMM: System Management Mode
- SMM_BWP: SMM BIOS Write Protect Disable
- SPI: Serial Peripheral Interface
Detection of ESET
SHA-1
Detection of ESET
SHA-1
Detection of ESET
SHA-1
Detection of ESET
SHA-1
Detection of ESET
SHA-1
Detection of ESET SHA-1
Detection of ESET
SHA-1.
Domain names of command servers.
IP addresses of command servers.
Short review
We found that, at least since the beginning of 2017, Sednit has been using a trojanized version of the old user agent program to protect devices against theft from the developer Absolute Software - LoJack. The tool attracted the attention of information security specialists because of the use of the UEFI / BIOS module as a mechanism for ensuring persistence. We called the trojanized version of this program LoJax .
The presence of well-known Sednit tools along with LoJax samples in the infected systems, and the fact that some command servers used by trojanized agents were previously part of the Sednit infrastructure, allow us to link the UEFI rootkit with this group with a high degree of confidence.
Together with the LoJax agents, tools were found to read the UEFI system firmware, and in one of the cases this tool could dump, patch and rewrite part of the system's SPI flash memory. The ultimate goal of the tool is to install a malicious UEFI module into a system whose SPI flash memory protection is vulnerable or misconfigured.
The UEFI module is responsible for introducing the LoJax agent into the system; this is the first UEFI rootkit of the Sednit group identified. Since it is in the system firmware, it can survive reinstalling Windows and replacing the hard disk.
There was at least one case where this rootkit was successfully installed into the system SPI flash memory. According to our information, this is the first UEFI rootkit detected in-the-wild.
Introduction
The Sednit group uses a number of malware families. We gave a detailed description of the frequently used tools of the group in the report .
We have been monitoring Sednit for several years and have released many reports on the work of the group, from describing zero-day vulnerabilities to custom programs such as Zebrocy . The components described in this report form a separate group.
UEFI rootkits have been described in the reports of information security companies earlier. Known, for example, rkloader, which appeared in the presentation about data leakage in the Hacking Team, and DerStarke, the implant in the macOS EFI / UEFI download, from Vault7 documents. We know about the existence of these tools, but reports on UEFI’s compromise by rootkits were not issued.
Now we have not only proved the in-the-wild use of the firmware with the malicious LoJax UEFI module, but also discovered the whole range of tools that were most likely used to install it. It is interesting to note that Sednit uses the DownDelph bootkit, which was used in 2013 and 2014 for the persistence of Downdelph, one of the Sednit backdoors of the first stage. The idea is similar, but in the new version of UEFI, the use of bootkits is no longer possible. Thus, these two components are significantly different in behavior.
This work is divided into three sections. In the first, we will examine the early LoJack / Computrace security studies and the possibilities of malicious use of the program. The second section is devoted to the research process, which eventually led us to the UEFI rootkit. Finally, in the third section, we describe in detail the various components of LoJax and how they ensure persistence in the system even after reinstalling Windows and replacing the hard disk.
Attribution
While many vendors have already made statements regarding the Sednit group in the past, ESET does not in any way determine the geopolitical affiliation. Since the publication of the study in 2016, our position has not changed. Identifying the source of a cyber attack based on a scientific approach is a complex task that is outside the scope of the competence of ESET specialists. What we call the “Sednit group” is simply a collection of software and an associated network infrastructure that we cannot authoritatively link to any particular organization.
Goals
During the study, we found a small number of different images of LoJax. Based on our telemetry data and the study of other Sednit programs found in-the-wild, we are confident that this particular module was rarely used in comparison with other tools. The targets were mainly state organizations located in the Balkans, in Central and Eastern Europe.
Early Computertrace / LoJack research
LoJack - software to protect computers from theft and loss, developed by Absolute Software. Early versions of the agent are known as Computrace. As the previous name suggests, after activating the service, the computer can contact its command server — the owner will be notified of the device's location in case of loss or theft.
The rest of this section describes the old LoJack architecture. Only the old version of the software was trojanized by the attackers, so we will focus on it. In addition, Absolute Software released in May 2018 a statement that the vulnerabilities described below do not affect the performance of the latest versions of their agents.
The Computrace program attracted the attention of information security specialists because it used an unusual method of ensuring persistence. Its purpose is to protect against theft, so resistance to reinstalling the OS and replacing the hard disk is important for it - all this is implemented in the UEFI / BIOS module that can survive after these actions. The solution is pre-installed in the firmware of a significant part of laptops from different manufacturers, the user only needs to activate this function. Activation can be performed in the BIOS, as shown in the figure below.
Figure 1. Activating Computrace in BIOS
One of the first reportsThe implementation of LoJack / Computrace was published in 2009. The global product architecture, the UEFI / BIOS module dropping the user agent to disk and the way the agent communicates with the web server managed by Absolute Software was disclosed. The scheme can be understood from the figure below.
Figure 2. LoJack persistence mechanism (approximately 2008)
The following is a description of the steps listed above:
1. If activated, the UEFI / BIOS module is executed at boot. He is trying to find the partition FAT / FAT32 / NTFS. Then, using the NTFS driver, he creates a backup file
autochk.exeand overwrites its contents through the dropper, which is responsible for installing the user agent component. Fileautochk.exe- Windows executable file launched at an early stage of the system boot to check for possible damage to the hard disk. 2. When a modified one is launched
autochk.exe, its main purpose is to deploy the mini-agent rpcnetp.exeand add it as a service so that it starts at each reboot. The last stage of this component is to restore the original version autochk.exe. 3. Mini-agent
rpcnetp.exe- a small executable file whose purpose is to ensure the work of the main agent. If the primary agent is down,rpcnetp.exetrying to connect to the Absolute Software team C & C server to download and execute it. First, the mini-agent will make a copy of itself, then make changes to the PE header for conversion to a DLL. This library is then loaded into memory, calls the process svchost.exeand injects the DLL there. Next, the iexplore.exeInternet Explorer process starts , and the DLL will be injected into it. The latter process will then be used for communication over the Internet. Injecting into third-party processes performed by the Computrace mini-agent is often found in malware and is rarely associated with legitimate software. 4. Now the full-featured agent works on the system and can use the Computrace features for tracking and recovery.
DescriptionThis process and the network protocol involved between the mini-agent and the C & C server was published in 2014. Due to the lack of an authentication mechanism, if attackers control the server with which the mini-agent communicates, they can force it to download arbitrary code. There are several mechanisms that allow an attacker to communicate directly with a mini-agent. The most important for us is using the method of getting the address of the C & C server by the mini-agent. In fact, this information is stored in the configuration file in the executable file itself.
Figure 3. Encrypted LoJack configuration file with partial decryption on the right
The figure shows the LoJack mini-agent configuration file. The “encryption” method used is a simple XOR with a single-byte key. The key 0xB5 is the same for all studied mini-agents. As can be seen from the figure, the C & C domain is specified in the file. The four preceding bytes contain the IP address of the command C & C server. In the absence of validation of the contents of the configuration file, attackers with write permissions
%WINDIR%can change its contents so that the mini-agent will communicate with their command server, instead of the legitimate one. Understanding the network protocol, you can force the mini-agent to download and execute arbitrary code. These risks have long been known, but until recently the mechanism was not used in practice.LoJack turns into LoJax
In May 2018, Trojanized LoJack mini-agent samples were described in the Arbor Network blog
rpcnetp.exe . Their hard-coded network settings were changed in such a way that malicious samples established communication with the attackers C & C server instead of the legitimate Absolute Software server. Some of the domains found in trojnized samples have been encountered earlier - they were used at the end of 2017 as the domains of the C & C servers for SedUploader, the backdoor of the first stage of the Sednit cyber group. The figure below shows an example of a modified configuration in one of the LoJax mini-agents. Figure 4. Left - legitimate configuration file, right - modified
The differences between legitimate and trojanized agents are extremely small; almost everything is listed above. Samples mini agent LoJax, we were able to detect - troyanizirovannye version of the same sample mini Computrace agent
rpcnetp.exe. All of them have identical compilation timestamps and only a few dozen bytes are different from the original. In addition to changes in the configuration file, there are differences in timer variables that determine the intervals between connections to the command C & C server.At the time of publication, we found various LoJax mini-agents used in attacks on various organizations in the Balkans, in Central and Eastern Europe, but we had no idea how to install them. An obvious explanation would be the installation using one of the famous Sednit backdoors. Do not forget that LoJack, as a well-proven tool, has been whitelisted by many anti-virus vendors. Thus, even if only a mini-agent was used in this campaign, which did not survive after reinstalling Windows, it still had an advantage - less likelihood of being detected as malware. But what if the compromise was even deeper, and the attackers tried to copy LoJack to get to the system firmware?
Hunting component of the lower level
We recorded LoJax attacks targeting several organizations in the Balkans, in Central and Eastern Europe. In all of them we managed to find traces of Sednit malware, including:
- SedUploader, the first stage backdoor
- XAgent, the flagship backdoor Sednit
- Xtunnel, a network proxy tool that can transfer any network traffic between a C & C server on the Internet and a destination computer on a local network
We found traces of the Sednit tools in most of the systems studied, which became LoJax targets, as well as a pair of systems where only LoJax was present. It can be assumed that in some cases LoJax was used as a separate tool, probably as an additional backdoor to restore access to Sednit operators to the network.
The XAgent backdoor usually drops additional modules into a compromised system, so it immediately comes to mind that LoJax samples were delivered in the same way, without any other mechanisms. One would assume that Sednit borrowed only a mini-agent from the LoJack solution. However, soon after the beginning of the analysis, we found several clues indicating that the source of inspiration was somewhat more extensive.
RWEverything (RwDrv) and info_efi.exe driver
The first piece of evidence was found thanks to the custom tool of the attackers, who, when executed, downloaded the information about the settings of the lower level system into a text file. The tool was found along with some LoJax samples. The following figure shows a fragment of a file with the logs of this tool under a logical name
info_efi.exe. Figure 5. Extract from log files generated by info_efi .exe
To read this type of information, the tool has a driver called
RwDrv.sys. Kernel driver comes with RWEverything, a free utility available on the network that can be used to read information on almost all of the lower level settings, including the PCI Express interface, memory, PCI Option ROMs, etc. The kernel driver is legitimate software and is signed with a valid certificate. Figure 6. Code signing certificate RwDrv.sys RWEverything
software comes with a graphical user interface that allows you to access all of this information.
Figure 7. Screenshot of the RWEverything Interface
Detection Tool
info_efiwas the first sign that a LoJax UEFI module could exist. When trying to update the system firmware, it is important to have information about its vendor, version, etc. Given the presence of vulnerabilities that allow user processes to access and modify the contents of the SPI flash memory where UEFI modules are stored, obtaining data on system firmware is the first step to a successful attack. The final clue that allowed us to find the first UEFI rootkit of the Sednit group was two tools — to dump the SPI flash memory and to write to it.
Dump SPI flash memory
The first piece of the puzzle was a file called
ReWriter_read.exe. It contains all the code required to dump system SPI flash memory via RWEverything driver RwDrv.sys. For the device driver to perform the necessary operations, the dump tool must send the correct I / O control codes (IOCTL). While it RwDrv.syssupports many different IOCTL codes, the dumper tool and recording tool described in this and the next section use only four of them. RwDrv.sys: supported IOCTL codes:
0x22280c - writes to the memory area allocated for I / O
0x222808 - reads the memory area allocated for I / O
0x222840 - reads dword from the specified PCI 0x222834 configuration
register- writes a byte to the specified PCI configuration register,
ReWriter_readfirst creates a service with an integrated kernel driver RwDrv.sysand writes UEFI / BIOS configuration information corresponding to the values of the three fields contained in the BIOS control register (BIOS_CNTL): BIOS Lock Enable (BLE), BIOS Write Enable (BIOSWE ) and SMM BIOS Write Protect Disable (SMM_BWP). Although it ReWrite_readdoes not use these values, in the following sections we will explain why these fields are of interest for this tool.The next task of the tool is to obtain the base address of the BIOS memory in SPI and its size. This information is contained in the main SPI interface register as the BIOS Flash Primary Region. All registers are mapped in memory in the Root Complex Register Block (RCRB), the base address of which can be obtained by reading the desired configuration register PCI Configuration Register.
ReWriter_readobtains this address using RwDrv IOCTL 0x22840 and reading the correct indentation (0xF0 in our case). As soon as the base address of the BIOS area and its size are known, the dump tool reads the corresponding contents of the SPI flash memory and writes it to a file on disk. The process of reading the SPI flash is illustrated in the following figure. The abbreviations are defined below in the glossary.Figure 8. Working sequence of reading from SPI flash memory
In addition to the first two steps, performed only once, the operations are repeated in a loop until all the data from the SPI flash memory has been read. The process is also well described here . Then
ReWriter_readvalidates the size of the merged image. It parses the image memory handle to get the BIOS range, Gigabit Ethernet (GbE) areas and Management Engine (ME). Adding the dimensions of these three areas allows the dumper tool to calculate the entire contents of the SPI flash memory. If the size matches the size obtained from reading the BIOS Flash Primary register area, the image is considered valid.UEFI firmware patch
The second piece of the puzzle was a file called
ReWriter_binary.exe. This file contains proof of the fact that Sednit got to the firmware. The file contains the code for applying the UEFI image unloading patch and writing back the trojanized version to the SPI flash memory. In this section we describe how this binary file is arranged. After the flash memory contents have been uploaded and verified by the above tool, a malicious UEFI module is added to the image. For this, the UEFI image must be analyzed to highlight the necessary information.
The data stored in the UEFI image is expanded into volumes using the file system (FFS). As the name suggests, this is a special file system for storing firmware images. Volumes contain files with GUIDs. Each file usually consists of a set of sections, one of which contains the actual PE / COFF executable, which is a UEFI image. Below for a simpler understanding of the scheme, there is a screenshot from UEFITool , an open source project for working with UEFI firmware images.
Figure 9. An example of a UEFI firmware image downloaded into UEFITool
ReWriter_binary analyzes all the firmware volumes found in the BIOS SPI flash memory and searches for specific files:
- Ip4dxe (8f92960f-2880-4659-b857-915a8901bdc8)
- NtfsDxe (768bedfd-7b4b-4c9f-b2ff-6377e3387243)
- SmiFlash (bc327dbd-b982-4f55-9f79-056ad7e987c5)
- Dx core
Figure 10. The result of using the Hex-Rays decompiler in the
Ip4Dxe and NtfsDxe firmware volumes — DXE drivers. In UEFI firmware, DXE drivers are PE / COFF images created either for hardware abstraction or for organizing services for use by other DXE drivers or UEFI applications. Such drivers are discovered and loaded by the DXE Foundation via the DXE dispatcher (DXE core) at an early stage of the boot process. After completing this phase, all services, such as the OS loader, are available to work with UEFI applications. Normally, DXE drivers are stored in the same volume. However, the DXE dispatcher may be separate.
ReWriter_binarylooks for Ip4Dxe just to find out if a given volume contains DXE drivers. As we will describe later, this volume becomes a candidate for installing the malicious DXE driver. It also searches for the DXE kernel and adds the volume in which it is located, as another candidate for a place to record the rootkit. The free available space in each of these volumes is stored and later used to test the sufficiency for adding a malicious driver. NtfsDxe - AMI NTFS DXE driver. If it is present in the firmware volume, its location is saved and later used to remove this file from the volume. In the section on UEFI rootkit, we will see why it deletes this file.
As for the SmiFlash image, the information relating to it is stored, but is not used anywhere in Malvari. What is interesting is the imagevulnerable . Therefore, we believe that Sednit operators can work on exploiting these vulnerabilities. This may allow them to write flash memory to even properly configured systems in SPI. As we will describe further, in the current view, the tool can only write to the BIOS area of incorrectly configured or fairly old systems (on motherboards with chipsets older than Platform Controller Hub, introduced around 2008).
After selecting the necessary metadata, it
ReWriter_binarypatches a dump of the UEFI image and adds a malicious DXE driver. First, it creates the file header (EFI_FFS_FILE_HEADER). He then selects the destination volume based on the location of the Ip4Dxe and the DXE core, as well as the free space available in these volumes.ReWriter_binaryembeds a compressed section containing a PE image and a User interface section defining the human-readable file name: SecDxe. A compressed section is added to the file header and written to the end of the volume, in free space. The figure below shows the structure - its display in UEFITool. Figure 11. UEFITool view of the SecDxe file
Finally, if the NtfsDxe driver is present in the image, it will be deleted. The firmware file system stores the files and their contents sequentially, so the process is quite simple:
- is indented to free space at the end of the volume
- over the image of NtfsDxe 0xFF bytes are written
- the subsequent part of the firmware volume is copied, starting at the indent where NtfsDxe was located
- the rest of the file system is filled with 0xFF bytes, i.e. free space
Write patched firmware back to SPI flash memory
After successfully making changes to the firmware image, the next step is to write it back to the SPI flash memory. Before diving into this process, we need to characterize some of the BIOS write protections that are important in this case. Other existing mechanisms, such as BIOS Range Write Protection, remain on the sidelines, as ReWriter_binary does not check them.
The platform uses several defense mechanisms to block unauthorized attempts to write to the BIOS area. It must be said that these mechanisms are not included by default. The firmware is responsible for their correct setting. These configurations are listed in the BIOS control register (BIOS_CNTL). It contains the BIOS Write Enable (BIOSWE) bit, which must be switched to “1” to enable writing to the BIOS area of the SPI flash memory. Since the platform should not allow any attempts to write to the BIOS area, there is another bit in BIOS_CNTL to protect the BIOSWE - this is BIOS Lock Enable (BLE). When set, the mechanism should block the BIOSWE bit and leave a value of "0". However, the solution has a vulnerability. When the BIOSWE bit request request comes to "1", the BIOSWE bit is set to "1",
In this version of the solution there are many problems. First, the SMI handler is left for the developers of the firmware. Therefore, if this code is not implemented in the firmware, the BLE bit is useless, since the BIOSWE bit will not be set back to “0”. Secondly, in this case, we have a “ race condition vulnerability, ” which allows you to completely bypass this mechanism, even if the SMI handler is implemented correctly. To exploit this vulnerability, an attacker needs to start a stream that continuously sets the BIOSWE to “1”, while another stream must write data to the SPI flash memory. According to the work of Kallenberg and Wojtchuk, this attack runs on multi-core processors and can also be successfully used on single-core processors with Hyper-Threading technology enabled.
To solve this problem, a new protection mechanism has been added to the platform, configured via BIOS_CNTL. It is introduced in the Intel Platform Controller Hub (PCH) chipset family. If the configuration bit is set, SMM BIOS Write Protect Disable (SMM_BWP) will provide the ability to write to the BIOS area only if all the cores are running in System Management Mode (SMM) and the BIOSWE is set to the value "1". This effectively protects the system from the “race condition vulnerability” described above. However, as in the case of BLE, SMM_BWP must be activated from the firmware side. Therefore, the firmware in which these mechanisms are incorrectly configured leaves in the system the risk of granting unauthorized write rights to the BIOS area.
ReWriter_binaryreads the contents of the BIOS control register to select the correct path.First, it checks whether the BIOSWE is set. If so, it goes into the recording phase. If BIOSWE is disabled, it checks the value of the BLE bit. If it is not installed, it changes the value of the BIOSWE bit and starts recording the patched firmware. If the BLE bit is set, it checks the disabled SMM_BWP state and applies the “race condition vulnerability” described above. If the SMM_BWP bit is set, the operation fails. The figure below illustrates the process.
Figure 12. Decision-making tree during the recording process
Assuming that the particular file being analyzed was
ReWriter_binaryused to deploy the UEFI rootkit, it can be concluded that either the firmware has incorrectly configured BIOS write protection or the victim's chipset is older than Platform Controller Hub.ReWriter_binaryI would not be able to replace the UEFI firmware on a well-tuned modern system. However, when searching for a vulnerable SmiFlash UEFI image, the parsing of UEFI firmware volumes suggests that attackers could work with more advanced BIOS write protection bypass techniques . In a manner very similar to the reading procedure, writing to the SPI flash memory takes place:
Figure 13. The writing sequence to the SPI flash memory
Besides the first two steps, which are performed only once, these operations are repeated in a loop until all the information is written to the SPI flash memory. .
When the write process is done, the contents of the SPI flash are unloaded once again into the file
image.bin. The same integrity check that was performedReWriter_read, performed on a new merged image. Then the image read from the SPI flash memory is compared with the patched image in the memory. If any bytes are different, their address is logged. The presence or absence of differences does not affect the progress of the malicious program. This information is recorded only so that the operators understand what is happening.
At the final stage, the registry key is set to the value:
HKEY_LOCAL_MACHINE\SYSTEM\CurrentControlSet\Control\Session Manager\BootExecute = “autocheck autochk *”Then the RwDrv service is stopped and deleted. It is important that the key of the Windows system registry is assigned the value of this string, since the UEFI rootkit searches for this string to change it and execute its component during the Windows startup process. We will tell you more about this when we describe the UEFI rootkit and its components.
Technical Analysis LoJax
The tool for dumping, patching and writing to SPI flash memory is customized for a specific firmware image and cannot be used on any system. In this case, the full module UEFI can be selected. The first thing we did after receiving this module was to study the telemetry data to find out if it had been encountered before. In this, we had to rely on a new UEFI scanner that can scan the system firmware. We found that the UEFI module of the Sednit group was installed in the system at least once, which means that this rootkit is actually in-the-wild.
It is not yet established how malicious tools were delivered to compromised systems. Most likely, other programs were used for this - for example, XAgent. Tools for dumping and writing were found in the same system, but at different times, the operators probably worked in several stages. At first they unloaded the firmware on the target machine, made sure that the tool for making adjustments to the program works without failures, and then re-uploaded it and in fact patched the firmware. We found only one version of the tool for dumping and writing, but there is a possibility that there are other versions for other firmware with vulnerabilities that they could find.
The figure below presents an overview of the operation of the UEFI rootkit up to the OS boot. First, the SecDxe DXE driver is loaded by the DXE controller. This is how the event group notification function is configured
EFI_EVENT_GROUP_READY_TO_BOOT. When the firmware is ready to select the boot device and start the OS loader, the notification function is called. She performs three actions:- loads the built-in NTFS DXE driver to provide access and write access to NTFS partitions
- writes two files to the Windows NTFS partition: rpcnetp.exe and autoche.exe
- changes the registry key 'HKEY_LOCAL_MACHINE \ SYSTEM \ CurrentControlSet \ Control \ Session Manager \ BootExecute': to: 'autocheck autochk *'; after: 'autocheck autoche *'.
Figure 14. The boot process of a UEFI rootkit-infected system
SecDxe: DXE Malicious Driver
In this section, we will reveal the sequence of events occurring in the compromised system. Let's start with a description of the rootkit, and then follow the chain of events down to the final components deployed at the operating system level.
The UEFI rootkit of the Sednit group is a DXE driver with a GUID identifier
682894B5-6B70-4EBA-9E90-A607E5676297. It is not signed, so it cannot be run on a system with Secure Boot protection enabled. After being deployed to one of the firmware volumes, the DXE Foundation loads it on every system startup.
SecDxe is a small DXE driver that basically does two things. It establishes a protocol defined by GUID
832d9b4d-d8d5-425f-bd52-5c5afb2c85dcwhich is never used. It then creates an event associated with the notification function. The notification function is configured to call, by a signal to the group EFI_EVENT_GROUP_READY_TO_BOOT. The signal for this group of events comes from the download manager when it is ready to select a device for loading. Figure 15. The result of the Hex-Rays decompiler passing through the event creation process
The notification function uses the Sednit rootkit UEFI malicious behavior. She writes components to the NTFS Windows file system. As a rule, the UEFI firmware alone works with the EFI partition, so the NTFS driver is usually not included. Only FAT file systems are supported as partitions for download. Therefore, UEFI firmware does not necessarily come bundled with NTFS drivers. For this reason, SecDxe has its own built-in NTFS driver. This driver is loaded first and connects to the disk device. That is, it installs
EFI_SIMPLE_FILE_SYSTEM_PROTOCOLon disk devices with NTFS partitions, thus including file access to them. Now that you are ready to write files to the Windows partitions, SecDxe resets
rpcnetp.exeand autoche.exe. It rpcnetp.exeis then installed %WINDIR%\SysWOW64on 64-bit versions of Windows or%WINDIR%\System32on 32-bit versions. A is autoche.exeinstalled in %WINDIR%\SysWOW64. The following figure shows the process responsible for writing these files to disk. Figure 16. The result of the Hex-Rays decompiler passing through the process of writing files to a disk.
Then SecDxe opens a
%WINDIR%\System32\config\SYSTEMfile with a backup of a set of registry keys HKLM\SYSTEM. It parses the file until it finds ‘autocheck autochk *’and replaces ‘k’in ‘autochk’with ‘e’. As a result, ‘HKEY_LOCAL_MACHINE\SYSTEM\CurrentControlSet\Control\Session Manager\ BootExecute’changes to ‘autocheck autoche *’. The next time you start Windows, autoche.exe will be launched instead autochk.exe.NTFS driver from Hacking Team
As previously discussed, the NTFS driver is built into the SecDxe module. There is strong evidence that the Sednit operators did not write their own driver, but compiled a copy of the published NTFS DXE driver from the Hacking Team.
Their NTFS driver uses the ntfs-3g project as the kernel. This is just a wrapper to make it work as a UEFI DXE driver. The Hacking Team driver's INF file itself lists the ntfs-3g project file names. Many of these file names are also listed in the SecDxe NTFS driver code lines: It is interesting to note that the path to the project is the same as what is found in vector-edk, the Hacking Team project for developing EFI. There is a subproject in vector-edk
- c:\edk2\NtfsPkg\NtfsDxe\ntfs\inode.c

- c:\edk2\NtfsPkg\NtfsDxe\ntfs\volume.c

- c:\edk2\NtfsPkg\NtfsDxe\ntfs\bootsect.c

- c:\edk2\NtfsPkg\NtfsDxe\ntfs\unistr.c

- c:\edk2\NtfsPkg\NtfsDxe\ntfs\attrib.c

- c:\edk2\NtfsPkg\NtfsDxe\ntfs\mft.c

- c:\edk2\NtfsPkg\NtfsDxe\ntfs\index.c

- c:\edk2\NtfsPkg\NtfsDxe\ntfs\cache.c

- c:\edk2\NtfsPkg\NtfsDxe\ntfs\misc.c

- c:\edk2\NtfsPkg\NtfsDxe\ntfs\dir.c

- c:\edk2\NtfsPkg\NtfsDxe\ntfs\runlist.c

- c:\edk2\NtfsPkg\NtfsDxe\ntfs\logfile.c

- c:\edk2\NtfsPkg\NtfsDxe\ntfs\uefi_io.c

- c:\edk2\NtfsPkg\NtfsDxe\ntfs\ntfsinternal.c

- c:\edk2\NtfsPkg\NtfsDxe\ntfs\mst.c

- c:\edk2\NtfsPkg\NtfsDxe\ntfs\lcnalloc.c

- c:\edk2\NtfsPkg\NtfsDxe\ntfs\compress.c

- c:\edk2\NtfsPkg\NtfsDxe\ntfs\bitmap.c

- c:\edk2\NtfsPkg\NtfsDxe\ntfs\collate.c

- c:\edk2\NtfsPkg\NtfsDxe\ntfs\security.cNtfsPkgwith absolutely identical directory scheme. The source code files for the ntfs-3g project are located at the same address path. And although the paths themselves are not remarkable, we believe that this is not a mere coincidence. Comparing the source code that has leaked to the network with what we got at the output of the Hex-Rays decompiler, it becomes obvious that this is the same project. The figure below shows an example of comparing a function
NtfsDriverBindingStarttaken from vector-edk/NtfsPkg/NtfsDxe/Ntfs.c. Comments from the original HT code are removed for better perception. The logic and sequence of function calls are the same. Both projects even use the same variable (LockedByMe) to save the locked state. Figure 17. Comparison of results at the output of the Hex-Rays NTFS decompiler of the Sednit driver (left) and the NTFS HT driver (right)
Above is the code for developers from the Hacking Team, not in the open source ntfs-3g. As mentioned in the section
ReWriter_binary, in the process of parsing the firmware file system, the executable file tries to remove the AMI NTFS driver. We wanted to figure out why it is being removed instead of being used.We analyzed the driver and found that it can only perform read operations. Since the file system entry is not available, the developers could not use it for their own purposes. It is also likely that the Sednit operators encountered difficulties due to the fact that there is already another NTFS driver in the firmware, so they decided to just remove it. In addition to the implementation of the ability to read and write, the Hacking Team driver does not comply with file permissions. For example, it can rewrite the file as read only, without causing any error.
At this point, we have already described the various operations to compromise the system performed by the UEFI rootkit. We also discussed the reasons why we believe that the Sednit operators used the Hacking Team vector-edk source code to develop their NTFS driver to write files to the NTFS partitions of Windows. Later in the paper we will present an analysis of the components delivered by SecDxe.
autoche.exe vs. autochk.exe
Malicious is
autoche.exeused to ensure the persistence of the mini-agent rpcnetp.exe. As can be seen from the following figure, it uses native calls to the Windows API to create a service. Figure 18. Malicious autoche .exe configures the rpcnetp.exe persistence.
It should be noted that the service name is the same as the legitimate Computrace agent uses. After creating the service, it restores the previous value of the registry key
BootExecute. Figure 19. Malicious autoche.exe restores the original value of the registry key BootExecute
Since the process occurs during Windows startup, the user is unlikely to notice a change in the key value
BootExecute. It should be noted that in autoche .exe there are some similarities with the autochk.exe module in Computrace, for example, the API calls used and the registration of services, but the rest is quite different. The Computrace module is larger and it restores the original executable file autochk.exeinstead of changing the registry key. It is also responsible for introducing a mini-agent to disk, while for LoJax this is done by the UEFI rootkit.rpcnetp.exe
While the mini-agent
rpcnetp.execan be implemented by a UEFI rootkit, there is a chance that in most cases, when we found a Trojanized version of LoJack, the mini-agent did not use this component. It is likely that they proceeded from opportunistic considerations and installed a UEFI rootkit, only when they had such an opportunity, and in organizations that are most interesting to them. During the investigation, we discovered various versions of the LoJax mini-agent. The list of compromise indicators shows their hashes and corresponding domains / IP addresses. As we have said, all the samples found were a trojanized version of the same old Computrace agent compiled in 2008.
We have never seen the LoJax agent download and install additional modules, but we know that such functionality exists. Since the best qualities of LoJax are stealth and persistence, it can be accurately used to provide access to key resources.
Preventing and eliminating consequences
To prevent an attack, a complex ecosystem of many active components is needed.
As with software, the UEFI firmware should always be updated in a timely manner. Visit the website of the motherboard manufacturer to make sure you have the latest version available.
You should also make sure that all your systems are equipped with modern chipsets with Platform Controller Hub (starting with Intel Series 5 chipsets and beyond). This will ensure the operation of security mechanisms against the “race condition vulnerability”, which, as we have indicated , is present in the platform.
Another part of the security firmware in the hands of vendors UEFI / BIOS. The security mechanisms provided by the platform must be properly configured with system firmware in order to truly ensure its protection. Therefore, the firmware should be initially built with an understanding of security measures. Fortunately, more and more security researchers are paying attention to the security of the firmware, attracting the attention of vendors. Also worth mentioning is CHIPSEC, an open source framework that performs a low-level security assessment, which allows you to determine if the platform is properly configured.
The elimination of the consequences of compromising through the UEFI firmware is a difficult task. There are no easy ways to clean up the system from such threats, and there are no special security products that could fix everything. In the case described here, to remove the rootkit, you need to flash the SPI flash memory. This is not a trivial task, it is not suitable for the average user. Upgrading the UEFI firmware can remove the rootkit if the entire SPI area of the flash memory is copied. If a UEFI flashing is not possible, the only solution is to replace the motherboard of the infected system.
findings
UEFI rootkit is one of the most dangerous and powerful tools of attackers due to the high persistence and immunity to reinstalling the OS and replacing the hard disk, as well as the exceptional difficulty of detection and removal. Although the UEFI system image is difficult to change, few solutions allow you to scan UEFI modules and identify malicious ones among them. Moreover, cleaning the UEFI firmware means flashing it, not an ordinary operation that a regular user cannot perform. These advantages explain why cyber-groups that are not limited in resources will continue attacks on UEFI systems.
For any questions about this work, please contact threatintel@eset.com.
We would like to thank those who work on the opensecuritytraining.info project. CourseIntroduction to BIOS & SMM helped us a lot when we analyzed interactions with the SPI flash chip.
Glossary
See Intel specifications for more detailed abbreviations.
- BIOS_CNTL: BIOS Control Register
- BIOSWE: BIOS Write Enabled
- BLE: BIOS Lock Enabled
- FADDR: Flash Address
- FDATAX: Flash Data from FDATA0 to FDATAN
- FDBC: Flash Data Byte Count
- FGO: Flash Cycle Go
- HSFC: Hardware Sequencing Flash Control
- HSFS: Hardware Sequencing Flash Status
- IOCTL: Input / Output Control
- PCH: Platform Controller Hub
- RCBA: Root Complex Register Address
Block
- RCRB: Root Complex Register Block - SCIP: SPI Cycle in Progress
- SMI: System Management Interrupt
- SMM: System Management Mode
- SMM_BWP: SMM BIOS Write Protect Disable
- SPI: Serial Peripheral Interface
Compromise indicators
ReWriter_read.exe
Detection of ESET
Win32/SPIFlash.ASHA-1
ea728abe26bac161e110970051e1561fd51db93bReWriter_binary.exe
Detection of ESET
Win32/SPIFlash.ASHA-1
cc217342373967d1916cb20eca5ccb29caaf7c1bSecdxe
Detection of ESET
EFI/LoJax.ASHA-1
f2be778971ad9df2082a266bd04ab657bd287413info_efi.exe
Detection of ESET
Win32/Agent.ZXZSHA-1
4b9e71615b37aea1eaeb5b1cfa0eee048118ff72autoche.exe
Detection of ESET
Win32/LoJax.ASHA-1
700d7e763f59e706b4f05c69911319690f85432eEXE mini agent
Detection of ESET SHA-1
Win32/Agent.ZQE

Win32/Agent.ZTU
1771e435ba25f9cdfa77168899490d87681f2029
ddaa06a4021baf980a08caea899f2904609410b9
10d571d66d3ab7b9ddf6a850cb9b8e38b07623c0
2529f6eda28d54490119d2123d22da56783c704f
e923ac79046ffa06f67d3f4c567e84a82dd7ff1b
8e138eecea8e9937a83bffe100d842d6381b6bb1
ef860dca7d7c928b68c4218007fb9069c6e654e9
e8f07caafb23eff83020406c21645d8ed0005ca6
09d2e2c26247a4a908952fee36b56b360561984f
f90ccf57e75923812c2c1da9f56166b36d1482beTeam Server Domain Names
secao[.]org

ikmtrust[.]com

sysanalyticweb[.]com

lxwo[.]org

jflynci[.]com

remotepx[.]net

rdsnets[.]com

rpcnetconnect[.]com

webstp[.]com

elaxo[.]org
Team Server IP Addresses
185.77.129[.]106

185.144.82[.]239

93.113.131[.]103

185.86.149[.]54

185.86.151[.]104

103.41.177[.]43

185.86.148[.]184

185.94.191[.]65

86.106.131[.]54
Mini agent dll
Detection of ESET
Win32/Agent.ZQESHA-1.
397d97e278110a48bd2cb11bb5632b99a9100dbdDomain names of command servers.
elaxo.orgIP addresses of command servers.
86.106.131[.]54