Thoughts aloud about developing javascript applications using the small Line Of Business framework as an example
- Tutorial
Hello, Habr!
Not so long ago, we set ourselves the task - to build a SPA application. Sophisticated, large, fast, with support for multiple devices, no memory leaks. Moreover, constantly evolving, so that it is easy to maintain. In general, as we love - all at once.
The topic of SPA-applications and javascript-applications as a whole is not new, but we were not able to find thorough guidelines for application development even on paid resources . They are more likely a story about a particular MV * library than an example to follow. However, examples of layering, building inheritance hierarchies and subtleties of inheritance in javascript, etc. are not considered.
We will try to go from the other side and describe, rather, the train of thought during development (with code and links) than any specific tool. We are forced to start from the level of hello world to set one starting point for readers and the writer. But already from the second section, the narrative will accelerate sharply.

The reading was very voluminous, but we hope that it is just as useful.
We tried to find a task that would be quite complicated, but at the same time realistic and understandable without a long immersion in the context. We will build the foundation for lists with sorting, paging, filtering, displaying master-details, selection of rows, etc. We will also briefly touch upon the issues of maintaining the state of the application, interaction with the back end, etc.
We will use the starter kit and the Durandal + knockout bundle as the basis of our application , because both libraries are as simple as three pennies ( you can complete the tutorial knockout in literally an hour; on Durandalyou will spend as much time, and we almost do not need its specifics, we just use it as a platform for a quick start).
We sincerely hope that the choice of technologies will not narrow the circle of potential readers. After all, in the end, all MV * frameworks have similar functionality, or ECMAScript of a higher version adds the missing things if you are not interested in browser support like IE 8/9.
First, we need to run the application and add a stub model there, on which we will put experiments:
Then you can go directly to writing our application.
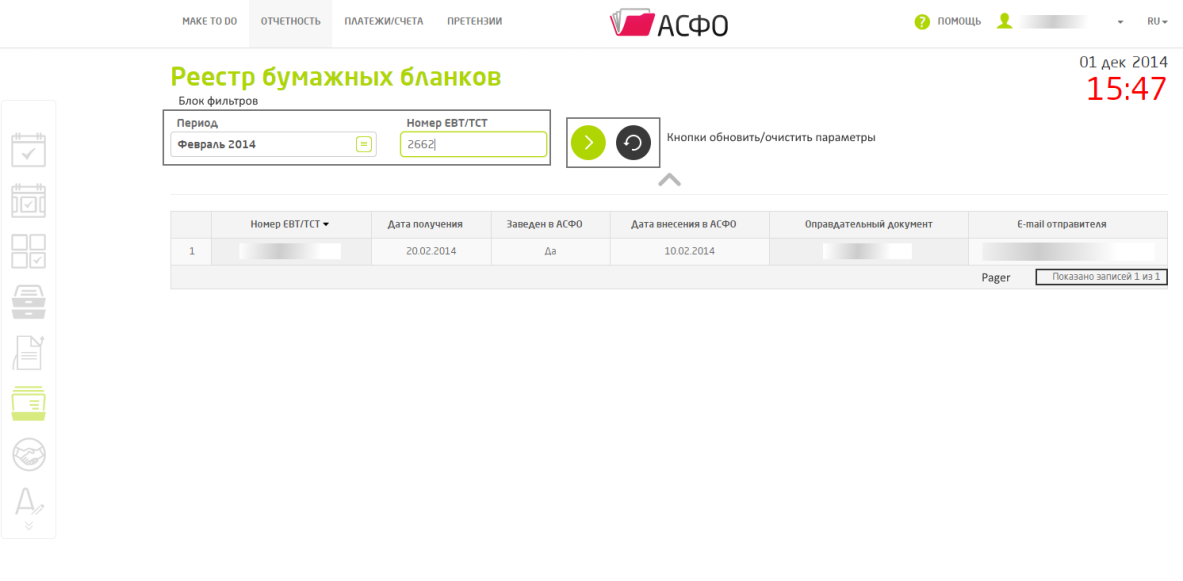
To begin, let's look at the pages of the application that we have to write, and highlight the general points. As we conduct our narrative based on real events, we have a lot of pictures. At the same time let us boast a little of our design.

Of the general points, one can observe the presence of a heading and a clock. Also, each page goes for data to the server, and it makes sense to add a sign to display the status.
So, add the BaseViewModel.js file to the viewModels folder with this code:
Let us explain some structural points, conventions, etc .:
First of all, we need the inheritance function. We decided not to be very smart and took her from here . For use, we put it in the Object class and named inherit:
Note: in general, to place such a “tuning” code (type extension, declaration of enumerations like ETR.ProgressState described earlier, etc.), it is recommended to have a separate module and load it immediately before starting the application. In this particular example, we will not have much of it, so you can simply put such definitions in the main.js file .
After inheritance, our TestList classwill look like this:
It’s up to the markup. Here it is worth highlighting one point: the display of the clock. Since you cannot fit a clock into one html element on our design, when approaching “head-on” in the model, we need at least two fields: for date and time. You will also have to solve the issue of formatting time into a string, and doing this in the view model is not the best solution. Therefore, we will write custom binding for knockout, which with the help of the moment library will solve this issue:
In general, nothing complicated. The binding array after is interesting in this , which signals knockout that it is necessary to start processing this binding after the binding text has completed. Thus, we guarantee that we will already have text in the markup that we need to reformat as a date.
In view, we get something like the following:
Nice and compact.
This time we will not lay out all the code at once, but sequentially add the necessary functionality, simultaneously voicing our thoughts. The routine and obvious code snippets are left out of the picture.
Let's take another look at the picture with the application and try to evaluate what we need from the lists:
So it goes. Let's start with the sortings.
We also need customBinding to draw the sortable columns on the UI:
The logic of what is happening in the view model is as follows:
Now, so that our TestList class gets sorting functionality, change the base class in it from BaseViewModel to ListViewModel and draw something like this in the markup:
Now we should be puzzled by how to send these sorts to the server when requested. Since we don’t want to write code for this in each final view model, we will add another pipeline method to our lists - toRequest . The successor modules will also wrap it, additionally storing information about the number and page size, filters, etc. As a result, we will get rid of the need in the final module to write copy-paste code to collect the request to the server:
This method is also useful for saving the state of the model in the query string and in a certain cache (we described it as the requirements above), in order to restore this state when returning to the page. To save state, you can create a separate class stateManager, which will save states in the cache (for example, in localStorage ) and replace url with router . Also, this module will be built into the router and, when navigating the route, it will look in the cache for the state for the object. If it is found, then it is necessary to supplement it with parameters that Durandal recognized from the query string. We will not give a detailed code here, since everything is trivial. We only note that Durandal has a rather weak query string parsing function. For example, it does not know how to parse arrays that jquery.param can serialize . Therefore, the standard function in Durandal can be replaced with the extension jquery.deparam : the function inverse to param .
As we said above, we will have three paging s:
1. Simple (in general, and not paging, but simply displaying the number of records).

2. Page by page:

3. Buffer loading:

The latter will be additionally with auto-loading by scroll.
First of all, we need information about how many records are currently loaded in the list and how many of them are in total. Add two properties to the ListViewModel :
We need to read this information from the back end, otherwise nothing. Yes, the loadedRecords property will also come from the server, and will not be determined as the length of the array of received records, since the list can be grouped. Plus, we already have (due to BaseViewModel ) the state sign , which we still do not expose anywhere. And this is just the beginning. More is more, but I don’t want to do code copy-paste. Additionally, to implement pagers, we need to know exactly how to call the method of loading data from the server when changing the page, that is, we need a certain contract.
Then we decided to make the thing a little strange, but quite workable. We impose one restriction on the ListViewModel descendant classes : all of them must have a methodloadData , which will return a promise (strictly speaking, jquery deferred will be returned , but in this context it does not really matter). We will also expect that the callback will receive data from which we can get the totalRecords and loadedRecords we need . Next, we will wrap this method with our loadData method and add interceptors for promise , which will do all the necessary work. It turns out a kind of replacement for an abstract method, which is not in javascript.
Ultimately, for a ListViewModel, it will look something like this:
The code in our successor class is now supplemented with something like this:
The result was very good. We don’t need to copy-paste the code for setting properties of parent classes, but at the same time we have complete freedom to send a request to the back end and receive a response from it.
Next, we need to define two successor modules - PagedListViewModel and BufferedListViewModel . We will not show the whole and explain the code, due to their triviality, we will simply give a general structure. A notable point is the use of writable computeds, the existence of which is not yet known to all users of this library. Their use allows us to verify that the user enters strictly numbers in the rowCount field, and the value entered does not exceed the specified limit for the number of records per request, as well as the total number of records in the list.
Now, just changing the base class for TestList , we almost get the functionality of paging. To get it in full, we need a few more binders. View with them will look something like this:
Here we also do without the obvious code and briefly explain in words:
A noteworthy point is the fact that instanceof can work correctly thanks to the function that we used for inheritance (it uses the creation of an intermediate proxy object, which allows us not to overwrite prototype with “multi-storey” inheritance).
It is also interesting that our bufferedListPager , pagedListPager , simpleListPager binders generate markup, and this is not very beautiful. Moreover, the entire tbody block is copy-paste from list to list, which is also not so great. For those who use Durandal or just knockout, we can recommend solutions in the form of Durandal widgets and knockout components. In our case, this is not so, because the first method did not work on our structure, the widget does not work as a virtual binding , and in the absence of one root element, it wraps it with a div, which makes the layout of the table invalid. The second method, we just did not have time to try, because it appeared after the main code base was written.
Before moving on, let's take a broad look at everything we have done and understand: do we need to write like this?
So, in order to get a list with sorts, pager, auto-loading, automatic collection of parameters for the request for the back-end, saving the state in the query string and local cache and resetting this state, we need to write such a view model:
And here is a View:
Agree, it’s very compact, considering what kind of functionality we get. But we have just begun, and much more can be invented ...
To make our TestList just like real, we just have to add the ability to pass parameters for filtering to the server. To do this, we have already made the toRequest pipeline . We can wrap it in the final model and add the necessary parameters to the object. At the same time, we will automatically receive a save in the query string and in the state cache.
But then in each init method we will have to pull them out ourselves from the query string (more precisely, from the params object , which is a query string + state from the cache). And we also have to add the resetSettings method ourselves , so that by clicking the reset button we clear the values. It’s easy to imagine a situation when a parameter in toRequestadded, and its analysis in init or reset in resetSettings - forgot. How long will we notice this?
For example, you can indicate in some declarative way which fields of our models are filters, and put the rest into the base classes. Another nice piece from the knockout arsenal - extenders will help us with this (you might notice that we already used them in the article). For example, the standard extender rateLimit is very interesting .
So, we will write an extender that allows us to register some observable as a filter. Something like this:
Also, for all sorts of special cases, we will need auxiliary settings. For instance:
We will add these settings to observable itself. Total, we get something like this:
As a result, in the view model object, we will have a filter object, in which lies everything that we need to assemble, disassemble and something else.
The code for collecting / parsing the parameters we, again, will not give. We will only make a reservation to a certain “convention”, which we have applied at home.
For objects that are not so easy to turn into something serializable, you must specify a formatting method. Moreover, if the type is reusable, then writing this in extender for each parameter is a copy paste. Therefore, we agreed that in each filter value we check the availability of the toRequest method, and, if there is such a method, we take as the value the result of its call. For example, we have a back end, among other things, it is a wcf service from Sharepoint 2010, which require a special date format “/ Date (1234567890000) /”. This problem was solved in two lines of code, not counting the brackets:
Another question worth considering: where to put the functionality for manipulating filter parameters? Our candidates are three * listViewModel modules plus a BaseViewModel module . Putting it in lists is too narrow; a similar thing may be needed not only in lists. Putting in BaseViewModel is too cool, not everyone needs it.
A good solution in such cases is mixins . In the case of our filters, we added mixin to the ListViewModel class with this line:
The contract of the extender itself looks something like this:
In general, the practice is very good, we recommend.
With the help of mixins in this application, we made functionality for selecting strings (unfortunately, we won’t have time to talk about it in detail, our article is too big). The bottom line is that the rows in the table can be selected with the mouse, arrows, Tab key using Ctrl or Shift for multiple selection. For implementation, we wrote selectionExtender (for the list) and selectedExtender (for the lines). Based on the written functionality, we implemented the functionality “collapse all / expand all”, “select all / clear selection”, display a context menu depending on the selected line / lines, display master / details. And in general, for which they have not yet applied.
What was our joy that the authors of the code did this in the form of a mixin, when it was necessary to implement grouped lists. All that had to be done was to write groups of records in the view model instead of a single line of code:
two:
And all the functionality in a recursive manner appeared in group lists.
And on this positive note, we take our leave. Thanks to everyone who read to the end. See you soon!
Not so long ago, we set ourselves the task - to build a SPA application. Sophisticated, large, fast, with support for multiple devices, no memory leaks. Moreover, constantly evolving, so that it is easy to maintain. In general, as we love - all at once.
The topic of SPA-applications and javascript-applications as a whole is not new, but we were not able to find thorough guidelines for application development even on paid resources . They are more likely a story about a particular MV * library than an example to follow. However, examples of layering, building inheritance hierarchies and subtleties of inheritance in javascript, etc. are not considered.
We will try to go from the other side and describe, rather, the train of thought during development (with code and links) than any specific tool. We are forced to start from the level of hello world to set one starting point for readers and the writer. But already from the second section, the narrative will accelerate sharply.
We believe this article will be helpful:
- Front-end developers who already have little experience, but want to grow.
- Back-end developers who at some point had to start doing js-development and who feel some uncertainty when working with javascript.
- Layout designers who began to engage in js-development and would like to pump their skills.
The reading was very voluminous, but we hope that it is just as useful.
For a good understanding of the article you must:
- Understanding the basic principle of MV * -patterns (there is a good article for starting on the hub )
- Knowledge of the AMD approach and requirejs library (in Russian there is a habr ).
- It will help, but, as it seems to us, knowledge of knockout is not strictly required.
Formulation of the problem
We tried to find a task that would be quite complicated, but at the same time realistic and understandable without a long immersion in the context. We will build the foundation for lists with sorting, paging, filtering, displaying master-details, selection of rows, etc. We will also briefly touch upon the issues of maintaining the state of the application, interaction with the back end, etc.
We will use the starter kit and the Durandal + knockout bundle as the basis of our application , because both libraries are as simple as three pennies ( you can complete the tutorial knockout in literally an hour; on Durandalyou will spend as much time, and we almost do not need its specifics, we just use it as a platform for a quick start).
We sincerely hope that the choice of technologies will not narrow the circle of potential readers. After all, in the end, all MV * frameworks have similar functionality, or ECMAScript of a higher version adds the missing things if you are not interested in browser support like IE 8/9.
Hello world (expand starter kit)
First, we need to run the application and add a stub model there, on which we will put experiments:
- Download HTML starter kit .
- Open it in any convenient editor.
- Delete all files from the app / viewModels and app / views folders except shell.html and shell.js .
- Add the TestList.js file to the app / viewModels folder with the following code:
define([], function () { 'use strict'; var testListDef = function () { }; return testListDef; }); - In the app / views folder, add the TestList.html file and draw the following markup there:Hello
- In the shell.js file, we change the configuration of the router with this:
On this one:{ route: '', title:'Welcome', moduleId: 'viewmodels/welcome', nav: true }, { route: 'flickr', moduleId: 'viewmodels/flickr', nav: true }{ route: '', title: 'Test list', moduleId: 'viewmodels/TestList', nav: true } - We also need the underscore and moment libraries . You can install them in any convenient way and write them in the config for requirejs in the main.js file in the paths section :
'underscore': '../lib/underscore/underscore', 'moment': '../lib/moment/moment' - We start and make sure that we see a page with the inscription “Hello”.
Then you can go directly to writing our application.
Let's get down to business
To begin, let's look at the pages of the application that we have to write, and highlight the general points. As we conduct our narrative based on real events, we have a lot of pictures. At the same time let us boast a little of our design.
Of the general points, one can observe the presence of a heading and a clock. Also, each page goes for data to the server, and it makes sense to add a sign to display the status.
So, add the BaseViewModel.js file to the viewModels folder with this code:
define(['ko', 'underscore'], function (ko, _)
{
    'use strict';
    var baseViewModelDef = function (title)
    {
        this.title = ko.observable(title || null);
        this.state = ko.observable(ETR.ProgressState.Done);
        this.busy = ko.computed(function ()
        {
            return this.state() === ETR.ProgressState.Progress;
        }, this);
        this.ready = ko.computed(function ()
        {
            return this.state() !== ETR.ProgressState.Progress;
        }, this);
        this.disposed = false;
        this.inited = false;
    };
    _.extend(baseViewModelDef.prototype,
    {
        nowDate: ko.observable(new Date()).extend({ timer: 5000 }),
        baseInit: function ()
        {
            this.inited = true;
        },
        baseDispose: function ()
        {
            this.ready.dispose();
            this.busy.dispose();
            this.disposed = true;
        }
    });
    return baseViewModelDef;
});
Let us explain some structural points, conventions, etc .:
- We will write all the code in strict mode .
- We declare all modules as named functions instead of anonymous ones. This practice will do you a great job when you profile your code for memory leaks, for example, using the chrome developer tools , because it allows you to easily determine what kind of object is hanging in memory.
- Instead of using the widespread approach of capturing context using closures , we will write code using this . Perhaps the main reason for this is discipline and clarity. Yes, situations often arise where this cannot be passed correctly. But in 99% of cases, the code can and should be written in such a way that the this context is correct. For the remaining 1% of cases, we use call , apply , underscore bind , but we do this with an understanding of why and why.
- Everything that can be crammed into prototype is crammed into prototype. There are many reasons for this. Starting from a more efficient use of memory and, in some cases, a noticeable difference in speed (you can start research on this topic from this article ) and ending with the same discipline (there will be no way to become attached to any faults).
- We use the underscore extend function so that all ads are in the same object. Such code is easier to read, plus in many code editors such a block can be minimized and hidden if it is not needed. In the case of writing a la
this will not work.object.prototype.something = function - Instead of using magic strings and magic numbers, we declare some kind of enumeration. In the case of the code above, this is an ETR.ProgressState enumeration that looks like this:
ETR.ProgressState =
                {
                    Done: 0,
                    Progress: 1,
                    Fail: 2
                };
We don’t hesitate to put such objects in the global ETR object (an acronym for the name of our company), believing that we do not violate the AMD approach, since if some static objects are needed in almost every module, then they can be moved to the global context instead of passing them as dependencies. - In the markup, we need to determine, for example, the state of the view model in order to show / not show progress bar. But to write in the markup of an expression is bad and fraught. Therefore, we are very actively using knockout computeds . This allows us to write if: busy binders instead of if: state === 1 .
- In the case of complex hierarchies, some kind of virtual methods is sometimes necessary with the ability to call basic methods. So, for example, it will be with our baseInit and baseDispose . In the successor modules, we will definitely define methods with the same name, but we should not lose the “base” one. For this we will use underscore wrap . As for the base prefix in the names, we agreed to call methods that belong to “abstract” modules, that is, that are intended only for inheritance. This naming allows you to call the method simply dispose in the final modules without wrapping the base method with wrap. That is, the final code (which you often have to look at) will be a little cleaner.
- Each page of our application will have its own life cycle, which, in general, is superimposed on the life cycle of ViewModel s in Durandal . In the case of the code above, these are the baseInit and baseDispose methods . Most often, these methods overlap with the activate and deactivate methods from Durandal, but sometimes you have to bind them to the attached / detached methods , sometimes models do not participate in the Durandal life cycle at all, and you still need to initialize and clean them (for example, nested view models). Therefore, we called the methods so as to clearly separate flies from cutlets.
- Flags inited and disposed are needed to avoid reinitialization / cleaning, work with an already destroyed object. They can also be useful for debugging and profiling. Personally, we only have to use inited , and then occasionally (but just in case we have them).
Inherit and draw
First of all, we need the inheritance function. We decided not to be very smart and took her from here . For use, we put it in the Object class and named inherit:
Object.inherit = function (subClass, superClass)
                {
                    var f = function () { };
                    f.prototype = superClass.prototype;
                    subClass.prototype = new f();
                    subClass.prototype.constructor = subClass;
                    subClass.superclass = superClass.prototype;
                    if (superClass.prototype.constructor === Object.prototype.constructor)
                    {
                        superClass.prototype.constructor = superClass;
                    }
                    return subClass;
                };
Note: in general, to place such a “tuning” code (type extension, declaration of enumerations like ETR.ProgressState described earlier, etc.), it is recommended to have a separate module and load it immediately before starting the application. In this particular example, we will not have much of it, so you can simply put such definitions in the main.js file .
After inheritance, our TestList classwill look like this:
define(['underscore', 'BaseViewModel'], function (_, baseViewModelDef)
{
    'use strict';
    var testListDef = function ()
    {
        testListDef.superclass.constructor.call(this, 'Тестовый список');
        this.activate = this.baseInit;
        this.deactivate = this.baseDispose;
    };
    Object.inherit(testListDef, baseViewModelDef);
    return testListDef;
});
It’s up to the markup. Here it is worth highlighting one point: the display of the clock. Since you cannot fit a clock into one html element on our design, when approaching “head-on” in the model, we need at least two fields: for date and time. You will also have to solve the issue of formatting time into a string, and doing this in the view model is not the best solution. Therefore, we will write custom binding for knockout, which with the help of the moment library will solve this issue:
ko.bindingHandlers.dateFormat = {
        after: ['text'],
        update: function (element, valueAccessor, allBindings)
        {
            if (allBindings.get('text'))
            {
                var format = ko.unwrap(valueAccessor()) || 'L';
                var value = ko.unwrap(allBindings.get('text'));
                if (value)
                {
                    var dateVal = moment(value);
                    var text = dateVal.isValid() ? dateVal.format(format) : value;
                } else
                {
                    text = '';
                }
                $(element).text(text);
            }
        }
    };
In general, nothing complicated. The binding array after is interesting in this , which signals knockout that it is necessary to start processing this binding after the binding text has completed. Thus, we guarantee that we will already have text in the markup that we need to reformat as a date.
In view, we get something like the following:
Nice and compact.
Create a list
This time we will not lay out all the code at once, but sequentially add the necessary functionality, simultaneously voicing our thoughts. The routine and obvious code snippets are left out of the picture.
Let's take another look at the picture with the application and try to evaluate what we need from the lists:
Additionally, we add two more things:
- Lists can be just lists showing the number of records, with pagination, buffer loading, infinite loading by scroll.
- Each list must save its state (paging, sorting, values in filters) in the query string so that the user can forward the link, and the recipient opens the application in the same state. Also, when leaving the window, the state of the list should be remembered and restored when returning to the window.
So it goes. Let's start with the sortings.
define(['jquery', 'underscore', 'ko', 'BaseViewModel'], function (jquery, _, ko, baseViewModelDef)
{
    'use strict';
    var listViewModelDef = function (title)
    {
        this.items = ko.observableArray([]).extend({ rateLimit: 0 });
        this.defaultSortings = [];
        if (this.sortings && ko.isObservable(this.sortings))
        {
            jquery.extend(true, this.defaultSortings, this.sortings());
            this.sortings.extend({ rateLimit: 0 });
        }
        else
        {
            this.sortings = ko.observableArray([]).extend({ rateLimit: 0 });
        }
        listViewModelDef.superclass.constructor.call(this, title);
        this.baseInit = _.wrap(this.baseInit, function (baseInit, params)
        {
            baseInit.call(this, params);
            if (params && params.sort && jquery.isArray(params.sort))
            {
                this.sortings(jquery.extend(true, [], params.sort));
            }
        });
        this.baseDispose = _.wrap(this.baseDispose, function (baseDispose)
        {
            this.defaultSortings = null;
            this.items.disposeAll();
            this.sortings.removeAll();
            baseDispose.call(this);
        });
    };
    _.extend(Object.inherit(listViewModelDef, baseViewModelDef).prototype,
    {
        setSort: function (fieldName, savePrevious){…},
        changeSort: function (){…},
        resetSettings: function (){…},
        reload: function (){…}
    });
    return listViewModelDef;
});
We also need customBinding to draw the sortable columns on the UI:
ko.bindingHandlers.sort = {
        init: function (element, valueAccessor, allBindingsAccessor, viewModel)
        {
            var $el = $(element);
            var fieldName = ko.unwrap(valueAccessor());
            var clickHandler = function (evt)
            {
                viewModel.setSort(fieldName, evt.ctrlKey);
                viewModel.changeSort();
            };
            $el.addClass('sortable').click(clickHandler);
            ko.computed(
            {
                read:{/*обновляем классы asc/desc у столбцов при изменении массива сортировок*/},
                disposeWhenNodeIsRemoved: element
            });
            ko.utils.domNodeDisposal.addDisposeCallback(element, function ()
            {
                $el.off('click', clickHandler);
                $el = null;
            });
        }
    };
The logic of what is happening in the view model is as follows:
- We declare the defaultSortings array and copy the values from the sortings array into it , if it was declared in a child class. This is necessary in order to restore the original sorts by pressing the reset button ( resetSettings method ). Please note that we copy through jquery.extend with the deep flag in order to make a full copy and not get problems afterwards due to a change in the reference object. If there are no sortings, we ourselves declare an array.
- Wrap the baseInit and baseDispose methods . In the first, we try to get the sorting parameters from the query string (passing parameters to us is Durandal's concern). In the baseDispose method, we simply clean up the order.
- The resetSettings and reload methods we will attach to the buttons on the UI. Also, these methods will be wrapped in the inheriting modules, making up some kind of pipeline. Thus, all the functionality of these buttons (which, after implementing the entire functionality of the lists will become quite voluminous) will be hidden in the base modules.
- The purpose of the setSort method is perhaps obvious from the name, and its code is trivial. Note only the savePrevious flag . We pass this parameter from custom binding in case Ctrl was pressed by clicking on the header . That’s exactly what it is worth separating: the logic for working with sorts is in the ListViewModel , and the logic under which user actions to save sorts is in the UI part, that is, in custom binding .
- The changeSort method exists separately and forces a reload of the list when changing the sort. It is rendered separately to abstract from the UI, since there may be a situation where the user first selects several sorts and only after that we need to load the data. We may also need (and need) to embed in the method in the successor modules.
- At the very beginning, we declare an array of items , that is, our records. It is needed in order to clean records from it when loading data in the list using the reload button and when dispose is called . Note that the disposeAll method , our extension to observableArray , is used for cleaning . Its essence is that we call removeAll , after which iterate over all the records, and, if there is a dispose method in them, we call it. We also do this through setTimeout 0 , so that the cycle works while data is being downloaded from the server, and not before it - slightly improves usability if there are a couple of thousand entries in the list:
ko.observableArray.fn.disposeAll = function (async)
                {
                    async = async === undefined ? true : !!async;
                    var items = this.removeAll();
                        setTimeout(function ()
                        {
                            ko.utils.arrayForEach(items, function (item)
                            {
                                if (item.dispose)
                                {
                                    item.dispose();
                                }
                            });
                            items = null;
                        }, 0);
                };
Now, so that our TestList class gets sorting functionality, change the base class in it from BaseViewModel to ListViewModel and draw something like this in the markup:
Now we should be puzzled by how to send these sorts to the server when requested. Since we don’t want to write code for this in each final view model, we will add another pipeline method to our lists - toRequest . The successor modules will also wrap it, additionally storing information about the number and page size, filters, etc. As a result, we will get rid of the need in the final module to write copy-paste code to collect the request to the server:
this.toRequest = function ()
        {
            var result = {};
            result.sort = this.sortings();
            return result;
     };
This method is also useful for saving the state of the model in the query string and in a certain cache (we described it as the requirements above), in order to restore this state when returning to the page. To save state, you can create a separate class stateManager, which will save states in the cache (for example, in localStorage ) and replace url with router . Also, this module will be built into the router and, when navigating the route, it will look in the cache for the state for the object. If it is found, then it is necessary to supplement it with parameters that Durandal recognized from the query string. We will not give a detailed code here, since everything is trivial. We only note that Durandal has a rather weak query string parsing function. For example, it does not know how to parse arrays that jquery.param can serialize . Therefore, the standard function in Durandal can be replaced with the extension jquery.deparam : the function inverse to param .
Paging
As we said above, we will have three paging s:
1. Simple (in general, and not paging, but simply displaying the number of records).
2. Page by page:
3. Buffer loading:
The latter will be additionally with auto-loading by scroll.
First of all, we need information about how many records are currently loaded in the list and how many of them are in total. Add two properties to the ListViewModel :
this.totalRecords = ko.observable(0).extend({ rateLimit: 0 });
this.loadedRecords = ko.observable(0).extend({ rateLimit: 0 });
And then another thought comes to mind ...
We need to read this information from the back end, otherwise nothing. Yes, the loadedRecords property will also come from the server, and will not be determined as the length of the array of received records, since the list can be grouped. Plus, we already have (due to BaseViewModel ) the state sign , which we still do not expose anywhere. And this is just the beginning. More is more, but I don’t want to do code copy-paste. Additionally, to implement pagers, we need to know exactly how to call the method of loading data from the server when changing the page, that is, we need a certain contract.
Then we decided to make the thing a little strange, but quite workable. We impose one restriction on the ListViewModel descendant classes : all of them must have a methodloadData , which will return a promise (strictly speaking, jquery deferred will be returned , but in this context it does not really matter). We will also expect that the callback will receive data from which we can get the totalRecords and loadedRecords we need . Next, we will wrap this method with our loadData method and add interceptors for promise , which will do all the necessary work. It turns out a kind of replacement for an abstract method, which is not in javascript.
Ultimately, for a ListViewModel, it will look something like this:
var listViewModelDef = function (title)
    {
        if (!this.loadData)
        {
            throw 'In order to inherit "ListViewModel" type you must provide "loadData" method';
        }
…
this.loadData = _.wrap(this.loadData, function (q)
        {
            var opts = { total: 'totalCount', loaded: 'selectedCount' };
	    //Список-наследник может переопределить названия для возвращаемых полей
            if (this.namingOptions)
            {
                opts = _.extend(opts, namingOptions);
            }
            this.totalRecords(0);
            this.state(ETR.ProgressState.Progress);
            var promise = q.apply(this, Array.prototype.slice.call(arguments, 1));
            promise.done(function (data)
            {
                this.loadedRecords(data[opts.loaded]);
                this.totalRecords(data[opts.total] || 0);
                        this.state(ETR.ProgressState.Done);
    }).fail(function ()
    {
        this.state(ETR.ProgressState.Fail);
    });
    if (this.saveStateOnRequest === true)
            {
                this.saveRequestState();
            }
            return promise;
 });
…
    }
The code in our successor class is now supplemented with something like this:
define(['underscore', 'BaseViewModel', 'SomeViewModel'], function (_, baseViewModelDef, someViewModelDef)
{
    'use strict';
    var testListDef = function ()
    {
        testListDef.superclass.constructor.call(this, 'Тестовый список');
    };
    _.extend(Object.inherit(testListDef, baseViewModelDef).prototype, {
        loadData: function ()
        {
            return this.someService.getSomeData(this.toRequest())
                 .done(function (result)
                 {
                     this.someCustomPropertyToSet(result.someCustomPropertyToSet);
                     this.items.initWith(result.items, someViewModelDef);
                 });
        },
…
    });
    return testListDef;
});
The result was very good. We don’t need to copy-paste the code for setting properties of parent classes, but at the same time we have complete freedom to send a request to the back end and receive a response from it.
Next, we need to define two successor modules - PagedListViewModel and BufferedListViewModel . We will not show the whole and explain the code, due to their triviality, we will simply give a general structure. A notable point is the use of writable computeds, the existence of which is not yet known to all users of this library. Their use allows us to verify that the user enters strictly numbers in the rowCount field, and the value entered does not exceed the specified limit for the number of records per request, as well as the total number of records in the list.
define(['ko', 'underscore', 'ListViewModel'], function (ko, _, listViewModelDef)
{
    'use strict';
    var bufferedListViewModelDef = function (title)
    {
        this.defaultRowCount = 20;
        this.minRowCount = 0;
        this.maxRowCount = 200;
        this.rowCountInternal = ko.observable(this.defaultRowCount);
        this.skip = ko.observable(0).extend({ rateLimit: 0 });
        this.rowCount = ko.computed({
            read: this.rowCountInternal,
            write: function (value) {…},
            owner: this
        });
bufferedListViewModelDef.superclass.constructor.call(this, title);
this.loadData = _.wrap(this.loadData, function (q) {…};
this.baseInit = _.wrap(this.baseInit, function (baseInit, params) {…};
        this.resetData = _.wrap(this.resetData, function (baseResetData) {…};
        this.toRequest = _.wrap(this.toRequest, function (baseToRequest) {…};
        this.changeSort = _.wrap(this.changeSort, function (baseChangeSort) {…};
        this.baseDispose = _.wrap(this.baseDispose, function (baseDispose) {…};
    };
    Object.inherit(bufferedListViewModelDef, listViewModelDef);
    return bufferedListViewModelDef;
});
Now, just changing the base class for TestList , we almost get the functionality of paging. To get it in full, we need a few more binders. View with them will look something like this:
Here we also do without the obvious code and briefly explain in words:
- The progress and nodata bindings rely on the view model properties of state and selectedCount to hide or show the element to which they are applied.
- Binding infinite checks that a bufferedListViewModel has been slipped to it , and hooks the handler on the scroll event of the window object, in which it loads the data into the list.
- Биндинг pager делегирует вызов другим биндингам в зависимости от того, какую view model ему передали:
ko.bindingHandlers.pager = {
        init: function (element, valueAccessor, allBindingsAccessor, viewModel)
        {
            if (viewModel instanceof bufferedListViewModelDef)
            {
                ko.bindingHandlers.bufferedListPager.init(element, valueAccessor, allBindingsAccessor, viewModel);
            }
            else if (viewModel instanceof pagedListViewModelDef)
            {
                ko.bindingHandlers.pagedListPager.init(element, valueAccessor, allBindingsAccessor, viewModel);
            }
            else if (viewModel instanceof listViewModelDef)
            {
                ko.bindingHandlers.simpleListPager.init(element, valueAccessor, allBindingsAccessor, viewModel);
            }
        }
    };
A noteworthy point is the fact that instanceof can work correctly thanks to the function that we used for inheritance (it uses the creation of an intermediate proxy object, which allows us not to overwrite prototype with “multi-storey” inheritance).
It is also interesting that our bufferedListPager , pagedListPager , simpleListPager binders generate markup, and this is not very beautiful. Moreover, the entire tbody block is copy-paste from list to list, which is also not so great. For those who use Durandal or just knockout, we can recommend solutions in the form of Durandal widgets and knockout components. In our case, this is not so, because the first method did not work on our structure, the widget does not work as a virtual binding , and in the absence of one root element, it wraps it with a div, which makes the layout of the table invalid. The second method, we just did not have time to try, because it appeared after the main code base was written.
Looking around
Before moving on, let's take a broad look at everything we have done and understand: do we need to write like this?
So, in order to get a list with sorts, pager, auto-loading, automatic collection of parameters for the request for the back-end, saving the state in the query string and local cache and resetting this state, we need to write such a view model:
define(['underscore', 'BufferedListViewModel'], function (_, bufferedListViewModelDef)
{
    'use strict';
    var testListDef = function ()
    {
        testListDef.superclass.constructor.call(this, 'Тестовый список');
    };
    _.extend(Object.inherit(testListDef, bufferedListViewModelDef).prototype, {
        loadData: function ()
        {
            return this.someService.getSomeData(this.toRequest())
                 .done(function (result){…});
        },
        init: function ()
        {
            this.baseInit();
        },
        dispose: function ()
        {
    this.someService.dispose();
            this.baseDispose();
        }
    });
    return testListDef;
});
And here is a View:
Other Property
Agree, it’s very compact, considering what kind of functionality we get. But we have just begun, and much more can be invented ...
Filtration
To make our TestList just like real, we just have to add the ability to pass parameters for filtering to the server. To do this, we have already made the toRequest pipeline . We can wrap it in the final model and add the necessary parameters to the object. At the same time, we will automatically receive a save in the query string and in the state cache.
But then in each init method we will have to pull them out ourselves from the query string (more precisely, from the params object , which is a query string + state from the cache). And we also have to add the resetSettings method ourselves , so that by clicking the reset button we clear the values. It’s easy to imagine a situation when a parameter in toRequestadded, and its analysis in init or reset in resetSettings - forgot. How long will we notice this?
Obviously, there is a more interesting solution.
For example, you can indicate in some declarative way which fields of our models are filters, and put the rest into the base classes. Another nice piece from the knockout arsenal - extenders will help us with this (you might notice that we already used them in the article). For example, the standard extender rateLimit is very interesting .
So, we will write an extender that allows us to register some observable as a filter. Something like this:
this.filterProperty = ko.observable(null).extend({filter: { fieldName: 'nameForRequest', owner: this }});
Also, for all sorts of special cases, we will need auxiliary settings. For instance:
- default value (for cases when the first value in observable is not it);
- a sign that it is not necessary to parse this field from the query string automatically (relevant for complex objects with their own constructor);
- method of formatting data for transmission to the server.
We will add these settings to observable itself. Total, we get something like this:
ko.extenders.filter = function (target, options)
                {
                    options.owner.filter = options.owner.filter || {};
                    options.owner.filter[options.fieldName] = target;
                    target.defaultValue = options.defaultValue === undefined ? target() : options.defaultValue;
                    target.ignoreOnAutoMap = (!!options.ignoreOnAutoMap) || false;
                    target.formatter = options.formatter || undefined;
                    target.emptyIsNull = options.emptyIsNull || false;
                    return target;
                };
As a result, in the view model object, we will have a filter object, in which lies everything that we need to assemble, disassemble and something else.
The code for collecting / parsing the parameters we, again, will not give. We will only make a reservation to a certain “convention”, which we have applied at home.
For objects that are not so easy to turn into something serializable, you must specify a formatting method. Moreover, if the type is reusable, then writing this in extender for each parameter is a copy paste. Therefore, we agreed that in each filter value we check the availability of the toRequest method, and, if there is such a method, we take as the value the result of its call. For example, we have a back end, among other things, it is a wcf service from Sharepoint 2010, which require a special date format “/ Date (1234567890000) /”. This problem was solved in two lines of code, not counting the brackets:
Date.prototype.toRequest = function ()
            {
                return '\/Date\(' + this.getTime() + ')\/';
            };
Another question worth considering: where to put the functionality for manipulating filter parameters? Our candidates are three * listViewModel modules plus a BaseViewModel module . Putting it in lists is too narrow; a similar thing may be needed not only in lists. Putting in BaseViewModel is too cool, not everyone needs it.
A good solution in such cases is mixins . In the case of our filters, we added mixin to the ListViewModel class with this line:
modelWithFilterExtender.apply.call(this);
The contract of the extender itself looks something like this:
define(['ko', 'underscore'], function (ko, _)
{
    'use strict';
    var modelWithFilterExtenderDef = {
        apply: function ()
        {
            this.filter = this.filter || {};
            this.initFilterParams = function (baseInit, params){…};
            this.apllyFilterParams = function (data) {…};
            this.resetFilterToDefault = function (){…};
            this.clearFilterParams = function (){…};
        }
    };
    return modelWithFilterExtenderDef;
});
In general, the practice is very good, we recommend.
Let's share a small success story.
With the help of mixins in this application, we made functionality for selecting strings (unfortunately, we won’t have time to talk about it in detail, our article is too big). The bottom line is that the rows in the table can be selected with the mouse, arrows, Tab key using Ctrl or Shift for multiple selection. For implementation, we wrote selectionExtender (for the list) and selectedExtender (for the lines). Based on the written functionality, we implemented the functionality “collapse all / expand all”, “select all / clear selection”, display a context menu depending on the selected line / lines, display master / details. And in general, for which they have not yet applied.
What was our joy that the authors of the code did this in the form of a mixin, when it was necessary to implement grouped lists. All that had to be done was to write groups of records in the view model instead of a single line of code:
selectedExtender.apply.call(this, this.key);
two:
selectedExtender.apply.call(this, this.key);
selectionExtender.apply.call(this, this.items);
And all the functionality in a recursive manner appeared in group lists.
And on this positive note, we take our leave. Thanks to everyone who read to the end. See you soon!