Arduino, Nokia 5110 LCD module and Cyrillic
It took me, for a small project on arduino, to display some information, naturally on the screen, and not in the console. I bought a couple of LCD modules a la Nokia 5110 with a resolution of 84 x 48 pixels. I decided to use the library from Adafruit , more precisely two Adafruit-PCD8544-Nokia-5110-LCD-library and Adafruit-GFX-Library . If someone is not familiar with them yet, they can display non-screen text (six lines of 14 characters each), display pre-prepared images, draw (lines, rectangles, circles, etc.), and draw pixel by pixel. The pcdtest sketch worked fine, and I started writing my
It turned out that there are no Russian characters in the font, but I wanted it so. He found like-minded people on the first link in Google , in comment # 35, a certain Droni shared his font editor and a ready-made font. In fact, the editor turned out to be crooked - it did not display the last (256) character, and the font itself was not brought to mind - not only that in cp866 encoding , it still has not been completed yet - a symbol is missing in the pseudographics (an error came from the original font from adafruit ), there are not enough characters "ё" and "ё". At first I tried to modify the font Droni editor, but when he found that the 256 does not display the character - my patience snapped and I decided to write my editor
Next, I discovered an unexpected Wiring behavior. The encoding of the utf-8 editor itself, but if preproc.substitute_unicode = false is set in the preferences file, then when compiling, the encoding takes place in the system encoding, i.e. in cp1251. It turns out that by disabling "unicode replacement" we enable encoding conversion. Simply put - you can write directly in the IDE in Cyrillic and after loading the sketch into the board, you can see the normal Russian text on the screen.
I also needed to display a couple of icons on the screen. Adafruit offers to use the Img2Code converter , but somehow I didn’t really like to draw in GIMP pixel by pixel, I was too lazy to look for a free editor for pixel art and I decided to make an icon editor in addition to the font editor. Editorit turned out to be sad, I tried to draw small icons, so it was quite convenient, but perhaps drawing a full-sized picture (84x48) would not be comfortable at all.
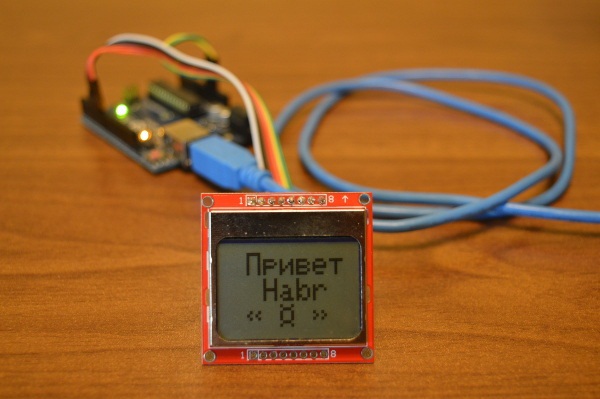
A sketch showing the display of the Cyrillic alphabet (photo at the beginning of the article) and icons (the picture from this article is taken as the basis ). Naturally, the sketch should be used with the finished font and the correct Wiring settings.
Editors Screenshots

In conclusion, the editors are written in Python 2, and no third-party libraries are required, because the interface on Tkinter, well, I think the cross-platform editors. Editors are designed for the sighted - I work on a netbook with a 10 ”screen, so the interface elements are very small. I honestly feel very ashamed of the code, so it's better not to watch it.
PS: The irony of fate - in my project, I eventually abandoned the Cyrillic alphabet and icons.