Enhancing Tween Animations in NGUI
Hi, my name is Mikhail Kulikov, I am a game developer and in my difficult craft I use Unity. I will not go into the description of what Unity is or how I got to the point that I started using it as an engine. I can only say that this is a great tool with many pros and cons, and the main disadvantage, in my opinion, is the lack of tools for comfortable work on the UI. The toolkit that Unity developers provided in version 4.6 as an open beta does not count. I didn’t go into it much, and I don’t have much desire, since I have been using the NGUI plugin for a long time. Today I want to share with you the problems that I had to face, making tween-animations for the interface, as well as the solution to these problems.
Or I don’t understand something, or the TweenPosition component does not fit in any way with anchors. I mean the following situation. I have a widget that is attached with anchors to the upper left corner of the screen. By changing the screen resolution and aspect ratio, my widget keeps its position well and everything looks great.
When I tried to use TweenPosition to animate the widget “moving out" from the edge of the screen, I realized that nothing would work. TweenPosition uses Vector3 coordinates to indicate the start and end positions of the animation. For example, we set the following values for the animation:
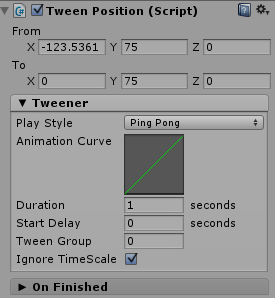
When I change the aspect ratio, the widget continues to move along the coordinates stored in TweenPosition , which in no way correspond to its new coordinates
I tried to write a script that would calculate the offset for the From and To vectors, but he did not want to be friends with anchors, and the animation turned into hell. This is no good. We begin to think further.
NGUI has a wonderful TweenTransform component that allows you to move an object from point A to point B, where A and B are transforms of any objects. Here is an example:
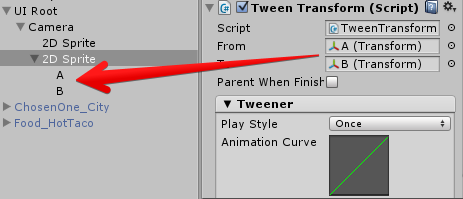
We remove the anchors from the widget and put the anchors from our game objects A and B
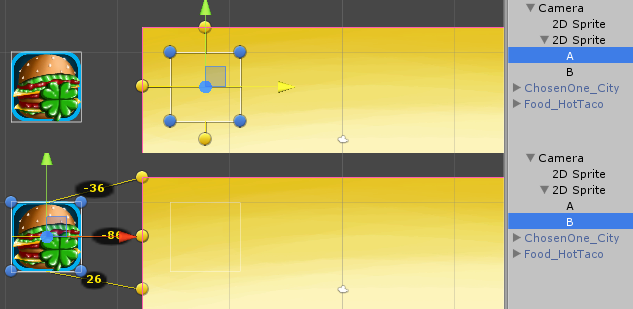
We look at what happened:
Now, with any resolutions and aspect ratios, the animation retains its appearance.
Well, it works fine, at least the expected result is achieved. But I want to automate the process. I have a lot of UI elements that require animation in my project and it’s terribly boring to carry out the operations described above on each of them. We are writing a simple script that will help us. Let's call it TweenTransformHelper .
I know that the above script probably struck you with its complexity, so the following will not scare you:
I do not see the point of describing the script in detail; there is nothing complicated in it. Now, if we add the script to the widget, we will see such a panel:
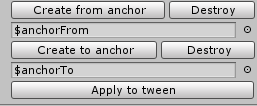
Create $ anchorTo and $ anchorFrom and click “Apply to tween” (this will automatically fill in the corresponding fields in TweenTransform ). Now the thing is small, adjust the binding to the edges of the screen for $ anchorTo and $ anchorFrom, after setting them to the desired positions.
On this, problem # 1 is resolved. Move on.
But what if we want to make a chain of objects leaving? Using NGUI to do this is elementary. Each TweenTransformer component has an On Finished field , which can contain any methods of any component, provided that this method is public. Added methods are called immediately after the animation finishes playing. For example, we can make a sequence of departures like this:

Now, when the animation starts, we will see the following miracles:
When the screen is activated, the elements leave and it looks good. But what if we want to play the animation in reverse when the screen is deactivated?
Based on what I found in the discussions on the plugin forum, I was not the only one to encounter such a problem. The participants in the discussions proposed to solve this problem in the following way: somehow get the list of event calls, turn it around and arrange the calls in the reverse order. This decision seemed to me too complicated, because as they say, normal heroes always go around. Existing functional events OnFinished class UITweener (successor is TweenTransform) is not enough, because it is called when the animation plays from beginning to end and vice versa. It is not possible to determine which way the animation played before being completed. If it were possible, my problem would be solved. In the end, I decided to expand the capabilities of NGUI. Forgive me ArenMook , but I had to manage in his code. In fact, the changes that need to be made to the UITweener class are minimal.
In UITweener.cs add the following fields:
And in the Update method after
add
We go into UITweenerEditor.cs and add a few more lines of code so that the advanced features of the UITweener class are displayed in the editor.
After
add
As a result of these manipulations, the TweenTransform window now looks like this.

Having the opportunity to find out in which direction the animation has finished playing, I can build a sequence that can correctly play both forward and backward. This is done elementarily:
To play the animation forward, you need to call the PlayForward method on the first element of the chain, and in order to play it in the reverse order, you need to call PlayReverse on the last element. Now we get the expected result:
NGUI is a great plugin for Unity, with great features, but it, like any sophisticated tool, has its drawbacks or shortcomings. But, having a little time and desire in reserve, they are easy to fix and achieve the desired result.
Problem # 1. Animations and anchors
Or I don’t understand something, or the TweenPosition component does not fit in any way with anchors. I mean the following situation. I have a widget that is attached with anchors to the upper left corner of the screen. By changing the screen resolution and aspect ratio, my widget keeps its position well and everything looks great.
4: 3 aspect ratio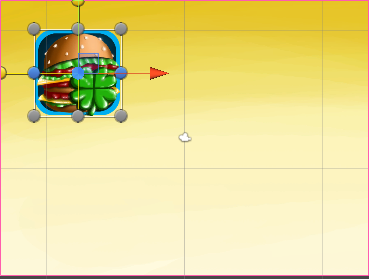 | 16: 9 aspect ratio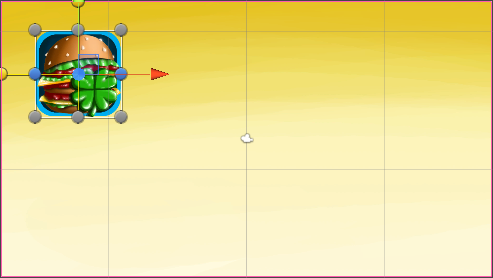 |
When I change the aspect ratio, the widget continues to move along the coordinates stored in TweenPosition , which in no way correspond to its new coordinates
4: 3 aspect ratio | 16: 9 aspect ratio |
NGUI has a wonderful TweenTransform component that allows you to move an object from point A to point B, where A and B are transforms of any objects. Here is an example:
We remove the anchors from the widget and put the anchors from our game objects A and B
We look at what happened:
4: 3 aspect ratio | 16: 9 aspect ratio |
Well, it works fine, at least the expected result is achieved. But I want to automate the process. I have a lot of UI elements that require animation in my project and it’s terribly boring to carry out the operations described above on each of them. We are writing a simple script that will help us. Let's call it TweenTransformHelper .
//TweenTransformHelper.cs
[RequireComponent(typeof(TweenTransform))]
public class TweenTransformHelper : MonoBehaviour {
    public GameObject FromAnchor;
    public GameObject ToAnchor;
}
I know that the above script probably struck you with its complexity, so the following will not scare you:
TweenTransformHelperEditor.cs
//TweenTransformHelperEditor.cs
[CustomEditor(typeof (TweenTransformHelper))]
public class TweenTransformHelperEditor : Editor {
    private TweenTransformHelper _tweener;
    private void Awake() {
        _tweener = (TweenTransformHelper) target;
    }
    public override void OnInspectorGUI() {
        EditorGUILayout.BeginHorizontal();
        if (GUILayout.Button("Create from anchor")) {
            CreateAnchorFrom();
        }
        if (GUILayout.Button("Destroy")) {
            DestroyAnchor(_tweener.FromAnchor);
        }
        EditorGUILayout.EndHorizontal();
        _tweener.FromAnchor = (GameObject) EditorGUILayout.ObjectField(_tweener.FromAnchor, typeof (GameObject));
        EditorGUILayout.BeginHorizontal();
        if (GUILayout.Button("Create to anchor")) {
            CreateAnchorTo();
        }
        if (GUILayout.Button("Destroy")) {
            DestroyAnchor(_tweener.ToAnchor);
        }
        EditorGUILayout.EndHorizontal();
        _tweener.ToAnchor = (GameObject) EditorGUILayout.ObjectField(_tweener.ToAnchor, typeof (GameObject));
        CreateAndApplyTweener();
        UpdateUI();
    }
    private void CreateAndApplyTweener() {
        bool toAnchorNotEqualsNull = _tweener.ToAnchor;
        bool fromAnchorNotEqualsNull = _tweener.FromAnchor;
        if (!fromAnchorNotEqualsNull) {
            EditorGUILayout.HelpBox("From anchor not created!", MessageType.Warning);
        }
        else if (!toAnchorNotEqualsNull) {
            EditorGUILayout.HelpBox("To anchor not created!", MessageType.Warning);
        }
        else {
            if (GUILayout.Button("Apply to tween")) {
                var tweenComponent = _tweener.GetComponent() ?? _tweener.gameObject.AddComponent();
                tweenComponent.from = _tweener.FromAnchor.transform;
                tweenComponent.to = _tweener.ToAnchor.transform;
                tweenComponent.enabled = false;
            }
        }
    }
    private void UpdateUI() {
        if (GUI.changed) {
            EditorUtility.SetDirty(_tweener);
        }
    }
    private void DestroyAnchor(GameObject gameObj) {
        if (gameObj == null) {
            return;
        }
        DestroyImmediate(gameObj);
    }
    private void CreateAnchorTo() {
        var anchor = CreateAnchor("$anchorTo");
        _tweener.ToAnchor = anchor;
    }
    private void CreateAnchorFrom() {
        var anchor = CreateAnchor("$anchorFrom");
        _tweener.FromAnchor = anchor;
    }
    private GameObject CreateAnchor(string anchorName) {
        var anchorGameObj = new GameObject(anchorName);
        anchorGameObj.transform.parent = _tweener.transform;
        anchorGameObj.transform.localPosition = Vector3.zero;
        anchorGameObj.transform.localScale = Vector3.one;
        var widgetScript = anchorGameObj.AddComponent();
        widgetScript.width = widgetScript.height = 100;
        return anchorGameObj;
    }
}
I do not see the point of describing the script in detail; there is nothing complicated in it. Now, if we add the script to the widget, we will see such a panel:
Create $ anchorTo and $ anchorFrom and click “Apply to tween” (this will automatically fill in the corresponding fields in TweenTransform ). Now the thing is small, adjust the binding to the edges of the screen for $ anchorTo and $ anchorFrom, after setting them to the desired positions.
On this, problem # 1 is resolved. Move on.
Problem # 2 Consistent Animations
But what if we want to make a chain of objects leaving? Using NGUI to do this is elementary. Each TweenTransformer component has an On Finished field , which can contain any methods of any component, provided that this method is public. Added methods are called immediately after the animation finishes playing. For example, we can make a sequence of departures like this:
Now, when the animation starts, we will see the following miracles:
When the screen is activated, the elements leave and it looks good. But what if we want to play the animation in reverse when the screen is deactivated?
Based on what I found in the discussions on the plugin forum, I was not the only one to encounter such a problem. The participants in the discussions proposed to solve this problem in the following way: somehow get the list of event calls, turn it around and arrange the calls in the reverse order. This decision seemed to me too complicated, because as they say, normal heroes always go around. Existing functional events OnFinished class UITweener (successor is TweenTransform) is not enough, because it is called when the animation plays from beginning to end and vice versa. It is not possible to determine which way the animation played before being completed. If it were possible, my problem would be solved. In the end, I decided to expand the capabilities of NGUI. Forgive me ArenMook , but I had to manage in his code. In fact, the changes that need to be made to the UITweener class are minimal.
In UITweener.cs add the following fields:
List mTempForward = null;
List mTempReverse = null;
[HideInInspector]
public List onFinishedForward = new List();
[HideInInspector]
public List onFinishedReverse = new List();
And in the Update method after
if (onFinished != null)
{
mTemp = onFinished;
…
}
add
if (onFinishedForward != null && direction == Direction.Forward) {
	mTempForward = onFinishedForward;
	onFinishedForward = new List();
    EventDelegate.Execute(mTempForward);
	for (int i = 0; i < mTempForward.Count; ++i) {
		EventDelegate ed = mTempForward[i];
        if(ed != null && !ed.oneShot) EventDelegate.Add(onFinishedForward, ed, ed.oneShot);
	}
	mTempForward = null;
}
if (onFinishedReverse != null && direction == Direction.Reverse) {
	mTempReverse = onFinishedReverse;
    onFinishedReverse = new List();
    EventDelegate.Execute(mTempReverse);
	for (int i = 0; i < mTempReverse.Count; ++i) {
        EventDelegate ed = mTempReverse[i];
		if (ed != null && !ed.oneShot) EventDelegate.Add(onFinishedReverse, ed, ed.oneShot);
	}
	mTempReverse = null;
}
We go into UITweenerEditor.cs and add a few more lines of code so that the advanced features of the UITweener class are displayed in the editor.
After
NGUIEditorTools.DrawEvents("On Finished", tw, tw.onFinished);
add
NGUIEditorTools.DrawEvents("On Finished forward", tw, tw.onFinishedForward);
NGUIEditorTools.DrawEvents("On Finished reverse", tw, tw.onFinishedReverse);
As a result of these manipulations, the TweenTransform window now looks like this.

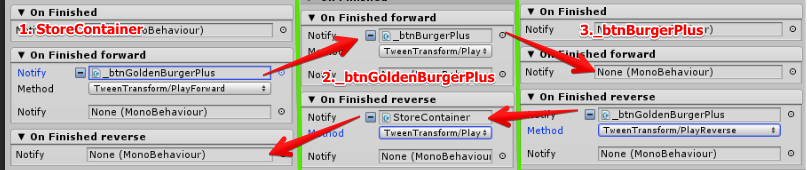
Having the opportunity to find out in which direction the animation has finished playing, I can build a sequence that can correctly play both forward and backward. This is done elementarily:

To play the animation forward, you need to call the PlayForward method on the first element of the chain, and in order to play it in the reverse order, you need to call PlayReverse on the last element. Now we get the expected result:

Conclusion
NGUI is a great plugin for Unity, with great features, but it, like any sophisticated tool, has its drawbacks or shortcomings. But, having a little time and desire in reserve, they are easy to fix and achieve the desired result.