Tips and recipes for a novice Android programmer
Good afternoon, dear habrayuzery.
In this article I want to share my development experience for Android.
The requirements for the functionality of the product being developed gave rise to various technical tasks, among which were both trivial, chewed in many blogs, and extremely ambiguous, with an unobvious solution. I came across a ton of things unfamiliar to me as a .NET developer. I learned about the existence of tools that greatly simplify life. I think that every novice Android player goes a similar way. I could save up to a third of the time spent developing, searching and experimenting with such an article.
Therefore, in this post I bring to your attention a collection of recipes and tips that will help you quickly and correctly create your application.
The article is intended for beginners, but experienced developers can find useful points. It is assumed that you have read the basics of building Android applications, you know about the wonderful StartAndroid resource , and you can do HelloWorld. At the same time, you do not have experience in creating full-fledged applications, and you have just begun to eliminate this shortcoming. For me, this was the first Android project.
My partner and I have long been thinking about creating some interesting product for Google Play. One fine day, while reading another SMS with a taxi advertisement, the idea came up to create an application that will deal with SMS spam. It seemed interesting to us, having practical application, relatively simple to implement for a small team.
Next, a set of specific requirements was developed and a set of tasks to be solved was formed. The most interesting of them:
The following points will be omitted in the article:
HelloWorld, and we already know how to create a template project for an Android application. Now let's see what we may need more. Knowing the existence of these tools, it is easy to find on the Internet how to use them. After all, the main problem is not to understand how to use the tool, but to find out that it even exists.
1) ActionBarSherlock is required to implement the platform-independent ActionBar - the menu at the top of the screen. We download from the official site and import into Workspace in the form of source codes. Just a library (a jar file) will not be enough, since there is a known problem with the underloading of some resources by a library.
2) We import into the Workspace in the form of the source Google play services from the SDK sdk \ extras \ google \ google_play_services \ libproject \ google-play-services_lib \. This will be needed for billing and authorization.
3) Put in the lib folder of the project library (before that we find them on the Internet)
* acra.jar - to implement the mechanism for sending crash reporting applications: ACRA .
* android-support-v4.jar - to implement compatibility with older versions of Android.
* roboguice-2.0.jar, roboguice-sherlock-1.5.jar - for implementing Dependency Injection, if you like the implementation of it in roboguice.
* ormlite-core.jar, ormlite-android.jar - a popular "lightweight" ORM for sqlite Android base .
* joda-time.jar - a library for working with dates.
* jdom.jar, gson.jar - for working with JSON.
* checkout.jar - for billing (I chose this library, Checkout as more convenient than working directly with the api).
Below I will give a method that runs on Android with a version lower than 4.4 (KitKat), since Google radically changed the approach to CMC processing in this version. I’ll add a description of working with KitKat later, when it will be implemented by me in the application.
To work with CMC, we need permission in the manifest:
where
RECEIVE_SMS is the permission for the application to receive CMC.
READ_SMS - permission to read SMS from the phone’s memory. It would seem that we do not need it, but without this permission recording does not work.
WRITE_SMS - permission to write CMC to the phone’s memory.
Let's create a SmsBroadcastReceiver accepted CMC event listener. It will be called when the phone receives SMS and starts the execution of the main processes for processing SMS.
It is very important that onReceive fulfills in less than 10 seconds. If the method takes control for a longer period, execution is interrupted and the event is dispatched to other handlers in priority order.
In my case, SuperMegaMethodForResolving checks for the presence of SMS in the contact list and in the local sender list, which takes less than a second. Then control is given to the dedicated stream, and onReceive calls abortBroadcast, which prevents other handlers from receiving SMS (including the basic SMS application).
After that, we need to sign SmsBroadcastReceiver for the CMC reception event. To do this, in the application block of the manifest, declare an android.provider.Telephony.SMS_RECEIVED event listener named SmsBroadcastReceiver, which listens to the SMS_RECEIVED system event and has priority 2147483631. The priority can be up to 2 ^ 31. At the same time, Google does not recommend using values greater than 999. But many applications use them, and we want the antispam to intercept the CMC before it is read, for example, by the Contacts + application. This application asks for the highest priorities I know.
Launching the application after turning on the device may be necessary to, for example, notify the user of the existence of yet unverified suspicious SMS through notification.
For startup, you need permission in the manifest:
where
RECEIVE_BOOT_COMPLETED - permission to listen to the "download" event
Create a listener for the "download" event ServiceBroadcastReceiver.
In it, we will perform the necessary actions after turning on the phone.
Then, you will need to sign ServiceBroadcastReceiver to the phone boot event. To do this, in the application block of the manifest, declare the event listener android.intent.action.BOOT_COMPLETED named SmsBroadcastReceiver.
So, we have CMC, and we need to contact the server. We complement the manifest as follows:
where
INTERNET is permission to send web request.
ACCESS_NETWORK_STATE - permission to read the status of the network (connected or not 3g or wifi).
Making requests is trivial, for them we use the basic Android http client: org.apache.http.client.HttpClient.
We do everything as described here .
We do not use app.config, * .ini or the application database to store application settings, since Android provides us with the SharedPreferences mechanism .
This took me the most time due to the lack of systematic and incomplete information, including Google documentation. So, our task is to get a signed token from Google through the application with information about the user and secret information about the application. This will give us reason to believe that the token was not generated by an attacker. To solve this problem, we use the CrossClientAuth mechanism .
You must do the following:
1) Get the application certificate and sign the application with it. This is easy to implement in Eclipse using the wizard. Right-click on the project in Package Explorer -> Android tools -> Export signed application package. The wizard will offer to create a new certificate store, generate a certificate and place it in a store protected by the password you specified. Do not forget to save the hash of the certificate, since it will be needed in the future.
2) Create a project in the Google console . Then open the created project and go to the Api & auth -> Credentials tab in the left panel. Here you need to create a pair of Client Id for the server side and the Android client. Click Create new Client ID, we need a Client ID for Android application.
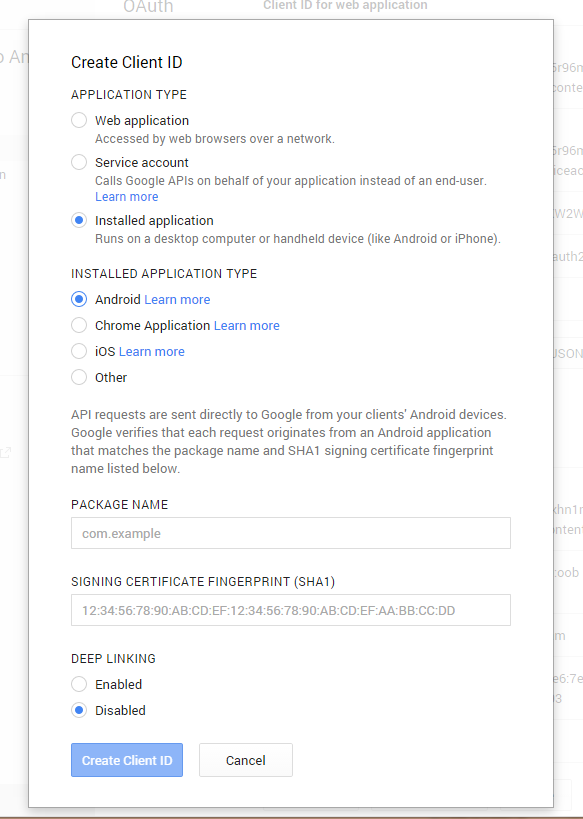
Fill out, as indicated in the screenshot, indicating the correct package name and certificate fingerprint. After completing the creation, we will get a plate with the information and the CLIENT ID generated for us. We need it on the server.
Then create a new Client Id of type Web application. In my case, the addresses can be specified arbitrarily, since we will not have http interaction with Google web resources. As a result, we get a new CLIENT ID, it will already be needed on the client.
3) Client code in its entirety can be found on the Internet, for example GoogleAuthUtil . I will note only key points: how to compose Scope correctly, and where to get Id for it
It remains to transfer the token to the server
4) Server code for checking the token
We use Microsoft.IdentityModel.Tokens.JWT Nuget . The code below allows you to get GoogleId user and his Email.
First, you need to create the necessary products in the Google development console of the application project on the CONTENT FOR SALE tab. The client will write based on Checkout examples . Here are some excerpts from my code regarding billing for a more complete understanding of the Checkout library.
That's all for now. If you want to analyze any aspect in more detail, write and I will supplement the article. I hope the post will help novice Android programmers break a smaller rake, avoid stepping on firewood and save time. You can try the finished application here .
In this article I want to share my development experience for Android.
The requirements for the functionality of the product being developed gave rise to various technical tasks, among which were both trivial, chewed in many blogs, and extremely ambiguous, with an unobvious solution. I came across a ton of things unfamiliar to me as a .NET developer. I learned about the existence of tools that greatly simplify life. I think that every novice Android player goes a similar way. I could save up to a third of the time spent developing, searching and experimenting with such an article.
Therefore, in this post I bring to your attention a collection of recipes and tips that will help you quickly and correctly create your application.
The article is intended for beginners, but experienced developers can find useful points. It is assumed that you have read the basics of building Android applications, you know about the wonderful StartAndroid resource , and you can do HelloWorld. At the same time, you do not have experience in creating full-fledged applications, and you have just begun to eliminate this shortcoming. For me, this was the first Android project.
Start
My partner and I have long been thinking about creating some interesting product for Google Play. One fine day, while reading another SMS with a taxi advertisement, the idea came up to create an application that will deal with SMS spam. It seemed interesting to us, having practical application, relatively simple to implement for a small team.
Next, a set of specific requirements was developed and a set of tasks to be solved was formed. The most interesting of them:
- Project preparation
- Getting and parsing CMC
- Autostart application when loading the phone
- Web requesting
- Data storage in the local database
- Settings Storage
- Google Token Authorization
- Work with the mechanism of purchases
The following points will be omitted in the article:
- Layout and Design
- Everything about pure Java code
- Application architecture
Project preparation
HelloWorld, and we already know how to create a template project for an Android application. Now let's see what we may need more. Knowing the existence of these tools, it is easy to find on the Internet how to use them. After all, the main problem is not to understand how to use the tool, but to find out that it even exists.
1) ActionBarSherlock is required to implement the platform-independent ActionBar - the menu at the top of the screen. We download from the official site and import into Workspace in the form of source codes. Just a library (a jar file) will not be enough, since there is a known problem with the underloading of some resources by a library.
2) We import into the Workspace in the form of the source Google play services from the SDK sdk \ extras \ google \ google_play_services \ libproject \ google-play-services_lib \. This will be needed for billing and authorization.
3) Put in the lib folder of the project library (before that we find them on the Internet)
* acra.jar - to implement the mechanism for sending crash reporting applications: ACRA .
* android-support-v4.jar - to implement compatibility with older versions of Android.
* roboguice-2.0.jar, roboguice-sherlock-1.5.jar - for implementing Dependency Injection, if you like the implementation of it in roboguice.
* ormlite-core.jar, ormlite-android.jar - a popular "lightweight" ORM for sqlite Android base .
* joda-time.jar - a library for working with dates.
* jdom.jar, gson.jar - for working with JSON.
* checkout.jar - for billing (I chose this library, Checkout as more convenient than working directly with the api).
Getting and parsing CMC
Below I will give a method that runs on Android with a version lower than 4.4 (KitKat), since Google radically changed the approach to CMC processing in this version. I’ll add a description of working with KitKat later, when it will be implemented by me in the application.
To work with CMC, we need permission in the manifest:
where
RECEIVE_SMS is the permission for the application to receive CMC.
READ_SMS - permission to read SMS from the phone’s memory. It would seem that we do not need it, but without this permission recording does not work.
WRITE_SMS - permission to write CMC to the phone’s memory.
Let's create a SmsBroadcastReceiver accepted CMC event listener. It will be called when the phone receives SMS and starts the execution of the main processes for processing SMS.
SmsBroadcastReceiver
//BroadcastReceiver обязательный предок прослушивателей системных событий
public class SmsBroadcastReceiver extends BroadcastReceiver {
	@Override
	public void onReceive(Context context, Intent intent) {
		//Интент - входной объект с данными, передаваемый всем прослушивателям
		Bundle bundle = intent.getExtras();
		//Извлекаем из словаря некий pdus - в нем информация о СМС
		Object[] pdus = (Object[]) bundle.get("pdus");
		if (pdus.length == 0) {
			return; // Что то пошло не так
		}
		// читаем CMC
		Sms sms = SmsFromPdus(pdus, context);
		// определям, спам ли
		Boolean isClearFromSpam = SuperMegaMethodForResolving Spam(sms, context);
		if (!isClearFromSpam) {
			// если это спам - прекращаем обработку CMC системой
			abortBroadcast();
			return;
		}
	}
	private Sms SmsFromPdus(Object[] pdus, Context context) {
		Sms sms = new Sms();
		for (int i = 0; i < pdus.length; i++) {
			SmsMessage smsMessage = SmsMessage.createFromPdu((byte[]) pdus[i]);
			sms.Text += smsMessage.getMessageBody(); //соберем весь текст (CMC может быть "многостраничной")
		}
		SmsMessage first = SmsMessage.createFromPdu((byte[]) pdus[0]);//из первой страницы получим
		sms.SenderId = first.getOriginatingAddress(); //отправителя
		Date receiveDate = new Date(first.getTimestampMillis()); //дату
		sms.RecieveDate = receiveDate;
		sms.Status = first.getStatus(); //статус (новое, прочтено, доставлено)
		return sms;
	}
}
public class Sms{
	public String SenderId;
	public String Text;
	public Date RecieveDate;
	public int Status;
}
It is very important that onReceive fulfills in less than 10 seconds. If the method takes control for a longer period, execution is interrupted and the event is dispatched to other handlers in priority order.
In my case, SuperMegaMethodForResolving checks for the presence of SMS in the contact list and in the local sender list, which takes less than a second. Then control is given to the dedicated stream, and onReceive calls abortBroadcast, which prevents other handlers from receiving SMS (including the basic SMS application).
After that, we need to sign SmsBroadcastReceiver for the CMC reception event. To do this, in the application block of the manifest, declare an android.provider.Telephony.SMS_RECEIVED event listener named SmsBroadcastReceiver, which listens to the SMS_RECEIVED system event and has priority 2147483631. The priority can be up to 2 ^ 31. At the same time, Google does not recommend using values greater than 999. But many applications use them, and we want the antispam to intercept the CMC before it is read, for example, by the Contacts + application. This application asks for the highest priorities I know.
Autostart application when loading the phone
Launching the application after turning on the device may be necessary to, for example, notify the user of the existence of yet unverified suspicious SMS through notification.
For startup, you need permission in the manifest:
where
RECEIVE_BOOT_COMPLETED - permission to listen to the "download" event
Create a listener for the "download" event ServiceBroadcastReceiver.
public class ServiceBroadcastReceiver extends BroadcastReceiver {
	@Override
	public void onReceive(Context context, Intent intent) {
		//Сделаем что-нибудь
	}
}
In it, we will perform the necessary actions after turning on the phone.
Then, you will need to sign ServiceBroadcastReceiver to the phone boot event. To do this, in the application block of the manifest, declare the event listener android.intent.action.BOOT_COMPLETED named SmsBroadcastReceiver.
Web requesting
So, we have CMC, and we need to contact the server. We complement the manifest as follows:
where
INTERNET is permission to send web request.
ACCESS_NETWORK_STATE - permission to read the status of the network (connected or not 3g or wifi).
Making requests is trivial, for them we use the basic Android http client: org.apache.http.client.HttpClient.
Data storage in the local database
We do everything as described here .
Settings Storage
We do not use app.config, * .ini or the application database to store application settings, since Android provides us with the SharedPreferences mechanism .
Google Token Authorization
This took me the most time due to the lack of systematic and incomplete information, including Google documentation. So, our task is to get a signed token from Google through the application with information about the user and secret information about the application. This will give us reason to believe that the token was not generated by an attacker. To solve this problem, we use the CrossClientAuth mechanism .
You must do the following:
1) Get the application certificate and sign the application with it. This is easy to implement in Eclipse using the wizard. Right-click on the project in Package Explorer -> Android tools -> Export signed application package. The wizard will offer to create a new certificate store, generate a certificate and place it in a store protected by the password you specified. Do not forget to save the hash of the certificate, since it will be needed in the future.
2) Create a project in the Google console . Then open the created project and go to the Api & auth -> Credentials tab in the left panel. Here you need to create a pair of Client Id for the server side and the Android client. Click Create new Client ID, we need a Client ID for Android application.
Fill out, as indicated in the screenshot, indicating the correct package name and certificate fingerprint. After completing the creation, we will get a plate with the information and the CLIENT ID generated for us. We need it on the server.
Then create a new Client Id of type Web application. In my case, the addresses can be specified arbitrarily, since we will not have http interaction with Google web resources. As a result, we get a new CLIENT ID, it will already be needed on the client.
3) Client code in its entirety can be found on the Internet, for example GoogleAuthUtil . I will note only key points: how to compose Scope correctly, and where to get Id for it
The code
//выбор аккаунта
@Override
protected void onActivityResult(int requestCode, int resultCode, Intent data) {
	if (requestCode == REQUEST_CODE_PICK_ACCOUNT) {
		if (resultCode == RESULT_OK) {
			Email = data.getStringExtra(AccountManager.KEY_ACCOUNT_NAME);
			getUsername();
		}
	}
	super.onActivityResult(requestCode, resultCode, data);
}
private void pickUserAccount() {
	String[] accountTypes = new String[] { "com.google" };
	Intent intent = AccountPicker.newChooseAccountIntent(null, null, accountTypes, false, null, null, null, null);
	startActivityForResult(intent, REQUEST_CODE_PICK_ACCOUNT);
}
//Код получения токена (по хитрому обернутый Try catch и в фоновом потоке
//WEB_CLIENT_ID из Client ID for web application
final private String WEB_CLIENT_ID = "1999999-aaaaaaaaaaaaaaaaaaaaaaaaa.apps.googleusercontent.com";
//"Область" применения Client id. Тут указано что мы хотим аутентификацию
String SCOPE = String.format("audience:server:client_id:%s", WEB_CLIENT_ID);
//Вот и токен
String token = GoogleAuthUtil.getToken(_activity, Email, SCOPE);
It remains to transfer the token to the server
4) Server code for checking the token
We use Microsoft.IdentityModel.Tokens.JWT Nuget . The code below allows you to get GoogleId user and his Email.
The code
public string GetUserIdByJwt(string jwt, out string userEmail)
{
	userEmail = string.Empty;
	string userId = null;
	//Секретный Client ID веб сервиса (Client ID for web application)
	string audience = "111111111111111111-aaaaaaaaaaaaaaaaaaaaa.apps.googleusercontent.com";
	//Секретный Client ID приложения (Client ID for Android application)
	string azp = "1111111111111-aaaaaaaaaaaaaaaaaaaaaaaa.apps.googleusercontent.com";
	var tokenHandler = new JWTSecurityTokenHandler();
	SecurityToken securityToken = tokenHandler.ReadToken(jwt);
	var jwtSecurityToken = securityToken as JWTSecurityToken;
	userEmail = GetClaimValue(jwtSecurityToken, "email");
	userId = GetClaimValue(jwtSecurityToken, "id");
	var validationParameters =
		new TokenValidationParameters()
		{
			AllowedAudience = audience,
			ValidIssuer = "accounts.google.com",
			ValidateExpiration = true,
			//с либами для токенов некоторая неразбериха.
			//По какой то причине не удалось заставить проверять подпись Google
			//в токене средствами Microsoft.IdentityModel
			ValidateSignature = false,
		};
	try
	{
		//Выкинет Exception, если токен не валидный
		ClaimsPrincipal claimsPrincipal = tokenHandler.ValidateToken(jwtSecurityToken, validationParameters);
		//Сверим, что наши Client Id совпадают с токеновскими
		bool allGood = ValidateClaim(jwtSecurityToken, "azp", azp) && ValidateClaim(jwtSecurityToken, "aud", audience);
		if (!allGood)
		{
			userId = null;
		}
	}
	catch
	{
		userId = null;
	}
	return userId;
}
//Сверим значение в Claim с ожидаемым
private static bool ValidateClaim(JWTSecurityToken securityToken, string type, string value)
{
	string claim = GetClaimValue(securityToken, type);
	if (claim == null)
		return false;
	return claim == value;
}
//Получим значение из Claim (по сути KeyValuePair)
private static string GetClaimValue(JWTSecurityToken securityToken, string type)
{
	var claim = securityToken.Claims.SingleOrDefault(x => x.Type == type);
	if (claim == null)
		return null;
	return claim.Value;
}
Work with the mechanism of purchases
First, you need to create the necessary products in the Google development console of the application project on the CONTENT FOR SALE tab. The client will write based on Checkout examples . Here are some excerpts from my code regarding billing for a more complete understanding of the Checkout library.
Changes to the Application class
public class MyApplication extends Application {
	private static final Products products = Products.create().add(IN_APP,
		asList("Ид вашего товара из консоли гугл", "Ид вашего товара2 из консоли гугл"));
	private final Billing billing = new Billing(this, new Billing.Configuration() {
		@Nonnull
		@Override
		public String getPublicKey() {
			String base64EncodedPublicKey = "ЛИЦЕНЗИОННЫЙ КЛЮЧ ДЛЯ ЭТОГО ПРИЛОЖЕНИЯ, который вы можете взять на вкладке СЛУЖБЫ И API консоли разработчика";
			return base64EncodedPublicKey;
		}
		@Nullable
		@Override
		public Cache getCache() {
			return Billing.newCache();
		}
	});
	@Nonnull
	private final Checkout checkout = Checkout.forApplication(billing, products);
	@Nonnull
	private static MyApplication instance;
	public MyApplication() {
		instance = this;
	}
	@Override
	public void onCreate() {
		super.onCreate();
		billing.connect();
	}
	@Nonnull
	public static MyApplication get() {
		return instance;
	}
	@Nonnull
	public Checkout getCheckout() {
		return checkout;
	}
}
Activity with a purchase
public class BillingActivity extends RoboSherlockActivity {
	private Sku _skuAccess;
	@Nonnull
	protected final ActivityCheckout checkout = Checkout.forActivity(this,
			MyApplication.get().getCheckout());
	@Nonnull
	protected Inventory inventory;
	@Override
	protected void onCreate(Bundle savedInstanceState) {
		super.onCreate(savedInstanceState);
		_skuAccess = null;
		_activity = this;
		checkout.start();
		checkout.createPurchaseFlow(new PurchaseListener());
		inventory = checkout.loadInventory();
		inventory.whenLoaded(new InventoryLoadedListener());
	}
	@Override
	protected void onActivityResult(int requestCode, int resultCode, Intent data) {
		super.onActivityResult(requestCode, resultCode, data);
		checkout.onActivityResult(requestCode, resultCode, data);
	}
	@Override
	protected void onDestroy() {
		checkout.stop();
		checkout.destroyPurchaseFlow();
		super.onDestroy();
	}
	@Nonnull
	public ActivityCheckout getCheckout() {
		return checkout;
	}
	public void Buy(View view) {
		purchase(_skuAccess);
	}
	private void purchase(@Nonnull final Sku sku) {
		boolean billingSupported = checkout.isBillingSupported(IN_APP);
		if (!billingSupported) {
			return;
		}
		checkout.whenReady(new Checkout.ListenerAdapter() {
			@Override
			public void onReady(@Nonnull BillingRequests requests) {
				requests.purchase(sku, null, checkout.getPurchaseFlow());
			}
		});
	}
	private class PurchaseListener extends BaseRequestListener {
		@Override
		public void onSuccess(@Nonnull Purchase purchase) {
			onPurchased();
		}
		private void onPurchased() {
			//перегрузим инвентарь - и после загрузки инвентаря проверим покупку и обработаем это в приложении
			inventory.load().whenLoaded(new InventoryLoadedListener());
		}
		@Override
		public void onError(int response, @Nonnull Exception ex) {
			// it is possible that our data is not synchronized with data on
			// Google Play => need to handle some errors
			if (response == ResponseCodes.ITEM_ALREADY_OWNED) {
				onPurchased();
			} else {
				super.onError(response, ex);
			}
		}
	}
	private class InventoryLoadedListener implements Inventory.Listener {
		private String _purchaseOrderId;
		@Override
		public void onLoaded(@Nonnull Inventory.Products products) {
			final Inventory.Product product = products.get(IN_APP);
			if (product.isSupported()) {
				boolean isPurchased = InspectPurchases(product);
				//Делаем что-нибудь
			}
		}
		private boolean InspectPurchases(Product product) {
			List skus = product.getSkus();
			Sku sku = skus.get(0); //допустим один товар
			final Purchase purchase = product.getPurchaseInState(sku,
						Purchase.State.PURCHASED);
			boolean isPurchased = purchase != null
						&& !TextUtils.isEmpty(purchase.token);
			if (isPurchased) {
				//Может уже куплено?
				return true;
			}
			else {
				//если нет - запомним товар для покупки
				_skuAccess = sku;
				return false;
			}
		}
	}
	private abstract class BaseRequestListener implements
			RequestListener {
		@Override
		public void onError(int response, @Nonnull Exception ex) {
		}
	}
}
Conclusion
That's all for now. If you want to analyze any aspect in more detail, write and I will supplement the article. I hope the post will help novice Android programmers break a smaller rake, avoid stepping on firewood and save time. You can try the finished application here .