InterSystems Enterprise Manager
- Tutorial
The InterSystems product stack has launched a new, free Caché and Ensemble instance management application - Enterprise Manager (EM). In this article I will talk about the main features of the new product. The application is actively developed and supports Caché, Ensemble and HealthShare version 2014.1+.
InterSystems EM provides tools for centralized management of InterSystems products. EM eliminates the need to manually change settings related to security, users, licensing, namespace and databases, and allows for a uniform policy for changing server configurations, eliminating manual input errors. EM will allow administrators to control who can make changes, as well as compare and undo any changes that have been made.
EM is a standalone, secure application. After you begin managing InterSystems products using EM, all communications between the EM and the managed instance are encrypted (using SSL / TLS or WSS).
The main function of Enterprise Manager is to manage various settings of instances included in groups, where settings are grouped into 5 different services. All these settings can be changed using an interface similar to an ordinary system management portal.
By combining instances into groups, EM allows you to manage settings so that all members of the group receive changes at the same time. However, a managed instance can get all of its settings not from one group, but from several that manage different services. In addition, for individual instances, it is possible to individually override some group settings.
EM allows you to subscribe groups to master groups, so the hierarchy of some conditional settings can be represented as follows:

This combination of services, groups and master groups gives you great flexibility in configuration: any configuration can be set globally for all managed instances, changed within a separate group, and, finally, redefined for a separate instance. The list of services is as follows:
The installation is similar to the installation of a regular Caché server, the installation is described in detail on the Habr for Windows habrahabr.ru/post/183340 and Linux (CentOS 6.5) habrahabr.ru/company/intersystems/blog/217567
The only thing worth mentioning is that they will ask you during the installation come up with an admin password - don't forget it!

You can verify the installation and start working at the address
Login : Manager, and the password was entered during installation.
I note that work with EM is carried out only through the EM management portal.
When you first log in, you will be prompted to select a security policy, there are 3 of them:
After selecting a security policy, the main window of the EM management portal opens.

Add the first instance to EM management. For simplicity, we assume that you installed Caché or Ensemble on the same server as the EM, and named the installation PROD and the server port 57772.
As you can see, our instance is not included in any groups, and none of its services are managed accordingly. Indeed, going to the instance system management portal it is clear that all the settings are still available for editing.
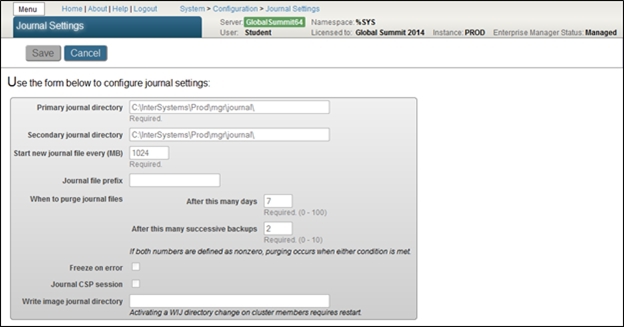
The PROD instance is now managed by the ProdConfig group. Some changes cannot be made in the PROD control portal. For example, we’ll go to the Journal settings by choosing System Administration> Configuration> System Configuration> Journal Settings (System Configuration> System Configuration> Journal Settings). The screenshot shows that all the settings are now available in read-only mode.
What happened Changes were made, then approved, and only then sent to the servers. These actions require various privileges for the user (they are all available for the Manager administrator), so separation of access rights can be configured.
If you look at the PROD instance management portal, the value of the changed setting should be 5.
So, we have a configured PROD server, and we want to clone these settings to another server and generally then administer these servers together. Pretty typical task. Let the new server be called TEST and be installed on the same or any other host. Next, do the following:
Sometimes the changes made are undesirable and need to be rolled back. It is also important to monitor all changes made to server configurations.
This article shows the basic functionality of Enterprise Manager.
Documentation
Download EM
InterSystems EM provides tools for centralized management of InterSystems products. EM eliminates the need to manually change settings related to security, users, licensing, namespace and databases, and allows for a uniform policy for changing server configurations, eliminating manual input errors. EM will allow administrators to control who can make changes, as well as compare and undo any changes that have been made.
EM is a standalone, secure application. After you begin managing InterSystems products using EM, all communications between the EM and the managed instance are encrypted (using SSL / TLS or WSS).
Main functions
The main function of Enterprise Manager is to manage various settings of instances included in groups, where settings are grouped into 5 different services. All these settings can be changed using an interface similar to an ordinary system management portal.
By combining instances into groups, EM allows you to manage settings so that all members of the group receive changes at the same time. However, a managed instance can get all of its settings not from one group, but from several that manage different services. In addition, for individual instances, it is possible to individually override some group settings.
EM allows you to subscribe groups to master groups, so the hierarchy of some conditional settings can be represented as follows:
This combination of services, groups and master groups gives you great flexibility in configuration: any configuration can be set globally for all managed instances, changed within a separate group, and, finally, redefined for a separate instance. The list of services is as follows:
| Configuration | License | Areas | Security | Users |
|---|---|---|---|---|
| Log Startup Settings SQL Devices Cluster Localization | License management | ECP Area Management | Roles Resources Web Applications Security Settings Audit | LDAP user management |
Installation
The installation is similar to the installation of a regular Caché server, the installation is described in detail on the Habr for Windows habrahabr.ru/post/183340 and Linux (CentOS 6.5) habrahabr.ru/company/intersystems/blog/217567
The only thing worth mentioning is that they will ask you during the installation come up with an admin password - don't forget it!
You can verify the installation and start working at the address
Login : Manager, and the password was entered during installation.
I note that work with EM is carried out only through the EM management portal.
When you first log in, you will be prompted to select a security policy, there are 3 of them:
- Unsecured - not recommended for operational use
- WS Security - SOAP protocol extension
- SSL / TLS
After selecting a security policy, the main window of the EM management portal opens.
Add Instance
Add the first instance to EM management. For simplicity, we assume that you installed Caché or Ensemble on the same server as the EM, and named the installation PROD and the server port 57772.
So, let's add a PROD instance under EM control
- From the instance system management portal, select the EM menu item from the System Administration tab
- On the page that opens, click the Apply button
- Enter the EM server information in the form that appears
- Network location: localhost
- Port: 57780 - standard EM port
- Prefix: leave blank
- Click Next
- Enter PROD Instance Information
- Description: PROD
- Network location: localhost
- Port: 57772
- Prefix: leave blank
- Click Finish . Management application sent
- Now we accept it. From the EM management portal, click on the link * Notifications

- Click on the Accept Request button
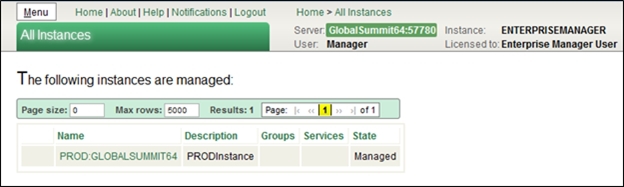
- Done. Let's move on to the list of managed instances by clicking on the View managed instances button.
Change settings
As you can see, our instance is not included in any groups, and none of its services are managed accordingly. Indeed, going to the instance system management portal it is clear that all the settings are still available for editing.
Create a new group that will manage the Configuration service.
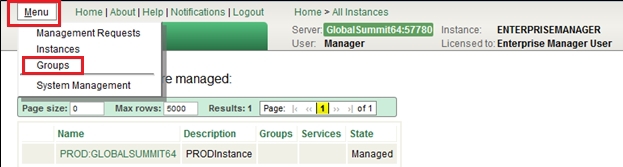
- Go to the EM management portal by clicking Menu -> Groups
- Click on the New Group button
- In the window that appears, fill in the fields:
- Name: ProdConfig
- Description: Configuration from Prod
- In the list of services, select: Configuration

- Click Finish
The group is created, now add the PROD instance there
- Go to the EM management portal via Menu -> Instances
- In the table that opens, the list of managed instances, click on the link “PROD: <Hostname of your computer>”.
- Click on the Assign to Group button
- Select the “ProdConfig” group by clicking on the appropriate row in the table and click Next.
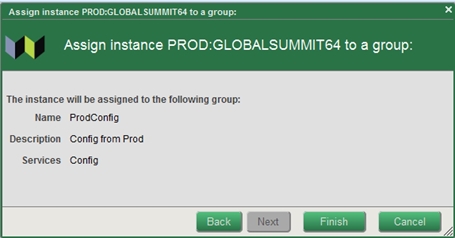
- Click Finish
The PROD instance is now managed by the ProdConfig group. Some changes cannot be made in the PROD control portal. For example, we’ll go to the Journal settings by choosing System Administration> Configuration> System Configuration> Journal Settings (System Configuration> System Configuration> Journal Settings). The screenshot shows that all the settings are now available in read-only mode.
Change the setting for the number of days after which log files are deleted
Now the value of this setting is 7.
- Go to the EM management portal in the menu item Groups
- Select ProdConfig from the list of groups
- Select Configuration from the list of services
- Click the Edit button
- On the page that opens, select System Configuration >> Journal Settings
- Change “After this many days” to 5
- Click Submit Changes
- Enter a description of the changes in the Description field and click Submit
- Click on the button Approve Changes
- Click on the button Approve
- Click on the Activate Changes button
- Press the Activate button
What happened Changes were made, then approved, and only then sent to the servers. These actions require various privileges for the user (they are all available for the Manager administrator), so separation of access rights can be configured.
If you look at the PROD instance management portal, the value of the changed setting should be 5.
Cloning Settings
So, we have a configured PROD server, and we want to clone these settings to another server and generally then administer these servers together. Pretty typical task. Let the new server be called TEST and be installed on the same or any other host. Next, do the following:
- Add the TEST instance to EM (as was done with PROD in p. Adding an Instance)
- Add a managed TEST instance to those groups whose service settings we want to see on the TEST server.
- That's it - the new server is configured just like PROD and will carry all the settings of the group.
Audit and rollback changes
Sometimes the changes made are undesirable and need to be rolled back. It is also important to monitor all changes made to server configurations.
These tasks are solved when working with the audit database.
- In the Enterprise Manager Management Portal, go to the home page> Systems Management> Auditing> View Audit Database
- In the “Event Name” field, enter “Edit” and click the Search button
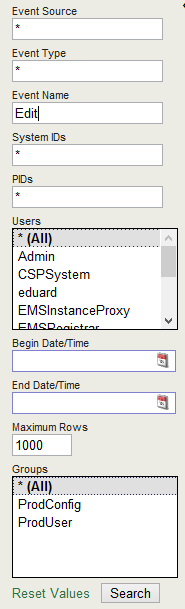
- View detailed information about changes made
Now cancel the change
- Go to the EM management portal in menu> Groups
- Click on the link ProdConfig
- Select Configuration Service
- Click the View History link
- Click View Changes to make sure that this is the change you are going to undo. A diff between different configurations will be shown.
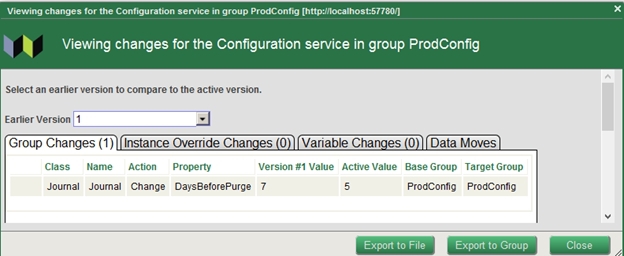
- Click Close
- Click on the Revert button
- Click OK
- On the ProdConfig group page (Menu> Groups> ProdConfig) click Submit
- Click on the Submit button
- Click on the button Approve Changes
- Click on the button Approve
Total
This article shows the basic functionality of Enterprise Manager.
useful links
Documentation
Download EM