Making a universal key for intercom
The title turned out to be too loud - and the key is not so universal, and not any one can give in to the intercom. Anyway.
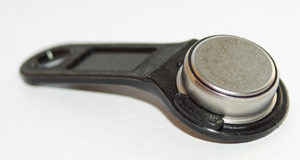
We will talk about intercoms working with 1-wire DS1990 tablets, like this:
On the Internet you can find a lot of materials on how to read information from them. But these pills are not only read-only. It’s human nature to lose keys, and today the stall with DS1990 cloning services can be found in any underground passage. For recording, they use discs that are compatible with the original keys, but with additional commands. Now we will learn how to program them.
Why is this needed? If you reject obviously bad options, the simplest thing is to reprogram the cloned tablets that have accumulated and become unnecessary from the old intercom, replaced by the new one, from the entrance of a rented apartment where you no longer live, from work where you no longer work, etc.
Immediately make a reservation that in the description I will omit some points that are obvious to most of those who are "in the subject", but who may not allow a simple person wandering here from the search engine to repeat the procedure. This is done on purpose. Although I am for the openness of information, I believe that information about all vulnerabilities should be brought to the public as quickly as possible, but still I do not want anyone who wants to be able to visit my entrance without problems.
As you know, DS1990 is characterized, in the general case, by one parameter - its own identification number. It consists of 8 bytes and is applied to the surface of the tablet. And it is issued in response to a request for 1-wire. In fact, one of these bytes is the identifier of the device type, another is the checksum, but for us this is not important. All the keys known to him are registered in the intercom memory, only the company managing the intercom can change this set. But in addition to the keys explicitly recorded in the memory, the intercom sometimes reacts to the so-called master keys, common for the intercoms of this manufacturer, this series, this installer. They try to keep the master key codes secret, but sometimes they leak. In five minutes of googling, you can find about 20 master keys from various intercoms. I have a “Visit”, so the choice fell on the key 01: BE: 40:
The discs on which keys are cloned are of different types. In our city, the most common are TM2004. According to the description, they support finalization, after which they lose the ability to overwrite and function as the most common DS1990. But for some reason, craftsmen making copies do not always finalize. Perhaps because the bulk of the programmers on the market was bought a long time ago and does not have such a function, perhaps because finalization requires an increased (9V) voltage. I do not know. But the fact remains, of the 4 keys on which I experimented, only one was finalized. The rest easily allowed you to change your code to whatever you like.
We will assemble the programmer on Arduino Uno, which is ideal for such purposes of prototyping and assembling disposable crafts. The circuit is simple, 1-Wire and 1-Wire.
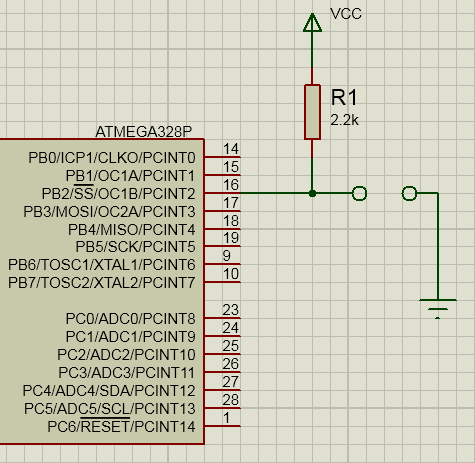
The assembly time of the device on the delboard does not exceed five minutes

. Sketch code. The recording algorithm itself is taken here - domofon-master2009.narod.ru/publ/rabota_s_kljuchom_tm_2004/1-1-0-5
There, however, it is written that you can write all 8 bytes in a row, but it didn’t work for me. Therefore, each byte is written separately, through its 0x3C command.
After starting, the program polls the 1-Wire interface once a second and issues a code read from it to the serial port. If it is FF: FF: FF: FF: FF: FF: FF: FF, then we believe that nothing is connected. In the general case, this, of course, is not true, since some discs, for example, TM2004, allow you to write 8 0xFF to the key identifier, so if your tablet is stitched with such a code, then the check must be removed.
Operation procedure: we start, connect the key, whose code we want to find out, and the resulting value is hardcode in the key_to_write array. We remove return marked by a comment. Again, start and connect the disc, it should be flashed with a new key. Naturally, to record an already known code (say, a master key), the first step is not required.
If an error occurred while writing the first byte, then your key is not rewritable. If the error is not on the first, but on some of the following bytes, then check the contact between the tablet and the arduino.
A successful write log looks something like this:
We get down to the street, trying to open the next entrance. Works!
Was it worth it to spread? Suddenly a homeless person will be able to enter my porch and start living there?
Well, firstly, let's face it - the master key will be programmed for you in any transition for very little money. Yes and the Internet offers a lot. In this regard, one and a half habrozhitel, repeating my experience - this is a drop in the ocean.
Secondly, I still intentionally missed out on some rather fundamental issues that would prevent a beginner from starting the device. Well, an advanced person is unlikely to come to your porch to sleep there or create indecency.
Therefore, I publish without the slightest doubt. Use it!
We will talk about intercoms working with 1-wire DS1990 tablets, like this:
On the Internet you can find a lot of materials on how to read information from them. But these pills are not only read-only. It’s human nature to lose keys, and today the stall with DS1990 cloning services can be found in any underground passage. For recording, they use discs that are compatible with the original keys, but with additional commands. Now we will learn how to program them.
Why is this needed? If you reject obviously bad options, the simplest thing is to reprogram the cloned tablets that have accumulated and become unnecessary from the old intercom, replaced by the new one, from the entrance of a rented apartment where you no longer live, from work where you no longer work, etc.
Immediately make a reservation that in the description I will omit some points that are obvious to most of those who are "in the subject", but who may not allow a simple person wandering here from the search engine to repeat the procedure. This is done on purpose. Although I am for the openness of information, I believe that information about all vulnerabilities should be brought to the public as quickly as possible, but still I do not want anyone who wants to be able to visit my entrance without problems.
A bit of theory.
As you know, DS1990 is characterized, in the general case, by one parameter - its own identification number. It consists of 8 bytes and is applied to the surface of the tablet. And it is issued in response to a request for 1-wire. In fact, one of these bytes is the identifier of the device type, another is the checksum, but for us this is not important. All the keys known to him are registered in the intercom memory, only the company managing the intercom can change this set. But in addition to the keys explicitly recorded in the memory, the intercom sometimes reacts to the so-called master keys, common for the intercoms of this manufacturer, this series, this installer. They try to keep the master key codes secret, but sometimes they leak. In five minutes of googling, you can find about 20 master keys from various intercoms. I have a “Visit”, so the choice fell on the key 01: BE: 40:
The discs on which keys are cloned are of different types. In our city, the most common are TM2004. According to the description, they support finalization, after which they lose the ability to overwrite and function as the most common DS1990. But for some reason, craftsmen making copies do not always finalize. Perhaps because the bulk of the programmers on the market was bought a long time ago and does not have such a function, perhaps because finalization requires an increased (9V) voltage. I do not know. But the fact remains, of the 4 keys on which I experimented, only one was finalized. The rest easily allowed you to change your code to whatever you like.
Practice.
We will assemble the programmer on Arduino Uno, which is ideal for such purposes of prototyping and assembling disposable crafts. The circuit is simple, 1-Wire and 1-Wire.
The assembly time of the device on the delboard does not exceed five minutes
. Sketch code. The recording algorithm itself is taken here - domofon-master2009.narod.ru/publ/rabota_s_kljuchom_tm_2004/1-1-0-5
There, however, it is written that you can write all 8 bytes in a row, but it didn’t work for me. Therefore, each byte is written separately, through its 0x3C command.
#include
#define pin 10
byte key_to_write[] = { 0x01, 0xBE, 0x40, 0x11, 0x5A, 0x36, 0x00, 0xE1 };
OneWire  ds(pin);  // pin 10 is 1-Wire interface pin now
void setup(void) {
  Serial.begin(9600);
}
void loop(void) {
  byte i;
  byte data[8];
  delay(1000); // 1 sec
  ds.reset();
  delay(50);
  ds.write(0x33); // "READ" command
  ds.read_bytes(data, 8);
  Serial.print("KEY ");
  for( i = 0; i < 8; i++) {
    Serial.print(data[i], HEX);
    if (i != 7) Serial.print(":");
  }
  // Check if FF:FF:FF:FF:FF:FF:FF:FF
  // If your button is really programmed with FF:FF:FF:FF:FF:FF:FF:FF, then remove this check
  if (data[0] & data[1] & data[2] & data[3] & data[4] & data[5] & data[6] & data[7] == 0xFF)
  {
    Serial.println("...nothing found!");
    return;
  }
  return; // remove when ready to programm
  // Check if read key is equal to the one to be programmed
  for (i = 0; i < 8; i++)
    if (data[i] != key_to_write[i])
      break;
    else
      if (i == 7)
      {
        Serial.println("...already programmed!");
        return;
      }
  Serial.println();
  Serial.print("Programming new key...");
  for (uint8_t i = 0; i < 8; i++)
  {
    ds.reset();
    data[0] = 0x3C; // "WRITE" command
    data[1] = i; // programming i-th byte
    data[2] = 0;
    data[3] = key_to_write[i];
    ds.write_bytes(data, 4);
    Serial.print(".");
    uint8_t crc = ds.read();
    if (OneWire::crc8(data, 4) != crc) {
        Serial.print("error!\r\n");
        return;
    }
    else
      Serial.print(".");
    send_programming_impulse();
  }
  Serial.println("done!");
}
void send_programming_impulse()
{
  pinMode(pin, OUTPUT);
  digitalWrite(pin, HIGH);
  delay(60);
  digitalWrite(pin, LOW);
  delay(5);
  digitalWrite(pin, HIGH);
  delay(50);
}
After starting, the program polls the 1-Wire interface once a second and issues a code read from it to the serial port. If it is FF: FF: FF: FF: FF: FF: FF: FF, then we believe that nothing is connected. In the general case, this, of course, is not true, since some discs, for example, TM2004, allow you to write 8 0xFF to the key identifier, so if your tablet is stitched with such a code, then the check must be removed.
Operation procedure: we start, connect the key, whose code we want to find out, and the resulting value is hardcode in the key_to_write array. We remove return marked by a comment. Again, start and connect the disc, it should be flashed with a new key. Naturally, to record an already known code (say, a master key), the first step is not required.
If an error occurred while writing the first byte, then your key is not rewritable. If the error is not on the first, but on some of the following bytes, then check the contact between the tablet and the arduino.
A successful write log looks something like this:
KEY FF:FF:FF:FF:FF:FF:FF:FF...nothing found!
KEY FF:FF:FF:FF:FF:FF:FF:FF...nothing found!
KEY FF:FF:FF:FF:FF:FF:FF:FF...nothing found!
KEY 1:98:2C:CD:C:0:0:EB
Programming new key...................done!
KEY 1:BE:40:11:5A:36:0:E1...already programmed!
We get down to the street, trying to open the next entrance. Works!
Moral and ethical issues.
Was it worth it to spread? Suddenly a homeless person will be able to enter my porch and start living there?
Well, firstly, let's face it - the master key will be programmed for you in any transition for very little money. Yes and the Internet offers a lot. In this regard, one and a half habrozhitel, repeating my experience - this is a drop in the ocean.
Secondly, I still intentionally missed out on some rather fundamental issues that would prevent a beginner from starting the device. Well, an advanced person is unlikely to come to your porch to sleep there or create indecency.
Therefore, I publish without the slightest doubt. Use it!